Creating and Defining Activities
This section discusses how to create and define activities.
To create an activity:
Select File, New in PeopleSoft Application Designer.
When prompted, select Activity. Save the activity.
Select the Use tab from the Activity Properties dialog box.
To open the properties dialog box, double-click in the map (but not on an item in the map).
Select Activity Guide.
(Optional) Select Automatically sequence steps.
After you add steps to an activity, you arrange the steps into a logical sequence using connecting arrows, and assign each step a number.
If you select Automatically sequence steps, the step numbers (and the path numbers) are automatically assigned when you save. The step and path numbers are based on the order in which you draw the connecting arrows. This is an efficient way to order the steps.
Add steps corresponding to the pages that make up the activity.
Arrange the steps, using connectors to put the steps in order.
To connect two steps:
Click the Link button.
Click the first step.
Click the second step.
Repeat until all steps are connected.
You have two options when you arrange the steps: sequential or parallel paths. In a sequential path, the steps form one unbroken sequence. When you create parallel paths, the steps appear in the workflow activity guide as a single row, but the user has more flexibility in choosing which step to do. This is because the user can go directly to any step whose immediate predecessor has been finished.
Define step attributes on the Step Attributes dialog box.
Image: Step Attributes dialog box
This example illustrates the fields and controls on the Step Attributes dialog box.

To define step attributes:
Double-click a step, or right-click and select Item Properties.
The Step Definition dialog box appears.
Enter a name and icon description.
Enter the step and path numbers for each step.
If you’re manually ordering steps, enter a step and path for each step in the activity.
If you’re automatically sequencing steps, the step and path number are automatically updated when you save the activity. However, even if you use this feature, check the step and path number after saving to verify that the steps are in the intended ordered.
Select Attributes.
The Step Attributes dialog box appears.
Indicate that the step is processed by a page.
Select Page in the Processed by group box of the dialog box. The External Program option is not supported for workflow activity guides.
Provide directions for starting the page.
Select the page from the list boxes in the Processing Page group box.
In the Action list box, select the type of activity that the user must perform on the database. When a user selects this step, the system displays the specified page in the specified action mode.
Click OK to close the Step Attributes dialog box.
Define workflow activity guide options on the Step Attributes dialog box.
Image: Step Attributes dialog box
This example illustrates the fields and controls on the Step Attributes dialog box.
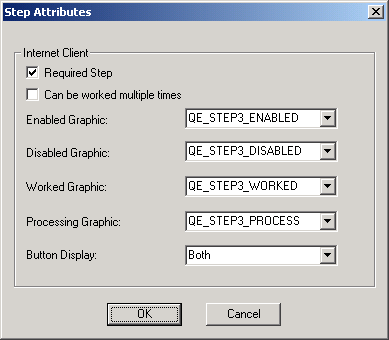
To define workflow activity guide options:
Select Activity Guide.
Configure workflow activity guide options.
Required Step is not currently used by workflow activity guides. However, to create your own programs to enforce required steps, you can use this option to identify them.
Select Can be worked multiple times to permit a user to return to an already-worked step. When this option is selected, the workflow activity guide link that opens the step remains active, even after the step is worked. When this option is cleared, the link is unavailable after the user finishes the step.
The button display determines what users see as they use the workflow activity guide.
Field or Control
Definition
Link Select to represent each step with the text that you used as the icon description. This text becomes a link to take the user to the page that is represented by the step.
Graphic Select to represent each step with an icon. The icons are not links, so if you select this option, the user cannot use the workflow activity guide to navigate between pages. Instead, the user must rely on the Back and Next buttons that appear in related pages. Use this option if you want the Back and Next buttons to be the only navigation objects in the workflow activity guide.
Both Select to display both icons and links. This is the default option.
(Optional) Add graphics to represent the possible statuses of the step.
If you display graphics in workflow activity guides, you must specify which graphics to use. Specify four graphics: one for each possible step status. You can use the same graphic for multiple statuses.
Field or Control
Definition
Enabled Graphic Use for the next step after the step that is currently in process. If you’ve defined parallel paths, multiple steps can be enabled simultaneously. If you’ve enabled both graphics and links, the accompanying link is active.
Disabled Graphic Use for steps that the user cannot yet start. If you’ve enabled both graphics and links, the accompanying link is inactive.
Worked Graphic Use for steps that the user has completed. If you’ve enabled both graphics and links, the accompanying link is inactive, unless you marked the step as one that can be worked multiple times.
Processing Graphic Use for steps on which the user is currently working. If you’ve enabled both graphics and links, the accompanying link is inactive.
You can select any graphic in the PeopleSoft image catalog. To use a custom graphic, you must first add it to the catalog.
Repeat for each step in the activity.
Save the workflow activity guide.