Defining Route Controls
To define route controls, use the Route Control Type (RTE_CNTL_TYPE) and Route Control Profile (RTE_CNTL_PROFILE) components.
This section provides an overview of route control definition and discusses how to add and build route controls.
Create route controls using Workflow Administrator. There are two major parts to defining route controls:
Route control types, which identify the situational factors on which you want to base routing decisions.
For example, to route purchase requisitions to different buyers based on which vendor can supply the requested item, you create a Vendor route control type. Later, you specify with whom each buyer works.
Note: You can create route control types based only on fields that have prompt tables.
Route control profiles, which specify the range of values within a route control type.
Assign route control profiles to role users to identify the areas on which they work.
To access the Route Control Type page, select PeopleTools, Workflow, Routings & Roles, Route Control Types.
To add a route control type:
Search for an existing route control type, or create a new one.
The Route Control Type page appears.
When creating a new route control type, use a descriptive name for the factor on which you want to base the route control.
In the Edit Table drop-down list box, select the prompt table against which you want to validate values.
Save this page and repeat the process for each route control type.
To access the Route Control Profile page, select PeopleTools, Workflow, Routings & Roles, Route Control Profiles.
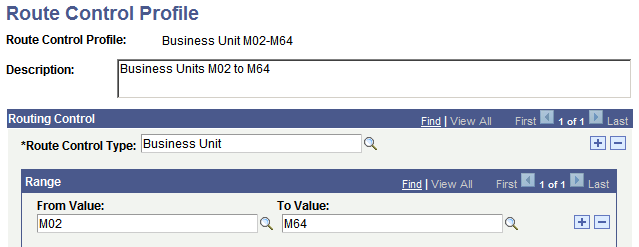
Image: Route Control Profile page
This example illustrates the fields and controls on the Route Control Profile page.
To build a route control profile:
Search for an existing route control profile, or create a new one.
The Route Control Profile page appears. Use this page to specify the range of values that is associated with a class of users.
Select a route control type from the Route Control Type drop-down list box.
The route control type specifies the prompt tables to which this profile applies.
Specify the range of values from the type’s edit table that users with this profile can process.
To provide access to a continuous range of values, select the lowest value in the From Value field and the highest value in the To Value field. To provide access to a single value, select the same value in both fields. To provide access to two values, add a new row to the Range field.
(Optional) Assign values for another route control type.
You can assign values for more than one route control type to the same route control profile. With your cursor in the Route Control Type field, click the Add button. Select a new route control type. Assign its authorized values.
Save the page.