from the Users tile, to add the Application
Users.
from the Users tile, to add the Application
Users.Understand the following terms before you begin performing User Management.
· Users: Customers create users in IDCS and can do the following:
§ Map them to existing groups
§ Create new groups to map them
After users are created, they are synced from IDCS to PACS.
· Groups: Groups are seeded (available out-of-the-box) by PACS. Customers can also create new groups in IDCS. After groups are created, they are synced from IDCS to PACS. Groups are mapped to roles using PACS by the same user that was created using IDCS.
· Roles: Roles are seeded by PACS. Customers can also create new roles using PACS and assign existing functions to these new roles.
· Functions: Functions are seeded by PACS. Customers cannot create new functions; however, they can only use the existing functions.
The Users Summary Page shows the list of available users. You can view the details of a user and map the user to one or more User Groups.
Select the Username in the Users Summary Page and then select Details to view the User ID and Username of the selected User.
To search for a specific User, type the first few letters of the Username that you want to search in the Search box and click Search. .
The search result displays the names that consist of your search string in the list of available users.
At the bottom of the page, you can enter the number of entries that are available on a single page in the Records box. You can increase or decrease the number of entries that are displayed using the up and down arrows. To navigate between pages in the View bar, use the following buttons:
· Use the First Page Button to view the entries on the first page.
· Use the Previous Page Button to view the entries on the previous page.
· Use the Next Page Button to view the entries on the next page.
· Use the Last Page Button to view the entries on the last page.
You can also navigate to the desired page. To do this, enter the page number in the View Bar Control and press Enter.
After you sign in to your IDCS Console, your first task is to create additional user accounts. You should assign specific User Groups to the User Accounts that you are creating. There are seeded User Groups available with the respective services, the users must be mapped to one or more of the User Groups, depending on the role that they perform.
For example, you can create a user for each member of your team. Each team member can then sign into the account with their credentials. You can also assign each user to specific User Groups and apply specific Security Policies or Roles to each Group.
You can create the users and map the users to groups for your service. After creating the users, they will receive a Welcome email. The users must activate their accounts and enter a new Password to access the services.
To create users in IDCS Console, perform the following steps:
1. In the IDCS Console, click
from the Users tile, to add the Application
Users.
2. In the Add User page, enter the following information:
§ The First Name and Last Name of the user.
§ The user's Email Address and the User Name.
Add User Details

NOTE:
1. Do not enter your email address as the Username and do not select the Use the email address as the username check box.
2. Enter a maximum of 20 characters.
3. Enter Alphanumeric Characters.
4. Enter only Hyphen (-) and Underscore (_) Special Characters.
3. Click Next.
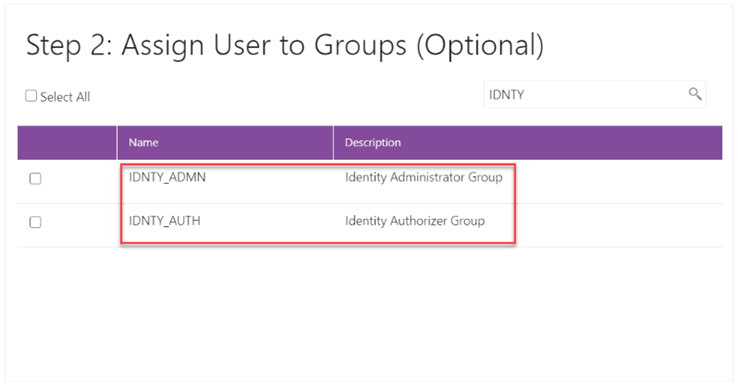
4. In the Assign User to Groups (Optional) window, select the User Groups according to your user-specific groups or access.
ATTENTION:
After a user signs into Profitability Analytics Cloud Service (PACS), the User to User-Group Mapping created in the IDCS Console will onboard into the Master and Mapping Tables. Later, if you deselect (remove) a User from a Group in the Assign User to Groups window after provisioning, ensure that you also unmap the User from the corresponding User- Group in the Admin Console. This is a mandatory step to complete the Unmapping Process.
For more information, see Unmap User from Groups.
5. To create an Identity Administrator or Authorizer User, assign the users to the following:
§ IDNTY_ADMIN: You can use this option to create an Administrator User.
§ IDNTY_AUTH: You can use this option to create an Authorizer User.
Assign User to Groups Window
6. Click Finish.
After the successful creation of the user, the added users receive an email to activate their account. The user must activate the account to use the service.
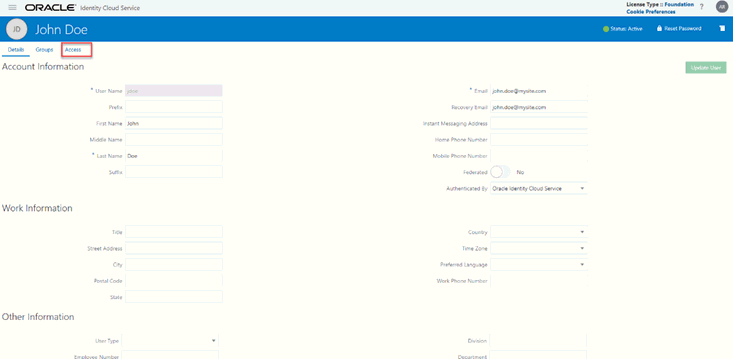
7. From the Users window, you can access the newly created user and edit the user details.
Users Window

8. Select the User that you want to edit the details. In the User Details Window, select the Access tab.
User Details Window
9. Click Assign.
10. In the Assign Application window, select the appropriate Application Instance to grant access to your user as mentioned below.
For example:
§ PACS etjygp-prd (For Production)
§ PACS etjygp-nprd (For Non-Production)
NOTE:
Based on this mapping the users will be able to access the appropriate instance.
11. Click OK.
The users are assigned based on the mapping.
For Bulk User Creation, you can batch import User Accounts using a comma-separated values (.CSV) file.
For more information about how to import application users, see Import Application Users.
After creating users and assigning them to groups, the users that you have added will receive a Welcome email to activate their account.
ATTENTION:
It is important that you configure the session duration for users. The Session Duration is the duration in minutes for which the User’s Session is valid. The user's session will time out after the Session Duration has been reached regardless of actual user activity or inactivity.
1. In the Session Duration field in the Oracle Identity Cloud Service Console, enter a duration in minutes.
2. It is recommended to have the Session Duration adequately long so that it does not impact user activity.
For more information, see Configuring Session Timeout.
If you are an Administrator, you can batch import User Accounts using a Comma-separated Values (.CSV) file.
NOTE:
Before you can import user accounts, you must create a CSV file that is properly formatted for the import process.
To import user accounts, perform the following steps:
1. In the IDCS Console, expand the Navigation Drawer, and then click Users.
2. Click Import.
3. In the Import Users dialog box, click Browse to locate and select the .CSV file that contains the user accounts to import.
NOTE:
Click Download sample file in the dialog box to download a sample file and carry out your accounts upload.
4. Verify that the path and name of the .CSV file that you selected appear in the Select a file to import field.
5. Click Import.
NOTE:
If a user account is missing a required value, such as the user's first name, last name, or username, then Oracle Identity Cloud Service cannot import it. If Oracle Identity Cloud Service cannot import a User Account, then it evaluates the next account in the CSV file.
After Oracle Identity Cloud Service evaluates all User Accounts, the Jobs page displays the accounts you have imported. You can also get information related to the successful imports and imports that did not happen due to system errors.
User Groups are seeded (available out-of-the-box) by PACS. Customers can also create new groups in IDCS. After groups are created, they are synced from IDCS to PACS. Groups are mapped to roles using PACS by the same user that was created using IDCS.
To create a User Group, follow these steps:
1. Login to the IDCS Admin Console.
IDCS Admin Console

2. Click the Groups tile.
The list of available groups are displayed.
List of Available Groups

3. To create a new group, click Add.
4. Enter the Group name, Description and click the Next button on the bottom of the page to assign the user to the group.
5. Click the Finish button to complete the process.
To map Roles to the User Group, perform the following steps:
1. Log in to the PBSM Application and click on the Admin Console.
NOTE:
User that was mapped to group in IDCS must be used to login to Admin Console.
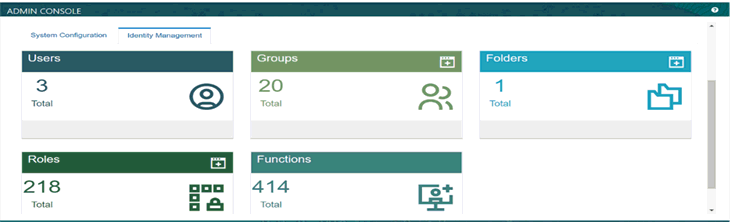
2. Navigate to Identity management under the Admin Console tab.
Admin Console
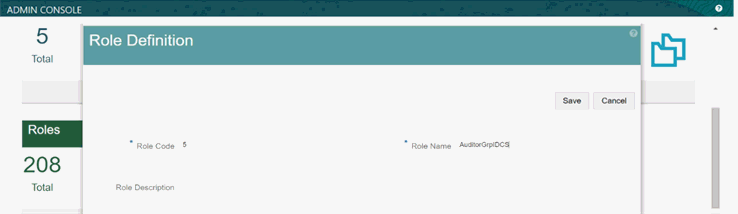
3. Create Role using add icon on the Roles Management
 .
.
4. Enter Role Code, Role Name and save the definition.
Admin Console
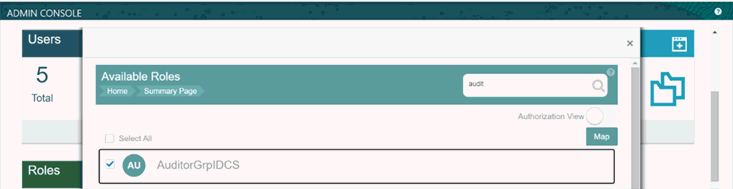
5. Click on groups management and search for the group name created in IDCS Portal.
It might take a few minutes for group names to appear in the Admin Console.
6. Click on the user group and click on New Mapping under the Mapped Roles tab.
7. Search for role names created in Roles Management and map each role by clicking on New Mapping.
Admin Console
8. The mapped role can be authorized using the Authorization View.
Authorization can only be performed by the user login which is mapped to the Authorization Role.
Admin Console

A User group created in IDCS Portal has been successfully mapped to a Role created in the Admin Console.
If you are an Administrator and want to map a User to a User Group, log in to IDCS and follow these steps:
1. Select the User Name in the Users Summary Page.
2. Select Mapped Groups.
3. Select the User Group Name.
NOTE:
To select a User Group, select the check box corresponding to the User Group. To select all User Groups displayed on the page, select the check box marked Select All.
4. 4. Click New Mapping to map the User to the selected User Group.
OR
Click Unmap to remove the User Group-Role Mapping.
If the Unmap action requires authorization, see the Unmap User from Groups section for details.
NOTE:
User-Group mapping changes from IDCS will take some time to sync with the PACS. If these changes are made during the active user session, then it will be reflected on the next login.
ATTENTION: ATTENTION
After a user sign into Profitability Analytics Cloud Service (PACS), the User to User-Group Mapping created in the IDCS Console will onboard into the Master and Mapping Tables. If you unmap a User from a Group in the Admin Console, navigate to the associated Console and open the Assign User to Groups Window. Deselect the User corresponding to the User Group and click Finish. This is a mandatory step to complete the Unmapping Process.
For more information, refer Unmap User from Groups.
After you click New Mapping, the list of User Groups you can map the user to appears in the Available Groups Summary Page.
5. Select a User Group.
NOTE:
To select a User Group, select the check box corresponding to the User Group. To select all User Groups displayed on the page, select the check box marked Select All.
If the logged-in user has both Administration and Authorization Entitlements, an Authorization View Toggle Button is available. Enable this button to complete the Authorization Process.
6. Click Map.
If you are an authorizer and want to authorize a mapping, follow these steps:
1. In Mapped Groups, select the User Group Name.
NOTE:
To select a User Group, select the check box corresponding to the User Group. To select all User Groups displayed on the page, select the check box marked Select All.
2. Click Authorize to authorize the User and User Group Mapping.
OR
Click Reject to cancel the Authorization Request.
To authorize the unmapping of a User to a User Group, log in to IDCS and follow these steps:
1. Click Unmapped Groups.
2. Click the User Group Name to select the User Group.
3. Click Authorize to authorize the unmapping.
OR
Click Reject to cancel the Authorization Request.
During implementation, you prepare your Oracle Application's Cloud Service for the Service Users. The decisions made during this phase determine how you manage users by default. Most of these decisions can be overridden. However, for efficient User Management, Oracle recommends that you configure your environment to reflect both enterprise policy and support most or all users.
For more information, see the View List of Application Users and User Roles and Privileges.
During implementation, you can use the Create User task to create Test Service Users. By default, this task creates a minimal person record and a user account. After implementation, you should use the Hire an Employee Task to create Service Users. The Create User Task is not recommended after the implementation is complete.
For more information, see Create Application Users.
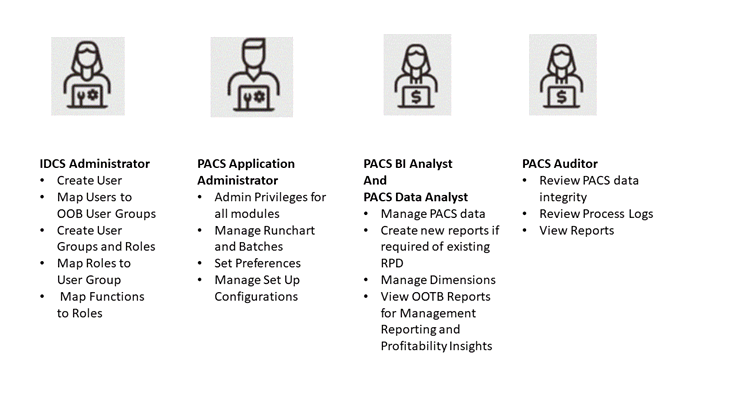
Oracle Financial Services Profitability Analytics Cloud Service (PACS) Users are assigned roles through which they gain access to functions and data. Users can have any number of roles.
The following figure shows User Personas and the tasks they can perform:
User Personas and Tasks
NOTE:
· User-Group mapping changes from IDCS will take five minutes to sync with the application. If these changes are made during the active user session then it will be reflected on the next login.
· You can create and manage Application users as required. For example, you can map the Pipeline Admin Group and PACS Admin Group to one user.
Role-based security in Oracle Financial Services Profitability Analytics Cloud Service Controls who can do what and to which data.
The following table provides examples of role-based access.
Table 1: Examples of Role Based Access
Role Assigned to a User |
Functions which Users with this Role can Perform |
Set of Data which Users with the Role can Access when performing the Function |
|---|---|---|
Application Administrators |
Perform Application Administrator activities |
User Group with Administration Roles across all Service Features |
Business Users |
Access to the Application to perform tasks |
User Group with Business Tasks' Roles across all Service Features |
The following User Roles are seeded in the PBSM Cloud Service to facilitate the activities expected from the users mapped to the seeded User Groups:
· Profitability Analytics Administrator
· Profitability Analytics Application Analyst
· Profitability Analytics Application Auditor
· PA BI Data Steward
· PA BI Analyst
· PA BI Auditor
· PA BI LOB Head
In addition to this, Custom User Roles can be created and managed as per requirement.
The user roles Profitability Analytics Application Administrator, Profitability Analytics Application Analyst, and Profitability Analytics Application Auditor are required to access the main application for view, edit and other purposes, based on the User Persona accessing the same. An Analyst User Persona can view all PA Screens and Edit-specific Screens. Similarly, an Admin Persona can view and edit all PA Screens. These different Persona tasks are facilitated by the User Roles. Thus, these three User Roles facilitate the accesses and activities for the corresponding User Groups that are mentioned in the below table.
The User Roles of - PA BI Data Steward, PA BI Analyst, PA BI Auditor and PA BI LOB Head - are seeded BI Roles to be used for the users to access the Analytics Menu in the PA Application. These four roles are created to facilitate Analytics access for four different types of User Persona. These roles can be mapped to any User Group to provide the Analytics access to users under the User Group.
The following table provides the information on the User Groups and related activities.
Table 2: User Groups and related Activities
User Groups |
Activities |
|---|---|
PA Application Administrator |
· Admin Privileges for all modules · Manage Run chart and Batches · Set Preferences · Manage Set Up Configurations |
IDCS Administrator |
· Create Users · Map Users to the Instance |
PA Application Analyst |
· Set User and Application Preferences · Set Setup Parameters · Currency and Rate Management · Dimension Management · Data Management: Metadata and Data Loaders · Data Model Extension · Create Filters and Expressions · Create Table Drivers · Create and Execute Allocation Rules · Create and Execute Allocation Models · Schedule Batch Processes · View Allocation Executions · View Profitability Analytics Reports |
PA Application Auditor |
· View privileges for all application-specific modules: · Review/Analyze Results · Review Process Logs · View Reports |
In addition to this, the following user groups are also seeded, namely – PA Authorizer, PA BI Analyst and PA Data Analyst. User roles can be mapped to these groups for efficient management of application. Custom User Groups can also be created and managed as per requirement.
The following table lists the seeded mapping of User Groups to the User Roles.
Table 3: Seeded Mapping of User Groups to User Roles
User Group |
Mapped User Role |
|---|---|
Profitability Analytics Application Administrator |
Profitability Analytics Application Administrator |
Profitability Analytics Application Analyst |
Profitability Analytics Application Analyst |
Profitability Analytics Application Auditor |
Profitability Analytics Application Auditor |
The BI User Roles of PA BI Data Steward, PA BI Analyst, PA BI Auditor, PA BI LOB Head are not mapped OOTB to any seeded User Group but can be mapped to any User Group to provide the Analytics access to users under than User Group. Customers can custom User Groups and map the seeded or Custom User Roles as it suites the requirement.
After you complete your tasks, you can sign out of your application. However, sometimes you might get automatically signed out due to session timeouts.
Let us understand how session timeouts work. When you sign in using your credentials, you're authenticated to use the application, and a session is established. During this session, you don't need to re-authenticate. But, for security purposes, your session is configured to be active for a predefined duration, which is called the session timeout period. Your sessions can expire due to various reasons such as leaving your application idle for a period longer than the timeout period. In such cases, you're automatically signed out of the application. Your timeout periods may vary on certain pages. For example, you may observe a longer timeout period on pages that automatically refresh or UIs that open in separate windows or tabs.
This table lists the various types of session timeouts you may experience. After the specified duration, your session expires, and you need to sign in again to continue your work.
Table 4: Types of Session Timeouts
Timeout Type |
Description |
Configurable |
Timeout Duration |
|---|---|---|---|
Session Lifetime Timeout |
After you are authenticated in the application, if you are actively working on it, your session remains active for a predefined duration, referred to as the session lifetime timeout period. Your session ends after this period, even if you're using the application. |
Yes |
8 Hours (Default value) |
Inactive Session Timeout |
This type of timeout considers the duration you leave your application idle/inactive. After this duration, System automatically terminates the session, and you are signed out of the session. |
No |
60 Minutes |
Browser Inactivity Timeout |
This type of timeout considers the duration you leave your browser idle. After this duration, your session is terminated by the System, which automatically. |
No |
60 Minutes |
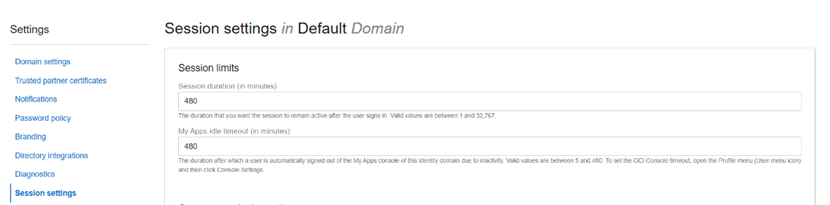
You can configure the Session Lifetime Timeout using your Identity Domain Settings in OCI Console. You need to have the Security Administrator Role mapped to you, to access and modify the settings.
1. Login with your Security Administrator Account.
2. Navigate to the Domain page. Click Settings and select Session Settings.
3. Specify the Session Duration under Session Limits. Enter the required value. By default, this is set to 480 Minutes.
Session Settings