 from
the Users tile, to add the Application Users.
from
the Users tile, to add the Application Users.Oracle Financial Services Accounting Foundation Cloud Service (AFCS) Users are assigned roles through which they gain access to functions and data. Users can have any number of roles.
To create Users, login to Identity Console with Admin Privileges.
The access Privilege of an User is set based on the mapped group. There are pre-defined groups provided in the AFCS. You can map the newly created users to any pre-defined group, based on the user’s access requirements.
For more information about managing users, refer to Managing Users.
Role-based security in Oracle Financial Services Accounting Foundation Cloud Service (AFCS) Controls who can do what and to which data.
The following table provides examples of role-based access.
Role Assigned to a User |
Functions which Users with the Role can Perform |
Set of Data which Users with the Role can Access when performing the Function |
Application Administrators |
Perform Application Administrator activities |
User Group with Administration Roles across all Service Features |
Business Users |
Access to the Application to perform tasks |
User Group with Business Tasks' Roles across all Service Features |
The following table lists the seeded mapping of User Groups to the User Roles.
User Groups |
Activities |
Identity Administrator |
· View Reports · View Object Storage · View OAuth Credentials · Perform Identity and Access Management Operations |
Identity Console Administrator |
· Create Users · Map Users to the Instance |
Accounting Foundation Administrator Group |
· User Group with Setup Roles · View all content · AFCS Service Administration Activities |
AFCS-BIAdministrator |
Administer Data Visualization Content |
AFCS-BIContentAuthor |
Author Data Visualization Content |
AFCS-BIConsumer |
Access Data Visualization Content |
Accounting Foundation Business User Group |
· Use the AFCS Service · Register, modify, or delete Entity-maps, Rules, Look-up, Adjustments, Corrections and so on · Register, modify, or delete EDD, Connector and so on · Register, modify or delete SLA, Source Registration, Event Grouping, Segment Code - Dimension Mapping and so on · Configure and Manage Pipelines · Execute Pipelines |
After you sign in to your Identity Console Console, your first task is to create additional user accounts. You should assign specific User Groups to the User Accounts that you are creating. There are seeded User Groups available with the respective services, the users must be mapped to one or more of the User Groups, depending on the role that they perform.
For example, you can create a user for each member of your team. Each team member can then sign into the account with their credentials. You can also assign each user to specific User Groups and apply specific Security Policies or Roles to each Group.
You can create the users and map the users to groups for your service. After creating the users, the users will receive a Welcome email. The users must activate their accounts and enter a new password to access the services.
To create users in Identity Console, perform the following steps:
1. In the IDCS Console, click from
the Users tile, to add the Application Users.
2. In the Add User page, enter the following information:
§ The First Name and Last Name of the user.
§ The user's Email Address and the User Name.
Add User Details

NOTE:
· Do not enter your Email Address as the User Name and do not select the Use the email address as the user name check box.
· Enter a maximum of 20 characters.
· Enter alphanumeric characters.
· Enter only Hyphen (-) and Underscore (_) Special Characters.
3. Click Next.
4. In the Assign User to Groups (Optional) window, select the user groups according to your user-specific groups or access.
ATTENTION:
After a User signs in to AFCS, the User to User-Group Mapping created in the IDCS Console will onboard into the Master and Mapping Tables. Later, if you deselect (remove) a User from a Group in the Assign User to Groups Window after provisioning, ensure that you also unmap the User from the corresponding User- Group in the Admin Console. This is a mandatory step to complete the unmapping process.
5. To create an Identity Administrator or Authorizer user, assign the users to the following:
§ IDNTY_ADMIN: You can use this option to create an Administrator User.
§ IDNTY_AUTH: You can use this option to create an Authorizer User.
Assign User to Groups Window

6. Click Finish.
After the user is successfully created, they will receive an email to activate their account. The user must activate the account to use the service.
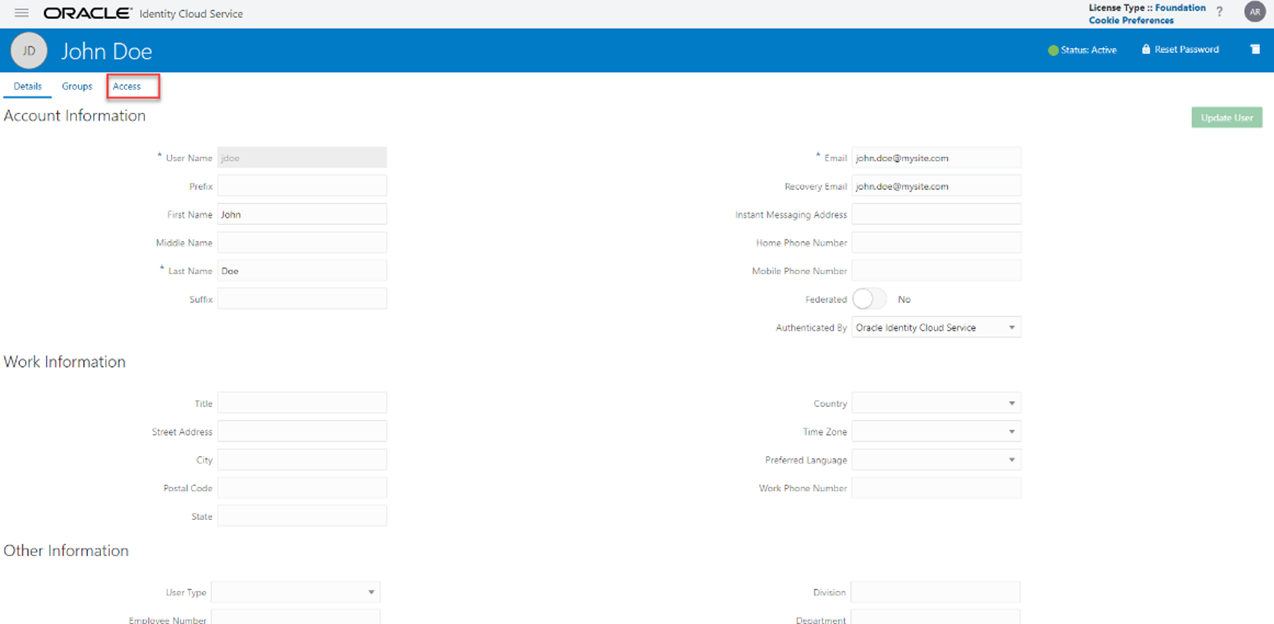
7. From the Users Window, you can access the newly created user and edit the user details.

8. Select the User that you want to edit the details. In the User Details Window, select the Access tab.
User Details Window
9. Click Assign.
10. In the Assign Application Window, select the appropriate Application Instance to grant access to your user as mentioned below.
For example:
§ xxxxxx-prd (For production)
§ xxxxxx-nprd (For non-production)
NOTE:
Based on this mapping the users will be able to access the appropriate instance.
11. Click OK.
For more information, see Create User Accounts.
To create users in Identity Domain, perform the following steps:
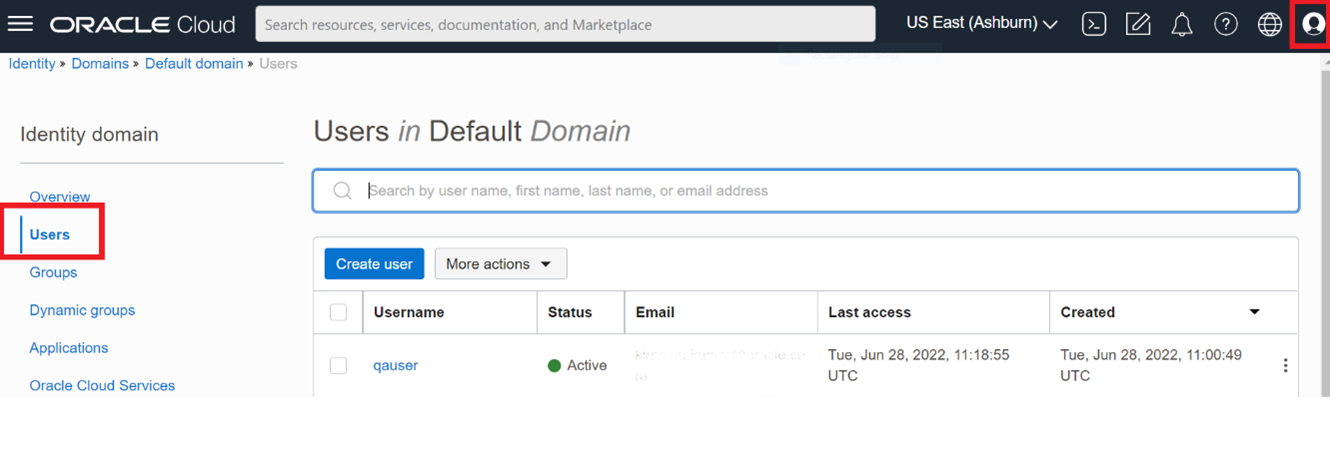
1. Click the
Profile
Icon ![]() and
select Identity Domain: default.
and
select Identity Domain: default.
2. From the LHS menu, select the Users option and click Create user to add the Application Users.
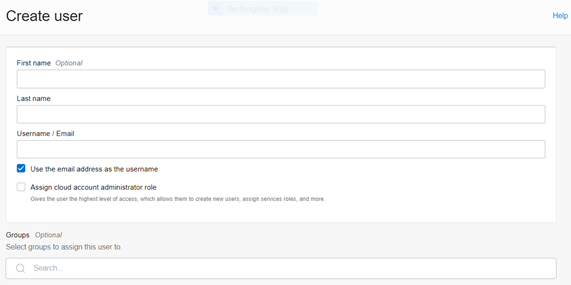
3. In the Create User page, enter the following information:
§ The First Name and Last Name of the user.
§ The user's Email Address or the User Name.
NOTE:
· Do not enter your Email Address as the User Name and do not select the Use the email address as the user name check box.
· Enter a maximum of 20 characters.
· Enter alphanumeric characters.
· Enter only Hyphen (-) and Underscore (_) Special Characters.
Create User Page
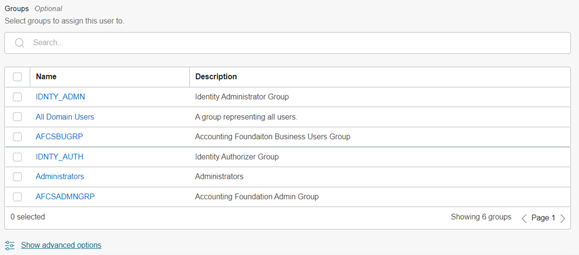
4. In the Groups (Optional) section, select the User Groups according to your user-specific groups or access.
5. To create an Identity Administrator or Authorizer User, assign the users to the following:
§ IDNTY_ADMIN: You can use this option to create an Administrator User.
§ IDNTY_AUTH: You can use this option to create an Authorizer User.
Assign User to Groups Window
6. Click Create.
After the user is successfully created, they will receive an email to activate their account. The user must activate the account to use the service.
7. From the Users window, you can access the newly created user and edit the user details.
User Details Window
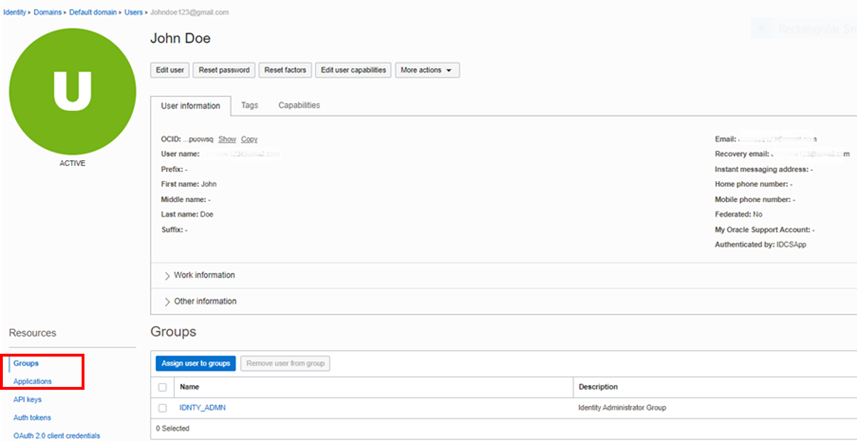
8. From the LHS menu, in the Groups section, select the required group and click Assign user to groups.
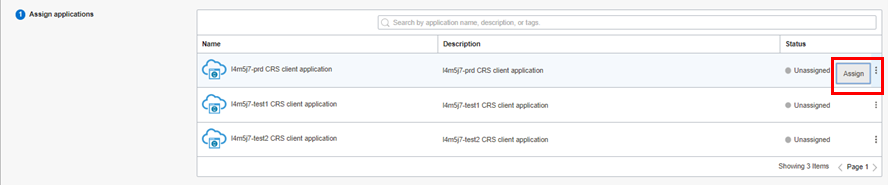
9. From the LHS menu, click Applications and then click Assign Applications. Select the appropriate Application Instance to grant access to your user as mentioned here.
For example:
§ AFCS xxxxx-prd (For Production)
§ AFCS xxxxx-nprd (For Non-Production)
NOTE:
Based on this mapping the users will be able to access the appropriate instance.
10. Click Assign.
For more information, see Create User Accounts - Using the Console section.