
Appendix A: Creating an Application Pool
If the Insbridge application pool needs to be created, you can create one. The Insbridge installation must be complete prior to creating an application pool. Make sure that Static Content is enabled in the Server Manager Roles. There are three steps to creating an Insbridge application pool and then assigning the virtual directories.
- Step 1: Create or Verify an Insbridge Application Pool.
- Step 2: Verify settings.
- Step 3: Associate the Insbridge application pool with virtual directories IBFA, Insbridge, and RM.
Step 1: Create or Verify an Insbridge Pool
1. Click Start -> Administrative Tools -> select IIS Manager.
2. Expand the Local Computer and select Application Pools. Right click and select Add Application Pool.

3. Enter “Insbridge” for the Application pool Name. Select the v4.0 for the .NET Framework version. Click OK. You will be returned to the IIS screen. Your new application pool is listed.

Step 2: Update Settings
1. Right click the Insbridge Application Pool you created and select Advanced Settings.

2. Verify that the .NET Framework Version is v4.0.
3. Verify the identity is Insbridge. If the identity is not Insbridge, you can update it. For the Identity choose to use custom account and enter the same user that was used to install Insbridge.
4. Click OK to save your changes.
Step 3: Associate the web applications with the Insbridge Application Pool
Next, you will need verify or associate the Insbridge web applications with the new Insbridge application pool.
1. Stay in IIS Manager. Under Local Server -> Sites -> select IBFA, right click and select
Manage Application -> Advanced Settings.

2. Under the General Settings -> Application Pool, click the Application Pool entry field to see the ellipsis (…) button.
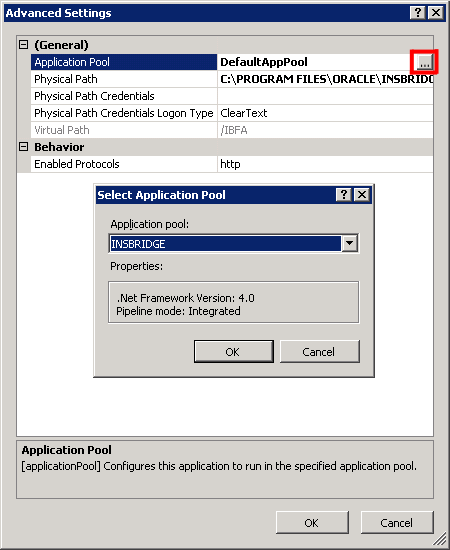
3. Click the ellipsis button. A separate window is displayed.
4. Select the Insbridge Application Pool.
5. Click OK. Click OK again to close the Advanced Settings window.
6. Repeat for RM and Insbridge.
7. Return to the Insbridge application pool. Right click and select to view the applications.
8. Right click to View Applications. The three Insbridge applications should be listed.
9. Select the server level above the application pools and restart IIS. On the IIS screen, Actions -> Restart IIS.

Application Pool Error
If you choose not to create an Insbridge Application Pool, the Insbridge application will use the default application pool. If you receive an error when accessing IBFA for the first time after a new install:
CS0016: Could not write to output file 'c:\Windows\Microsoft.NET\Framework64\v4.0.50727\Temporary ASP.NET Files\ibfa\783d6267\bcca0b3e\App_global.asax.zf-kqiii.dll': 'Access is denied. '
You may have to create a separate Insbridge Application Pool.
