10. Customer Credit Limit
10.1 Introduction
Customer Credit limit in general refers to the maximum amount of credit that a financial institution can extend to a prospective customer which can then be leveraged by an underwriter while funding an application.
In Oracle Financial Services Lending and Leasing, you can define the Customer Credit Limit during underwriting stage based on the customer credit worthiness or historical customer data. Using this limit, applications can be funded up to the credit limit amount allowed. However, application funding with or without customer credit limit is controlled based on the setup and applications can still be funded with the normal process when a particular customer is not allocated with any credit limit.
A customer credit limit facilitates for quick decisioning by an underwriter and also facilitates for auto approval of accounts on-boarded from external system with basic validations. While approving, underwriter has to ensure that the sum of utilizations should always be equal to the financed amount which can be distributed within applicants primary / secondary or business categories.
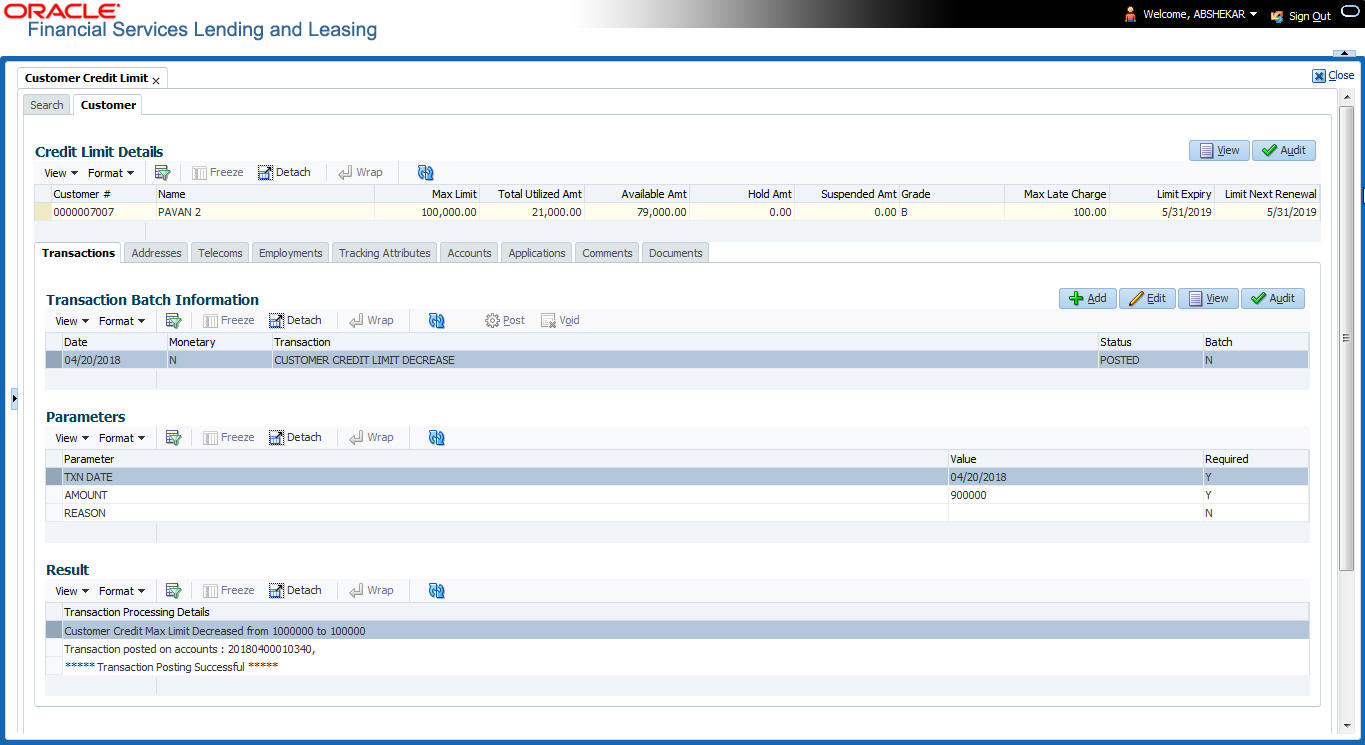
A minimum of one application has to be funded to define customer credit limit for funding subsequent applications and the defined information is updated into credit limit details. A credit limit once defined can further be increased from servicing module by posting the required transaction which is referenced in origination module during application funding.
On receiving a payment, the amount is reinstated to the credit limit balance which can be re-used while funding next application. Similarly, the credit limit balance is also updated when account is moved to VOID status. On reversing a payment, the Total Utilization of credit limit is increased by the principal portion of the payment and decreased with the Available Amt field. Also, the Suspended and Hold amount fields are increased and decrease based on the respective transactions posted.
When two applications are being funded simultaneously (i.e. moving application to ‘Approved Funded’ status), the utilization amount will be considered for first application while the second one will be on HOLD since there could be a difference in the available credit limit after funding. In such a case, you need to re-hash the application, fetch the details in Origination > Decision tab, (if required) increase credit limit from servicing module, and then proceed for funding.
While processing applications using Customer Credit Limit, the ‘Update Customer Info’ (check box in applicant tab) and ‘Link to Existing Customer’ (check box in contract tab) are selected by default for all the existing customers. This is to ensure the application details are propagated to customer accounts.
On funding a new application for an existing customer using customer credit limit, the details are updated into the existing customer details in the Servicing module. Also, while posting any monetary transaction that results in increase of account maturity date, system auto validates if the same is within the 'Customer Credit Limit Expiry date' of any one or all of the customer(s) who contributed for funding the Account. In case it is greater, system displays an error indicating that the resulting Maturity date is greater than 'Customer Credit Limit Expiry date' and does not allow to post the transaction.
Navigating to Customer Credit Limit screen
From the LHS menu, select Servicing > Customer Credit Limit. The screen by default opens with ‘Search’ tab.

Customer Credit Limit screen consists of the following tabs:
- Search
- Customer
10.2 Search tab
The Search tab available in Customer Credit screen facilitates to locate the Customer or Business applicant’s details maintained in the system and consists of the following sections:
- Quick Search
- Search Criteria
To search for a Customer/Business
- On the Oracle Financial Services Lending and Leasing home screen, click Servicing > Customer Credit Limit tab.
- In the ‘Search Options’, select the option against Customer or Business to search for corresponding details.
- Do one of the following:
- In ‘Quick Search’ section, specify the Customer or Business number and click ‘Submit’.
-Or-
- In the ‘Search Criteria’ section, use ‘Comparison Operator’ and ‘Value’ columns to enter search criteria and click ‘Search’.
System displays the matching records in the ‘Search Results’ section at the bottom of the screen.
- Select the required record and click ‘Open Customer Details’. The details of that particular record is displayed in the adjacent Customer/Business tab. However, system displays the selected record details only for authorized users based on access/permissions defined in setup.
You can click ‘Reset Criteria’ at any time to clear search parameter values.
10.3 Customer/Business tab
The Customer / Business tab displays the Credit Limit Details that are recorded while funding the application.
To view Customer/Business details
- Click Servicing > Customer Credit Limit screen.
- In the Search tab, search for the required customer/business applicant details and click ‘Open Customer Details’.
The following credit limit details of the Customer/ Business are as displayed:
Customer Details |
Business details |
Customer # (Customer ID is displayed in case of Individual Customer) Name Max Limit Total Utilized Amt Available Amt Hold Amt Suspended Amt Grade Max Late Charge Limit Expiry Limit Next Renewal |
Business # (Business ID is displayed in case of Business Customer) Name Max Limit Total Utilized Amt Available Amt Hold Amt Suspended Amt Grade Max Late Charge Limit Expiry Limit Next Renewal |
The ‘Credit Limit Details’ tab allows to capture additional details in the below sub tabs.
10.3.1 Transactions sub tab
The Transactions sub tab allows you post the following non-monetary transactions to update the customer/business credit details in respective tabs.
- Customer Credit Limit Transactions:
- Customer Credit Limit Increase
- Customer Credit Limit Decrease
- Decrease Customer Credit Limit HOLD
- Increase Customer Credit Limit HOLD
- Increase Customer Credit Limit SUSPEND
- Decrease Customer Credit Limit SUSPEND
- Business Credit Limit Transactions:
- Business Credit Limit Increase
- Business Credit Limit Decrease
- Decrease Business Credit Limit HOLD
- Increase Business Credit Limit HOLD
- Increase Business Credit Limit SUSPEND
- Decrease Business Credit Limit SUSPEND
- Customer/Business Credit Limit Maintenance
- Customer/Business Address Maintenance
- Customer/Business Telecom Maintenance
- Business Partners Maintenance
- Business Affiliates Maintenance
For information on how to post non-monetary transaction, refer to Creating Monetary and Non monetary Transactions section in Customer Service > Maintenance chapter.
For information on defining parameters for each of the above transactions, refer to Customer Credit Limit Transactions section in Appendix chapter.
10.3.2 Addresses sub tab
The Addresses sub tab allows you to maintain address information of the customer/business. This tab is similar to the Addresses sub tab in Customer Service screen’s Customer Details tab. For information on updating the field details, refer to Addresses sub tab section.
On updating the address information in this tab, system automatically posts ‘ADD CUSTOMER ADDRESS PHONE’ transaction to update the details into Customer Service screen’s Customer Details > Addresses sub tab.
10.3.3 Telecoms sub tab
The Telecoms sub tab allows you to maintain Telecom information of the customer/business. This tab is similar to the Telecoms sub tab in Customer Service screen’s Customer Details tab. For information on updating the field details, refer to Telecoms sub tab section.
On adding the Telecom information in this tab, system automatically posts ‘ADD CUSTOMER TELECOM’ transaction and similarly during update, system posts ‘CUSTOMER TELECOM MAINTENANCE’ transaction to update the details into Customer Service screen’s Customer Details > Telecoms sub tab.
10.3.4 Employments sub tab
The Employments sub tab allows you to maintain employment information of the customer. This tab is similar to the Employment sub tab in Customer Service screen’s Customer Details tab. For information on updating the field details, refer to Employments sub tab section.
On updating the Telecom information in this tab, system automatically posts ‘EMPLOYMENT ADDRESS MAINTENANCE’ transaction to update the details into Customer Service screen’s Customer Details > Employment sub tab.
10.3.5 Partners sub tab
The Partners sub tab allows you to maintain business partner Information. This tab is similar to the Partners sub tab in Customer Service screen’s Business Details tab. For information on updating the field details, refer to Partners sub tab section.
On adding the Partner information in this tab, system automatically posts ‘ADD BUSINESS PARTNER’ transaction and similarly during update, system posts ‘BUSINESS PARTNERS MAINTENANCE’ transaction to update the details into Customer Service screen’s Customer Details > Partners sub tab.
10.3.6 Affiliates sub tab
The Affiliates sub tab allows you to maintain business affiliate information. This tab is similar to the Affiliates sub tab in Customer Service screen’s Business Details tab. For information on updating the field details, refer to Affiliates sub tab section.
On updating the Affiliates information in this tab, system automatically posts ‘ADD BUSINESS AFFILIATES’ transaction to add new affiliate details and ‘BUSINESS AFFILIATES MAINTENANCE’ to update the existing affiliate details into Customer Service screen’s Business Details > Affiliates sub tab.
10.3.7 Tracking Attributes sub tab
The Tracking Attributes sub tab allows you to add tracking attribute information to customer/business. This tab is similar to the Tracking Attributes sub tab in Customer Service screen’s Customer Details tab. For information on updating the field details, refer to Tracking Attributes sub tab section.
10.3.8 Accounts sub tab
The Accounts sub tab allows you to view customer/business accounts information maintained in the system. For information on the field details, refer to ‘Existing Accounts’ section in Origination User Guides.
10.3.9 Applications sub tab
The Applications sub tab allows you to view customer/business applicant’s information maintained in the system. The application details are fetched based on ‘Customer / Business number’ and displays only non-funded applications with ‘Existing Customer flag = Y’ in Origination > Applicant tab and ‘Link to existing customer flag = Y’ in Contract tab. The following application details are displayed:
- App #
- Company
- Branch
- Date
- Title
- Product
- Status
- Sub Status
- Collateral Description
- Identification #
Note
The Collateral Description and Identification # displayed here are populated from primary collateral details.
10.3.10 Comments sub tab
The Comments sub tab allows you add additional customer/business information as comments. Comments updated from Customer/Business > Comments tab are categorized with default Type as ‘Regular’ and Sub type as ‘Customer/Business’.
For information on adding comments, refer to Customer Service > Comments sub tab section.
10.3.11 Documents sub tab
The Documents sub tab allows you to view the documents attached to the customer/business. For detailed information about the usability of this tab, refer to Document Tracking sub tab section.
10.3.12 Master Account tab
The Master Account tab in Customer Credit Limit screen displays all the Customer / Business Master Accounts and its associated accounts maintained in the system.
Using the Master Account tab, you can generate a consolidated payoff quote for a selected combination of master and its associated accounts. For more information, refer to ‘Consolidated Payoff Quote’ section.

In the Master Account Details section, you can view the following information:
In this field: |
View this: |
Account # |
The master account number. Clicking on the hyperlink opens the respective account in Customer Servicing screen. |
Title |
The title of the account. |
Relation |
Customer’s relationship to the account. |
Product |
The type of product associated with the account. |
Currency |
The disbursement currency. |
Billing Cycle |
The billing frequency. |
Delq Days |
The number of days the account has been delinquent. |
Pay Off Amount |
The total pay off amount on the account. |
Amount Due |
The total amount due on the account. |
Oldest Due Dt |
The oldest payment due date on the account. |
Status |
The status of the account. |
Asset Type |
The type of asset associated with the account. |
Asset Sub Type |
The asset sub type. |
Collateral Description |
Details of primary collateral associated with account. In case of Home Collateral, no Collateral Description is displayed. |
Identification # |
The identification number of the asset. |
Company |
The portfolio company. |
Branch |
The portfolio branch. |
Product Type |
The product type of Master Account. |
Funding Type |
The funding type as either OPEN ENDED or CLOSED ENDED. |
10.3.12.1 Consolidated Payoff Quote
You can generate a consolidated payoff quote for any combination of Master and its associated accounts which includes the consolidated amount owed on all selected accounts.
To generate a Consolidated Payoff Quote:
- In the Master Account Details section, select the required Master Account and select ‘CONSOLIDATED PAYOFF QUOTE’ option from the Transaction drop-down list.
- Select ‘Include Master Account’ check box to include the selected master account details for consolidated payoff quote.
- In the Associated Account Details section, filter the list of accounts based on ‘Product Type’, ‘Statement Consolidation Only’ and ‘All Currencies’ options. Select the check box adjacent to required associated account. You can also choose ‘Select All’ check box to select all the listed accounts. Note that, this check box column is enabled only on selecting an option from Transaction drop-down list.
- Click ‘Load Parameters’ in the Master Account Details section. System creates the transaction with default values in OPEN status. The same can be viewed in Transaction Batch Information tab. The selected accounts for consolidated payoff quote are indicated with comma separated values in ACCOUNT NUMBER parameter and can be edited accordingly.
- Do one of the following:
- Click ‘Post’ in this tab to post the transaction with default values.
- Edit the required parameters and then post the transaction in Transaction Batch Information tab. For information on updating transaction parameters, refer to ‘Consolidated Payoff Quote’ section.
System automatically posts the Transaction on all selected individual accounts. On successfully posting, the Transaction Batch Information tab displays the following details of consolidated payoff quote for selected accounts:
- The TOTAL PAYOFF QUOTE IN section indicates currency-wise consolidation payoff quote i.e. if multiple accounts are selected for consolidation with different currencies, then consolidation is listed for accounts with same currency and subsequently for other/individual currencies.
- Subsequently, individual payoff quote is generated and displayed for each of the Associated account selected along with Master account payoff quote (if selected).
10.3.12.2 Associated Account Details
The ‘Associated Account Details’ section displays all the accounts associated with the selected Master Account along with a summary of rolled-up balances for the accounts being displayed.
For detailed information, refer to Customer Service screen’s Associated Accounts tab section.