6. Securitization
With the Securitization screen, the system provides a powerful tool that enables financial institutions to create account pools, to track and manage portfolios.
The Securitization screen enables you to:
- Query account information
- Select accounts based on selection criteria
- Create a pool of selected accounts for sale
- Maintain the pools created and report transactions on these accounts
- Report on investors
- Repurchase pools or specific accounts from pools.
Navigating to Securitization screen
On the Oracle Financial Services Lending and Leasing home screen, click Servicing > Servicing > Securitization.
Data in the Securitization screen is grouped into two tabs:
- Pool Inquiry
- Pool Creation
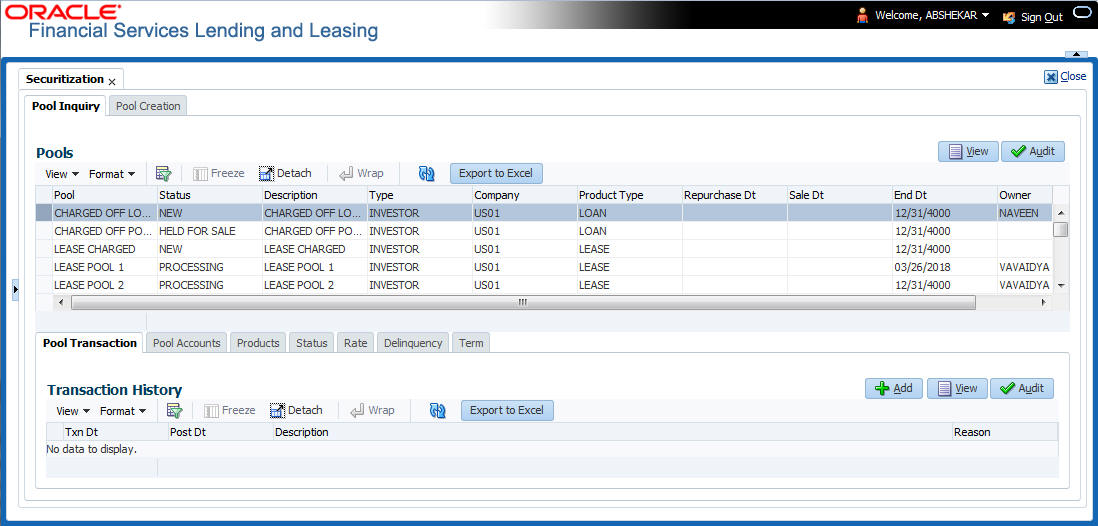
6.1 Pool Inquiry
The Pool Inquiry screen enables you to enter and view pool related transactions. It can also be used to view various summaries related to the pool.
Navigating to Pool Inquiry
- On the Oracle Financial Services Lending and Leasing home screen, click Servicing > Servicing > Securitization > Pool Inquiry. The details for each inquiry pool are maintained in the following seven categories:
- Pool Transaction
- Pool Accounts
- Products
- Status
- Rate
- Delinquency
- Term
- In the Pools section, you can view the following information:
A brief description of the fields is given below:
Field: |
View this: |
Pool |
Displays the pool code. |
Status |
Displays the pool status. |
Description |
Displays the pool description. |
Class |
Displays the pool class from the drop-down list. |
Company |
Displays the pool portfolio company from the drop-down list. |
Product Type |
Displays the type of product associated with the Pool. |
End Dt |
Displays the pool end date. |
Owner |
Displays the pool owner. |
Super Pool |
Displays the pool super pool code from the adjoining drop-down link. |
Repurchase Dt |
Displays the pool re-purchase date. |
Reason |
Displays the pool re-purchase reason. |
Sale Dt |
Displays the pool sale date. |
Days Repo |
Displays the number of days in repossession to liquidate. |
Days Delq |
Displays the number of days in delinquency to liquidate. |
Max Limit |
Displays the max limit of the pool. |
Service Rate |
Displays the servicing rate for the pool. |
Certificate Rate |
Displays the certificate rate for the pool This is the rate which will be payable to the investor who buys this pool and is entitled to its receivable stream. |
- In the Pool section, you can click ‘Export to Excel’ button to export the details of the selected record to a .xls file with the following information:
- Pool
- Status
- Description
- Type
- Company
- End Dt
- Owner
6.1.1 Pool Transactions
The Pool Transactions sub screen enables you to view pool related transactions history, and well as enter a pool transaction.
To post Pool Transactions
- In the Servicing > Servicing > Securitization > Inquiry > Pool section, select the record you want to work with.
- Click Pool Transactions.
- In the Transaction History section, click Add.
A brief description of the fields is given below:
Field: |
Do this: |
Transaction |
Select the transaction from the following list: ADD ACCOUNT -- Add an account to the pool externally. REMOve ACCOUNT -- Remove an account from Securitization pool before the pool is marked as SOLD. This transaction is supported for pools which are in NEW / OPEN status and helps to remove account(s) without recreating the pool. CANCELLED -- Cancel the pool. HELD FOR SALE -- Change the status of pool to “Held for sale.” OPEN -- Change the status of pool to “Open.” RELEASED -- Change the status of the pool to “Released” and clear all accounts related to the pool. REPURCHASED -- Change the status of pool to “Repurchased.” SOLD -- Change the status of pool to “Sold.” (required). |
Reason |
Enter the transaction reason (required). |
Date |
Enter the transaction effective date (required). |
Account |
Select the account to be added (optional). |
- Click Post. The Details appear in the Transaction History summary table.
- Click Clear to clear the details.
- In the Transaction History section, click ‘Export to Excel’ button to export the details of the selected transaction to a .xls file with the following information:
- Txn Dt
- Post Dt
- Description
- Reason
6.1.2 Pool Accounts
The Pool Accounts sub screen enables you to view previous account related transactions, as well as enter a pool account transaction for the selected pool.
To post the Pool Accounts
- In the Servicing > Servicing > Securitization > Inquiry > Pool section, select the record you want to work with.
- Click the Pool Accounts. The details are grouped into two:
- Accounts
- Account Transactions
- In the Accounts section, you can view the following information:
A brief description of the fields is given below:
Field: |
View this: |
Account # |
Displays the account number. |
Title |
Displays the account holder’s name. |
Sale Acc Status |
Displays the account status at the time of pool sale. |
Account Status |
Displays the account status. |
Dt |
Displays the pool sale date. |
Sale Rate |
Displays the account interest rate at the time of pool sale. |
Balance |
Displays the account balance at the time of pool sale. |
Term Remaining |
Displays the account remaining terms at the time of pool sale. |
- In the Account Transactions section, click Add:
A brief description of the fields is given below:
Field: |
Do this: |
Txn date |
Transaction date. |
Post date |
Transaction posted date. |
Description |
Details of the transaction. |
Amount |
Amount of the transaction. |
Reason |
Reason for the transaction . |
- Click Post. The Details appear in the Account Transaction summary table.
- Click Clear to clear the details
6.1.3 Product
The Product sub screen enables you to view summaries of various statistics of the products in the pool.
To view the Product details
- In the Servicing > Servicing > Securitization > Inquiry > Pool section, select the record you want to work with.
- Click the Product.
- In the Product section, you can view the following information:
A brief description of the fields is given below:
Field: |
View this: |
Product |
Displays the product. |
Principal at Sale |
Displays the principal at sale amount. |
Principal Paid |
Displays the principal paid amount. |
Repurchase Balance |
Displays the principal repurchase balance amount. |
Loss Amount |
Displays the loss amount. |
Pay ahead Amount |
Displays the pay ahead amount. For any paid off accounts in the product summary, this field contains the sum of the amount that was applied to principal during the payoff payment allocation. |
Current Balance |
Displays the current balance amount. |
6.1.4 Status
The Status sub screen enables you to view summaries of various statistics of the status of the products in the pool.
To view the Status details
- In the Servicing > Servicing > Securitization > Inquiry > Pool section, select the record you want to work with.
- Click the Status.
- In the Product/Status section, you can view the following information:
A brief description of the fields is given below:
Field: |
View this: |
Product |
Displays the product. |
Status |
Displays the securitization account status. |
Principal at Sale |
Displays the principal at sale amount. |
Principal Paid |
Displays the principal paid amount. |
Repurchase Balance |
Displays the principal repurchase balance amount. |
Loss Amt |
Displays the loss amount. |
Payahead Amt |
Displays the pay ahead amount. |
Current Balance |
Displays the current balance amount. |
6.1.5 Rate
The Rate sub screen enables you to view a summary of the pool by product and rates.
To view Rate details
- In the Servicing > Servicing > Securitization > Inquiry > Pool section, select the record you want to work with.
- Click the Rate.
- In the Product/Rate section, you can view the following information:
A brief description of the fields is given below:
Field: |
View this: |
Product |
Displays the product. |
Rate |
Displays the rate (should equal the interest rate on account). |
Principal at sale |
Displays the principal at sale amount. |
Principal Paid |
Displays the principal paid amount. |
Repurchase Balance |
Displays the principal repurchase balance amount. |
Loss Amt |
Displays the loss amount. |
Pay ahead Amt |
Displays the pay ahead amount. |
Current Balance |
Displays the current balance amount. |
6.1.6 Delinquency
The Delinquency sub screen enables you to view a summary of the pool in regards to delinquencies of products.
To view Delinquency details
- In the Servicing > Servicing > Securitization > Inquiry > Pool section, select the record you want to work with.
- Click Delinquency.
- In the Product/Delinquency section, you can view the following information:
A brief description of the fields is given below:
Field: |
View this: |
Product |
Displays the product. |
Category |
Displays the delinquency category. |
Principal at Sale |
Displays the principal at sale amount. |
Principal Paid |
Displays the principal paid amount. |
Repurchase Balance |
Displays the principal repurchase balance amount. |
Loss Amt |
Displays the loss amount. |
Pay ahead Amt |
Displays the pay ahead amount. |
Current Balance |
Displays the current balance amount. |
6.1.7 Term
The Term sub screen enables you to view a summary of the pool by product and by terms.
To view the Term
- In the Servicing > Servicing > Securitization > Inquiry > Pool section, select the record you want to work with.
- Click Term.
- In the Product/Term section, you can view the following information:
A brief description of the fields is given below:
Field: |
View this: |
Product |
Displays the product. |
Term |
Displays the term. |
Principal at sale |
Displays the principal at sale amount. |
Principal Paid |
Displays the principal paid amount. |
Repurchase Balance |
Displays the principal repurchase balance amount. |
Loss Amount |
Displays the loss amount. |
Pay ahead Amount |
Displays the pay ahead amount. |
Current Balance |
Displays the current balance amount. |
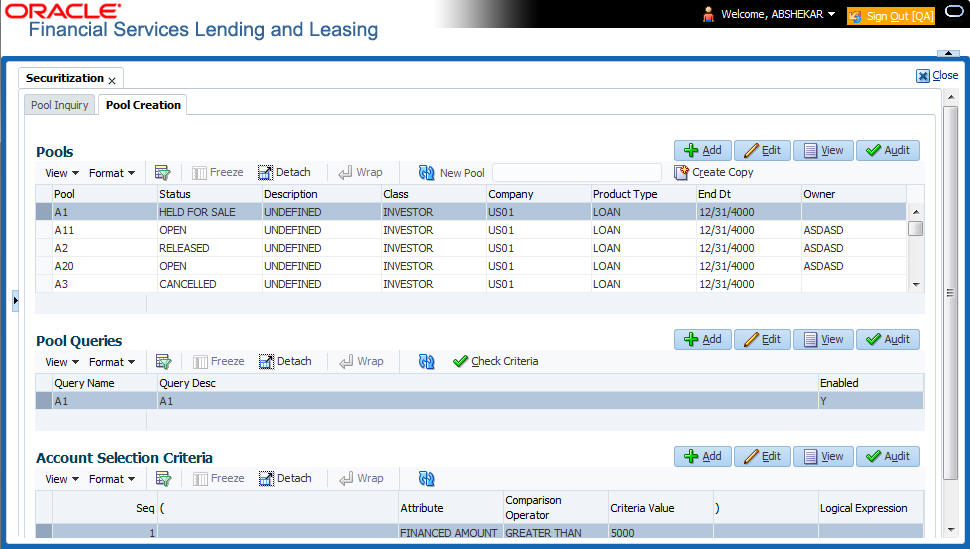
6.2 Pool Creation
The Pool Creation screen enables you to create pools and perform “what if” analysis of pool appearance using different criteria. Based on the parameter values, the system will query the accounts database and builds the list of accounts. Once you choose the pool criterion, you can view the query generated by the system. Oracle Financial Services Lending and Leasing would further display errors in the query built so that you can revisit the parameter values.
In addition, Oracle Financial Services Lending and Leasing application facilitates to ‘add’ or ‘remove’ account(s) to a pre-defined pool in bulk through file upload process. For more information, refer to section ‘Bulk Update of Accounts to Securitization Pool’.
To create a pool
- Click Servicing > Servicing > Securitization > Pool Creation. Securitization details are grouped into three:
- Pools
- Pool Queries
- Account Selection Criteria
- In the Pools section, you can define a pool (set of accounts) that you want to securitize by doing one of the following:
- Use the ‘Create Copy’ feature to quickly create new pool with the existing pool parameters (pool queries and account selection criteria) by specifying ‘New Pool’ name. The new Pool created this way (copying from existing pool) will be in disabled stage.
- Create new pool by clicking ‘Add’. You can also perform any of the Basic Operations mentioned in Navigation chapter.
A brief description of the fields is given below:
Field: |
Do this: |
Pool |
Specify the pool code. |
Status |
Displays the pool status. |
Description |
Specify the pool description. |
Class |
Select the pool class from the drop-down list. |
Company |
Select the pool portfolio company from the drop-down list. |
Product Type |
Select the type of product from the drop-down list. It is mandatory to select the product type and based on the selection, each pool created can have specific product type accounts associated to it. Note: Product type can be selected only during ADD (i.e. new Pool Creation) and is displayed in view mode during EDIT operations. |
End Dt |
Specify the pool end date. You can even select the date from adjoining Calendar icon |
Owner |
Specify the pool owner. |
Super Pool |
Select the code for super pool from the drop-down list (Multiple pools belong to a super pool). Note: The Super Pool list is sorted based on the ‘Class’ selected. |
Repurchase Dt |
Displays the pool re-purchase date. |
Reason |
Displays the pool re-purchase reason. |
Sale Dt |
Displays the pool sale date. |
Days Repo |
Specify the number of days in repossession to liquidate. |
Days Delq |
Specify the number of days in delinquency to liquidate. |
Max Limit Amt |
Specify the max limit of the pool. |
Service Rate |
Specify the servicing rate for the pool. The servicing rate is an additional rate you can charge for security. |
Certificate Rate |
Specify the certificate rate for the pool. This is the rate which will be payable to the investor who buys this pool and is entitled to its receivable stream. |
- Perform any of the Basic Actions mentioned in Navigation chapter.
- In the Pool Queries section, you can define possible queries for the pool. Perform any of the Basic Operations mentioned in Navigation chapter.
A brief description of the fields is given below:
Field: |
Do this: |
Query Name |
The query name is system generated which is the concatenation of Pool name with system generated random number. |
Query Description |
Specify the query description. |
Enabled |
Check this box to enable the query. |
- Perform any of the Basic Actions mentioned in Navigation chapter.
- In the Account Selection Criteria section, you can define the account selection criteria for each of the queries. Perform any of the Basic Operations mentioned in Navigation chapter.
Note
Although system allows to define customized selection criteria, the execution of additional selection criteria requires additional processing at server level and can have significant performance impact delaying the EOD processing/web services. Hence it is recommended to have careful consideration while defining the additional selection criteria (like using user-defined tables and columns) and/or get approval from your database administrator before using any selection criteria.
A brief description of the fields is given below:
Field: |
Do this: |
Seq |
Specify the sequence number. |
( |
Specify the left bracket. |
Attribute |
Select the attribute from the drop-down list. |
Comparison Operator |
Select the comparison operator from the drop-down list. |
Criteria Value |
Specify the criteria value. |
) |
Specify the right bracket (optional). |
Logical Expression |
Specify the logical expression (optional). |
- Perform any of the Basic Actions mentioned in Navigation chapter.
Validate Account Selection Criteria
After defining the Account Selection Criteria for the created Pool Query, you can validate the criteria which is further used to query the database to build the list of accounts.
- In the Pool Queries section, select the required pool from the list.
- Click ‘Check Criteria’.
The ‘SQL Statement’ that is generated based on the defined Account Selection Criteria is displayed. Also the ‘SQL Result’ of the query is indicated with either the status or issues (if any) to be rectified.
Note that, adding accounts to a Securitization Pool through the Account Selection Criteria is also controlled by the status of a system parameter ‘POOL_ACTIVE_ACCOUNTS_ONLY’.
- If the status of the system parameter is ‘Y’ (default), system includes all the matching accounts with only ‘ACTIVE’ status.
- In case if ‘Account Status’ is selected as the Attribute in Account Selection Criteria, on clicking either ‘Check Criteria’ or ‘Create pool’, system displays an error indicating ‘Parameter is set Only to include Active accounts in pool; change the Parameter’
- If the status of the system parameter is ‘N’, system allows to include all the matching accounts to the Securitization pool irrespective the account status. However, you are expected to define the ‘Account Status’ as the Attribute in Account Selection Criteria to filler accounts with different status such as VOID, PAIDOFF, CHGOFF and so on.
Create Pool
You can create a Securitization Pool after creating the Pool Query and validating the Account Selection Criteria. However, ensure that the selected Pool Query is ‘Enabled’.
- In the Pool Queries section, select the required pool from the list.
- Click ‘Create Pool’.
Further, when the Pool Query is updated with additional account selection criteria, you can click ‘Re-Create Pool’ to consider the new criteria for building the list of accounts for Securitization Pool.
Remove Pool
To remove a Securitization Pool Query, select the required pool from the Pool Queries section and click ‘Remove Pool’.
6.2.1 Bulk Update of Accounts to Securitization Pool
In addition to manually adding / removing accounts from Securitization pool, you can perform bulk update of records using file upload process. In this process, all the accounts which are to be either attached or detached from respective pool can be collated into a single file as individual record and uploaded into the system through input file processing.
During bulk update, you can,
- Add accounts to pool
- Remove accounts from pool
- Transfer account from Pool A to Pool B (depending on configured pool status)
In-order to perform bulk upload, the upload file should be a csv (comma separated value) file and need to contain two main parameters namely Pool ID and Account ID separated by comma as one record. Multiple rows can be included in a single upload file to process the data in bulk.
For example,
POOL A,20190100010673,
SEC_POOL_1,20190100010673,
,20181200010027,
If there is no value provided for Pool ID, then system assumes it as NULL and respective account is removed from the Pool to which it is currently attached.
The below table indicates the possible combinations on how data in upload file is processed based on Pool ID and Account ID value in upload file:
Condition |
Pool ID |
Account ID |
Results |
If account is not attached to any Pool |
A |
ABC |
Account ‘ABC’ is attached to pool A |
If account is attached to Pool A |
NULL or no value |
ABC |
Account ‘ABC’ is detached from Pool A |
If account is attached to Pool A |
B |
ABC |
Account ‘ABC’ is detached from Pool A and attached to pool B |
If account is attached to Pool A |
A |
ABC |
Indicates error -Account ‘ABC’ is already mapped to Pool. |
During processing of upload file data, separate transactions either to ADD ACCOUNT or REMOVE ACCOUNT or both, are automatically posted on respective pool.
The processing of data in upload file is also controlled by the following lookup types:
Lookup Type |
Description |
POOL_ADD_ACC_CRITERIA |
CRITERIA TO ADD ACCOUNT TO POOL |
POOL_REMOVE_ACC_CRITERIA |
POOL CRITERIA FOR REMOVING ACCOUNT FROM POOL |
Each Lookup Type can have on or more lookup code which are basically the configured pool status and acts as the criteria to allow an account to either get attached or detached from a specific Securitization pool, Lookup can be defined in Setup > Administration > System > Lookups screen.
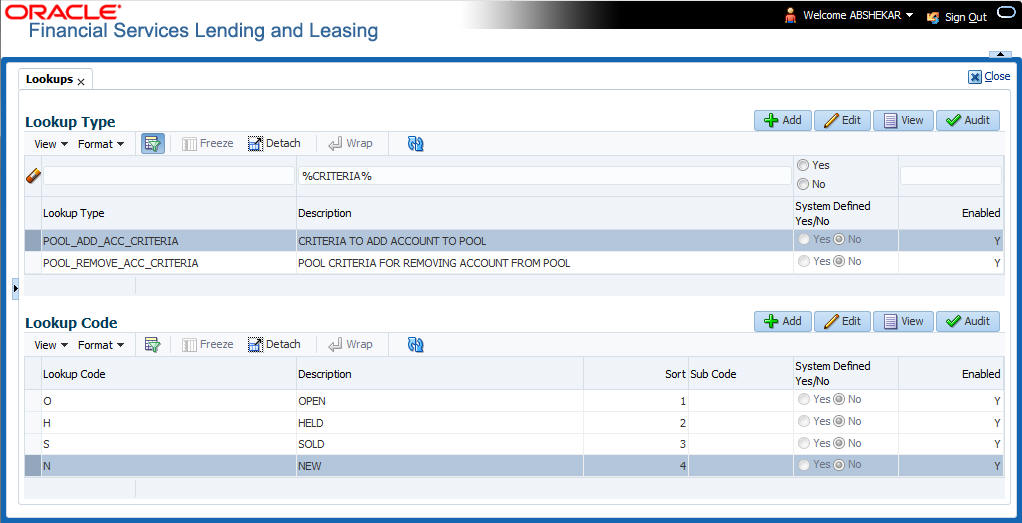
As per the above configuration, for Lookup Type POOL_ADD_ACC_CRITERIA an account is attached to only those Securitization pool which are in status OPEN, HELD, NEW, and SOLD. Any other status is not processed in the system and is indicated as error.
Processing Bulk Update of Accounts to Securitization Pool
The upload file is to be placed in the location - /scratch/work_area/<domain name>/input/isc. During the scheduled execution of batch job - SET-IFP-ISCPRC_BJ_100_01 (SECURITIZATION POOL FILE UPLOAD) in SET-IFP (Input File Processing), the file is picked up for processing and data within is loaded into respective table. The status of batch job can be viewed in DashBoard > System Monitor > Batch Jobs screen.
After the batch processing, the records which are successfully processed during bulk update can be viewed in Servicing > Securitization > Pool Inquiry > Pool Accounts tab.
The records which resulted in error are listed in the bad file indicating the account number in specific row with inappropriate data that was not processed. For example, record 1,3,5 failed due to improper data.