5. Setup - Administration User
In the Administration > User, you can record setup data that define your organization structure and its users. Information in this link is more “data” related, whereas the information stored on the System drop-down link functions more like switches that control system behavior.
This section consists of the following topics:
- Companies
- Printers
- Bank Details
- Check Details
- Standard Payees
- Currencies
- ZipCodes
- Payment Hierarchy
Please note that, at any given point you can click “Refresh’ button to fetch the latest records data. Also the pagination option on all the screens display 5 records by default and helps to navigate to subsequent records. However, you can jump to the required page by entering the number in the ‘Page’ field.
5.1 Companies
The Companies screen records the hierarchical structure of your portfolio companies and their branches. Just as Oracle Financial Services Lending and Leasing uses the Organization screen to determine the location of people, it uses the information on the Companies screen to determine the location of applications and accounts. In completing the Companies screen, there can be more than one company, and each company can have more than one branch.
Accounting is performed at the company level. Applications Accounts and applications can be sorted down to the branch level. For this reason, branches are set up to reflect different business practices. You would set up different branches if, for example:
- The General Ledger (GL) differs between branches
- The branches work with different accounts
- There is a difference between branches in terms of the tasks they perform origination, servicing, collections, and so on
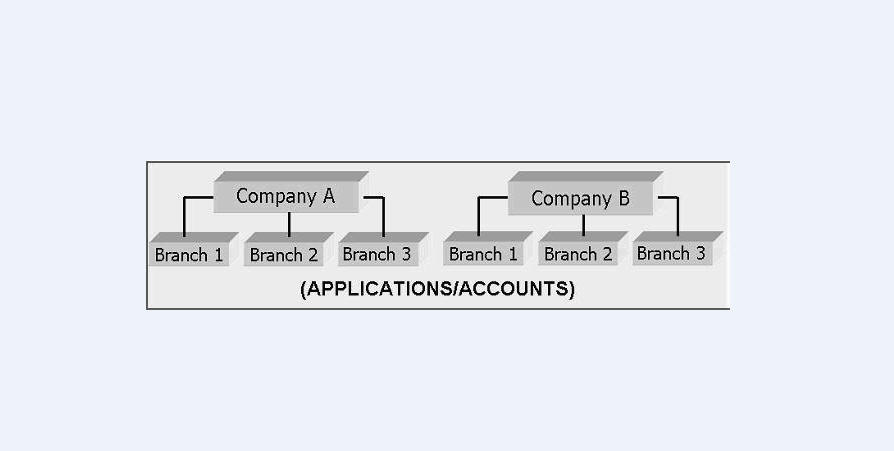
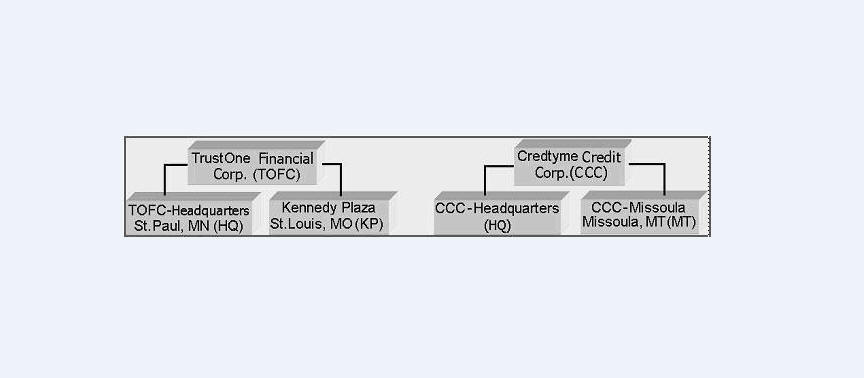
As an example of the companies setup, Oracle Corp. might have the following companies and branches defined as:
Company: C-0001-TrustOne Financial Corp -TOFC
Branch: CB-01-TOFC - Headquarters-HQ
Branch: CB-02-Kennedy Plaza-KP
Company: C-0002-Credtyme Credit Corp-CCC
Branch: CB-11-CCC - Headquarters-HQ
Branch: CB-12-CCC - Missoula-MT
Note
- The system does not limit the number of companies or associated branches with the company you can enter.
- The Short Name field on the Companies screen allows you to create the ID that the system will use while referring to the company and branch.
Key concept: Note the difference between the Company screen and the Organization screen:
- On the Organization screen, Oracle Financial Services Lending and Leasing users belong to an organization and division.
- On the Companies screen, credit applications and accounts belong to a company and branch.
As you can see in the following Access screen section, the information on the Organization and Companies screens define the operational hierarchy of your companies in terms of which Oracle Financial Services Lending and Leasing users will have access to which applications and accounts.
To setup the Companies
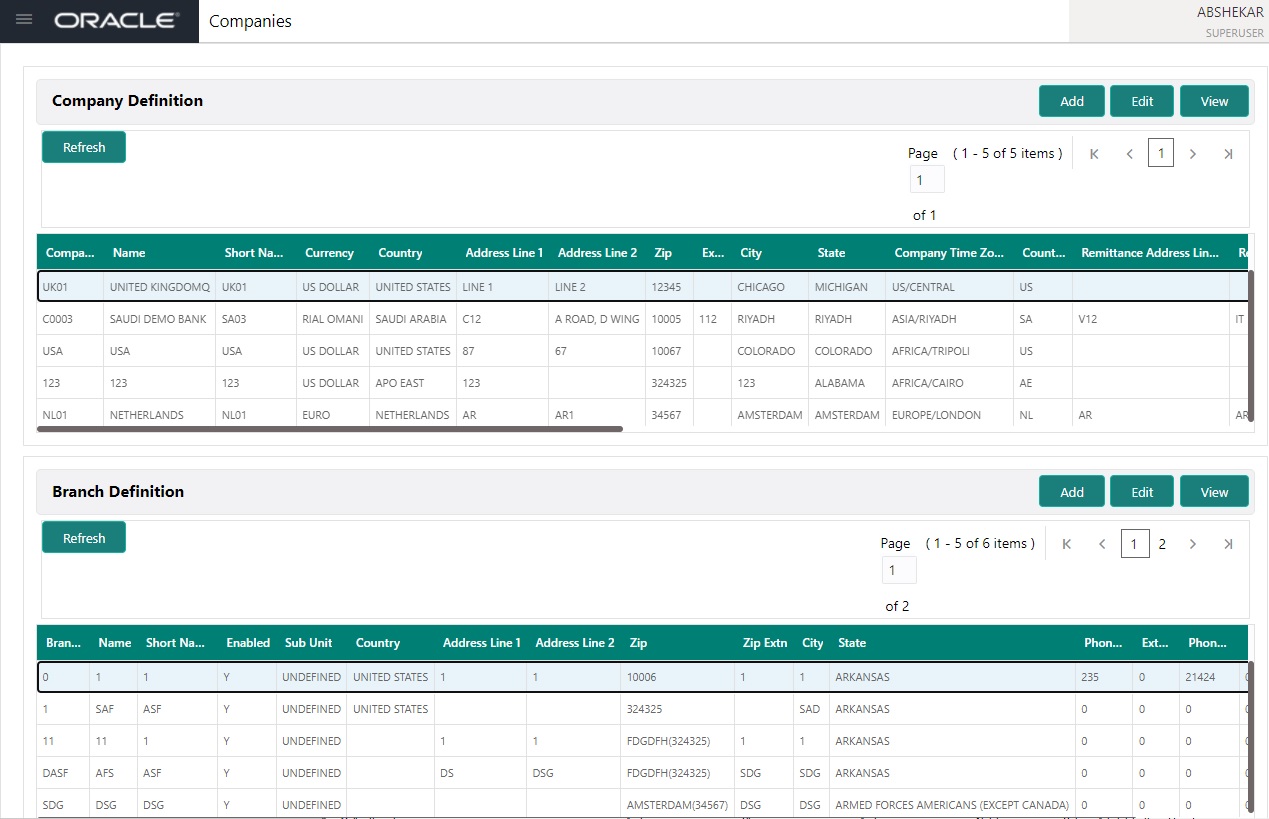
- In the LHS menu, click Setup > Administration > User > Companies. The Companies screen defines entities within your organization that originate and/or service the product type.
- In the Company Definition section, you can Add, Edit and View Company Definition details maintained in the system.
A brief description of the fields is given below:
Field: |
Do this: |
Company |
Specify the portfolio company ID. (This ID is the unique identifier used internally by the system to represent the company). |
Name |
Specify the name of the portfolio company (required). |
Short Name |
Specify the short name for the portfolio company (ID displayed to represent the company). |
Currency |
Select the currency of the portfolio company from the drop-down list. The system displays the default value as ‘US DOLLAR’. |
Enabled |
Toggle the switch to enable the portfolio company. |
Country |
Select the country where the portfolio company is located from the drop-down list. The system displays the default value as ‘UNITED STATES’. |
Address Line 1 |
Specify the address line 1 for the portfolio company. |
Address Line 2 |
Specify the address line 2 for the portfolio company. |
Zip |
Select the zip code of the location where the portfolio company is located from the drop-down list. |
Extn |
Specify the extension of the zip code where the portfolio company is located. |
City |
Specify the city where the portfolio company is located. |
State |
Select the state where the portfolio company is located from the drop-down list. |
Company Time Zone |
Select the time zone in which the company operates using the drop-down list. This time zone is considered if system is setup to process GL at Company level. For more information, refer to ‘Appendix - Configuration at Company Level’ chapter. |
Country |
Select the remittance address country from the drop-down list. The system displays the default value as ‘UNITED STATES’. |
Remittance Address 1 |
Specify the remittance address line 1, if it is different from the company address. This address is included as the remittance address on statements. |
Remittance Address 2 |
Specify the remittance address line 2. |
Zip |
Select the zip code of the remittance address line 1 from the drop-down list. |
Extn |
Specify the extension of the remittance address zip code. |
City |
Specify the remittance address city. |
State |
Select the remittance address state from the drop-down list. |
Phone 1 |
Specify the primary phone number for the portfolio company. |
Extn 1 |
Specify the phone extension for the primary phone number. |
Phone 2 |
Specify the alternate phone number for the portfolio company. |
Extn 2 |
Specify the phone extension for the alternate phone number. |
Fax 1 |
Specify the primary fax number for the portfolio company. |
Fax 2 |
Specify the alternate fax number for the portfolio company. |
Tax ID # |
Specify the tax identification number for the portfolio company. |
TCC |
Specify the transmitter control code for the portfolio company (1098 Electronic Filing). |
Contact |
Specify the contact information about the portfolio company. |
Coupon Order Code |
If you are using coupons, Specify the coupon order code to be used by a third party printing the coupons for billing statements. |
HMDA |
Select the HMDA agency (Home Mortgage Disclosure Act reporting agency for the company). |
- Click ‘Save and Return’ to update the record or click ‘Return’ to cancel the update.
- On the Branch Definition section, you can Add, Edit and View the Branch Definition details maintained in the system.
A brief description of the fields is given below:
Field: |
Do this: |
Branch |
Specify the portfolio branch ID. (This ID is the unique identifier used internally by the system to represent the branch within your company). |
Name |
Specify the name of the portfolio branch (required). |
Short Name |
Specify the short name for the portfolio branch (ID displayed to represent the branch) (required). |
Enabled |
Toggle the switch to enable the portfolio branch. |
Sub Unit |
Select the Sub Unit from the drop-down list. Sub Unit refers the entity which is the source of funds for the credit application/Account. System associates the selected sub unit with the particular company/branch combination and displays by default when the same is selected during an application/Account creation. |
Country |
Select the country from the drop-down list. The system displays the default value as ‘UNITED STATES’. |
City |
Specify the city where the portfolio branch is located. |
State |
Select the state from the drop-down list. |
Address Line 1 |
Specify the address line 1 for the portfolio branch. |
Address Line 2 |
Specify the address line 2 for the portfolio branch. |
Zip |
Select the zip code of the location where the portfolio branch is located. |
Zip Extn |
Specify the extension of the zip code, where the portfolio branch is located. |
Phone 1 |
Specify the primary phone number for the portfolio branch. |
Extn 1 |
Specify the phone extension for the primary phone number. |
Phone 2 |
Specify the alternate phone number for the portfolio branch. |
Extn 2 |
Specify the phone extension for the alternate phone number. |
Fax 1 |
Specify the primary fax number for the portfolio branch. |
Fax 2 |
Specify the alternate fax number for the portfolio branch. |
- Click ‘Save and Return’ to update the record or click ‘Return’ to cancel the update.
5.2 Printers
The Printers screen allows you to set up an unlimited number of network printers and fax devices to be used with the system server. The system uses the information on this screen while selecting a printer, when the printing process involves a batch job or uses a job scheduler. Examples include printing reports and correspondence.
The printers and fax devices can be set up at each organization, division, or department to promote efficient printing of documents, and reports. The system uses this information during product setup and on the Letters screen in the Batch Printer field.
Special printer names
The following printer names are predefined and have specific functions within the system:
Name |
Description |
UNDEFINED |
Indicates that the document to be printed is to be previewed in your browser instead of actually printing the document. |
archive |
Instead of sending an item to the printer, the system generates a PDF document and saves it in the archive directory on your server. |
For origination correspondences that can be faxed, the system e-mails the document as a PDF attachment to the consumer for direct lending or to the producer in the case of in-direct lending. |
|
fax |
For origination correspondences that can be faxed, the system generates a PDF document and will send to the fax server defined in System Parameters. |
Additionally, you may set up composite entries in the Printer Name field to perform two or more functions at the same time. This can be done by defining a printer name with the following format:
Printer name = <Printer_Name1> + <Printer_Name2>
For example, if a printer named jet4050 was previously defined, as were the special printer names listed above, then the following additional printers could be defined:
Name |
Description |
jet4050+archive |
Prints the document with the jet4050 printer and archives the document. |
fax+archive |
Faxes and archives the document. |
email+archive+jet4050 |
E-mails, archives, and prints the document with the jet4050 printer. |
To set up the Printers
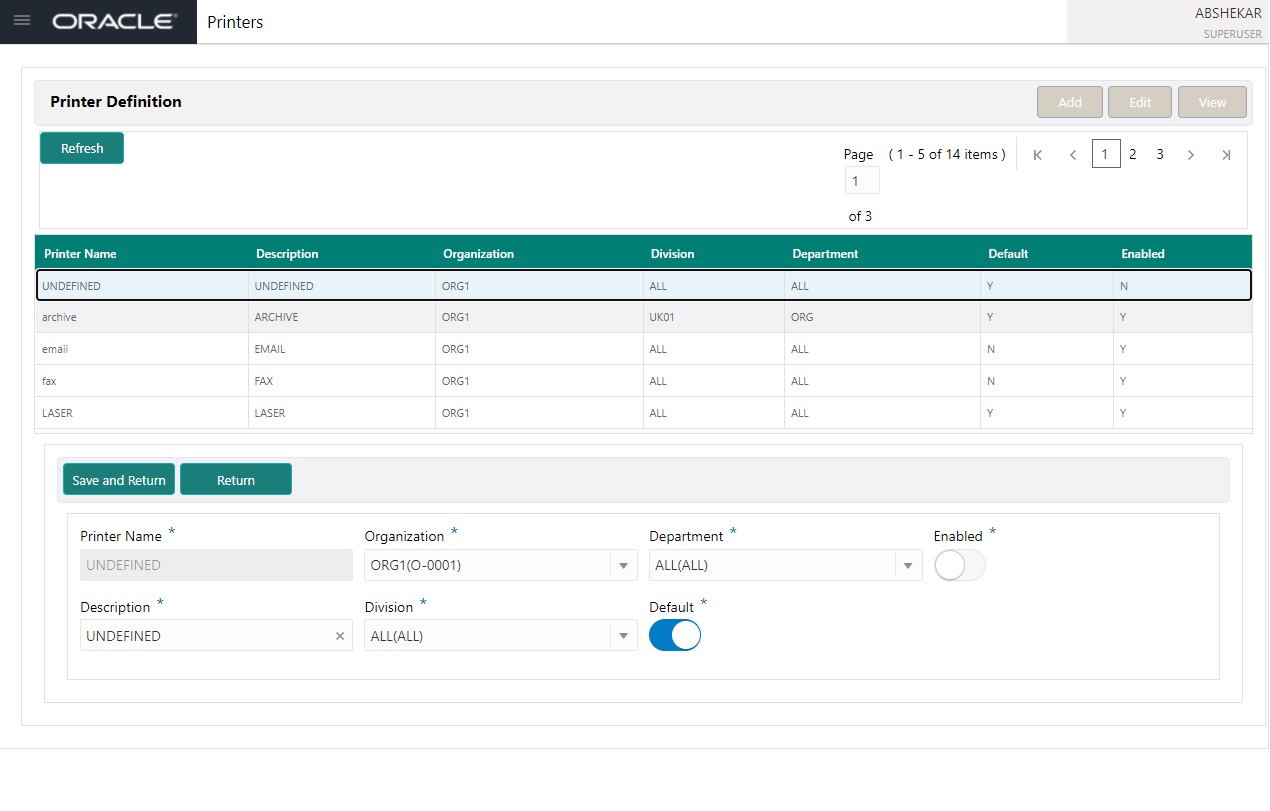
- In the LHS menu, click Setup > Administration > User > Printers. The system displays the Printers screen
- In the Printers section, you can Add, Edit and View Printer Definition details maintained in the system.
A brief description of the fields is given below:
Field: |
Do this: |
Printer Name |
Specify the printer name. The name of the printer as defined by the server. For a UNIX server, the name might be jet4050, while to access the same printer from a Windows server the name would be: \\servername\jet4050. |
Description |
Specify the description for the printer. |
Organization |
Select the organization to which the printer belongs, from the drop-down list. |
Division |
Select the division to which the printer belongs, from the drop-down list. The division will be displayed based on the organization selected. |
Department |
Select the department to which the printer belongs, from the drop-down list. The department will be displayed based on the division selected. IMPORTANT: When you select a printer to use, the system searches for a best match using the following attributes: 1 Organization 2 Division 3 Department Hence, Oracle recommends creating a version of each edit, where ALL is the value in these fields. It is also recommended that, you define a default printer for an Organization, Division and Department. |
Default |
Toggle the switch to set the printer as a default printer. |
Enabled |
Toggle the switch to enable the printer and that the printer is active. Note: Never disable the UNDEFINED printer. |
- Click ‘Save and Return’ to update the record or click ‘Return’ to cancel the update.
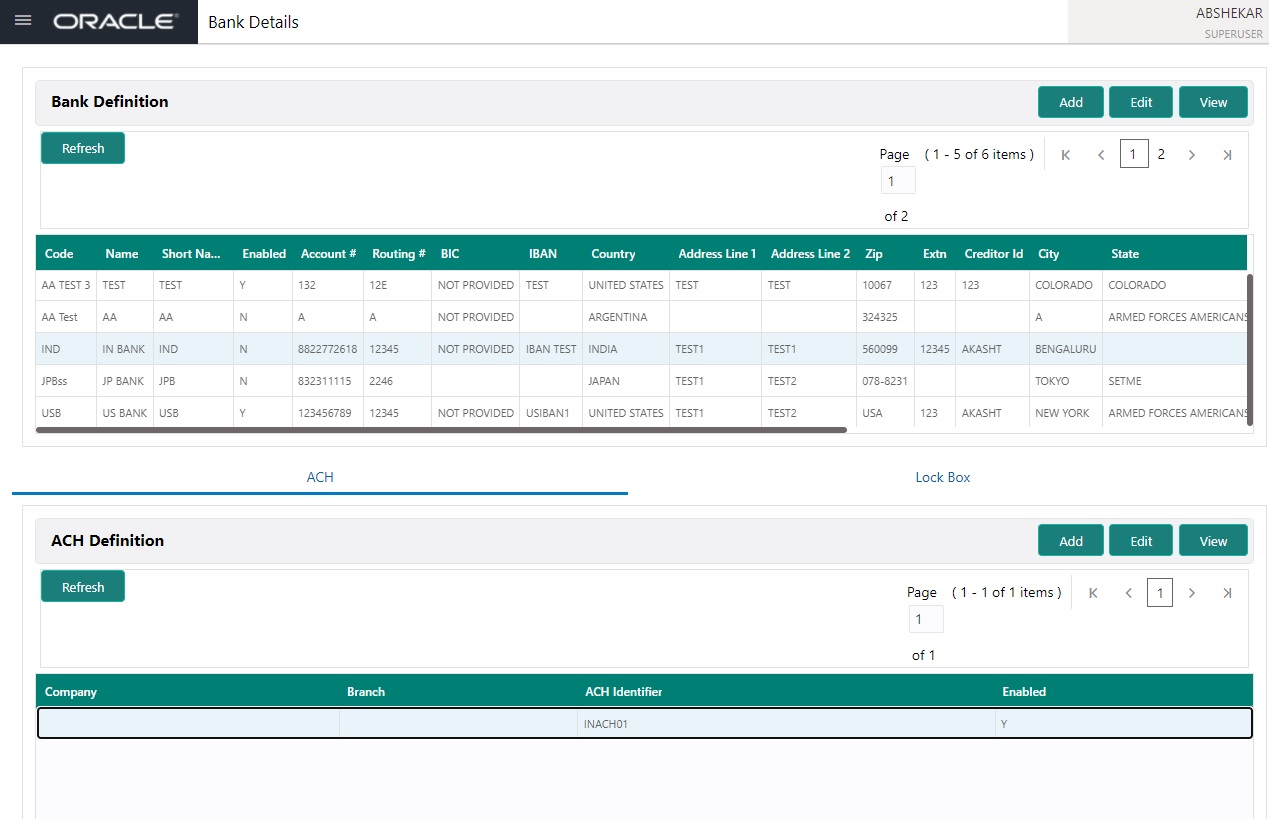
5.3 Bank Details
The Banks screen defines the banks, a company/branch uses for processing Automatic Clearing House (ACH) and lock box payments.
Note
This is “behind the scenes” information that the system uses for payments and does not appear on any other forms.
To set up the Banks
- In the LHS menu, click Setup > Administration > User > Bank Details link. The system displays the Bank Details screen.
- In the Banks Definition section, you can Add, Edit and View the Bank Definition details maintained in the system.
A brief description of the fields is given below:
Field: |
Do this: |
Code |
Specify the bank code (ID used internally by Oracle Financial Services Lending and Leasing to represent the bank). |
Name |
Specify the name for the bank. |
Short Name |
Specify the short name for the bank (ID displayed to represent the bank. This may be included in any output files). |
Enabled |
Toggle the switch to enable and indicate this as an active bank |
Account # |
Specify the account number used for banking transactions with the bank. Note: If the organizational parameter UIX_HIDE_RESTRICTED_DATA is set to Y, this appears as a masked number; for example, XXXXX1234. |
Routing # |
Specify the routing number of the bank. |
BIC |
Select the Business Identifier Code from the drop-down list. The list displays the BIC codes defined in the system. |
IBAN |
Specify the IBAN (International Bank Account Number). IBAN is used for identifying bank accounts across national borders with a minimal of risk of propagating transcription errors. Ensure that value entered satisfies the check-digit validation based on modulo 97. On save, system automatically validates the IBAN number length based on country code, characters, white spaces, and checksum. Validation is also done during posting non-monetary transaction (ACH Maintenance). You can maintain the IBAN length and other details required as per the country code in the user defined table (Setup > Administration > System > User Defined Tables). Note: IBAN for 'NL' country code (IBAN_FORMAT_NL) is defined by default with length of IBAN as 18. |
Country |
Select the country where the bank is located, from the drop-down list. |
City |
Specify the city where the bank is located. |
State |
Select the state where the bank is located, from the drop-down list. |
Address Line 1 |
Specify the address line 1 for the bank. |
Address Line 2 |
Specify the address line 2 for the bank. |
Zip |
Specify the zip code where the bank is located, from the drop-down list. |
Extn |
Specify the extension of the zip code where the bank is located. |
Creditor Id |
Specify the creditor identification details. |
Phone 1 |
Specify the primary phone number of the bank. |
Extn 1 |
Specify the phone extension for the primary phone number. |
Phone 2 |
Specify the alternate phone number for the bank. |
Extn 2 |
Specify the phone extension for the alternate phone number. |
Fax 1 |
Specify the primary fax number for the bank. |
Fax 2 |
Specify the alternate fax number for the bank. |
ACH Format |
Select the ACH format accepted by this bank from the drop-down list. The list displays the following options: - NACHA Format - SEPA Format |
- Click ‘Save and Return’ to update the record or click ‘Return’ to cancel the update.
- Click Setup > Administration > User > Bank Details > ACH.
- On the ACH Definition sub screen, you can create ACH files for the bank listed in the Banks section. You can Add, Edit and View the ACH Definition.
A brief description of the fields is given below:
Field: |
Do this: |
Company |
Select the portfolio company from the drop-down list. |
Branch |
Select the portfolio branch from the drop-down list. |
ACH Identifier |
Specify the lock box ID provided by the bank. This field is used in the ACH files to identify the bank. |
Enabled |
Toggle the switch to enable the ACH and indicate this as an active ACH identifier. |
- Click ‘Save and Return’ to update the record or click ‘Return’ to cancel the update.
- Click Setup > Administration > User > Bank Details > Lock Box.
- On the Lock Box sub screen, you can create lock box files for the bank listed in the Banks screen. You can Add, Edit and View the ACH Definition.
A brief description of the fields is given below:
Field: |
Do this: |
Lock Box Identifier |
Specify the lock box ID provided by bank. This field is used in the lock box files to identify the bank. |
Company |
Select the portfolio company from the drop-down list. |
Branch |
Select the portfolio branch from the drop-down list. |
Enabled |
Toggle the switch to enable the lock box. |
- Click ‘Save and Return’ to update the record or click ‘Return’ to cancel the update.
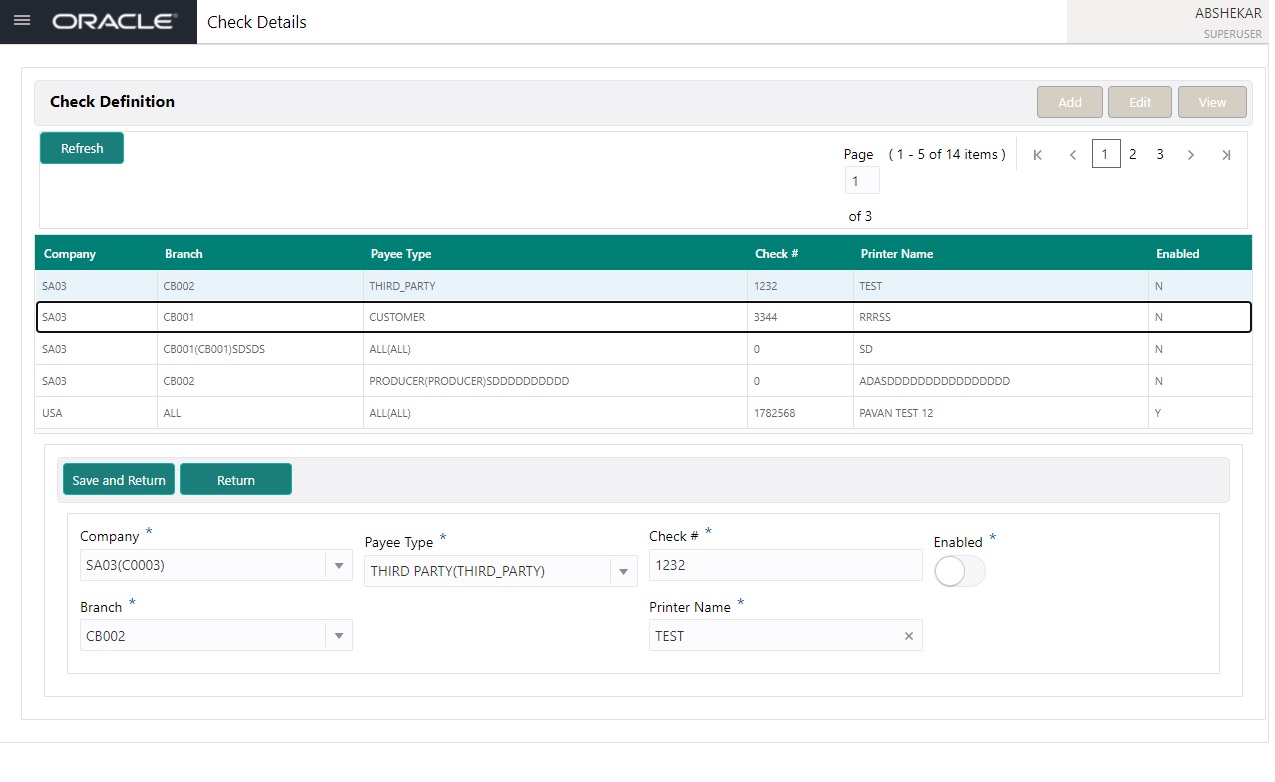
5.4 Check Details
The Check Details screen allows you to set up check details.
To setup the Check Details
- In the LHS menu, click Setup > Administration > User > Check Details. The system displays the Check Details screen.
- In the Check Definition section, you can Add, Edit and View the Check Definition maintained in the system.
A brief description of the fields is given below:
Field: |
Do this: |
Company |
Select the company from the drop-down list. |
Branch |
Select the branch from the drop-down list. |
Payee Type |
Select the payee type from the drop-down list. |
Check # |
Specify the check number (required). |
Printer Name |
Specify the printer name (required). |
Enabled |
Toggle the switch to enable the check details entry. |
- Click ‘Save and Return’ to update the record or click ‘Return’ to cancel the update.
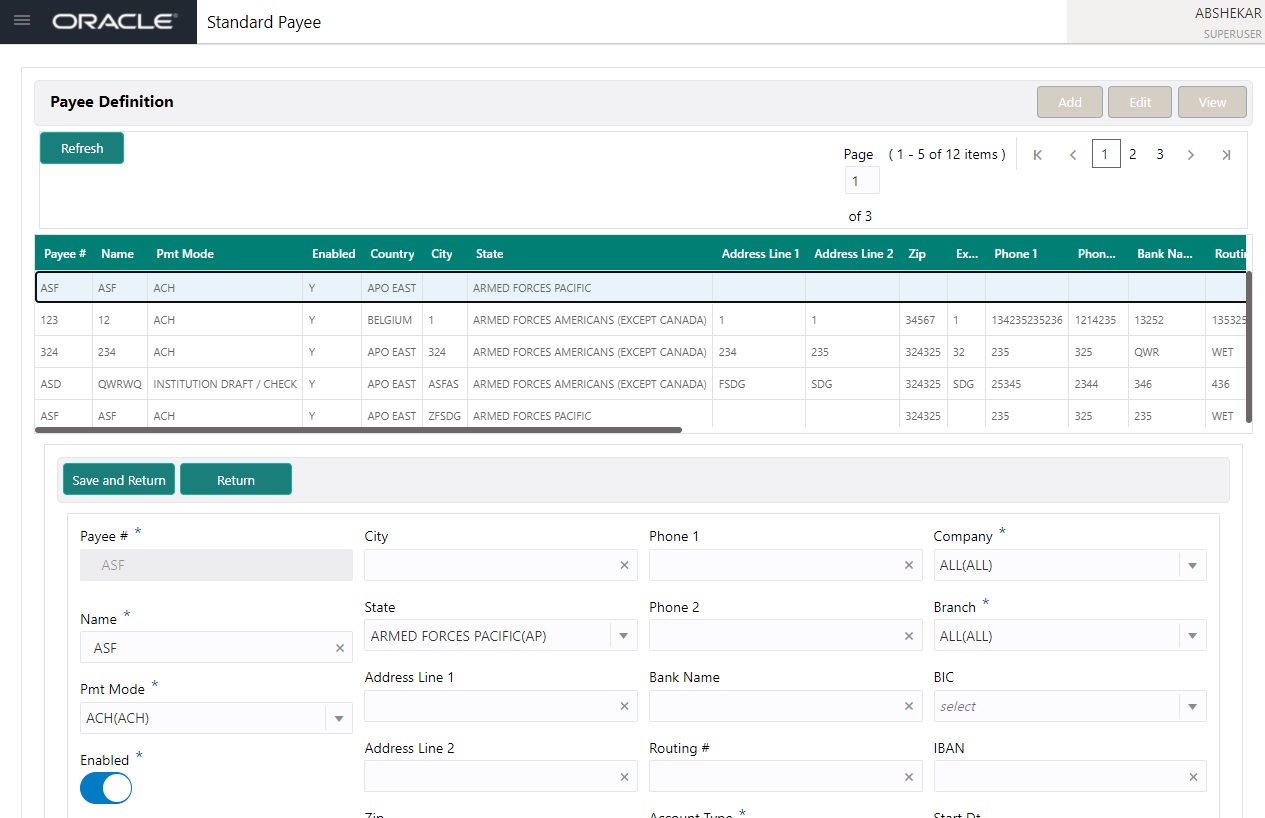
5.5 Standard Payees
The Standard Payees screen defines the third parties that are frequent payees for checks issued within your organization. These payees are then available on the Consumer Lending screen’s Advance Entry screen. When you select the Payee # in the Advance Allocation section, the system completes the remaining fields in this screen with information from the Standard Payees screen.
Note
The Payee # field on the Advance Payment forms is a non-validated field. This allows you to select an entry or enter one of your own.
To set up the Standard Payees
- In the LHS menu, click Setup > Administration > User > Standard Payee. The system displays the Standard Payees screen.
- In the Payee Definition section, you can Add, Edit and View the Payee Definition details maintained in the system.
A brief description of the fields is given below:
Field: |
Do this: |
Payee # |
Specify the payee number (Identifier for the payee). |
Name |
Specify the payee name. |
Pmt Mode |
Select the payment method for the payee from the drop-down list. |
Enabled |
Toggle the switch to enabled the payee. |
Country |
Select the country where the payee is located from the drop-down list. |
City |
Specify the city where the payee is located. |
State |
Select the state where the payee is located from the drop-down list. |
Address Line 1 |
Specify the address line 1 for the payee (optional). |
Address Line 2 |
Specify the address line 2 for the payee (optional). |
Zip |
Select the zip code where the payee is located from the drop-down list. |
Extn |
Specify the extension of the zip code where the payee is located. |
Phone 1 |
Specify the primary phone number for the payee. |
Phone 2 |
Specify the alternate phone number for the payee. |
Bank Name |
Specify the payee ACH bank name used by the standard payee. |
Routing # |
Specify the payee ACH bank routing number of bank used by the standard payee. |
Account Type |
Select the payee type of ACH bank account maintained by the Standard Payee from the drop-down list. |
ACH Account # |
Specify the payee ACH bank account number. |
Company |
Select the company from the drop-down list. The list is populated with Company definitions based on the Country selected. |
Branch |
Select the branch drop-down list. The list is populated with Company branch based on the Country selected. |
BIC |
Select the Business Identifier Code from the drop-down list. The list displays the BIC codes defined in the system. |
IBAN |
Specify the IBAN (International Bank Account Number). IBAN is used for identifying bank accounts across national borders with a minimal of risk of propagating transcription errors. Ensure that value entered satisfies the check-digit validation based on modulo 97. On save, system automatically validates the IBAN number length based on country code, characters, white spaces, and checksum. Validation is also done during posting non-monetary transaction (ACH Maintenance). You can maintain the IBAN length and other details required as per the country code in the user defined table (Setup > Administration > System > User Defined Tables). Note: IBAN for 'NL' country code (IBAN_FORMAT_NL) is defined by default with length of IBAN as 18. |
Start Dt |
Specify the payment mode start date, the date the current payment method was implemented (defaults on Pmt Mode change). you can also select from the adjoining calendar icon. |
Comment |
Specify a comment for this advance allocations. This is the default comment to include with payments to this Payee. |
- Click ‘Save and Return’ to update the record or click ‘Return’ to cancel the update.
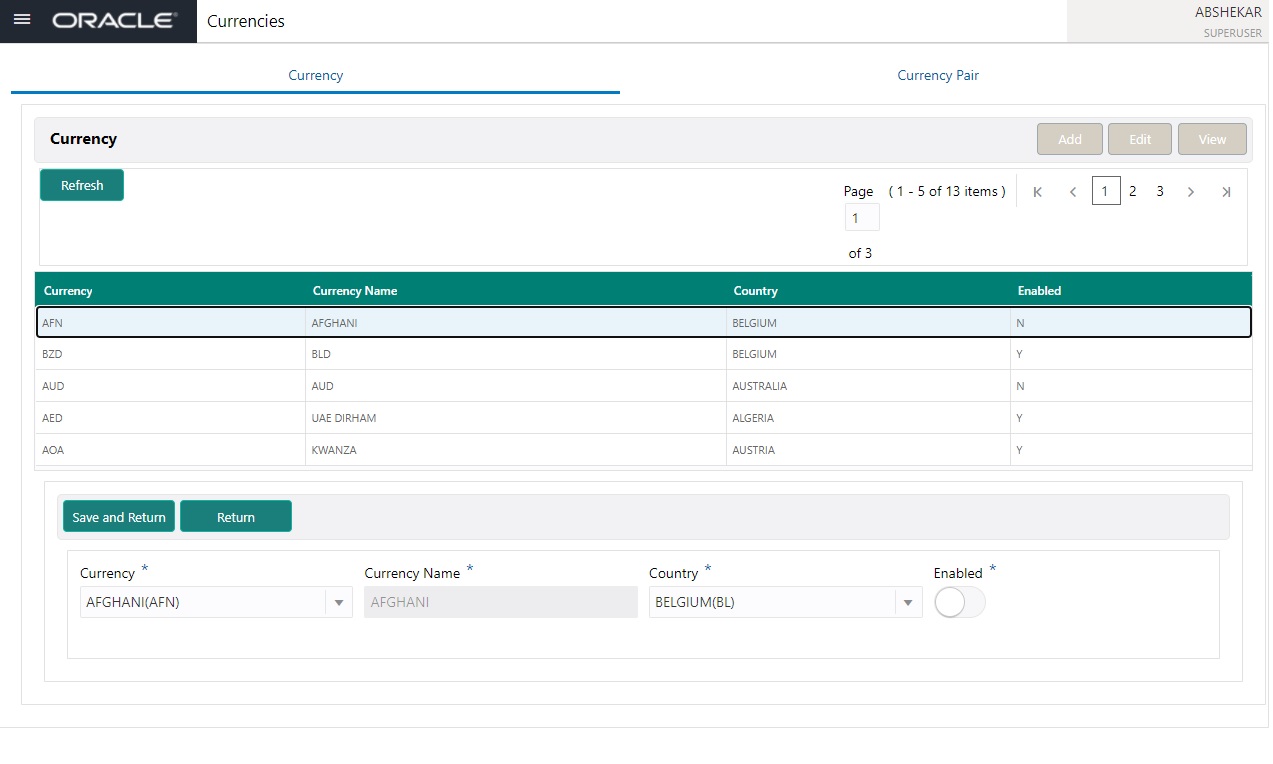
5.6 Currencies
The Currencies link allows you to set up currency details.
Navigating to currencies
- In the LHS menu, click Setup > Administration > User > Currencies. The system displays the Currencies screen. In this screen, you can set up:
- Currency Definition
- Currency Pair Definition
5.6.1 Currency Definition
The Currency Definition screen allows you to set up currency details.
To set up the currency definition information
- Click Setup > Administration > User > Currencies > Currency. The system opens the Currency Definition tab by default.
- In the Currency section, you can Add, Edit and View the Currency Definition details maintained in the system.
A brief description of the fields is given below:
Field: |
Do this: |
Currency |
Select the currency you want to define, from the drop-down list. |
Currency Name |
The system displays the currency name based on the currency selected. |
Country |
Select the country for which the currency is defined, from the drop-down list. |
Enabled |
Toggle the switch to enable the currency entry. |
- Click ‘Save and Return’ to update the record or click ‘Return’ to cancel the update.
5.6.2 Currency Pair link
The Currency Pair Definition link allows you to set up currency pair details.
To set up the currency pair definition information:
- In the LHS menu, click Administration > User > Currencies > Currency Pair. The system displays the Currency Pair Definition screen
- In the Currency Pair Definition section, you can Add, Edit and VIew Currency Paid Definition details maintained in the system.
A brief description of the fields is given below:
Field: |
View this: |
Currency Code |
Select the currency code from the drop-down list. |
Currency Pair Code |
Select the currency pair code from the drop-down list. |
Through Currency |
Toggle the switch to set the selected currency as a through currency. |
Through Currency Code |
Select the through currency code from the drop-down list. |
Enabled |
Toggle the switch to enable the currency pair entry. |
- Click ‘Save and Return’ to update the record or click ‘Return’ to cancel the update.
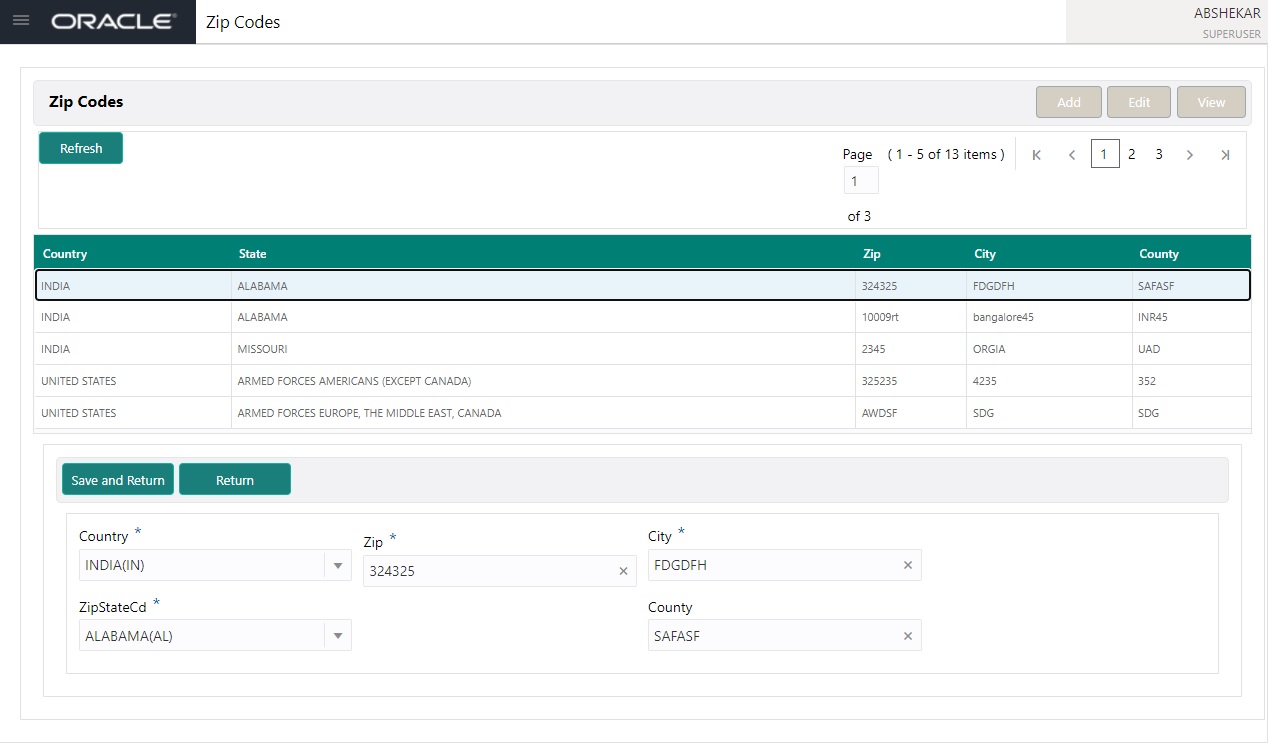
5.7 Zip Codes
The Zip Codes screen allows you to set up zip code details.
To set up the zip codes information
- In the LHS menu, click Setup > Administration > User > ZipCodes. The system displays the Zip Codes screen
- In the Zip Codes section, you can Add, Edit and View the Zip Code details maintained in the syst.em.
A brief description of the fields is given below:
Field: |
View this: |
Country |
Select the country from the drop-down list. |
State |
Select the state from the drop-down list. |
Zip Code |
Specify the zip code (required). |
City |
Specify the city. |
County |
Specify the county. |
- Click ‘Save and Return’ to update the record or click ‘Return’ to cancel the update.
5.8 Payment Hierarchy
The Payment Hierarchy screen facilitates to define hierarchy definition along with payment appropriation, excess payment handling, account selection criteria and sort order. These details are required by the system to allocate payments to the matching accounts of a customer, when customer based payments are being processed in ‘Payment Entry’ screen.
Below is an illustration on how payment hierarchy is used to post customer based payments.
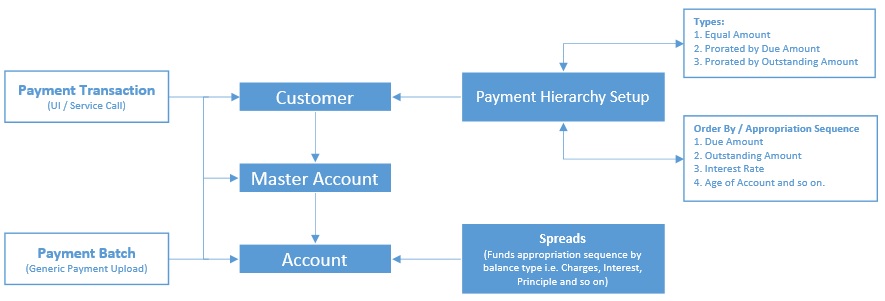
Any Payment transaction generated in the system either from UI / Web Service Call or through a Payment Batch (Generic Payment Upload) can be directly posted to an Account or at Customer level.
- If payment is posted directly to an Account, the funds are allocated based on the defined spread with funds appropriation sequence of balance type i.e. Charges, Interest, Principle and so on.
- If payment is posted at Customer level having two accounts and if the payment amount is less than the due, then appropriation sequence is required. Else, one of the account can have a short fall with payment allocation.
In such case, the Payment Hierarchy determines the sequence of payment as to which account is to be appropriated first and which is to be appropriate next. This is based on 'order by clause' and ‘appropriation sequence’ defined.
Also the Balance Type determines the distribution type as one of the following:
- Equally to all the accounts
- Prorated by Due amount (i.e. highest due or lowest due first)
- Prorated by Outstanding Amount.
Once the account is narrowed down and payment amount is decided, then based on spread the payment is appropriated. This gives additional flexibility for defining payment modes at the master account level.
If Payment Hierarchy is not defined while funding an application or needs correction, the same can be done by posting ‘MASTER ACCOUNT PAYMENT HIERARCHY MAINTENANCE’ non-monetary transaction in Servicing > Maintenance > Transaction Batch Information section. At Customer level, Payment hierarchy can be updated by posting CUSTOMER MAINTENANCE transaction.
5.8.1 Payment Appropriation Methods
While creating Hierarchy definition in the Payment Hierarchy screen, you can use any of the following payment appropriation methods available in Hierarchy Type field. On selecting the specific Hierarchy definition at Application or Account level, the defined method is used to allocate payments to corresponding accounts.
However in all the methods, the payment criteria is also used for identifying the due accounts and careful consideration is required while defining the same.
Method |
Description |
EQUAL AMOUNT |
To allocate payment equally to all the accounts picked. This is traditional method of payment allocation in which the total payment amount received is divided and adjusted equally to all customer linked accounts. |
DUE AMOUNT RATIO |
To allocate payment based on the ratio of amount due on all accounts. In this method, the due accounts are identified based on the defined selection criteria and the payment appropriation is done on the ratio of amount due on each account using the below formula. 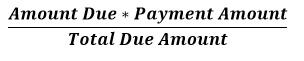 Following is an illustration on payment allocation: 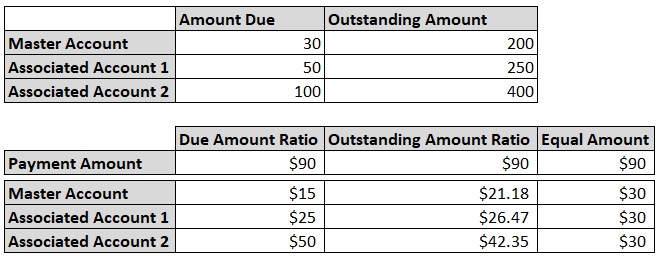 |
OUTSTANDING BALANCE RATIO |
To allocate payment based on the ratio of total outstanding due on all accounts. Similar to above, even in this method the due accounts are identified based on the defined selection criteria and the payment appropriation is done on the ratio of outstanding amount due on each account using the below formula.  This method can be selected if the received payment amount is equal to total outstanding due on all linked accounts indicated in Customer Service > Transaction History > Balances screen. |
ACCOUNT COLUMN BASED |
To allocate payment based on hierarchy order. In this method, the due accounts are identified based on the defined selection criteria and the payment appropriation is done as per the sequence of due accounts defined either in ascending/descending order. |
During payment appropriation, system allocates the payment amount only up to the total of resulted accounts and remaining amount (if any) are processed based on the excess payment method value.
While onboarding accounts through web services, system considers the value of system parameter PMT_HIERARCHY_CODE to default the payment allocation in Customer/Business Details screen after account activation.
Also while onboarding if the Payment Hierarchy is not passed as part of the request (Applicant/Application), then system parameter value is considered.
5.8.2 Excess Payment Appropriation
During or after payment appropriation, there can be a residual amount pending for allocation. For example, $0.01 remains when $100 is equally paid to 3 accounts. In such case the residual amount is transferred to last account in the hierarchy sequence. However, note that system performs this residual payment allocation only once.
In other case where there in an excess payment received which is more than account dues, the same can be processed for payment allocation using any of the following ‘Excess Handling Method’ while defining the Hierarchy Definition.
Method |
Description |
SUSPENSE |
To post the excess amount as suspense on Customer or Master account. |
HIERARCHY BASED |
To allocate the excess payment based on any of the Hierarchy Definitions maintained in the system. |
Based on the selection, system re-allocates the excess amount to corresponding accounts.
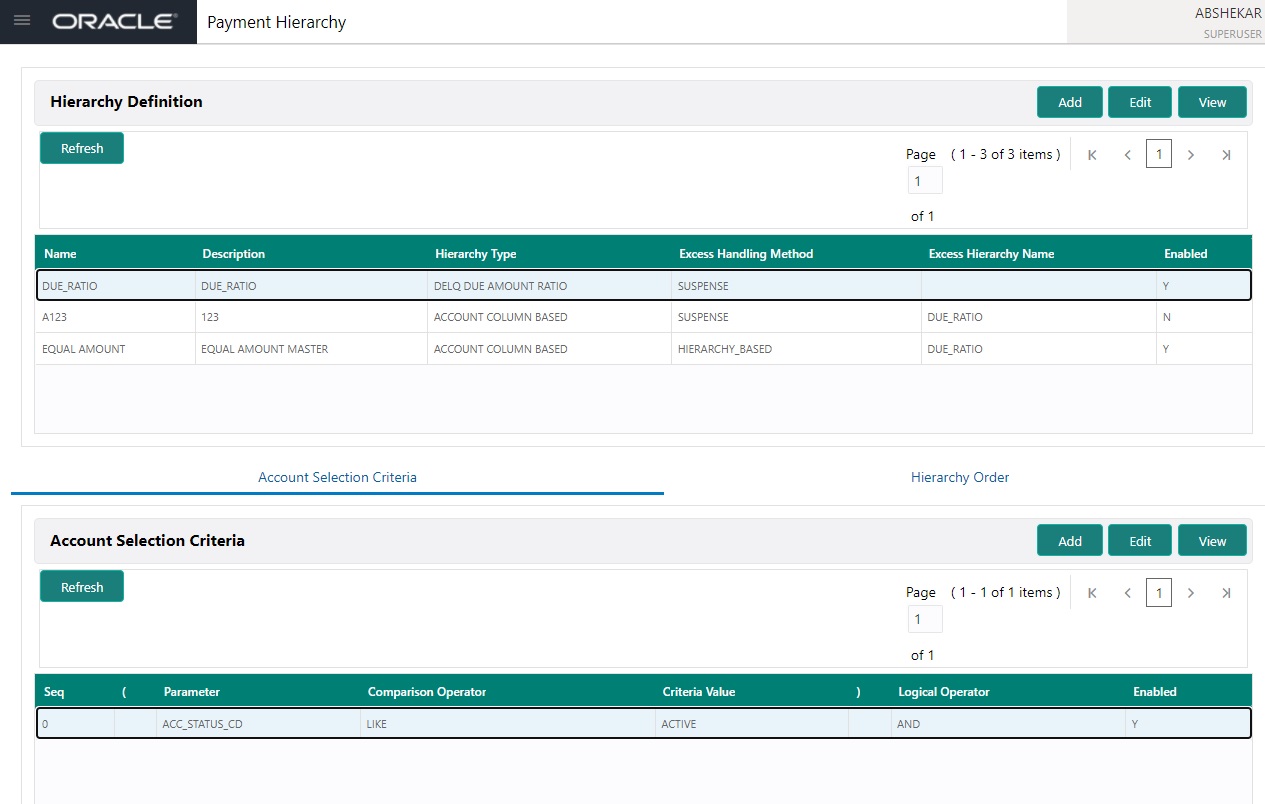
To set up payment hierarchy
- In the LHS menu, click Setup > Administration > User > Payment Hierarchy.
- In the Payment Hierarchy Definition section, you can Add, Edit and View the Payment Hierarchy Definition details maintained in the system.
A brief description of the fields is given below:
Field: |
View this: |
Name |
Specify an unique name for the hierarchy definition. |
Description |
Specify the description for the hierarchy definition. |
Hierarchy Type |
Select one of the following type of payment allocation method from the drop-down list. The list is populated based on the PMT_HIERARCHY_TYPE_CD lookup. - EQUAL AMOUNT - DUE AMOUNT RATIO - OUTSTANDING BALANCE RATIO - ACCOUNT COLUMN BASED For more information on the above methods, refer to ‘Payment Appropriation Methods’ section. You can define multiple Hierarchy definitions with same Hierarchy type. |
Excess Handling Method |
Select one of the following type of excess payment allocation method to be used with payment hierarchy definition from the drop-down list. The list is populated based on PMT_HIERARCHY_EXCESS_METHOD_CD lookup. - SUSPENSE - HIERARCHY BASED For more information on the above methods, refer to ‘Excess Payment Appropriation’ section. |
Excess Hierarchy Name |
This field is enabled and is mandatory if the Excess Handling Method is selected as ‘Hierarchy Based’. Select the Hierarchy Definition from the drop-down list. This list is populated with all the pre-defined and enabled hierarchy definitions maintained in the system. For more information on the above methods, refer to ‘Excess Payment Appropriation’ section. |
Enabled |
By default this check box is enabled for new hierarchy definition. |
- Click ‘Save and Return’ to update the record or click ‘Return’ to cancel the update.
Account Selection Criteria
This sub tab facilitates to define the account selection criteria that is used to identify due account for payment allocation. Atleast one valid account selection criteria is required for all the Hierarchy Types.
- In the Account Selection Criteria section, you can Add, Edit and View Account Selection Criteria details maintained in the system. A brief description of the fields is given below:
Field:
Do this:
Seq
Specify sequence numbers.
(
Specify left bracket.
Parameter
Select the parameter from the drop-down list. The list is populated based on the values maintained in CUSTOMER PAYMENT HIERARCHY ORDER PARAMETERS user defined table.
Comparison Operator
Select comparison operator from the drop-down list.
Criteria Value
Specify criteria value.
)
Specify right bracket.
Logical Expression
Select logical operator from the drop-down list.
Enabled
Toggle the switch to enable the selection criteria.
- Click ‘Save and Return’ to update the record or click ‘Return’ to cancel the update.
- You can click ‘Check Criteria’ for system to validate the query and display the results.
Hierarchy Order
This sub tab facilitates you to define hierarchy order that is used to sort the due account for payment allocation. This sub tab is enabled only for ‘ACCOUNT COLUMN BASED’ Hierarchy type.
- In the Hierarchy Order section, you can Add, Edit and View the Hierarchy Order details maintained in the system. A brief description of the fields is given below:
Field:
Do this:
Seq
Specify sequence number.
Sort Field
Select sort field from the drop-down list. The list is populated based on values maintained in CUSTOMER PAYMENT HIERARCHY ORDER PARAMETERS user defined table.
Order
Select sort order as either Ascending or Descending from the drop-down list.
- Click ‘Save and Return’ to update the record or click ‘Return’ to cancel the update.