4. Processing Fees
This section contains the following topics:
- Section 4.1, "Defining a Fee Class"
- Section 4.2, "Defining fee components for a product"
- Section 4.3, "Specifying Fee details for a contract"
4.1 Defining a Fee Class
A class is a specific type of component that you can build with certain attributes. You can build a fee class, for instance, with the attributes of a specific type of fee, such as Loan processing fees, Amendment Fees.
When building a fee class, you define certain attributes such as:
- Module in which you would use the class
- Fee type
- Basis Amount Tag
- Fee Rule
- Fee Rule type
- Payment Type
- Fee collection mode
- Default Fee rule
You can define the attributes of a fee class in the ‘Fee Class Maintenance’ screen, You can invoke the ‘Fee Class Maintenance’ screen by typing ‘LFDFEECL’ in the field at the top right corner of the Application tool bar and clicking the adjoining arrow button.
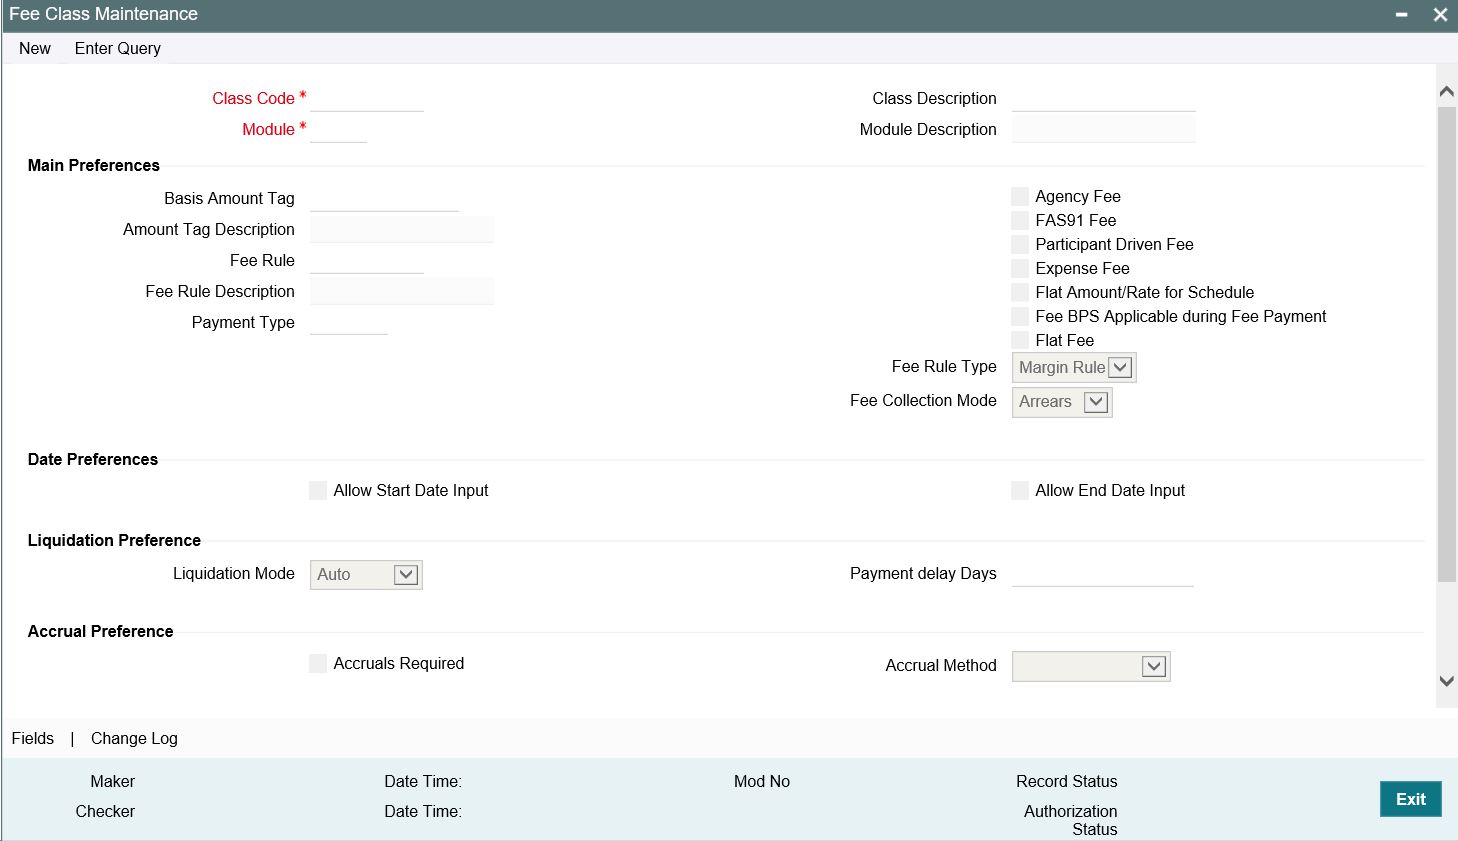
Before defining the attributes of a fee class, you should assign the class a unique identifier, called the Class Code and briefly describe the class. A description would help you easily identify the class.
Module
A fee class is built for use in a specific module. As a fee component would be applied on different basis amounts, in different modules.
Note
The Basis Amount Tags available would depend on the module for which you build the class.
Fee Type
The Rule Type identifies the type of component you are defining. The attributes applicable for a component depend on the Rule Type. Select the fee rule type as 'ICCF Rule' or 'Margin Rule'.
Fee Rule
If fee type is ‘ICCF Rule’, then you can get the fee rule details from 'Rule Master Definition’' Screen. If type is ‘Margin Rule’ then you can get fee rule details from 'Fee Rule Maintenance' screen.
Allowing Rule Amendments
If you would like to allow the amendment of a rule for a fee component, indicate this by selecting the ‘Allow Rule Amendment’ option.
Consider as Discount
While defining a fee class for either the loans or the bills module, you can indicate whether the fee component is to be considered for discount accrual on a constant yield basis.
If you select this option the fee received for the component is used in the computation of the constant yield and subsequently amortized over the tenor of the associated contract.
Payment Delay Days
The free period between 'Schedule Date' and 'Pay by Date'. Based on ‘Payment Delay Days’, the extended buffer period is provided for the fee payment. Hence, instead of the due date, fee payment is done at ‘Pay by Date’. ‘Payment Delay Days’ can be overwritten while creating a new product even if same is defined at Fee maintenance level. This field is optional.
Note
This is applicable for ICCF fee components. This functionality is NOT applicable to adhoc fees and adhoc expenses.
Accrual Required
If you select this option, the fee received for the component is accrued based the constant yield and subsequently amortized over the tenor of the associated contract.
Propagation Required
Select this option to indicate that the fee collected from the borrower must be passed on to the participants of the contract.
Fee Mode
The fee mode can be any one of the following:
- Arrears
- Advance
Note
Advance fee is supported only if Basis Amount Tag is 'User Input'.
4.2 Defining fee components for a product
This section contains the following topics:
- Section 4.2.1, "Associating a fee with a product"
- Section 4.2.2, "Associating several fee classes with a product"
- Section 4.2.3, "Stop Association"
- Section 4.2.4, "Specifying Fee Period Basis"
- Section 4.2.5, "Specifying Fee Basis"
- Section 4.2.6, "Payment Delay Days"
You can specify the fee components applicable to a product, in the fee Definition sub- screen of ‘Loans and Commitment Product Definition’ (OLDPRMNT) screen. Click ‘Fee’ from ‘Loans and Commitment Product Definition’ screen to invoke the ‘Fee Details’ sub-screen.
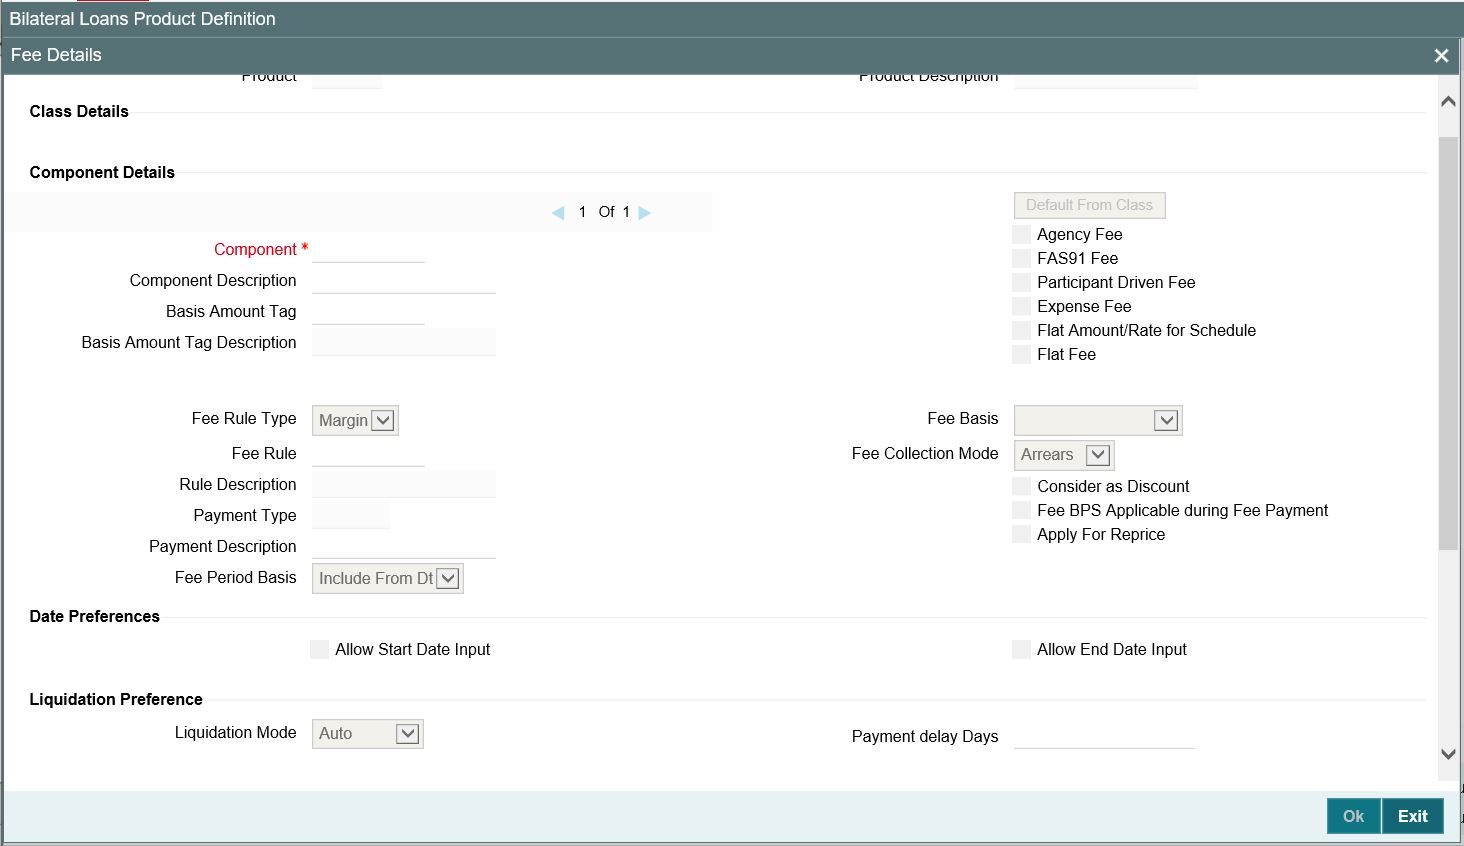
You should necessarily use a fee class to indicate the fee components applicable to a product. A fee class is a specific type of component that you can build with certain attributes.
4.2.1 Associating a fee with a product
To associate a fee class with a product, select the appropriate fee class from the list of classes defined specifically for the particular module of Oracle Lending. Click ‘Default From Class’ from the ‘Fee Details’ screen.
The attributes defined for the fee class are displayed. You have the option to change the attributes defined for the fee class to suit the requirement of the product you are creating.
4.2.2 Associating several fee classes with a product
You can associate several fee classes with a product. To add to the list of classes associated with the product click the ‘Add row’ button. Thereafter, select a class from the option list that is displayed and then click ‘Default From Class’.
To navigate between the fee classes associated with a product, you can use the icons provided for the same.
To disassociate a fee from the product, navigate to the class, and click the ‘Delete row’ button.
4.2.3 Stop Association
The fee component displayed in the Component field is not associated with the portfolios maintained under the product that you are defining.
Note
- The fee details specified for a product is automatically applied on all contracts involving the product.
- The options ‘Accrual Required’ is defaulted from the ‘Fee Class Maintenance’ screen. You cannot change these preferences in this screen.
4.2.4 Specifying Fee Period Basis
During fee accrual calculation, you can choose fee period basis to compute number of days for the fee schedule based on the option chosen during contract life cycle.
You can select the tenor basis upon which fee is computed over a schedule or fee period for a contract. You can select an option in while defining fee components for a product and the same is inherited to the contract. If required, you can change the default option.
You can select any of the following options:
Including the From Date
For all schedules, the period considered for fee calculation includes the start date and exclude the end date. Therefore, the value date of the loan is considered for fee calculation and the maturity date is excluded.
Including the To Date
For all schedules, the period considered for fee calculation excludes the start date and include the end date. Therefore, the value date of the loan is excluded, but the maturity date is included for fee calculation.
Including both From and To Dates
The period considered for fee calculation includes both the value date and the maturity date. This means the following:
- For the first schedule, it includes the value date. Fee is calculated for the value date
- For the last schedule, it includes the maturity date.
- Fee is calculated for the maturity date
Excluding both From and To Dates
The period considered for fee calculation excludes both the value date and the maturity date. This would mean:
- For the first schedule, it excludes the value date. No fee is calculated for the value date
- For the last schedule, it excludes the end date. No fee is calculated for the maturity date
Example
A loan with a value of USD 400,000 is value dated 1st January 2019 and matures on 1st May 2019. The intermediate fee payment schedules are on 1st February 2019, 1st March 2019 and 1st April 2019.
Schedule |
Start Date |
End Date |
1 |
1st January 2019 (Value Date) |
1st February 2019 |
2 |
1st February 2019 |
1st March 2019 |
3 |
1st March 2019 |
1st April 2019 |
4 |
1st April 2019 |
1st May 2019 (Maturity) |
The periods considered for fee calculation for each schedule, for each of the four options, are arrived at as given below:
Include From Date
Schedule |
Days from |
Days To |
Days for Fee Calculation |
1 |
1st January 2019 |
1st February 2019 |
31 |
2 |
1st February 2019 |
1st March 2019 |
28 |
3 |
1st March 2019 |
1st April 2019 |
31 |
4 |
1st April 2019 |
1st May 2019 |
30 |
Include To Date
Schedule |
Days from |
Days To |
Days for Fee Calculation |
1 |
1st January 2019 |
1st February 2019 |
31 |
2 |
1st February 2019 |
1st March 2019 |
28 |
3 |
1st March 2019 |
1st April 2019 |
31 |
4 |
1st April 2019 |
1st May 2019 |
31 |
Include both From and To Dates
Schedule |
Days from |
Days To |
Days for Fee Calculation |
1 |
1st January 2019 |
1st February 2019 |
31 |
2 |
1st February 2019 |
1st March 2019 |
28 |
3 |
1st March 2019 |
1st April 2019 |
31 |
4 |
1st April 2019 |
1st May 2019 |
31 |
You would notice that consequent to the first schedule, this option would work in the same manner as the Include To Date option.
Exclude From and To Dates
Schedule |
Days from |
Days To |
Days for Fee Calculation |
1 |
1st January 2019 |
1st February 2019 |
30 |
2 |
1st February 2019 |
1st March 2019 |
28 |
3 |
1st March 2019 |
1st April 2019 |
31 |
4 |
1st April 2019 |
1st May 2019 |
30 |
You would notice that consequent to the first schedule, this option would work in the same manner as the Include From Date option.
4.2.5 Specifying Fee Basis
A new fee basis methods are introduced to support fee calculations based on working days and 365.25 as denominator for leap and non-leap year.
Different values for the numerator basis are as explained below:
- Actual - Actual number of days in a month is taken.
- 30 (Euro) - 30 days is considered for all months including February irrespective of leap or non-leap year.
- 30 (US) - 30 days is considered for interest computation for all months except February where the actual number of days is considered.
- Working Days - To calculate the working days, branch holiday maintenance of the branch where loan is booked is considered. During fee calculation the days are calculated based on the working days.
Different values for the denominator of the fee basis are as explained below.
- 252- Number of days in a year is taken as 252 which is the number of working days.
- 360 - Number of days in a year is taken as 360 irrespective of actual number of calendar days.
- 365 - Number of days in a year is taken as 365 for leap as well as non-leap year.
- Actual: Actual number of days in a year is taken for interest calculation which is 366 for non-leap year.
- 365.25 - Number of days in a year is taken as 365.25 for leap as well as non-leap year.
Note
- 252 fee basis is applicable for all schedule type like, bearing, Amortized, Discounted, and so on. There is no restriction in component level for the application of 252 basis.
- The system does not consider the currency holiday preference for working day calculation. It considers only the branch local holiday maintenance.
- No changes are done to fee basis available in currency definition screen.
- Fee accrual happens only for working days. The fee basis gets the number of days from the previous accrual date to the current accrual date. If there are no holidays in a month, even though denominator is 252, interest accrual happens till end of the month.
In case an ad hoc holiday is declared, then the system does not recalculate the fee as part of ad hoc holiday processing. Accrual adjustment for the unaccrued portion happens on the schedule end date.
4.2.6 Payment Delay Days
This value is defaulted from 'Fee Class Maintenance' screen. If required, you can edit during product creation or modification.
4.3 Specifying Fee details for a contract
This section contains the following topics:
From the Loan and Commitment - Contract Input (‘OLDTRONL’) screen, click ‘Fee’ to invoke the ’Fee Details’ sub-screen.

When the details of a contract are captured, the fee components defined for the product is automatically applied. However, while processing a contract, you can change certain attributes of the fee component.
4.3.1 Features of the Contract Fee Details screen
The contract reference number of the contract you are processing is displayed on this screen.
4.3.2 Fee details
The fee components specified for the product to which you have linked the contract is displayed in tabular columns.
Component
The name given to the fee component is displayed here. The attributes defined for this component is displayed in the subsequent fields.
For a fee component the following details are displayed:
- Billing Notice Required
- Billing Notice Days
- The currency in which the fee is specified if it is a total fee amount and the total fee amount itself.
Consider as Discount
It is applicable for only Advance Fee type and for IRR computation.
Accrual Fee
In the Accrual Fee Class maintenance screen (LFDACFCL), you maintain accrual fee related details.
In the Product Definition screen, you can get these details and link it to the 'Accrual fee’.
The accrual fee will not be defaulted to the contract. You need to go to 'Amortization Fees' screen (LFDACFIN).
Note
If both the options ‘Consider as Discount’ and ‘Accrual Required’ are selected, the fee amount is considered for Internal Rate of Return calculation.
Fee Period Basis
During periodic accruals for a contract, fee accruals also depend on the fee period basis defined for the contract.The fee period basis determines whether the fee calculation for schedules takes into account the schedule start dates or the end dates, or both, or whether it excludes both.
Note
For contracts booked with the fee period basis as ‘Include To Date’ and ‘Include To and From Date’, the maturity date is considered for fee calculations. However, accrual is posted in previous working day prior to maturity date and there is no accrual on maturity date.
4.3.3 Pay By Date
After providing the fee schedule details, ‘Payment Schedule Summary’ displays the ‘Pay By date’ based on the parameter ‘Payment Delay Days’.

- After capturing all the details at contract level, liquidation event FLIQ fires on 'Pay by Date' for advance and arrear fee components.
- Pay By Date is applicable for bullet fee schedule also.
- Accruals takes place according to the liquidation done on ‘Pay by date’.
- Accounting entries are similar to that for normal loans.
4.3.3.1 Payment Delay Days: 5 Days
- Product Maintenance screen > Fee Detail > For example. Payment Delay Days as 5 Days.
- Schedule >Schedule Details
Type |
Component |
Start Date |
Amount |
Payment |
Fee_Comp1 |
15 Jun 2018 |
1000 |
Payment |
Fee_Comp2 |
15 Jun 2018 |
1000 |
- Schedule Details should display an additional information “Pay by Date” derived using "Payment Delay Days".
For advance and arrear fee components, fee liquidation takes place on 20th June 2018 instead of 15th June 2018 as a result of payment delay days.
Due Date |
Component |
Total Amount Due |
Pay By Date |
15 Jun 2018 |
Fee_Comp1 |
1000 |
20 Jun 2018 |
15 Jun 2018 |
Fee_Comp2 |
1000 |
20 Jun 2018 |
4.3.4 Liquidating Fee Components
You can manually liquidate the fee schedules defined for fee components in the ‘Fee Liquidation’ screen. You can liquidate even future dated schedules through this screen.
You can view manual and auto liquidation fee details here. You can query and view the fees that are reversed either by manual or auto fee liquidation method.
You can invoke the ‘Fee Liquidation’ screen by typing ‘OLDFEELQ’ in the field at the top right corner of the Application tool bar and clicking the adjoining arrow button.
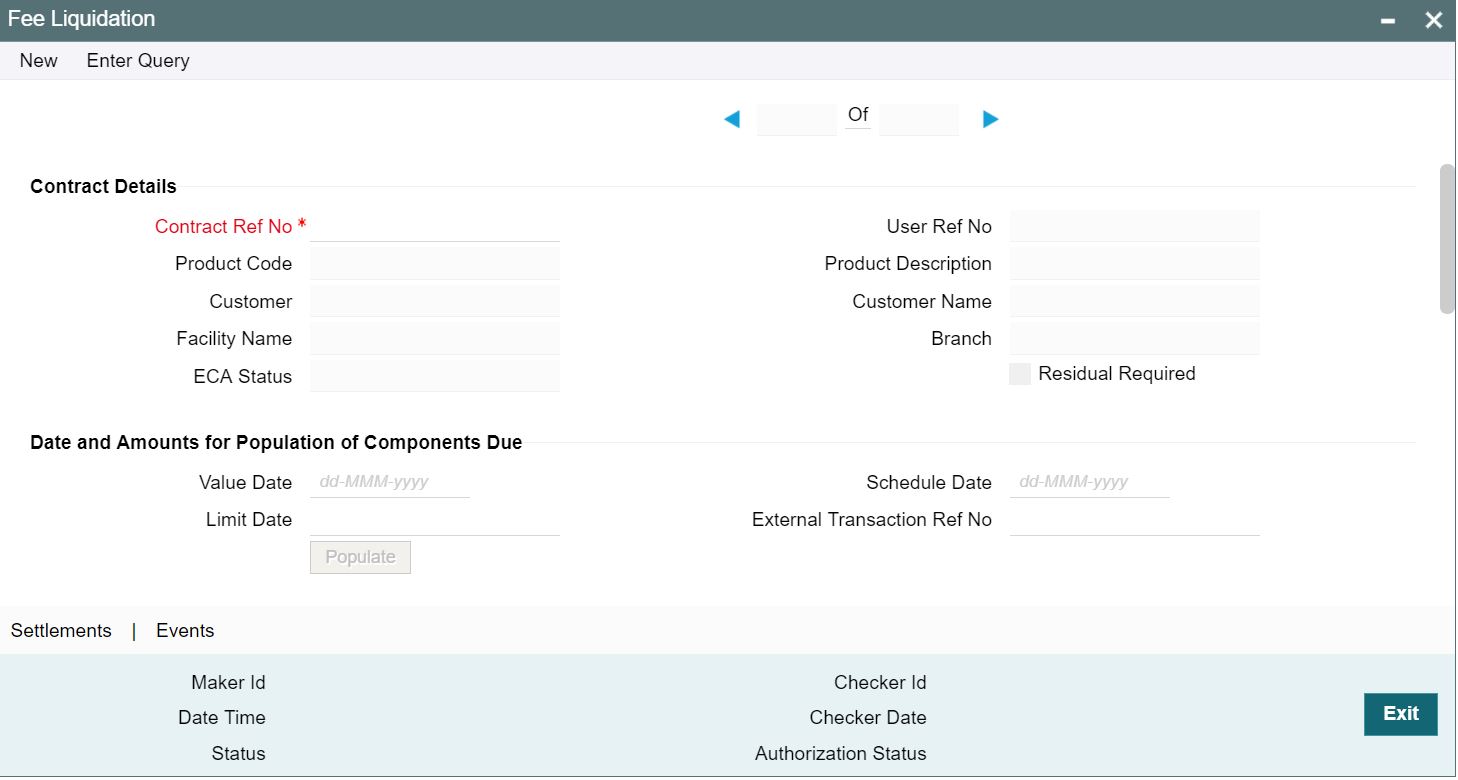
To liquidate a fee component schedule, do the following:
- Select the contract for manual liquidation
- Click on the new button - Click ‘New’ from the menu. The ‘Value Date’ and ‘Limit Date’ displays the current system date. The accounting entries for liquidation will be passed as of the value date.
- You can change the value date, if required. However, if you specify a back valued date, it cannot be earlier than the last schedule that was paid. The date you capture here is the date on which liquidation occurs.
- You can also change the limit date. This date indicates the date upto which you want to make the payment. This may include future schedules as well as unpaid past schedules. Again, a back valued limit date should not be earlier than the last liquidation date. Also, you can specify a limit date beyond the contract maturity date.
- After capturing the value date and the limit date, click
the
‘Populate’ button. The system will display all the components which are due till the limit date (both unpaid past and future schedules till the limit date). The following details are displayed in the ‘Payment Breakup’ section of the screen:
- Component
- Currency
- Mode of liquidation
- Amount Due
- The ‘Payment Breakup For –‘section of the screen will display the component-wise schedule breakup. The following details are displayed here:
- Due Date of each schedule defined for the component (upto the limit date)
- Amount Due for each due date
- Pending Amount Due (= Amount Due)
- Select ‘Cash Prop’ box to indicate that the below component is for cash payment during fee liquidation:
- Facility Fee
- Commitment Fee
- Stand by LC Fee
- Commercial LC fee You can check the ‘Cash Prop’ flag only if the fee component which is getting liquidated is maintained in the static table. Otherwise the flag is not allowed to be selected.
- Capture the amount you want to pay for a component in the ‘Amount Paid’ field. This amount may be less than or equal to the ‘Amount Due’.
After capturing the ‘Amount Paid’, click the ‘Allocate’ button. The system allocates the amount against each schedule and update the ‘Amount Paid’ against each schedule in the ‘Payment Breakup For – (Component Name)’ section of the screen.
You can perform selective liquidation of the fee components as the payment happens, if required. For this, you need to specify the amount in the Amount Paid field for the fee component which needs to be liquidated. The System liquidates only those components for which Amount Paid value is the same as Amount Due. You cannot perform partial payments here.
For those components which are not part of the current fee liquidation, you need to specify the Amount Paid as zero.