2. Corporate Lending - Payments Integration in Co-Deployed Setup
This chapter contains the following sections:
2.1 Introduction
You can integrate Oracle Banking Corporate Lending (OBCL) with Oracle Banking Payments product (OBPM). To integrate these two products on co-deployed environment, you need to do specific maintenances in OBCL, Payments, and Common Core.
2.2 Maintenances in OBCL
The integration between Oracle Banking Corporate Lending (OBCL) and Oracle Banking Payments (OBPM) enables you to dispatch the loan disbursement through cross border payment by generating SWIFT MT103 and MT202 messages.
External System Maintenance
You can invoke this screen by typing ‘GWDETSYS’ in the field at the top right corner of the Application tool bar and clicking on the adjoining arrow button.
You need to define an external system for a branch that communicates with the OBCL using integration gateway.
Note
Ensure in OBCL you maintain an active record with all the required fields and ‘External System’ in ‘External System Maintenance’ screen. For example maintain External System as “INTBANKING”.
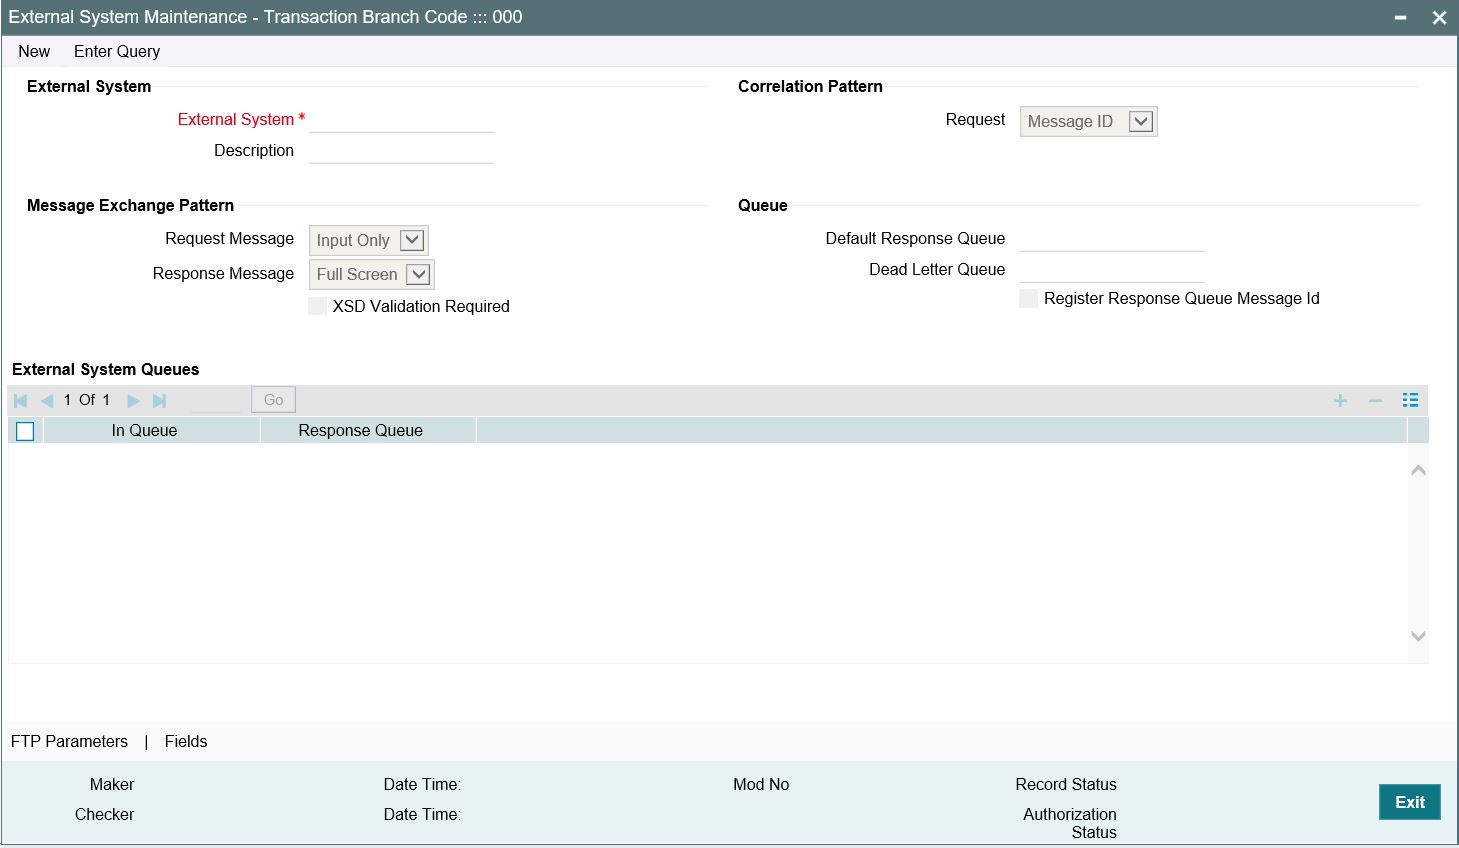
Request
Maintain it as Message ID.
Request Message
Maintain it as full screen.
Response Message
Maintain it as full screen.
External System Queues
Maintain the In & Response JMS queues. These are the queues, where OBCL posts the SPS request XML to OBPM.
For more information external system maintenances, refer to Common Core - Gateway User Guide.
Branch Maintenance
You need to create a branch in ‘Branch Core Parameter Maintenance’ (STDCRBRN) screen.
This screen is used for capturing basic branch details like branch name, branch code, branch address, weekly holiday, and so on.
You can invoke this screen by typing ‘STDCRBRN’ in the field at the top right corner of the Application tool bar and clicking on the adjoining arrow button.
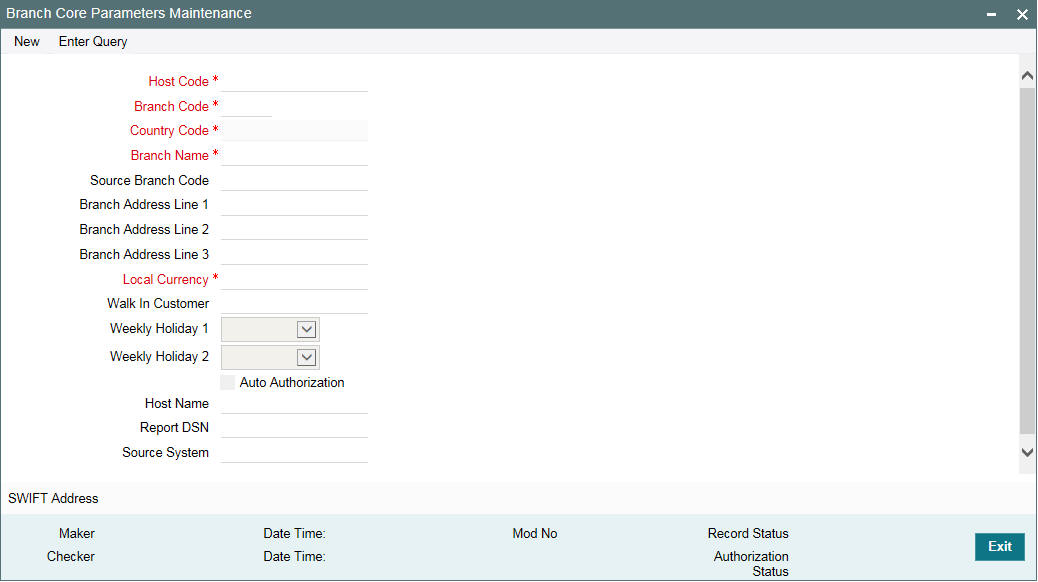
You can specify a host for every branch created. To maintain host for different time zone, refer Oracle Banking Payments Core User Manual.
Note
A pair of branches which can transact inter-branch payments, should be maintained under the same host.
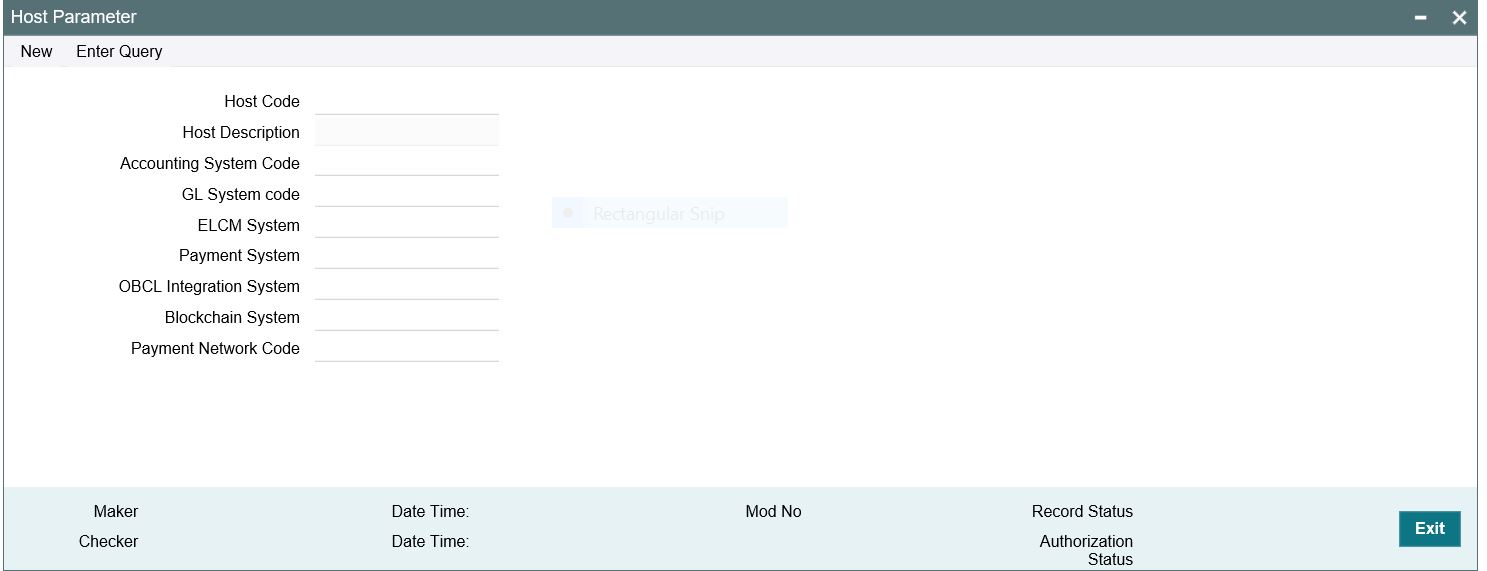
Host Parameter Maintenance
You can invoke this screen by typing ‘PIDHSTMT’ in the field at the top right corner of the Application tool bar and clicking on the adjoining arrow button.
Note
- In OBCL, ensure you maintain host parameter with an active record with all the required fields.
- 'OBCL Integration System' is for UBS integration for 360 and trade integration. 'Payment System' is for OBPM integration, 'INTBANKING' need to be selected.
Specify the following details
Host Code
Specify the host code.
Host Description
Specify the brief description for the host.
Accounting System Code
Specify the accounting system code. For example, “OLINTSYS”
Payment System
Specify the payment system. For example, “INTBANKING”
ELCM System
Specify the ELCM system. For example, “OLELCM”
OBCL Integration System
Specify the external system. For example, “OLINTSYS”, for integration with UBS system.
Block Chain System
Specify the Block Chain system. For example “OLBLKCN”.
Payment Network Code
Specify the Network via which OBPM to send the outbound message, for loan disbursement. For example, “SWIFT”.
Integration Parameters Maintenance
You can invoke this screen by typing ’OLDINPRM’ in the field at the top right corner of the Application tool bar and clicking on the adjoining arrow button.
Note
Ensure you maintain an active record with all required fields and Service Name as “PMSinglePaymentService” in ‘Integration Parameters Maintenance’ screen

Branch Code
Specify as ‘ALL’ in case the integration parameters are common for all branches.
Or
Maintain for individual branches.
External System
Specify external system as ‘INTBANKING’.
External User
Specify the User ID to be passed on the payment request to OBPM.
Service Name
Specify service name as ‘PMSinglePayOutService’.
Communication Channel
Specify the communication channel as ‘Web Service’.
Communication Mode
Specify the communication mode as ‘ASYNC’.
Communication Layer
Specify the Communication Layer as Application.
WS Service Name
Specify the web service name as ‘PMSinglePayOutService’.
WS Endpoint URL
Specify the WSDL of the services as ‘Payment Single Payment Service’ WSDL link.
WS User
Maintain the OBPM user with access to all branches and auto authorize facility.
Customer Maintenance
Customer Maintenance (OLDCUSMT) is mandatory. You need to create a record in this screen for the bank. 'Primary BIC' and 'Default Media' should be 'SWIFT' to generate SWIFT messages.
Settlement Instruction Maintenance
NOSTRO account need to be created for the bank in which the borrower and participant (both) should have their CASA account. This needs to be mapped in LBDINSTR and pay/receive account should be NOSTRO. You need to select NOSTRO account in pay and receive accounts fields, but borrower cannot have NOSTRO account, only bank can have the NOSTRO bank account and you need to select Pay and Receive as BANK id. This is replaced by internal bridge GL while doing the transaction.
Maintain the counter party with all required fields in the ‘Settlement Instructions Maintenance’ screen (LBDINSTR). For more information on settlement instructions, refer to Loan Syndication User Manual.
Inter system Bridge GL
You can invoke this screen by typing ‘OLDISBGL’ in the field at the top right corner of the Application tool bar and clicking on the adjoining arrow button.
Note
Ensure you maintain an active record with all the required fields and ‘External System’ as ‘INTBANKING’ in ‘Inter-system Bridge GL Maintenance’ screen.
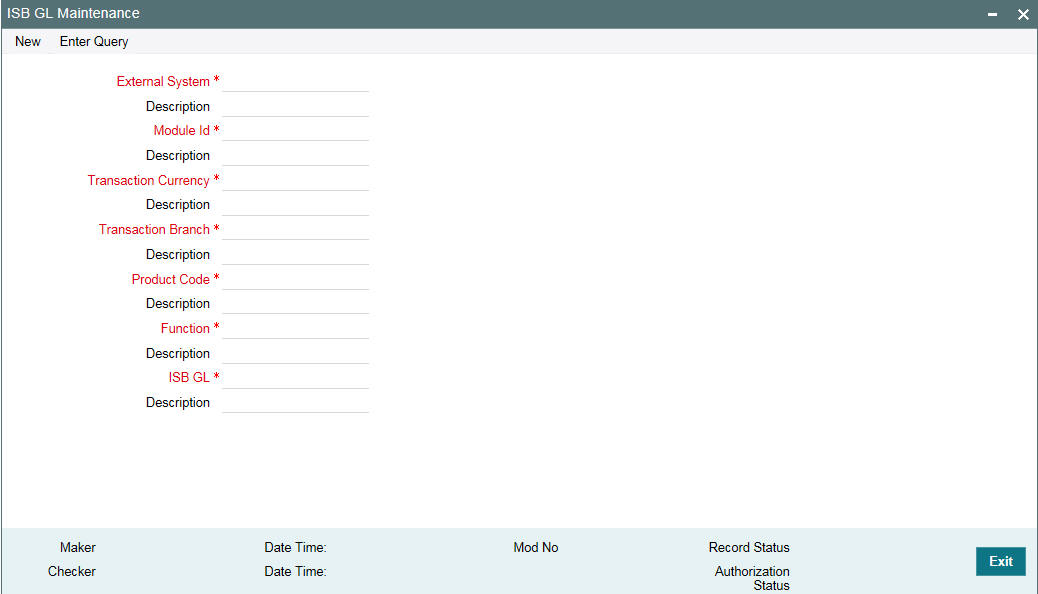
External System
Specify the external system name as ‘INTBANKING’.
Module Id
Specify the module code as ‘OL’.
Transaction Currency
Specify the transaction currency ‘ALL’ or a specific currency.
Transaction Branch
Specify the transaction branch as ‘ALL’ or a specific branch.
Product Code
Specify the product code as ‘ALL’ or a specific product.
Function
Specify the transaction function ids as ‘ALL’ or a specific function id.
ISB GL
Specify an Inter System Bridge GL, where credit from OBCL for a loan disbursement is transferred. The same GL need to be maintained in OBPM for further processing.
2.3 Maintenances in OBPM
Source Maintenance
You can invoke this screen by typing ‘PMDSORCE’ in the field at the top right corner of the Application tool bar and clicking on the adjoining arrow button.
Note
Ensure you maintain an active record with all the required fields in ‘Source Maintenance Detailed’ screen.

Source code
Specify the source code. Example ‘INTBANKING’.
Host code
Host code is defaulted automatically based on the branch.
Prefunded Payments Allowed
Select the ‘Prefunded Payments Allowed’ check box.
Prefunded Payments GL
Specify the Prefunded Payments GL same as the Inter System Bridge GL maintained in OLDISBGL for OBCL.
OBPM debits the disbursed loan amount from this GL & credit the specified Nostro on sending the payment message.
Notification Required
Select the ‘Notification Required’ check box.
External Notification Queue
You can invoke this screen by typing ‘PMDEXTNT’ in the field at the top right corner of the Application tool bar and clicking on the adjoining arrow button.
Note
Ensure you maintain an active record with all the required fields in “External Notification Queue” screen..

Host and Source Code
Specify the source code as ‘INTBANKING’. The host code gets defaulted based on source code.
The gateway external system setup to be done for a source code “INTBANKING”.
Communication Type
Select the communication type as ‘Web Service
Notification System Class
Select the notification system class as ‘OFCL’.
WebService URL
For a given Host code and Source code combination, a web service URL need to be maintained with the OL Service (FCUBSOLService) to get a notification call from OBPM to OBCL.
Service
Specify the webservice as ‘FCUBSOLService’.
Source Network Preference
You can invoke this screen by typing ‘PMDSORNW’ in the field at the top right corner of the Application tool bar and clicking on the adjoining arrow button.
Note
Ensure you maintain an active record in ‘Source Network Preference Detailed’ screen. The preference for various payment networks through which OBCL initiates a payment request needs to be maintained on this screen for the same source codes.
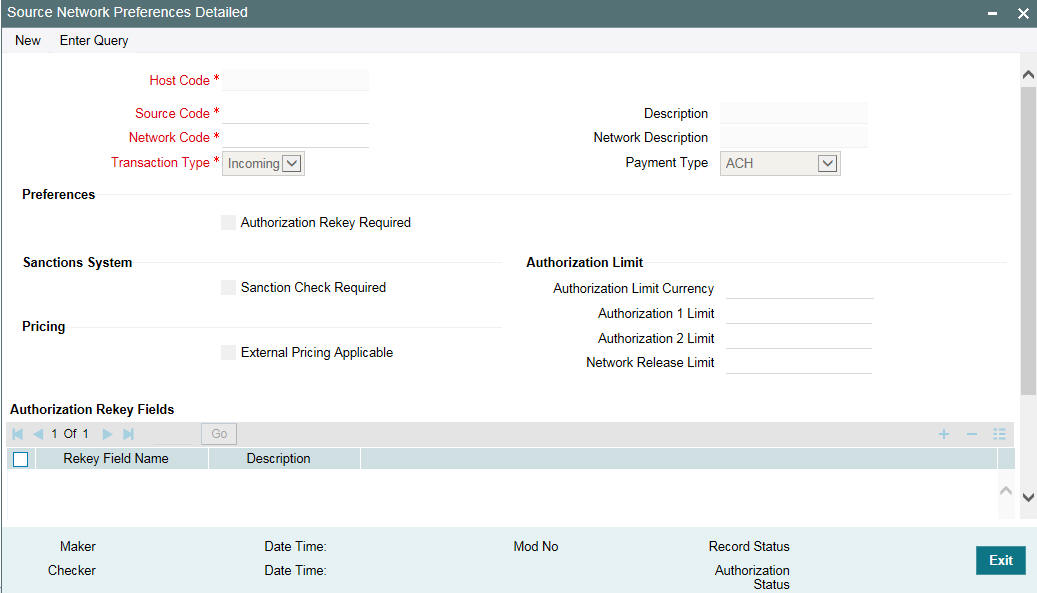
Host and Source Code
Specify the source code as ‘INTBANKING’. The host code gets defaulted based on source code.
The gateway external system setup to be done for a source code “INTBANKING”.
Network Code
Specify the network code as ‘SWIFT’. This is to enable OBPM to trigger SWIFT message for the loan disbursement amount.
Transaction Type
Specify the Transaction Type as ‘Outgoing’, to send the SWIFT message out.
Network Rule Maintenance
You can invoke this screen by typing ‘PMDNWRLE’ in the field at the top right corner of the Application tool bar and clicking on the adjoining arrow button.
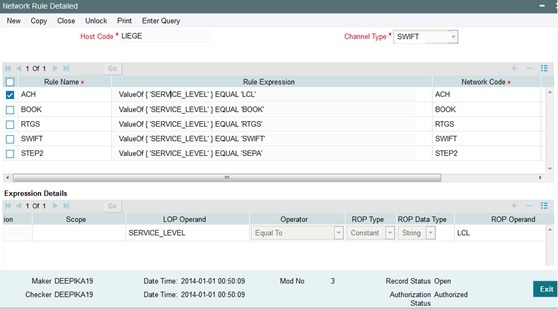
Note
Ensure you maintain an active record with all required fields in ‘Network Rule Detailed’ screen to route the OBCL request to the respective network.
For more information about Network Rule maintenance, refer to Payments Core User Guide.
ECA System Maintenance
Ensure you create an External Credit Approval Check system (DDA system) in the STDECAMT screen. Provide the required source system where the ECA check happens as indicated in the below screen.

You can invoke this screen by typing ‘PMDECAMT’ in the field at the top right corner of the Application tool bar and clicking on the adjoining arrow button.
Map the above mentioned ECA system in the ‘External Credit Approval System Detailed’ screen.
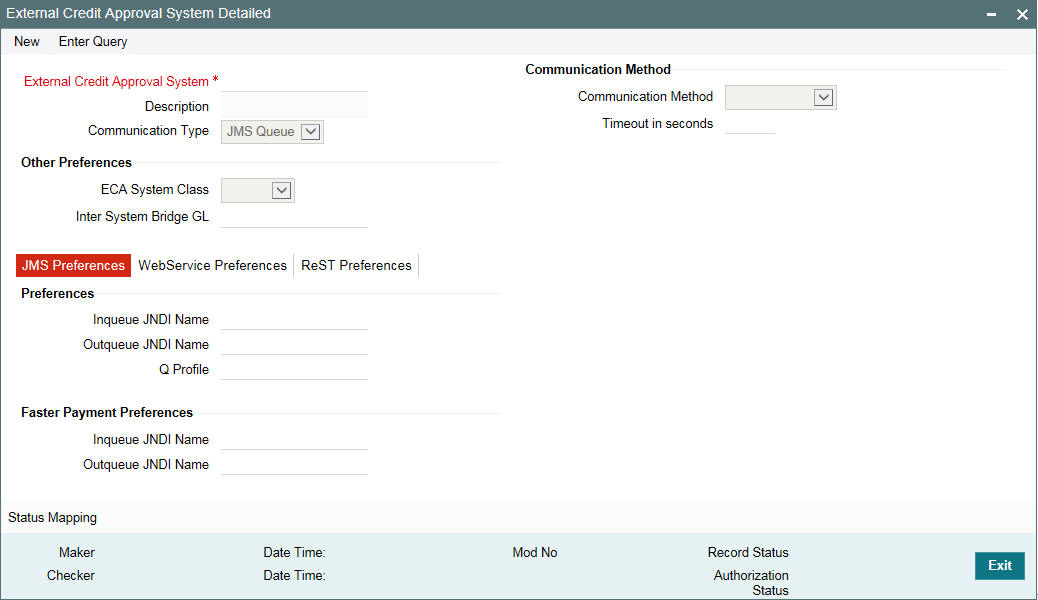
Inqueue JNDI Name
Specify the in queue JNDI Name as ‘MDB_QUEUE_RESPONSE’.
Outqueue JNDI Name
Specify the out queue JNDI Name as ‘MDB_QUEUE’.
Q Profile
Q Profile need to be maintained as per the MDB Queue created on the App Server. Q Profile need to be with an IP Address where the JMS Queue has been created.
The OBPM system posts the ECA request to DDA system through these MDB queues.
For more information about ECA System maintenance, refer to Oracle Banking Payments Core User Guide.
Queue Profile Maintenance
You can invoke this screen by typing ‘PMDQPROF’ in the field at the top right corner of the Application tool bar and clicking on the adjoining arrow button.
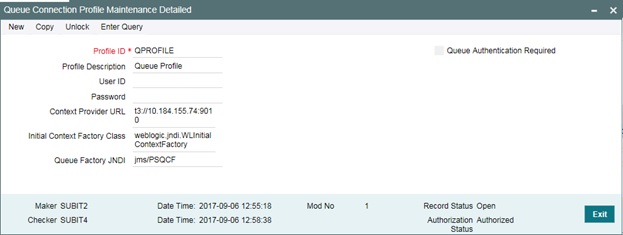
Note
Ensure that you maintain Queue Profile in ‘Queue Profile Maintenance’ screen.
Profile ID
Specify the Queue Connection profile ID.
Profile Description
Specify the profile description
User ID
Specify the user ID.
Password
Specify the password.
Note
User ID and password are used for queue authentication. This ensures external system is allowed only to read or view the messages posted in messaging queue.
Context Provider URL
Queue profile requires the context provider URL of the Application Server where the queue created. All other parameters are same as mentioned above.
Note
OBPM build the ECA request with details and post to MDB_QUEUE. DDA system through GWMDB pulls the gateway request and call internally the ECA block process to create or undo the ECA block. Once the process is completed, the DDA system post the response through gateway infra to MDB_QUEUE_RESPONSE.
MDB_QUEUE_RESPONSE is configured with a redelivery Queue as jms/ACC_ENTRY_RES_BKP_IN. This Queue is internally pull the response through OBPM MDB to complete ECA processing in OBPM.
Accounting System Maintenance
You can invoke this screen by typing ‘PMDACCMT’ in the field at the top right corner of the Application tool bar and clicking on the adjoining arrow button.
This is to enable OBPM to post the accounting entries ( Dr ISBGL & Cr Nostro Ac) to the DDA system, on sending the SWIFT message
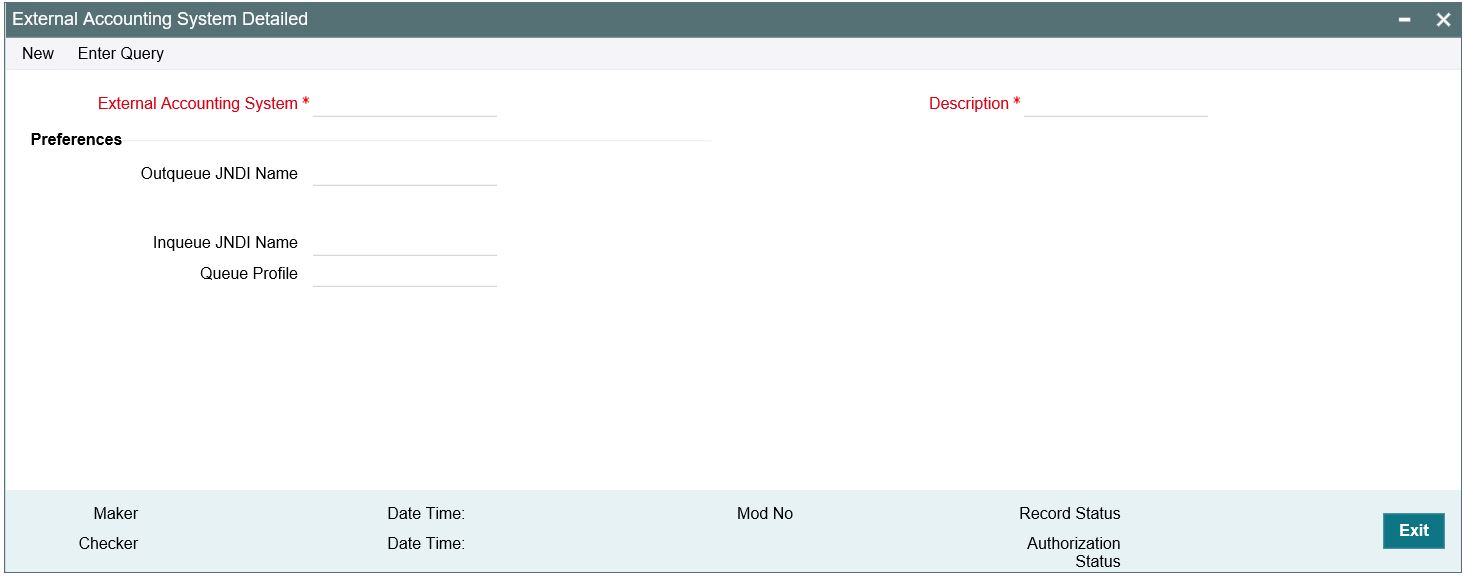
Note
Ensure that you need to maintain the required accounting system in ‘External Accounting System Detailed’ screen. In addition, maintain Account System Mapping for the Accounting System and Networks (PMDACMAP)
Inqueue JNDI Name
Specify the inqueue JNDI Name as ‘MDB_QUEUE_RESPONSE’.
Outqueue JNDI Name
Specify the outqueue JNDI Name as ‘MDB_QUEUE’.
Q Profile
Q Profile need to be maintained as per the MDB Queue created on the App Server. Q Profile needs to be with an IP Address where the JMS Queue has been created.
The OBPM system posts the Accounting handoff request through these MDB queues.
Note
OBPM build the Accounting Handoff request with details and post to MDB_QUEUE. Accounting system through GWMDB pulls the gateway request and call internally the External Accounting request. Once the process is completed, the Accounting system posts the response through gateway infra to MDB_QUEUE_RESPONSE.
MDB_QUEUE_RESPONSE is configured with a redelivery Queue as jms/ACC_ENTRY_RES_BKP_IN. This Queue internally pull the response through OBPM MDB to complete Accounting Handoff processing in OBPM.
Currency Correspondent Maintenance
For SWIFT / Cross border payments the bank should maintain the currency correspondent i.e. the bank’s correspondents so that the payment can be routed appropriately. The payment chain is built using the currency correspondent maintenances
The bank can have multiple currency correspondents for the same currency but a particular correspondent can be marked as the primary correspondent so that the payment is routed through that bank even though there are multiple correspondent banks.
Currency correspondent maintenance (PMDCYCOR) is used in payment chain building for Cross-border payments. This is a Host level maintenance. Currency, Bank BIC and Account number can be maintained for the correspondent.You can invoke this screen by typing ‘PMDCYCOR’ in the field at the top right corner of the Application tool bar and clicking on the adjoining arrow button.

Maintain the AWI or AWI’s Currency Correspondent on this screen.
Host Code
The system displays the host code of the selected branch of the logged in user.
Bank Code
Select the Bank Code from the list of values displayed. Selected BIC Code is displayed in this field.
Currency
Specify the currency. Alternatively, you can select the currency from the option list. The list displays all valid currencies maintained in the system.
Primary Correspondent Check
This box if this correspondent is the primary currency correspondent. There can be only one primary currency correspondent for the combination of Account type, Currency. Account Type Select the account type. The list displays the following values:
- Our- Account maintained with the correspondent input in the Bank Code field.
- Their- Account maintained by the correspondent input in the Bank Code field with the Processing bank (Nostro account).
Account Type
Specify the account type as Our – the Nostro of the Correspondent which is maintained in our books.
Account Number
Specify the account number associated with the correspondent input in the Bank Code field in the specified currency.
Alternatively, you can select the account number from the option list. The list displays all Nostro accounts for Account type OUR and valid normal accounts for account type THEIR. The account currency displayed in the list should be same as the currency specified.
Primary Account
Select this check box to indicate if the account is the Primary Account. You can add multiple accounts. But only one account can be marked as Primary Account. This indicates that the account marked as Primary account is the key account for the ‘Host Code, Bank Code, Currency’ combination maintained.
MT 210 required?
Select this check box to indicate if MT 210 is required to be sent to the Currency Correspondent in the scenarios where it is auto-generated like generation of Outbound MT 200/MT 201. Only if this check box is selected, the system generates the MT210
Reconciliation External Accounts Maintenance
You can invoke this screen by typing ‘PXDXTACC’ in the field at the top right corner of the Application tool bar and clicking on the adjoining arrow button.

Maintain the Vostro account number, (equivalent of the Nostro) that is maintained in the Correspondent’s books. This will be sent in the 53B tag in the MT103 & MT202 Cover messages.
Reconciliation Class
Maintain it as NOST.
External Entity
Specify the Correspondent’s BIC.
External Account
Specify the Vostro Account Number.
Account GL
Specify the Nostro Account Number. This should exist in STDCRACC as a Nostro Account.
RMA or RMA Plus Details
Relationship Management Application details are to be maintained here and allowed Message Category and Message Types are to be provided. Correspondent should be our bank BIC code (for direct relation).
You can invoke this screen by typing ‘PMDRMAUP’ in the field at the top right corner of the Application tool bar and clicking on the adjoining arrow button.
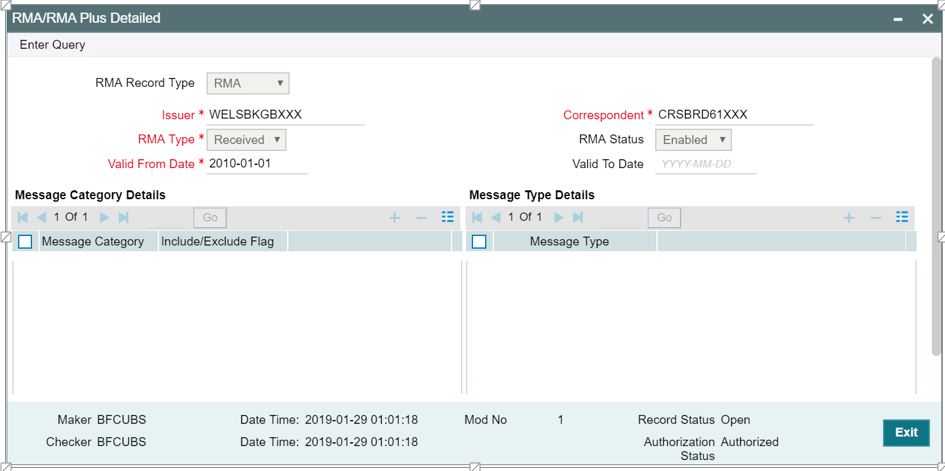
RMA Record Type
The system would indicate if this is a RMA or RMA+ authorization record based on the details of the uploaded or manually created RMA authorization record.
Note
If the uploaded RMA file has included or excluded Message Types in different Message categories, then this would be RMA+ record. If not, the record is an RMA record.
Issuer
Select the required BIC of bank branch that has issued the authorization to receive All or particular message types (in case of RMA+) from the available list of values.
RMA Type
Specify the RMA Type. Choose between Issued and Received from the drop down.
Valid From Date
Specify the start date of validity of RMA authorization
Correspondent
Select the BIC of bank branch, which has received the authorization from Issuer bank from the list of values.
RMA Status
Select the status of the RMA from the drop down. The options are Enabled, Revoked, Deleted and Rejected.
Note
Only ‘Enabled’ RMA authorizations are used for RMA validation.
Valid To Date
Specify the End date of validity of RMA authorization.
Message Category Details Grid
Message Category
Select the required Message Category from the drop down.
Include/Exclude Flag
If this is being created as RMA+ record, select the flag for each Message category indicating ‘Include’ or ‘Exclude’ of one or multiple or ALL Message Types (MTs) that are authorized by the Issuer bank.
Message Type Details
Message Type
If this is being created as RMA+ record, then specify a list of ‘Included’ or ‘Excluded’ the Message Types to be added for each Message Category.
Note
- If All MTs within a Message Category are to be included then the Include/Exclude flag should indicate “Exclude” and no MTs should be selected in the Message Type Details grid. This would mean ‘Exclude – Nothing’ i.e. all MTs within the category are included in the RMA+ authorization.
- If All MTs within a Message Category are to be excluded then the Include/Exclude flag should indicate “Include” and no MTs should be displayed in the Message Type Details grid. This would mean ‘Include – Nothing’ i.e. none of the MTs within the category are included in the RMA+ authorization.
- The screen should not list any Message Category that is not allowed as part of the RMA+ authorizations issued by the Issuer bank.
As mentioned above, any modifications to existing authorizations are allowed only from Head Office
- For the selected pair of Issuer and Correspondent BICs and RMA Type,
the following attributes would be allowed to be changed –
- RMA Status - Status can be changed to any of the available Options – Enabled, Revoked, Deleted and Rejected.
Note
In reality, RMA Status cannot be changed to any option as it depends on who is the Issuer BIC, current status and other factors. However, these status changes happen in the RMA/RMA+ module of SAA and the Modification facility is only allowed for Ops users to manually replicate the status in this maintenance (if they cannot wait till the next RMA upload).
- – Valid From Date – New (modified) date that is greater than existing ‘Valid To’ Date can be set.
- – Valid To Date – New date that is greater than New ‘Valid From’ Date can be set.
- – Deletion of existing Message category and/or Message types.
- Addition of new Message Category and/or Message Type along-with Include/ Exclude indicator.
A new authorization would be possible to be created by copying an existing authorization and then modifying the same.
Modifications to existing authorizations as well as creation of new authorizations would need approval by another user or by the maker (if the branch and user supports Auto-authorization facility).
2.4 Common Core Maintenance
The following common core maintenances need to performed for integration.
- Customer Maintenance
- Create the customers in STDCIFCR.
- Account Maintenance
- Create the Accounts (CASA / NOSTRO) in STDCRACC.
- NOTSRO account need to created for the bank in which the borrower has the CASA account.
- OBPM to use OFCUB Dates
- Maintain IS_CUSTOM_DATE parameter as ‘Y’ in cstb_param table.
- Maintain OBCL_EXT_PM_GEN parameter as ‘Y ‘in CSTB_PARAM to handover the request to OBPM
- By this, OBPM will use the ‘Today’ from sttm_dates as the transaction booking date.
- BIC Code Details Maintenances
- The BIC Code is a standardized international identifier and which is used to identify entities and to route Payment Messages. You can define bank codes through the ‘BIC Code Details’ screen (ISDBICDE).
- Other Payments Maintenances
- Refer Oracle Banking Payments Core User Manual, for the other Day 0 maintenances.
For detailed information on above mentioned screens, refer to Oracle Banking Payments Core User Manual.