2 Operations
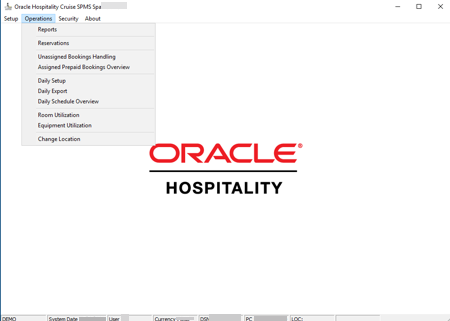
Figure 2-1 Operations Window
Reservations
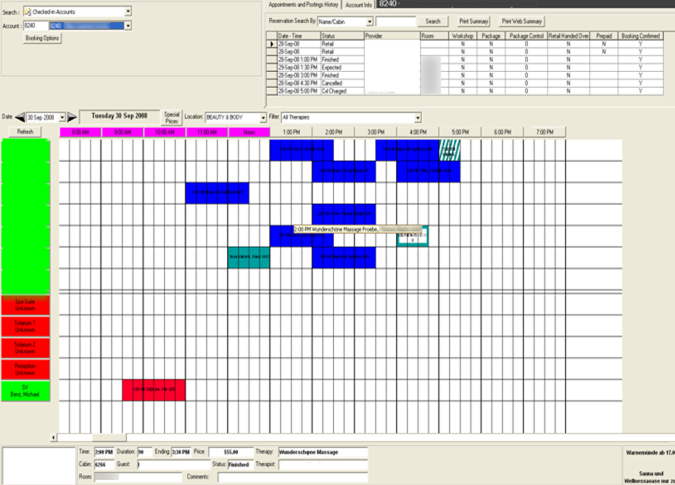
Main Reservations Screen (Booking Calendar Overview)
The Booking Calendar is the main form in the Spa Management System.
To display the Booking Calendar, select Reservations from the Operations main menu.
Note:
You can add, update, cancel, check-in and complete a reservation. The form provides grids to look-up and display guest information by a variety of look-up criteria.Figure 2-2 Booking Calendar Overview
-
Right-click on a row of the Appointments Grid. On an appointment or on an empty space will display different context menus will appear. From the Guest selection, you can create a new regular Reservation, add a new Package or create a Retail posting for the selected guest.
-
You can edit, cancel, no show, check-in, post, view posting, void posting or print the appointment ticket.
-
In the Booking Calendar, you can use the Suggest feature, Add a Reservation, Add a Package or a Workshop, and Block the Schedule.
-
From an Appointment, you can Edit, Cancel, No Show, Check-In, Post, View Posting, Void Posting, Print the Appointment Ticket, create a new Block Schedule or Add a Reservation or a new Package or Workshop depending upon the status of the appointment.
Guest Selection
Guest Information can be queried by Guest last Name or Stateroom Number by entering look-up information into the Account field and pressing the Tab Key.
Figure 2-3 Account Info

Query Appointments
Appointments can be queried by selecting a type of query to run, and then entering search criteria for that query.
The system supports query by Name/Cabin for checked in guests, query of all reservations due in today, all reservations due in on a specific date, and all guests that are currently marked as in the Spa.
Figure 2-4 Query Appointments

The appointment query is normally set to Due In Today so that the receptionist can easily take new reservations on other dates while checking in and completing appointments for today.
Viewing an Appointment Status
When you hover the mouse pointer over an appointment, the current information about that appointment appears in the selected Appointment Information frame.
Figure 2-5 Status Appointment

A tool tip also appears when hovering over your mouse cursor over an appointment with guest information.
Changing Locations
You can request a booking calendar for a different location by selecting the location for the Location drop-down combo box.
Figure 2-6 Changing Locations

Changing Dates
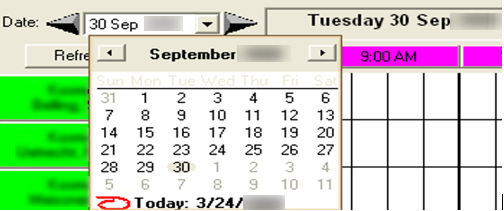
You can request a booking calendar for a different date by clicking the arrow buttons on each side of the date, or by selecting a new date by clicking on the date editor.
Figure 2-7 Changing Dates
Changing Size of the Form
-
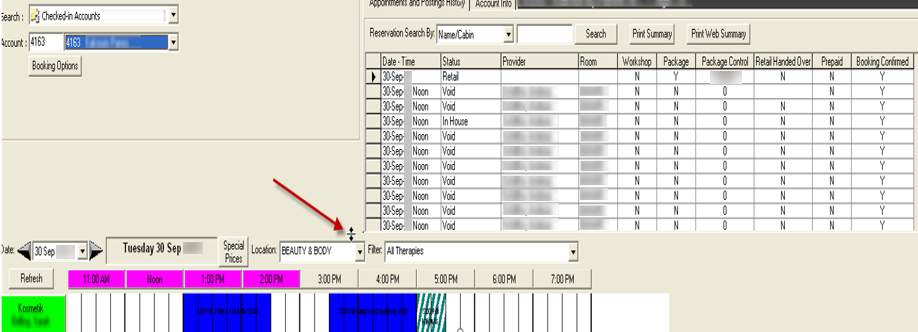
When the pointer turns into a double-headed horizontal arrow, left-click and drag the mouse to adjust the size of the grids.
-
You can achieve a similar form sizing between the lower displayed Booking Calendar and upper Account Selection and Appointment & Posting History grid by placeing the mouse pointer just above the Date/Area/Filter labels.
Figure 2-8 Changing Size Form
Making Reservations
-
Double-click on any white space on the Booking Calendar.
-
Right-click anywhere on the Booking Calendar and select Add Reservation.
-
Select a guest, click on Booking Options and select Add Reservation.
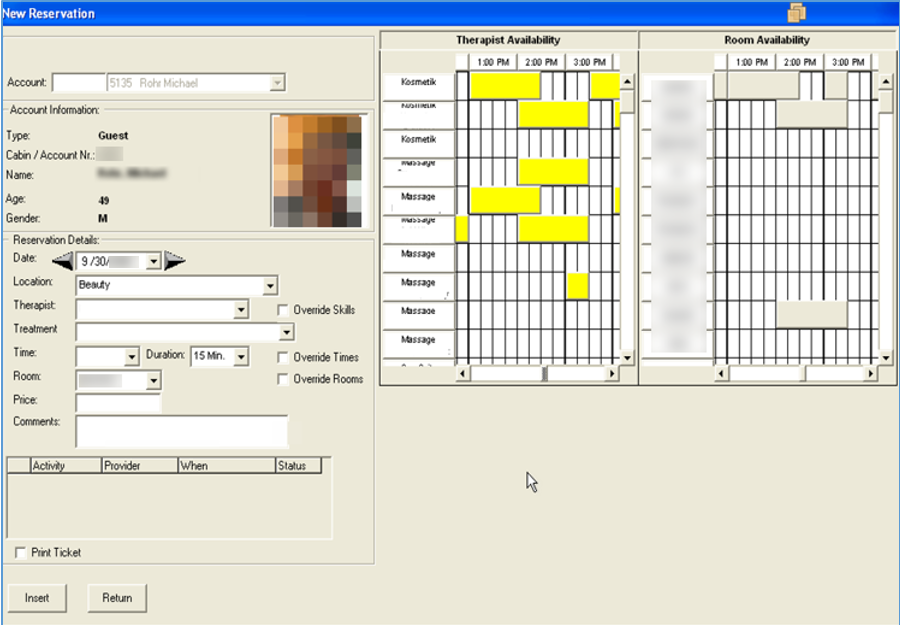
Figure 2-9 New Reservation
-
If the guest is selected in the Guest selection, then the information for that guest is brought forward to this form.
-
If the guest has any other Spa appointments, the guest and status are listed in the grid at the bottom..
-
If the start of the reservation is from the Booking Calendar, the Therapist name and Time of the reservation, pre-fill based on where the Booking Calendar is selected.
-
If no guest is pre-selected, the New Reservation form offers a similar Guest selection area so that you can select the correct guest for the upcoming Treatment appointment.
Table 2-1 Description of the Blocks that appear on the New Reservation Setup
| Blocks | Description |
|---|---|
|
Gray & Dark Green |
Therapist is blocked during that time. |
|
Yellow |
Therapist already has an appointment during that time. |
|
Lighter Green |
Current selected time and duration for the appointment. |
Performing Overriding Skills
Select the Override Skills check-box. Answer Yes to “Load all treatments regardless of skills?”
-
Click on Override Times check-box.
-
Select Treatment, Time and Duration and Room assignment for the appointment.
-
Click Insert.
-
If the Print Ticket check box is checked, the system sends a reservation ticket to the ‘Ticket’ printer.
Editing Reservations
-
Select Edit Reservation from the context menu,
-
Alternatively, search for the appointment using the Reservation Search By area, select the appointment to be changed, right-click and select Edit Reservation from the context menu.
-
Make any required changes to the reservation and click Update to store the change into the database. When the form closes, any changes reflect in the Booking Calendar. If the Print Ticket check box is checked, a revised reservation ticket prints to the Ticket Printer.
Note:
Only Expected Reservations can be edited. The current information about the reservation appear in the Edit Reservation form.
-
Right-click on the reservation in the Booking Calendar.
-
Select Check In from the context menu.
-
Alternatively, search for the appointment using the Reservation Search By area, select the appointment to be check in, right-click and select Check In from the context menu.
-
If the appointment includes a comment, the comment appears in a Message Box. The color of the reservation changes to match the In-House Appointment image.
-
If an Appointment is incorrectly checked in, it can be placed back into expected by right-clicking the appointment in the Booking Calendar or Appointments grid, and selecting UnCheckIn from the context menu.
-
Finishing Reservations
-
Finish &Post>
-
Finish without Posting>
-
To Finish & Post, right-click the appointment on the Booking Calendar and select Finish & Post from the context menu.
-
Alternatively, search for the appointment using the Reservation Search By area, right-click and select Finish & Post from the context menu. At the Spa Posting Logon, either swipe the board card or enter thei user-id/password into the form.
-
Click OK. Once the User ID and Password are accepted, the Posting form appears with the service and any associated retail items in the posting box.
Figure 2-10 Posting
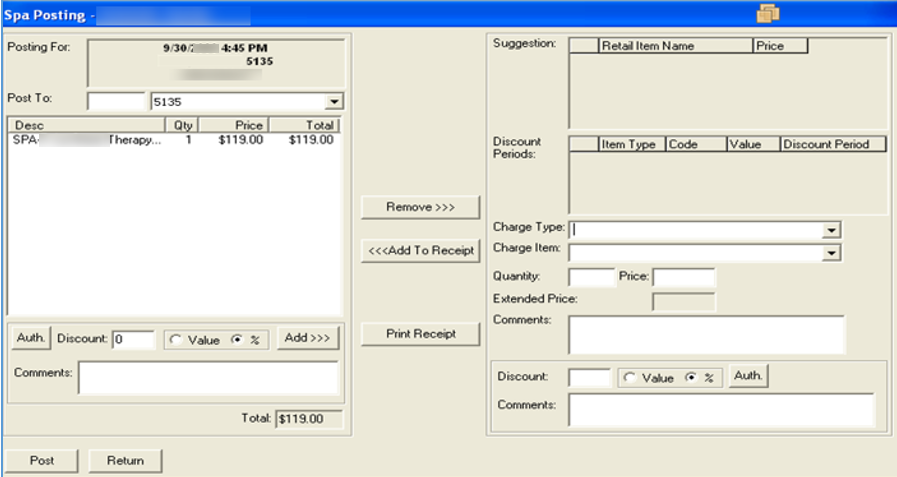
To change where the charge will be posted (Payer Account), you can enter a new cabin, name or account in the Post To textbox, and a posting account is selected from the drop-down box.
-
If the Treatment of the reservation includes suggested retail items, they will appear in the Suggestion grid. Double-click on a retail item in the Suggestion grid to move it to the posting box. You can add additional charges for other services or retail products to the posting area by selecting a Charge Type, a Charge Item, entering a Quantity , and clicking the Add To Receipt.
-
Finish without Posting (any charges)
-
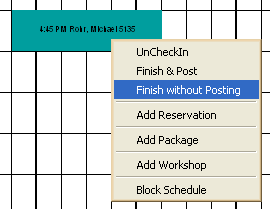
Right-click the appointment on the Booking Calendar and select Finish without Posting from the context menu.
-
Alternatively, search for the appointment using the Reservation Search By area, select the appointment, right-click and select Finish without Posting from the context menu. You will be prompted to confirm your selection with the following message: Are you sure you want to set the status of this Reservation to Finished without Posting it?
Figure 2-11 Finish Without Posting
Entering a Tip
-
Click Print Receipt to print a receipt of all pending charges to the receipt printer. The receipt is given to the guest for signature and to capture the tip amount prior to posting.
-
Select the Charge Type of Miscellaneous and the Charge Item of Tip.
-
Enter the Tip amount from the signed receipt.
-
The Spa Posting form automatically calculates the Treatment and Retail discounts based on the start time of the appointment and the discount times set up for the day. Authorized users can change the price or discount percent on any item added to the posting area.
-
To remove a charge from the posting, select it in the Post To area, and click Remove.
Note:
If the Return is selected, additional charges added to the posting area will be removed, and will have to be re-entered the next time the Finish and Post option is selected for that Appointment.Undoing Finish Option
-
Click the Print Receipt to print a receipt of all pending charges to the receipt printer. The receipt is given to the guest for signature and to capture the tip amount entered.
-
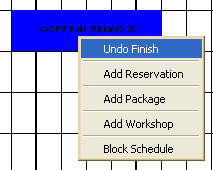
Right-click on the appointment and select Undo Finish.
-
Click OK.
-
Figure 2-12 Undo Finish
-
Right-click the appointment from the Booking Calendar.
-
Select Cancel from the context menu.
-
Alternatively, search for the appointment using the Reservation Search By area, select the appointment to cancel, right-click and select Cancel from the context menu.
Figure 2-13 Cancel

-
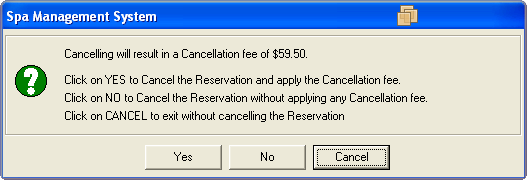
If the reservation is within the cancellation period based on the cancellation rules, a message displaying a warning that a cancellation feel will apply.
Figure 2-14 Cancellation Fee
-
If you select:
-
Yes, the cancellation fee appears on the Spa Posting form and is placed in the Posting Area.
-
No, the selected appointment is canceled without posting a Cancellation Fee.
-
Cancel, then the reservation will not be canceled.
-
No-Show Appointments
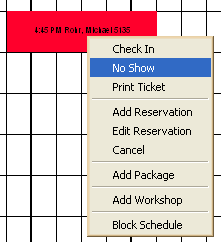
Once an appointment is late, the appointment on the Booking Calendar appears using the “Late Appointment” image.
Figure 2-15 No Show
-
Click on No Show.
-
If you select Yes the No Show fee is calculated and placed in the Posting Area. You can then adjust the fee if required and post it to the guest account.
-
If you select No, the appointment is set to No Show without a charge. If you to click Cancel, then the reservation will not be canceled.
Posting Services and Retail without a Reservation
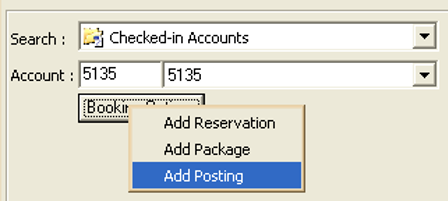
Figure 2-16 Add Posting
-
Select the appropriate guest, click Booking Options, and select Add Posting.
-
Swipe your board card or enter the user-id/password, click OK.
- Select Charge Types and Charge Items from the drop-down list, add them to the Posting Area, and post the transaction.
Ability to Assign Discount Percentage on the Entire Invoice During a Posting Process
-
By default, the Discount Percentage textbox is disabled, as with the right side of the Discount Percentage textbox, and is enabled if you have the User Access Rights checked after clicking the Auth.
-
After the user is verified, the Discount Percentage textbox gets enabled to accept valid Discount Percentage values (0-100).
-
Only after those values are verified as correct, the Add>>> button is enabled. Click the Add>>> button to start the process of applying a 10 percent discount on all items.
Figure 2-17 Spa Posting
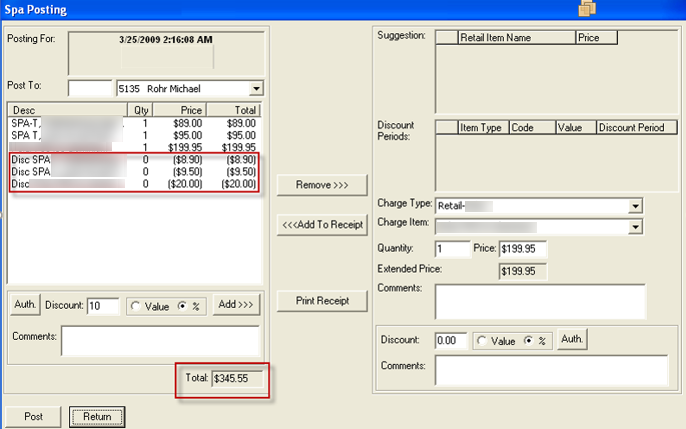
The above figure shows a 10 percent discount is applied to all three listed items in one easy step. The system only allows you to apply the discounts as long as there are no other discounts already applied, this way or the existing way from the right side of the screen.
For example, in a case where you applied a 10 percent discount to all three items, clicking the Add>>> button again results in the following warning message “Discounts already exist! Adding more Discounts not possible.”
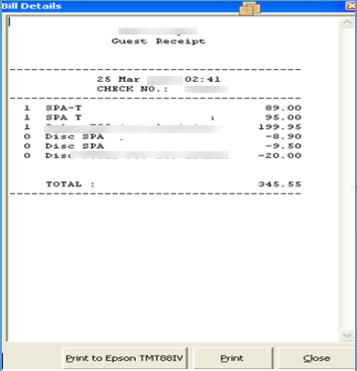
When the Discount percentage is correctly applied, clicking Post posts all items with their Discount Percentage values into the Accounts. The Billing Image of this posting is viewable in Management.
Figure 2-18 Bill Details
Viewing a Posting
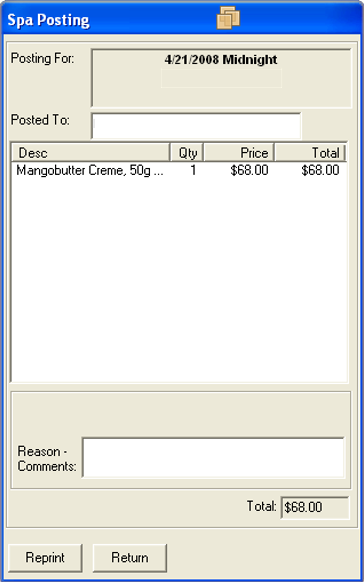
To view a posted appointment or retail sale, select the appointment from the Appointments Grid or Booking Calendar. Right-click and select View Posting from the context menu. The Spa Posting form displays all of the details for the posted appointment.
Once displayed, the receipt for the posting can be reprinted by clicking Reprint.
Figure 2-19 Spa Posting (View)
Voiding a Posting
To void POS transactions for an appointment, a retail sale or a cancellation/no show fee, select the appointment from the Appointments Grid or the Booking Calendar, right-click, and select Void Posting from the context menu.
The Spa Posting form will display the information needed to void the posting. When you click the Void, all charges are reversed and the appointment is marked as a status “V” for Voided. If the posting was for a true appointment, the new appointment record is created with a status of “I” for In-House.
Blocking Time
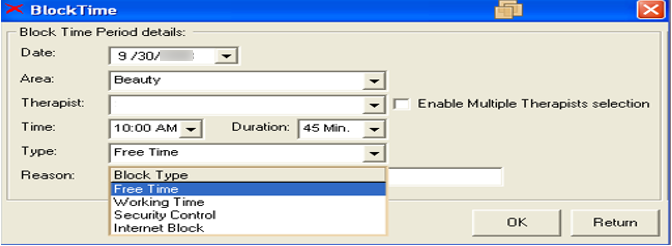
Blocked Time represents time when a therapist is not available to take appointments.
-
Free Time.
-
Working Time.
-
Security Control.
-
Internet Block.
To distinguish these different Blocked Time options in the screens where the schedules are displayed, the following colors are used.
Table 2-2 Description of the Blocks that appear on the New Reservation Setup for Blocked Time
| Block Colors | Description |
|---|---|
|
Original Gray |
Free Time. |
|
Dark Gray |
Working Time. |
|
Dark Green |
Security Control. |
|
Black |
Internet Block. |
On the Reservations screen, where a lot of information is displayed, the Working Time Type appears in a dark gray color with white fonts. To enter a blocked time, right-click on the Booking Calendar and select Block Schedule from the context menu.
Figure 2-20 Block Time
Quick Time Blocking
-
You must select the Enable Multiple Therapists selection check box to expand the Block Time form and display the Multiple Therapists assignment list box.
-
Once you have selected all necessary Therapists, click OK to automatically create all Blocked Times for all selected Therapists.
Note:
Ending a Blocked Time schedule is only allowed on a one to one Therapist basis.Multiple Reservations — Workshops
Workshops are defined as specific Group Treatments, such as Yoga, Walking and Aerobic or Hairstyling workshops, where multiple participants (Attendees) are assigned.
Similar to regular Spa Reservations, Workshops are handled in the daily schedule as appointment blocks using the following options:
Table 2-3 Description of the Multiple Reservation Workshops Overview
| Option | Description |
|---|---|
|
Add Workshop |
Create the original Workshop Reservation. |
|
Edit Workshop |
Add or remove Workshop Attendees. |
|
Check-In / Un-Check-In Individual Workshop Attendees |
Check-In or Un-Check-In Individual Workshop Attendees as they show up. |
|
Cancel Workshop |
Cancel entire Workshop with the option to apply Cancellation Fees to all or selected Workshop Attendees (supports Cancelling Workshops without any Cancellation Fee posting). |
|
No Show Workshop |
No Show entire Workshop with an option to apply No show Fees to all or selected Workshop Attendees (supports the No Show Workshop without any No Show Fee posting). |
|
Finish & Post Workshop |
Finishing the Workshop with the option to apply the Workshop therapy amounts to all or selected Workshop Attendees. |
To distinguish between regular Guest Reservations blocks, and Workshop Reservations blocks, you can use the same colors but different styles.
Figure 2-21 Workshops
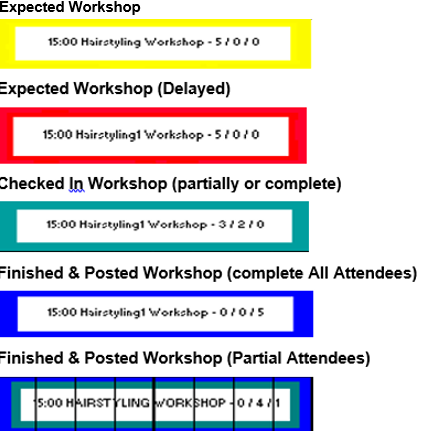
Since there is limited space to display all Workshop participants in the Daily schedule block, the Workshop Reservation block contains the following information:
Figure 2-22 Workshop Hairstyling

Hover your mouse pointer over the Workshop Reservation block to display the following information in the tool tip text as shown in the above figure.
Another way of displaying more detailed information about each Workshop Reservation is at the bottom of the Reservations screen, where an enhanced Workshop Information area is created to display all Workshop relevant data when hovering the mouse pointer over the Workshop Reservation block.
Figure 2-23 Workshop Reservation

For a detailed listing of all Workshop Reservation related data as well as the Workshop participants, the above described Edit Workshop option appears all necessary information related to the selected Workshop.
Similar to regular Spa Reservations, you can create Workshops by selecting the option Add Workshop from the right-mouse click context options.
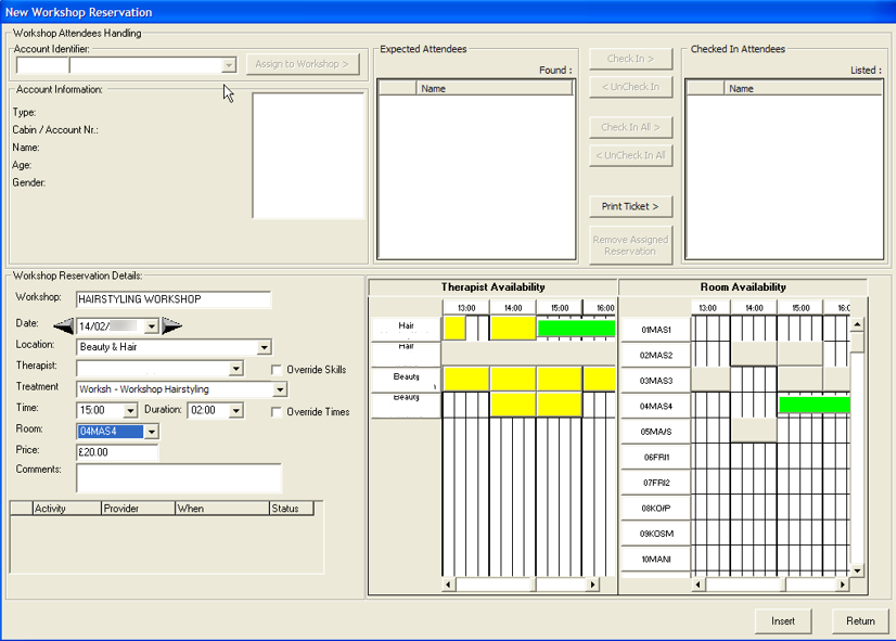
The New Workshop Reservation screen that opens is similar to the regular Spa Reservation screen with additions to handle Workshop specific requirements.
Figure 2-24 New Workshop Reservation
-
An account selection area created to search for Accounts and assign them to the workshop.
-
A list box displays all Expected Workshop Attendees as well as Checked In Attendees.
-
Check In and Expected Attendee.
-
Check In All listed Expected Attendees in one single step.
-
Un-Check In a selected Checked In Attendee.
-
Un-Check In all listed Checked In Attendees in one single step.
-
Remove selected Expected Attendee from Workshop.
-
Print individual Workshop Tickets for selected Checked In Attendees.
When you first create a Workshop Reservation using the Add Workshop option, you can only create the Workshop Reservation during the initial creation. You need to create the Workshop Reservation before you can see the necessary options to control the Workshop attendees such as assign Attendees, Check In Attendees, and Un-Check In Attendees.
In the example shown in the screenshot above, a Workshop is created with the description “Hairstyling Workshop”. Then, you can select the appropriate Treatment and, Workshop Hairstyling, and assign the correct starting time and Room. When ready, click the Insert button.
The Workshop created will appear in the main Reservations time plan.
Figure 2-25 New Attendees
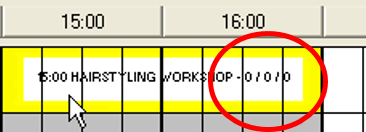
There are still no Attendees assigned, therefore values for Assigned / Checked In / Posted attendees are zero.
Editing Workshop Reservations and Assigning Attendees into Workshops
-
Right-click over the Workshop Reservation and select Edit Workshop. The Edit Workshop Reservation screen that opens is the same as the one you used before to create the Workshop Reservation except that you can now assign Attendees to the Workshop.
You can also review and change all Workshop Reservation related information from within this screen. The cursor is positioned at the Account Identifier field and is ready to search for Accounts.
-
Select the appropriate account and click Assign to Workshop.
- The selected Account is moved to the Expected Attendees list box and the Expected Attendees count shows the number 1.
Figure 2-26 Workshop Attendees Handling

You can also assign more Accounts at the same time, assuming that you know other guests that would like to participate in this Workshop or you could assign them later.
Note:
The Remove Assigned Reservation option becomes available once you have an Attendee assigned to the Workshop. You can remove an Attendee you select from the Expected Attendees list box, if you want to correct a wrongly entered assignment.To edit Workshop Reservation data, click Update to save the Workshop Reservation related data you just updated. This addition of the first attendee is reflected in the Workshop Reservation block.
Figure 2-27 Expected

This is also shown in the Workshop Reservation data.
Figure 2-28 Expected Workshop

-
Right-click the Workshop Reservation and select Edit Workshop from the context menu options.
-
Select the appropriate account and click Assign to Workshop.
-
Click Return to close the Edit Workshop screen.
Checking-In Workshop Attendees
After all the Attendees are successfully assigned to the Workshop as Expected, you can check them in using one of these options:
-
Right-click the booking menu and select the first option, Checkin Entire Workshop to automatically check in all workshop attendees.
-
Confirm your selection by answering Yes in the context message.
-
The system automatically checks in all Expected Attendees and the Main Reservations time plan is being refreshed to reflect this change.
-
Select the option Checkin Workshop Attendees.
-
This opens the Edit workshop reservation screen, where all Expected Attendees are listed in the appropriate Expected Attendees list box. The buttons Check In > and Check In All > are enabled to allow you to check in specific or all Expected Attendees. Selecting the correct name from the Expected Attendees list and clicking the Check In button does the following:
-
Checks in the selected attendee and moves it into the appropriate Checked In Attendees list box.
-
Removes the selected attendee from the Expected Attendees list box.
-
While checking In the Workshop Attendees, the Edit Workshop Reservation screen allows you to complete any of the following tasks that you might want to do.
-
Selecting and assigning new attendees into the Workshop by using the Account Identifier search capability as well as using the Assign to Workshop.
-
Removing already assigned attendees from the Workshop, by selecting the Remove Assigned Reservation for a selected Expected Attendee.
-
Editing Workshop Reservation related data, such as Room, Starting Time or Comments.
-
-
Click Return to close the Edit Workshop screen and go back to the Main Reservations time plan. Remember to click Update in case you have performed any changes in the other Workshop Reservation related data that needs to be saved.
-
The Workshop reservation block reflects the status change of the first Checked in Attendee.
Un-checking In Workshop Attendees
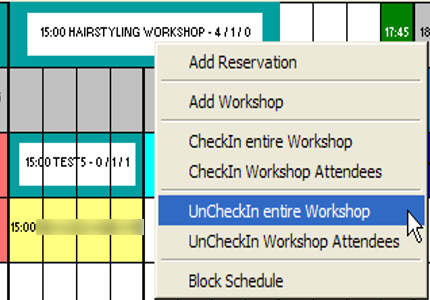
If there are situations where you would like to Un-Check In some or all of the Workshop Attendees, below are the available options for Un-Checking In all the Workshop Attendees in one single step.
Figure 2-29 UnCheck Entire Workshop
-
Selecting the first option UnCheckIn entire Workshop will automatically uncheck-in all the attendees.
-
Confirm the selection by selecting Yes in the context message.
-
The system automatically un-checked in the Expected Attendees and the Main Reservations time plan is refreshed to reflect this change.
Note:
Due to all Attendees status being updated to Expected, the entire Workshop Reservation block also turned Yellow to reflect the overall Workshop Expected status.-
Select the UncheckIn Workshop Attendees option. The Edit Workshop Reservation screen shows the Expected Attendees (listed in the appropriate Expected Attendees list box) and the Checked In Attendee (listed in the appropriate Checked-In Attendees list box), if any.
-
Select one of the Checked-In Attendees from the Checked-In Attendees list and click UncheckIn and move it into the appropriate Expected Attendees list box. This removes the selected Attendee from the CheckedIn Attendees list box.
Note:
The < UnCheck In and < Un Check In All buttons become unavailable when there are no any attendees in the list.In the process of Un-Checkin the Workshop Attendees, the Edit Workshop reservation screen still allows you to complete any of the following tasks:
-
Selecting and assigning new Attendees to the Workshop by using the Account Identifier search capability as well.
-
Removing already assigned Attendees from the Workshop Use the Remove Assigned Reservation for a selected Expected Attendee to remove an assigned attendee.
-
Editing Workshop Reservation related data, such as Room, Starting Time, or Comments.
-
-
When finished click Update and then the Return to close the Edit Workshop screen to ensure that the changes you have performed in other Workshop Reservation related data is saved. The Workshop Reservation block reflects the status change of the first Checked In Attendee back to Expected.
Finishing & Posting the Entire Workshop
When the Workshop is completed, the system gives you the option to assign it as Finished and post the appropriate Treatment fees into the Attendees accounts.
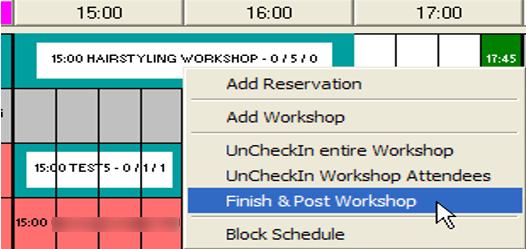
To Finish & Post a Workshop reservation, right-click and select the Finish & Post Workshop option.
Figure 2-30 Finish & Post Workshop
-
An accounts information area where information is displayed for every selected Workshop Attendee.
-
There are list boxes that displays all Checked In Workshop Attendees as well as all Finished & Posted Attendees.
-
Finish & Post only selected Checked In Attendee.
-
Finish & Post All listed Checked In Attendees in one single step.
In this example, the Hairstyling Workshop lists five Checked In Attendees that you would like to charge the displayed Workshop Hairstyling treatment charge of $20.00.
If the Post button is disabled, this means you must select any of our five Checked In Attendees to assign them as Finished.
-
Mark all five (5) Attendees as Finished and list them into the appropriate Finished Attendees list box.
-
Removing all five (5) Attendees from the Checked In Attendees list box.
As soon as a minimum of one attendee appears in the Finished Attendees list box, the Post button becomes available and you can post the $20.00 Treatment charge.
-
Posting the defined Workshop Treatment charge to each Attendee account.
-
Print a posting receipt for each Attendee account.
-
Assign each Attendee account to Finished status.
-
Assign the complete Workshop Reservation to Finished status.
-
As soon as the above actions are completed, the Spa Workshop Posting screen closes and the system refreshes the Main Reservation time plan and sets the Workshop status to Finished.
Figure 2-31 Finished

Figure 2-32 Finished Workshop

Finishing & Posting Selected Workshop Attendees
Apart from the above steps, the system also provides the option to Finish & Post each workshop attendee singularly, as guests register at the Spa Reception desk, by selecting the same option Finish & Post Workshop from the context menu.
To complete the posting for the selected attendee, right-click on the Checked In Attendees list box and select Finish & Post >.
-
Mark the selected Attendee as Finished and list it into the appropriate Finished Attendees list box.
-
Remove the Attendee from the Checked In Attendees list box.
-
Posting the defined Workshop Treatment charge to the one listed Finished Attendee account.
-
Printing a posting receipt for this Attendee account.
-
Assigning only this Attendee account to Finished status.
-
Assigning the complete Workshop Reservation to Finished status.
As soon as all of the above actions are completed, the system refreshes the Main Reservation time plan with the Workshop status change to Finishedand closes the screen.
Note:
The Workshop Reservation block will maintain the Blue & Cyan color combination until all Workshop Attendees have been Finished & Posted.Viewing Workshop Postings
-
Select a Finished Workshop to view its postings and select the option View Workshop Postings from the context menu. This option opens the View Spa Workshop Postings screen in three different areas.
-
An accounts Information area where you get information for every selected Workshop Attendee.
-
The Finished Attendees list box that displays all Workshop Attendees that have been marked as Finished.
-
The Postings List that lists all posted transactions as part of the current Finished & Posted Workshop of each selected Finished Attendee.
-
-
Click on Reprint to reprint the Posting Receipt for the current selected Finished Attendee.
Voiding Workshop Postings
-
Select the Finished Workshop to view its postings and select the option Void Workshop Postings from the context menu.
-
This option opens the Void Spa Workshop Postings screen in three different areas.
-
An accounts information area where you get displayed information for every selected Workshop Attendee.
-
The Finished Attendees list box that displays all Workshop Attendees that have been marked as Finished.
-
The Postings List that lists all posted transactions as part of the current Finished & Posted Workshop of each selected Finished Attendee.
-
-
Clicking Void voids all of the listed Transactions posted as part of the current Finished Workshop for the current selected Workshop Attendee and prints a Void Receipt.
Deleting Workshop Reservations (No-Shows)
If for any reason the entire Workshop Reservation has not shown up and are marked as late in the Main Reservations time plan (Red color), the system provides the necessary option to define this Workshop as No Show.
-
Define the Workshop Reservation as No Show and charge the predefined No Show fee to all or selected attendees accounts.
-
Define the Workshop Reservation as No Show without charging any No Show fees to the Attendees accounts.
-
Select the option No Show Workshop from the context menu. The system displays a confirmation message.
-
Click No to delete the entire Workshop Reservation and reflect in the Main Reservation time plan. Click Yes to open the Spa Workshop Posting screen, which allow you to charge the predefined No Show Fee to the Workshop Attendees It also provides:
-
An accounts information area where you get information for every selected Workshop Attendee.
-
List boxes that display all Expected Workshop Attendees as well as No Show & Charged Attendees.
-
-
No Show & Post only selected Expected Attendees.
-
No Show & Post All listed Expected Attendees in one single step.
-
The predefined Treatment No Show Fee is listed and ready to be charged.
-
Select some or all of the Expected Attendees.
-
Click the No Show & Post > to move Expexted Attendees into the Attendees To Be No Show & Posted list box.
Note:
If you select only a few attendees, the remaining attendee’s status will change to No Show without a charge.-
Post the predefined Treatment No Show Fee to the two Attendee’s accounts listed in the Attendees to be No Show & Posted list box.
-
Print posting receipts for both Attendee’s accounts.
-
Assign those two Attendee’s accounts to No Show & Posted status, and the rest to No Show status.
-
Assign the complete Workshop Reservation to No Show & Posted status.
The Spa Workshop Posting screen closes and the system refreshes the Main Reservation time plan with the Workshop status changed to No Show & Posted (the Workshop Reservation block is appears in blue to indicate that something has posted to the Attendee’s accounts. This way you still have the options to View & Reprint as well as Void those posted transactions.
Cancelling Workshop Reservations
-
If the reservation is within the cancellation period, based on the cancellation rules, a message warns you that a cancellation fee will apply.
-
As with the regular reservations, the Cancel definition gives you the option to:
-
Define the Workshop Reservation as Cancelled and charge the predefined Cancellation fee to all or selected Attendee accounts.
-
Define the Workshop Reservation as Cancelled without charging any Cancellation fees to the Attendees’ accounts
-
-
Answering with No results in Cancelling & Deleting the entire Workshop Reservation and this reflects the same moment into the Main Reservations time plan.
-
Answering with Yes opens the Spa Workshop Posting screen, which has been updated to handle the requirements for charging the predefined Cancellation Fee to the Workshop Attendees. The Spa Workshop Posting screen now shows:
-
An accounts information where you get information for every selected Workshop Attendee.
-
List boxes that display all Expected Workshop Attendees as well as all Cancelled & Posted Attendees.
-
-
Within the two list boxes, the following options are available:
-
Cancel & Post only selected Expected Attendees.
-
Cancel & Post All listed Expected Attendees in one single step.
-
The predefined Treatment Cancellation Fee is already being listed and ready to be charged.
-
-
Clicking on the Post results in:
-
Posting the predefined Treatment Cancellation Fee to the two Attendees account listed in the Attendees To Be Cancelled & Posted list box.
-
Printing posting receipts for both Attendees account.
-
Assign those two Attendee account to Cancelled & Posted status and the rest to Cancelled status.
-
Assign the complete Workshop Reservation to Cancelled & Posted status.
-
As soon as all of above actions are completed, the Spa Workshop Posting screen closes and the system refreshes the Main Reservation time plan with the Workshop status change to Cancelled & Posted (the Workshop Reservation block appears in blue color to indicate that something has been posted into the Attendee accounts. This way you still have the options to View & Reprint Receipts as well as Void those posted transactions.
Packages Handling
-
Add Package: assign a specific package to an Account.
-
View/Edit Package: assign a Reservation to a Package Treatment, edit a Package Treatment Reservation or assign Package Retail Items as Handed Over or Not Handed Over.
-
Cancel Package: Cancel the entire package with all included Treatment Reservations with the option to apply Cancellation Fees to all Treatment Reservations.
-
No Show Package: No Show the entire package with the option to apply No Show Fees to all Treatment Reservations.
-
Edit Reservation: Update specific information of a Treatment Reservation that is part of a package.
-
Finish & Post: Finishing a Packaged Treatment Reservation will result is posting the entire Package into the payer’s Account.
To distinguish between regular Guest Reservations blocks, Package blocks uses the same colors but a different style, as shown below:
Figure 2-33 Packages Treatment
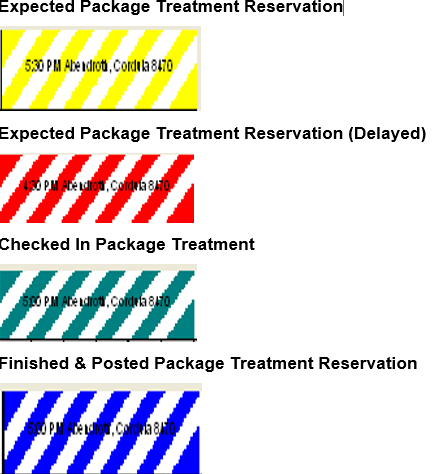
Another way of displaying more detailed information about each Package Reservation is the bottom of the Reservations screen, where an enhanced Package Information area displays package relevant data upon hovering with the mouse pointer over the Package Reservation block.

For a detailed listing of all Package Reservations related data, the above described View Package or Edit Reservation option will display all necessary information related to the selected Package block.
Assigning Packages to Accounts
Packages are assigned to Accounts by selecting the Add Package option from the context menu. Assigning Packages can also be achieved by clicking Booking Options.
The Add New Spa Package screen gives you the option to select certain Spa Packages from certain Package Groups.
Figure 2-34 Add New Spa Package
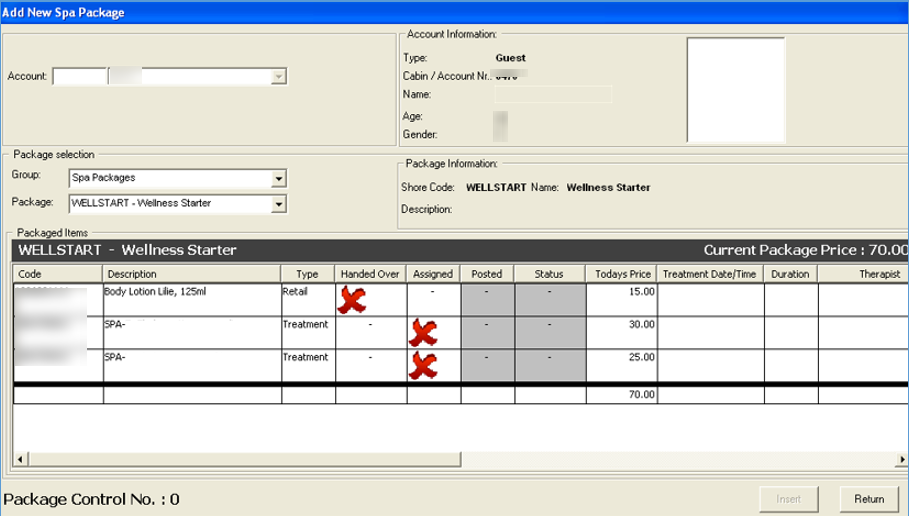
As soon as a Spa Package is selected, all Items included are displayed, including the package’s current price. All Treatment Items may appear as not assigned because there are not many Treatment Reservation created yet. To proceed with inserting the Package into the selected Account, the Insert remains disabled and you will need to assign all Package Treatment Reservations.
-
Select each Treatment Reservation from within the grid and right-click to display the menu.
-
For Packaged Treatment, the new / Edit Reservation screen appears that you use for regular Treatments. You can select the Date, Time and Therapist to create the Packaged Treatment Reservation.
-
Click Insert, the Packaged Treatment Reservation is created and the Package Treatment Reservation creation in reflected into the Packaged Items grid.
-
The Treatment Reservation appears with Expected Status and lists all the Treatment Reservation information (Treatment Date/Time, Duration, Therapist, Room). Enable the Insert, and you can assign the current Spa Package into the selected Account.
Viewing & Editing Packages
-
Using the known Edit reservation option from the context menu.
-
Using the View Package option from the context menu. This option will open the known Edit Reservation screen which is now enhanced with Spa Packages related information.
Selecting any Treatment Reservation and right-clicking on it displays the context menu with the Edit Reservation available, where you can edit certain Treatment Reservation settings. Selecting any Retail Item and right-clicking on it, will display the context menu with the option to Hand Over the Retail Item to the customer.
The following confirmation message appears “Are you sure you want to Hand over the selected Retail Item?”
Clicking on Yes, assigns the selected Packaged Retail Item as Handed Over and will refresh the relevant information into the data grid.
If any of the Package Treatment Reservations or the entire Package needs to be canceled, the system provides the necessary Cancellation options.
-
Cancel the selected Package Treatment.
-
Cancel the entire Package and all its included Treatment Reservations.
-
Cancel all expected Treatment Reservations for this Package.
-
Cancel the selected Package Treatment Reservation only.
-
Cancel the selected Package Treatment only (click No).
-
All Package Items (Treatments and Retail Items) listed with their Package Price as well as their Regular onboard Price.
-
The Treatment selected to cancel marked with red and a Cancellation Fee price appears based on the existing Cancellation Percent value.
-
At the lower left corner, detailed information about the necessary steps are performed to complete the Cancellation of the selected Treatment.
-
Void the entire Package with the Package Price.
-
Re-Charge the already finished Package Treatments with Regular Price.
-
Re-Charge the already handed over Package Retail items with Regular Price.
Update all expected Package Treatments with Regular Price.
-
Click Yes to cancel the selected Packaged Treatment Reservation and apply the Cancellation Fee.
-
Click No to cancel the selected Packaged Treatment Reservation without applying any Cancellation Fee.
-
Click Cancel to exit without cancelling this package.
Unassigned Bookings Handling
The Unassigned Bookings Handling screen lists all single Treatment or Package Reservations imported through the Data Import module before they are confirmed and assigned a Treatment Room.
To ease the imported Reservations handling, the system provides separation of bookings by system Cruise.
-
The Unassigned Cruise Bookings grid.
This grid lists all imported Cruise Treatments Reservations sorted by the scheduled Treatment Date & Time. You can modify the sorting order by clicking on the grid column headers.
-
A smaller edition of the main Reservations & Schedules screen.
This screen displays all current (already confirmed) appointments for the selected date in the colour gray to distinguish those appointments from the unassigned appointments that you selected on the top grid. The system can process the appointment and propose the correct Therapist Schedule according to the predefined Treatment Date & Time.
Clicking on every imported unassigned treatment reservation initiates the internal process of finding the necessary available open time space that fits the booking’s requested Treatment Date & Time, as well as the first available therapist. As soon as an available period is found, the system places the unassigned treatment reservation into the Reservations & Schedules time scale on the lower part of the screen, in the colour yellow to identify it as an Expected Appointments.
-
Assign room and confirm booking
The Unassigned Treatment Appointment is ready to be confirm and added into the system as a regular Expected Treatment Reservation assigned to a valid and available date, time & therapist. The last step is to define the Treatment Room.
-
Edit reservation
You can edit specific reservation data before confirming the booking.
Note:
The System does not allow you to update the Treatment and Price for imported prepaid treatment Reservations.As soon as you select the toom and confirms the selected unassigned treatment, the treatment appears in the Reservations Schedule in the color gray similar to the rest of the regular bookings. At the same time, the treatment disappears from the Unassigned Bookings grid for the user to continue confirming the remainding unassigned bookings still listed in the grid.
If no availability for requested period found, the system places the unassigned treatment reservation into the first Therapist Schedule colored in red indicating the overlap with another existing appointment or time block. There is still the option to assign the appointment to another time and/or therapist, either by selecting Edit Reservation or by moving the red colored reservation block using the drag and drop method and positioning it to the desired available time and/or therapist.