4 Account Handling
The Account Handling section allow you to Add/Remove Discounts, Void Bookings, Move Bookings, and Print Tickets.
Adding a Discount
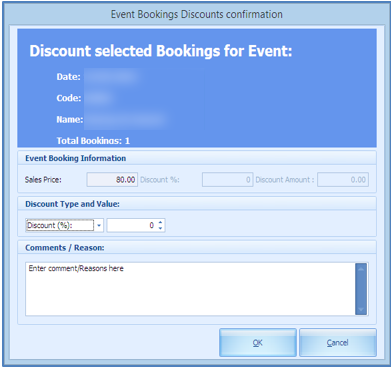
Figure 4-1 Event Booking Discount

-
Select the booking and click Add Discount.
-
Select the type of discount- by value or by percentage.
-
Insert a comment or reasons in the free text field.
-
Click OK.
Figure 4-2 Discount Posting

Removing a Discount
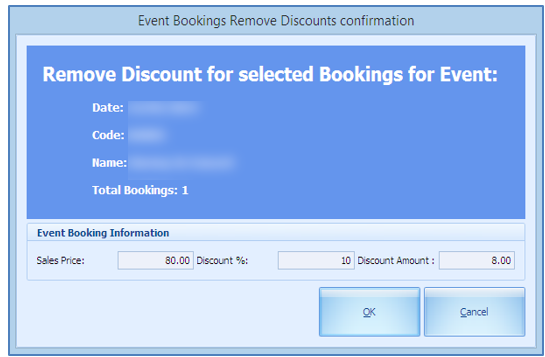
Figure 4-3 Event Bookings Remove Discount

-
Select a booking with a discount value / percentage.
-
Click Remove.
-
You are prompted by a confirmation with its value shown, which is non-editable.
-
Click OK.
-
This reverses the transaction with the discount and reposts a new transaction (undiscounted).
Voiding a Booking
Figure 4-4 Void Booking

-
Select the transaction to void.
-
Click Void Bookings.
-
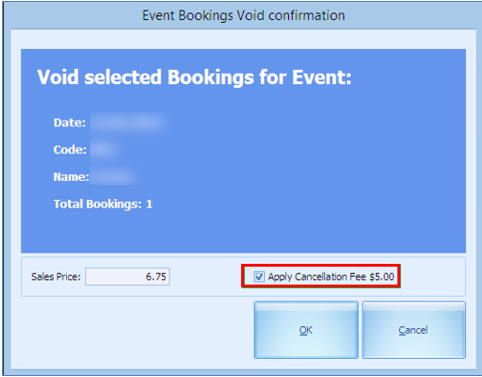
At the confirmation prompt, the Apply Cancellation Fee $ X is selected by default. Deselect this if a cancellation fee is not applicable or update the PAR setting to permanently disable this function.
Figure 4-5 Void Confirmation

-
Click OK to proceed.
-
Enter a void reason when the system prompts the Void Event Booking Reason screen.
-
Click OK to confirm.
Voiding a Cancellation Fee
-
Select the booking that has a Cancellation Fee flagged with Y.
-
Click the Void Cancellation Fees button and click OK.
-
Enter a reason at the Void Event Cancellation Fee Reason prompt.
-
Click OK to confirm.
Moving a Booking
The Move Booking function allows you to move tickets purchased from one date or event to another. A bookable event is created using the same template from Event Templates Setup.
Note:
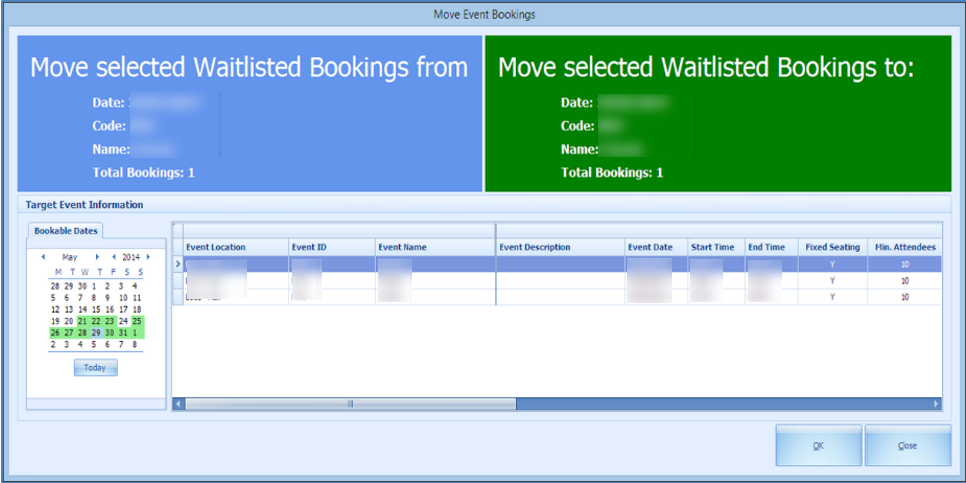
It is not possible to move an event if was copied from Bookable Event Setup.Figure 4-6 Move Bookings

-
Select a booking from the Account Handling screen.
-
At the Confirm to Move All or Selected Bookings prompt, select an option.
-
The system prompts you to confirm the number of booking(s) to move.
-
Select the new date to move to.
-
Click OK.
Move Bookings using the same template
The system allows you to move the bookings when they are created using the same template. If you are moving a booking that uses a different template, the system prompts you to void the first booking and re-post.
Removing Waitlisted Bookings
Figure 4-7 Remove Waitlisted Bookings

If a guest wishes not to remain on the waitlist, you can remove the guest in the Account Handling window using the following steps:
-
At the Account Search, Booking Types, select Waitlisted Bookings only.
-
Click the Remove Waitlisted Bookings button.
-
At the confirmation prompt, select the appropriate option.
Printing Tickets
This function allow you to print ticket(s) of the selected account:
-
Select the booking to print the ticket.
-
Click Print Tickets.
-
At the confirmation prompt, select the appropriate option.