2 Installing Cruise SPMS Border Control Rest API/Web Application Server
Prerequisites
-
The Time zone on both the Web application server and API server must be the same. It is recommended that you use the database server time zone.
-
The minimum version of SPMS Database must be:
-
20.1.3 if the SPMS 20.1.x is installed or
-
20.2.4 if SPMS 20.2.x is installed or
-
20.3.2.1 if the SPMS 20.3.x is installed.
-
If you are running a lower version, upgrade the SPMS database version before continuing.
-
-
The Web application server and API server do not require IIS.
-
Java JDK version 17.0.4 and above is required.
-
A tool for generating certificates. As an example, this document uses a custom tool for our internal team to generate Json web Key(JWK). Other tools are available. We recommend that you select a tool that suits your security requirements. Whichever tool you use, ensure that it is virus scanned and virus-free, up to date, and patch with the latest security fixes. Otherwise, you could compromise your environment.
-
The API and Web application access uses a Secure Socket Layer and Transport Layer Security (SSL/TSL) cryptographic protocol. You must set up a keystore (.jks format) that contains the private key and certificate.
-
The keystore must have the default option value as
“-alias server -keyalg RSA -keysize 2048” -
The minimum PowerShell version required is 5.1.
-
A public (verify-jwk.json) and private key (sign-jwk.json) for setting up secure OAUTH. As an example, this document explains how to generate a public and private key.
-
Ensure that the 'Path' in the 'System Variable' (Environment variable) is entered like the following example:
'%SYSTEMROOT%\System32\WindowsPowerShell\v1.0\'.
Preparing the Java Environment
Before you install the Cruise SPMS Border Control Version 23.0 API / Web App server,
-
Ensure the JDK is installed.
-
Ensure that you have a tool for manipulating certificates installed.
Set JAVA_HOME or JRE_HOME variable
-
Search Environment Variables in the search box (next to the Windows start button) then select Edit to edit the system environment variable.
-
Click the Environment Variables button.
-
Under System Variables, click New.
-
In the Variable Name field, enter either of the following:
-
JAVA_HOME if you have the JDK (Java Development Kit) installed
-
JRE_HOME if you have the JRE (Java Runtime Environment) installed.
-
-
Browse the Directory and select
“C:\Program Files\Java\[java version]” -
Click OK to apply the changes.
Setting the JAVA Path
-
Search Environment Variables then select Edit to edit the system environment variable.
-
Click the Environment Variables button.
-
Find the ‘Path’ from the System Variable and click Edit then select New.
-
Browse directory
“C:\Program Files\Java\[java version]\bin” -
Click OK to apply the changes.
Installation Process
Installation is a three-step process, where:
-
Step 1: Create a Java keystore containing certificates purchased from a reputable Certificate Authority
-
Step 2: Generate security keys for OAuth
-
Step 3: Install the software
Step 1: Create the Java Keystore for Cruise SPMS Border Control API/Apps Server
Background
Java Keystore is required to store private keys and certificates used by the Cruise SPMS Border Control Version 23.0 API/Web App. A Java’s Keytool is used to create a Java Keystore. Java’s Keytool is distributed as part of the Java JDK. Java Keystore files can be generated on any machine. They need not be on the same server where the SSL/TLS certificate will be installed.
Important: In this section, we use OpenSSL to demonstrate the process. You should select a certification manipulation tool that meets your organization’s security policy.
Recommendations
It is recommended that you generate a new Keystore following the process outlined in this section. Installing a new certificate to an existing Keystore often ends in installation errors or the SSL/TLS certificate not working properly. Before you begin this process, backup and remove any old Keystores.
The act of generating a self-signed Digital Certificate to identify the Cruise SPMS Border Control API/Web app is not recommended for the production environment. It increases the risk of an unscrupulous party impersonating the Cruise SPMS Border Control API/Web App to steal sensitive information. However, for limited, non- production testing of Cruise SPMS Border Control API/Web app, you could use a self- signed certificate despite the increased security risk. However, do so at your own risk: this is not recommended.
Generate a new Java Keystore using Java Keytool
-
Navigate to the directory where you plan to manage your Keystore and SSL/TLS certificates.
-
Run the following command:
keytool -genkey -alias server -keyalg RSA -keysize 2048 -keystore <SITE_NAME>.jks –ext SAN=dns:<SITE_NAME> -
In the command above,
<SITE_NAME>is the name of the domain you want to secure with the SSL/TLS certificate. When using a Domain wildcard certificate, do not include the asterisk (*) character in the SITE_NAME as the asterisk (*) character is not a valid Keytool command character. The command will generate the Keystore with the public and private key pair and a self-signed certificate for the server. -
You will be prompted to create a password for the new Keystore.
-
Enter the SSL/TLS certificate information for the self-signed certificate.
-
When prompted for the first and last name, enter the Fully Qualified Domain Name (FQDN) for the site you wish to secure with the SSL/TLS certificate. For example,
www.yourdomain.comormail.yourdomain.com. If the SSL/TLS certificate is a Domain wildcard type, the FQDN is*.yourdomain.com. -
Enter the Common Name (CN), for example, The FQDN.
-
Enter the Organizational Unit (OU), for example, Cruise Operation
-
Enter the Organization (O), for example, Cruise Company
-
Enter the Locality (L). For example Redwood City
-
Enter the State or Province Name (S), for example, California
-
Enter the Country Name (C), for example. US
-
You will be prompted to verify all the information entered. Type ‘y’ or ‘yes’ to confirm.
-
Enter enter the Keystore password when prompt. The new Keystore file
<SITE_NAME>.jksis now available in the current working directory.
-
Generate a Certificate Signing Request (CSR) using Java Keytool
-
Navigate to the directory where the Keystore was generated earlier.
-
Run the following command:
keytool -certreq -alias server -file csr.txt -keystore <SITE_NAME>.jks –ext SAN=dns:<SITE_NAME> -
In the command above,
<SITE_NAME>is the name of the Keystore generated in earlier section. The CSR will manifest itself as an output file based on the Certificate Info you entered earlier. You will also need to enter the Keystore password to proceed. -
The CSR output file is in the same current working directory, for example,
<SITE_NAME>.txt.
Backing Up the Keystore
Save and back up the Keystore file to a safe, secure location.
Importing SSL/TLS Certificate to the Keystore
After receiving your SSL/TLS certificate from Certificate Admin, you must import the SSL/TLS Certificate file to the same Java Keystore under the same alias name (for example, alias server) used to generate your CSR. If you try to install the certificate to a different keystore or under a different alias, the import command will not work.
Note:
Before importing the SSL/TLS certificate, make sure the certificate chain is in appropriate format and valid. You can use OpenSSL tool to check on the validity as follows:
openssl pkcs7 –print_certs –in <cert_name>.p7b
-
Navigate to the directory where the Keystore was generated earlier.
-
Run this command:
keytool -import -alias server -file <CERT_NAME>.p7b -<SITE_NAME>.jks -
In the command above,
<CERT_NAME>is the name of the SSL/TLS Certificate.<SITE_NAME>is the name of the Keystore generated in earlier section. -
You will get a confirmation message that displays “Certificate reply was installed in keystore.” Type ‘y’ or ‘yes’ to proceed.
-
This will load all the necessary Certificates to the Keystore.
-
The Keystore is now ready to be used by the Tomcat/Tomcat Embedded Server.
Step 2: Create the Key Pair for Cruise SPMS Border Control API Authentication
Background
OAuth 2.0 is the user authorization mechanism used by Cruise SPMS Border Control API. It requires a generation of an asymmetric key pair to work. The asymmetric key pair is used to securely sign and read contents found in the Security token. Security of the API relies on the security token. API calls made without a valid Security token will be rejected. In detail, the security token contains a checksum. This checksum ensures that the token is not tampered with. The checksum is calculated by adding up the bytes in the security token and is signed by the private key. A third party can check the validity of a token by recalculating the checksum, decrypting the original checksum with the public key, and comparing the two. Any differences between the two checksums indicates that the token has been tampered with.
Note:
We provide the process below as an example. You can use other certificate manipulation tools to generate the public and private keys. Whichever tool you use, ensure that you download them from a reliable source and that the downloaded tool is security checked, virus scanned, and checksum checked. Without such due diligence, you may compromise the security of your installation.Generating a new Key Pair using JSON Web Key Generator
-
Go to https://mkjwk.org/ for the JSON Web Key generator tool.
-
Select the RSA tab.
-
Select the right Key Size in bits, required for RSA key types. Recommended size is 2048 and above.
-
Select the Key Use as signature.
-
Select the Key ID as specify and enter any string, for example sign-rsa.
-
In the ShowX.509, select No
-
Copy the ‘Public Key’ and “Public and Private Keypair Set” into a separate files with .json extension and save.
-
Sample public and private keys are shown below.
Sample Public key:
{
    "keys": [
        {
            "kty": "RSA",
            "e": "AQAB",
            "use": "sig",
            "kid": "sign-rsa",
            "alg": "RS256",
            "n": "g88SjdDsfdHd64fdf..."
        }
    ]
}

Sample Private key:
{
    "keys": [
        {
            "p": "5BjdvhhdGjjjdsUI...",
            "kty": "RSA",
            "q": "k-7TihGsdfjnjLLf8...",
            "d": "e4t4J7dfk7jddPo78...",
            "e": "AQAB",
            "use": "sig",
            "kid": "sign-rsa",
            "qi": "UlYwJ6Jsdfsdfc...",
            "dp": "CDz5rYYsdffffI1...",
            "alg": "RS256",
            "dq": "fBAEeUP98HHdf...",
            "n": "g88SjLLjsdf881IP..."
        }
    ]
Step 3: Install Cruise Border Control
You can perform a custom installation or a typical installation. A custom installation allows you to exclude the products that you do not need. If you choose to perform a typical installation, manually remove or disable the features that you do not need after the installation.
The installation requires the user performing the installation to have Administrator privileges.
Installing Cruise Border Control 23.0
-
Log in as a Microsoft Windows Administrative user.
-
Start the installation program by right-clicking the Cruise Border Control 23.0.0.0.exe and select Run as Administrator.
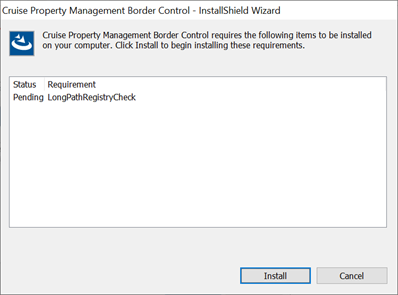
Figure 2-1 Cruise Border Control Installation Wizard Long Path Enablement
-
Click Install to apply the LongPathRegistryCheck to enable Long Paths setting in the registry. At the prompt continue by clicking ‘Yes’ and a message is shown if the change is applied to the registry is successfully or not. This setting is required for a successful 23.0 install. By default, Windows only support file path length of 260 characters and this setting allow windows to support beyond 260 characters.
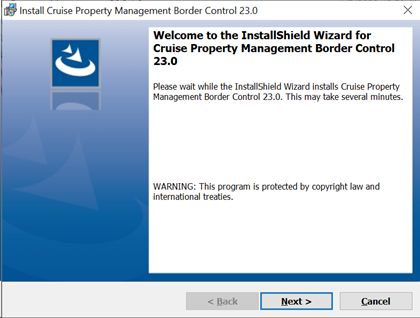
Figure 2-2 SPMS Platform Property Management Installation Wizard — Welcome Page
-
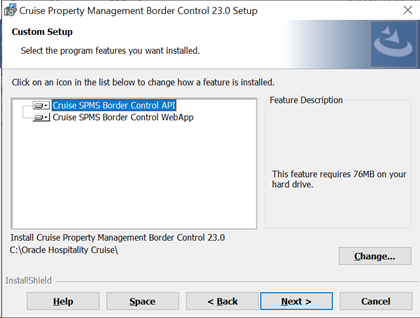
Click Next and navigate to the “Custom Setup” window. If you want to perform a custom installation, select the option to set the feature as “This feature will not be available”. The default folder to install has changed from
“C:\Oracle Hospitality Cruise\”If you choose to install it in a different folder from the default, you need to grant the folder full permission so that the user can start the APIs or Apps.
-
To grant the folder permission,
-
Access the Properties dialog box.
-
Select the Security tab.
-
Click Edit.
-
In the Group or user name section, select the user(s) you wish to set permissions for.
-
In the Permissions section, use the check boxes to select the appropriate permission level.
-
Click Apply.
-
Click OK.
Figure 2-3 Cruise Border Control Installation Wizard- Custom Setup
-
-
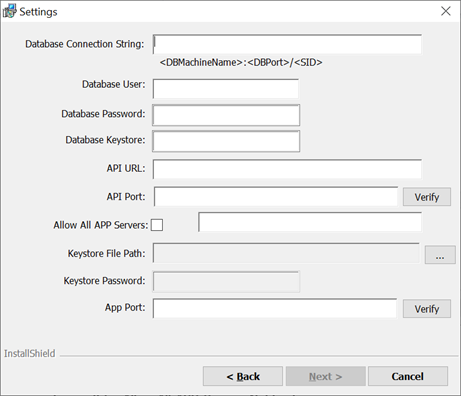
Click Next to update the settings window for the fields below:
-
Database connection String:
<DBMachineName>:<DBPort>/<SID> -
Database User: DB Password.
-
Database Keystore: DB Keystore’s password for database encryption. Minimum password length is 8 characters.
-
API URL: API Server’s URL.
-
API Port: API Server’s port. If you need to install multiple instances of the Border Control API, enter the ports in comma separated format. By default, the Install shield populates ports 7543, 8543. If these ports are unavailable or used, you need to choose an unused port for the installation. The verify button to the right checks and displays a message if any of the entered ports are used for other applications or processes.
-
Allow All APP Servers: Server machines with APP installed that are allowed to access the API, * meaning all the servers are allowed.
-
Keystore File Path: Keystore file path which contain .JKS file extension.
-
Keystore password: Keystore password.
-
App Port: Web App port. If you need to install multiple instances of Border Control Web App, enter the ports in comma separated format. By default, Install shield populates port 7190, 8190. If these ports are unavailable or used, you need to choose an unused port for the installation. The verify button to the right checks and displays a message if any of the entered ports are used for other applications or processes. Use the command “netstat -ano -p tcp” at the command line to view the tcp ports in use by different applications
Figure 2-4 Cruise Border Control Installation Settings
-
-
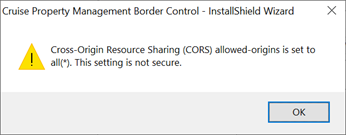
When the option Allow All APP Servers is checked, the message box above shall prompt, alerting the user of the chosen option.
Figure 2-5 Allow All APP Servers Notification
-
Click Next to update the OAuth Configuration settings for the fields below:
-
OAuth Public Key File: OAuth public key file in .json file extension.
-
OAuth Private Key File: OAuth private key file in .json file extension.
-
-
Click Install to begin installation.
Note:
For a better end user experience, at the end of the installation a config.txt file containing all the configurations, excluding the passwords is created and added to folderUserProfile/AppData/Local/Oracle Hospitality Cruise. This file is reloaded on upgrade/re-install, so that end user does not have to re-enter the configuration -
During the install, a couple of PowerShell windows will launch and closed automatically.
-
API’s configuration is stored in the
application.propertiesfile. -
At the end of the installation, the system creates two (2) new Windows Services and they are Oracle Hospitality Cruise SPMS Border Control WebApp and Oracle Hospitality Cruise SPMS Border Control API.
Figure 2-6 Cruise SPMS Border Control Window Services

-
The system will also create three (3) sub-folders under
Oracle Hospitality Cruise\Cruise SPMS Border Control\v23.0– ‘API’, ‘WebApp’ and ‘Scripts’.
Uninstalling Cruise SPMS Border Control 23.0
-
Start the installation program by right-clicking the Cruise Property Management Border Control 23.0.0.0.exe and select Run as Administrator. If 23.0 is already installed, the Setup starts in Maintenance mode, allowing you to reinstall.
-
Select the available option and wait until uninstall is complete. In the case of Reinstall, follow the prompts presented to uninstall and install.
-
The system removes the following:
-
From the
Oracle Hospitality Cruise\Cruise SPMS Border Control\v23.0folder: API’, ‘WebApp’ and ‘Scripts’ folders. -
Windows Services: Oracle Hospitality Cruise SPMS Border Control API and Oracle Hospitality Cruise SPMS Border Control WebApp.
-
SPMS Platform for High Availability (HA)
To set up a High Availably environment for Cruise Border Control API and the associated web applications, Oracle recommends:
-
Running multiple instances of API Services on the same server (to protect against failure of a single instance on that server).
-
Running multiple instances of the Web Application on the same server (to protect against failure of a single instance on that server).
-
Setup of multiple servers with the same configurations as 1 and 2 (to protect against a single server failing).
-
Use a High Availability (HA) Oracle database environment (such as Oracle RAC).
-
Provide multiple instances of the load balancer and connect them together through technology like the Virtual Router Redundancy Protocol (VRRP).
-
Route all requests between the browser and the API through the load balancers.
-
Route all requests between the browser and the administration/mobile app through the load balancers.
-
Set up rate limiting on the load balancer to prevent Distributed Denial of Service (DDOS) attacks.
Important:
Before you change any of the Database Encryption Key/Password and if you have Cruise Border Control REST API Server installed, you must uninstall and then reinstall the application after the password change.