3. Maintaining Mandatory Information
As part of capturing customer related information in Oracle FLEXCUBE you need to maintain Customer Information Files (CIF records) for each entity who is a customer of your bank. Apart from creating CIF records for each entity you need to maintain certain mandatory information. These details have been discussed in the preceding sections.
This chapter contains the following sections:
l Section 3.1, "NSF Level Maintenance"
l Section 3.2, "Maintaining Narratives"
l Section 3.3, "Instruction Maintenance"
l Section 3.4, "Lead Details Maintenance"
l Section 3.5, "Service Request Maintenance"
l Section 3.6, "Maintaining Location Details"
l Section 3.7, "Capturing Algorithm Details in Oracle FLEXCUBE"
l Section 3.8, "Generating Procedure for Algorithm"
l Section 3.9, "Maintaining Deposits Instructions"
This section contains the following topics:
l Section 3.1.1, "Maintaining NSF Cheque Level"
l Section 3.1.2, "Action Components in NSF Level"
l Section 3.1.3, "Advice Button"
l Section 3.1.4, "Maintaining NSF Cheque Parameter"
l Section 3.1.5, "Mutual Settlement Transaction"
3.1.1 Maintaining NSF Cheque Level
Oracle FLEXCUBE supports cheque processing through web branch screen and generic interface upload routine facility. You can maintain customised Non Sufficient Fund Cheque level and the components associated with NSF level in ‘NSF Level Maintenance’ screen.
You can invoke the ‘NSF Level Maintenance’ screen by typing ‘STDNSMNT’ in the field at the top right corner of the Application tool bar and clicking the adjoining arrow button.
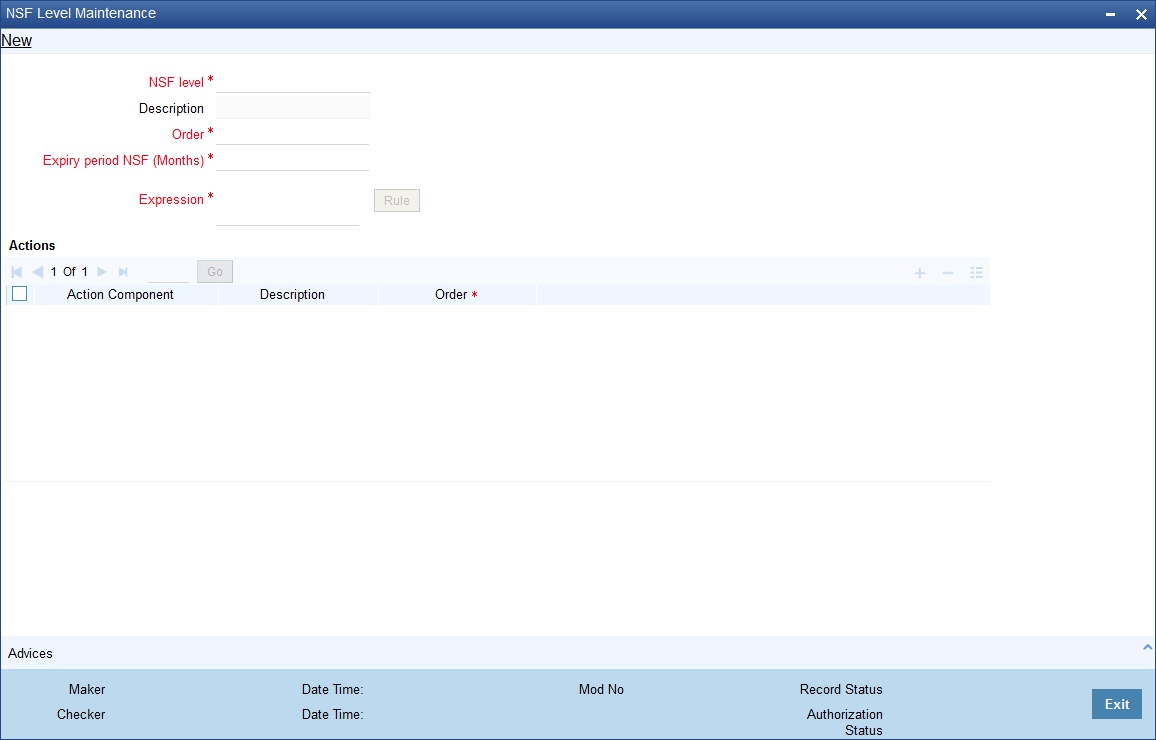
You can specify the following in this screen:
NSF Level
Select the NSF level code to which the configuration is maintained from the adjoining option list.
Description
The system defaults a brief description about NSF Level.
Order
Specify the internal order of the NSF levels.
Expiry Period NSF (Months)
Specify the Expiry period for the NSF level from the first NSF return.
Expression
Specify the formula expression to identify the NSF level of the customer.
Actions Details
Action Component
Specify the action component. It is executed when the customer status is changed to the level that is maintained in NSF level.
Description
The system defaults a brief description on the action component.
Action Order
Specify the order in which selected action code has to be triggered.
Note
NSF level is defined in the status code definition screen STDSTSCD and system allows the user to select the code in NSF level maintenance screen.
Note
– The Expiry period for the high NSF level is always greater than the lower NSF level. System raises an alert message if the expiry period is lesser than the previous order expiry date.
– Once the formula expression is changed it is applicable for all NSF transactions (to arrive at NSF level) from the changed date.
NSF levels arrived by the previous formula will remain unchanged.
The following SDEs are provided for construction the formula and is used to arrive NSF level changes:
|
S.No |
SDE Name |
Remarks |
|
1 |
CHEQUE_AMOUNT |
Amount of the cheque which has been rejected for NSF |
|
2 |
NSF_COUNT |
Number of NSF returned cheques for the validation period |
|
3 |
CUSTOMER_TYPE |
Type of the customer who has presented the NSF cheque |
|
4 |
CB_BK_STATUS |
The active Central bank blacklist status of the customer. SDE will return “Y”, if the customer is blacklisted in central bank, “N”, if the customer is not a blacklisted in central bank. |
3.1.2 Action Components in NSF Level
As part of NSF validation functionality predefined NSF action components are provided. System triggers the mapped NSF action components whenever the customer status is changed to the new status.
|
Action Code |
Description |
|
MARK_BLACKLIST_CUST |
Mark the customer as blacklisted customer. Cheque return in clearing/counter due to NSF , Mark the customer as blacklisted customer (0 – Blocked Data) , effective date will be the date on which the customer is marked as blacklisted, the expiry date will be the application date + expiry period of the active NSF level. Suppose, action component is assigned to SP3 level and the expiry period is set as 12Months, and the customer is blacklisted on 10-Jan-2010, then the expiry period would be 10-Jan-2011 In case the customer is already blacklisted customer, then the effective date will be recomputed. if the newly arrived expiry date is greater than the existing expiry date, then the new expiry date will be updated as the expiry date for that customer. Cheque return in clearing/counter due to NSF for the customer who is already blacklisted in Central bank, then customer will be marked as blacklisted customer (1 – Extended Data) Customer is part of the Central bank blacklisted customer (2 - Blocked data by Central bank) |
|
UNMARK_BLACKLIST_CUST |
Mark the customer as non-blacklisted customer, only if the customer blacklist status got expired. Otherwise system will keep the customer as blacklisted customer. In case the customer is part of the Central bank blacklisted customer (2 - Blocked data by Central bank) |
|
BLACKLIST_CUST_ACC |
Mark all customer accounts as blacklisted accounts Based on the bank level parameter “Account consideration for action”, system will mark current accounts / savings accounts / all current & savings accounts as blacklisted accounts. In case “Current account” is selected, then system will mark all current accounts as blacklisted account In case “Savings account” is selected, then system will mark all Savings accounts as blacklisted account In case “Both” is selected, then system will mark all current accounts and savings accounts as blacklisted account For joint accounts, in case any one of the joint customer is marked as blacklisted customer, then the joint account will be blacklisted. |
|
UNBLACKLIST_CUST_ACC |
Unlock all customer accounts, only if the customer is not a blacklist customer |
|
REVOKE_CHQ_ISSUE_FSLTY |
Revoke the cheque Issue facility from customer accounts (based on the bank level parameter “Account consideration for action”) |
|
GRANT_CHQ_ISSUE_FSLTY |
Grant the cheque issue facility to all customer accounts (based on the bank level parameter “Account consideration for action”) only if the account is not a blacklisted account. If the account is blacklisted account, then system will not grant the cheque issue facility System will grant the cheque issue facility only if the issue facility is revoked by the system. Manually revoked check issue facility will not be grated. |
|
MARK_NSF_OVER_COUNTER |
Mark the Customer – Web branch NSF cheque status as “3”. (This status will be marked as NULL after the hand off) |
Note
System grants cheque issue facility only if the cheque issue facility is revoked through the NSF process. If the cheque issue facility is revoked manually, then system does not grant the cheque issue facility.
Click on the Advice button in the NSF level maintenance screen to invoke NSF Advice screen.
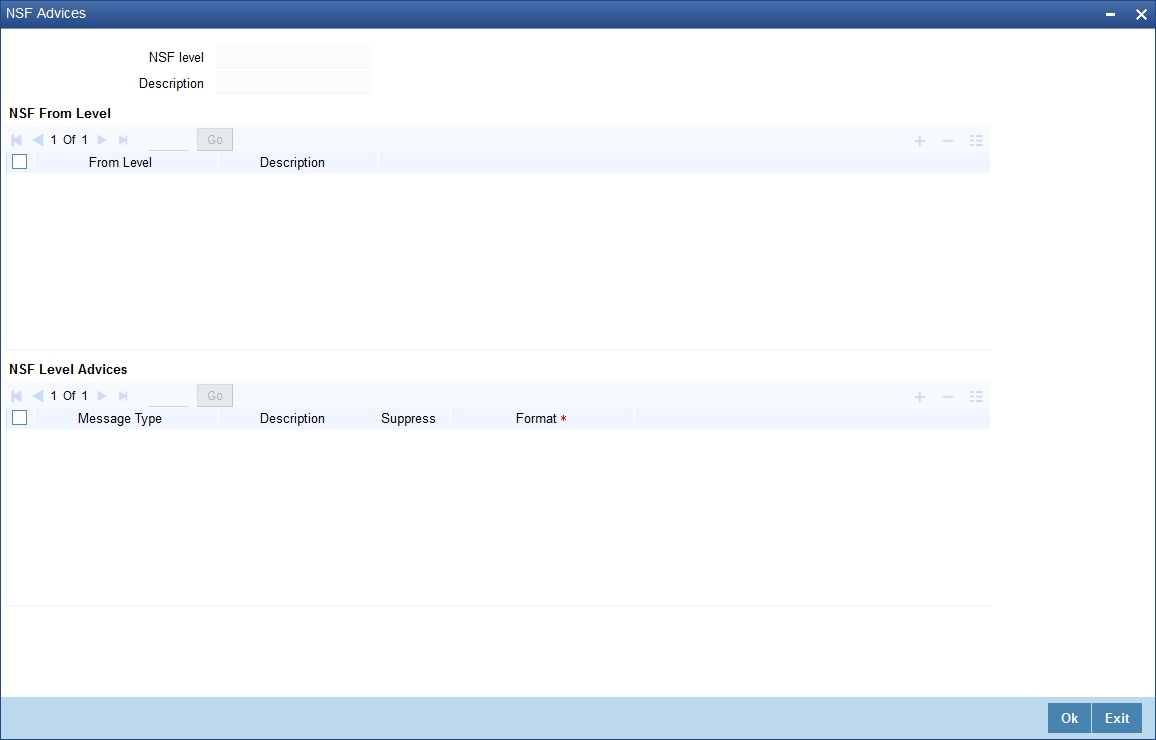
NSF Level
The system defaults the NSF Level code to which advice is configured.
Description
The system defaults the description for the NSF level.
From Level
Select the source of your NSF level which has been moved to target level (SP1 level).
Description
The system defaults the description of the from level
Message Type
Select the Message type from the adjoining option list.
Description
The system displays the description for the advice message.
Suppress
Check this box to suppress the message.
Format
Select the advice format from the adjoining option list.
Note
– After the NSF Level change, system generates advices which are configured for that specific NSF Level.
– Maintaining advice messages for the same Levels (From NSF level and To NSF level are same) are restricted.
– By default ‘NSF_ADV_CCR’ advice format is generated for sending the advice message to the customers whose cheque has been returned over the counter due to NSF. The EOD process will generate and post the above advice message.
– Advice message types and advice message formats are required to maintain (in ST module) prior to associate the advice messages to a NSF Level.
3.1.4 Maintaining NSF Cheque Parameter
You can capture the NSF validation related parameters in the NSF Cheque parameters screen. You can invoke this screen by typing ‘STDNSFPR’ in the field at the top right corner of the Application tool bar and clicking the adjoining arrow button.
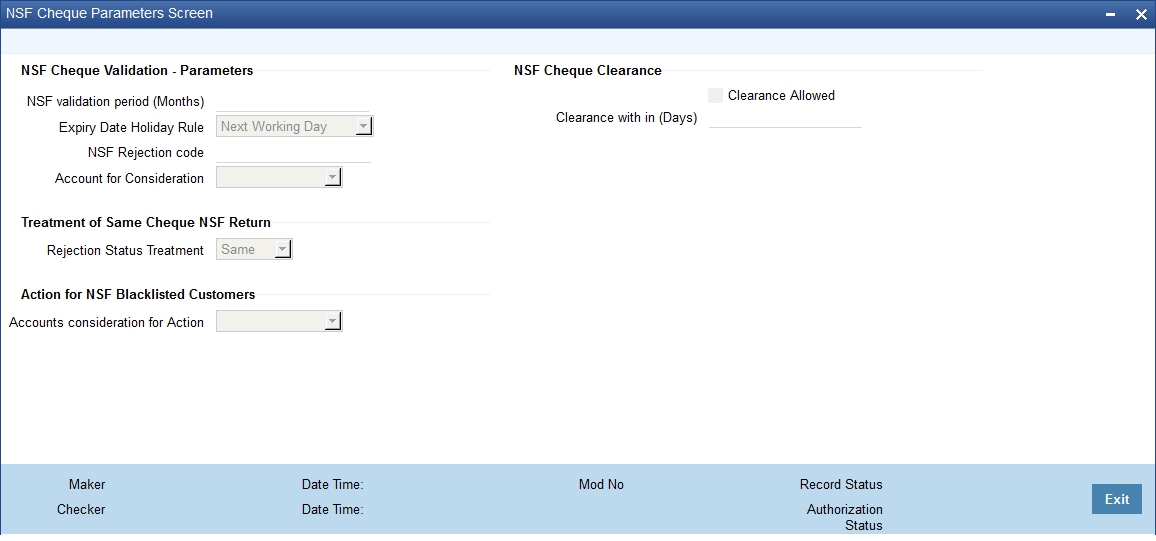
NSF Cheque Validation – Parameters
NSF validation period (months)
Specify the period during which the NSF validation is considered for cheque return.
Expiry Date Holiday Rule
Select the Expiry Date Holiday Rule from the drop down list.
The options are:
l Next Working Day - If the expiry date falls on a holiday, then the expiry date will be set to the next working day of the application.
l Previous Working Day - If the expiry date falls on a holiday, then the expiry date will be set to the previous working day of the application.
NSF Rejection Code
Select the reason for NSF rejection from the adjoining option list.
Account for Consideration
Select the type of accounts to be considered for NSF return from the drop down list.
The options are:
l Current Account - If ‘Current account’ is selected, then the system will consider the NSF of current accounts cheques for the NSF blacklisting process.
l Savings Account - If ‘Savings Account’ is selected, then the system will consider the NSF of savings account cheques for the NSF blacklisting process.
l Both - If ‘Both’ is selected, then the system will consider both current accounts and savings accounts cheques for the NSF blacklisting process.
Note
– If the customer is blacklisted inside the bank or central bank, the cheque book issue should be blocked for all his/her accounts till the expiry date of the NSF level. On the expiry date, the restriction should be removed for the customer automatically.
– If customer A who is blacklisted, has personal account and also has a joint account with customer B, then customer A cannot request for cheque book in his personal account and joint account. However, Customer B can still get cheque book in his personal account but not in the joint account.
– If the customer who is blacklisted is an authorized signatory in a corporate account, the corporate account will not be blacklisted.
– If a corporate customer is blacklisted due to cheque returns, the authorized signatories will not be blacklisted and their individual accounts will not be blacklisted.
l System should mark the customer status as per the below criteria:
– If a customer cheque is returned over the counter or uploads clearance due to NSF, the customer status should be set as ‘0’ and it should be reported to CB during the Interface hand off.
– If a customer cheque is returned over the counter or upload clearance due to NSF and the customer is already marked as Central bank blacklisted customer, then the customer status should be set as ‘1’ and it should be reported to CB during the Interface hand off
– If the customer is blacklisted in central bank and updated though the interface, the customer status should be set as ‘2’ and it should be reported to CB during the interface hand off.
– If a customer cheque is returned over the counter due to NSF, the customer status (retuned over the counter) should be set as ‘3’ and it should be reported to CB during the Interface hand off. Here, the customer will be reported in two interface hand off (status as ‘1’ and status as ‘3’)
Treatment of Same Cheque NSF Return
Rejection Status Treatment
Select the rejection status treatment from the drop down list.
The options are:
l Same - If the rejection status is same then the multiple rejection of the same cheque is considered as single rejection and NSF level is moved only once.
l Different - If the rejection status is different then each rejection of the same cheque will be considered as different rejection and is changed to next level.
|
Clearing Flag |
Clearing Days |
Rejection Treat |
Cheque Process |
Status Movement |
|
Yes |
Less than 7 days |
Same |
Cleared |
(SP1 to NORM) |
|
Yes |
Less than 7 days |
Same |
Reject |
No Change |
|
Yes |
Less than 7 days |
Different |
Cleared |
(SP1 to NORM) |
|
Yes |
Less than 7 days |
Different |
Reject |
(SP1 to SP2) |
The system displays the error message on processing of cheque after clearing days: as “Cheque No XXX1 of account XXXXXXX01 cannot be used again as the clearing days have exceeded.”
Action for NSF Blacklisted Customers
Accounts consideration for Action.
Select the accounts considered for blacklisting actions from the drop down list.
The options are:
l Current Account
l Savings Account
l Both
Note
– If ‘Current account’ is selected, then the system will consider current accounts for executing the actions.
– If ‘Savings Account’ is selected, then the system will consider all savings accounts for executing the actions.
– If ‘Both’ is selected, then the system will consider both all current accounts and savings accounts for executing the actions.
NSF Cheque Clearance
Clearance allowed
Check this box to indicate if the cheque is Cleared within the clearance period.
Clearance with in (days)
Specify the time span for clearance of NSF returned cheque.
Note
– If the cheque is rejected due to NSF in joint account then the entire joint account holder’s NSF level will be changed from level1 to level 2.
– If you are blacklisted and you are an authorized signatory in a corporate account then the account will not be frozen.
– If the parameter is set, then, suppose a cheque is returned and represented for clearance. If the cheque is cleared within the specified time, then the system will consider the cheque as cleared cheque and up-grade the NSF level of the customer ( SP2 to SP1)
– If the parameter is not set, then, suppose a cheque is returned and represented for clearance. If the cheque is cleared, even then system will consider the cheque as a retuned cheque and keep the down grated status without any change.
3.1.5 Mutual Settlement Transaction
You can settle the NSF rejected cheque transaction through offline settlement in “Mutual Settlement Transaction’ screen. You can invoke this screen by typing ‘STDNSFMS’ in the field at the top right corner of the Application tool bar and clicking the adjoining arrow button.
If the settlement transaction status is settled then the system executes the NSF formula for all the NSF cheque transactions except NSF transaction.
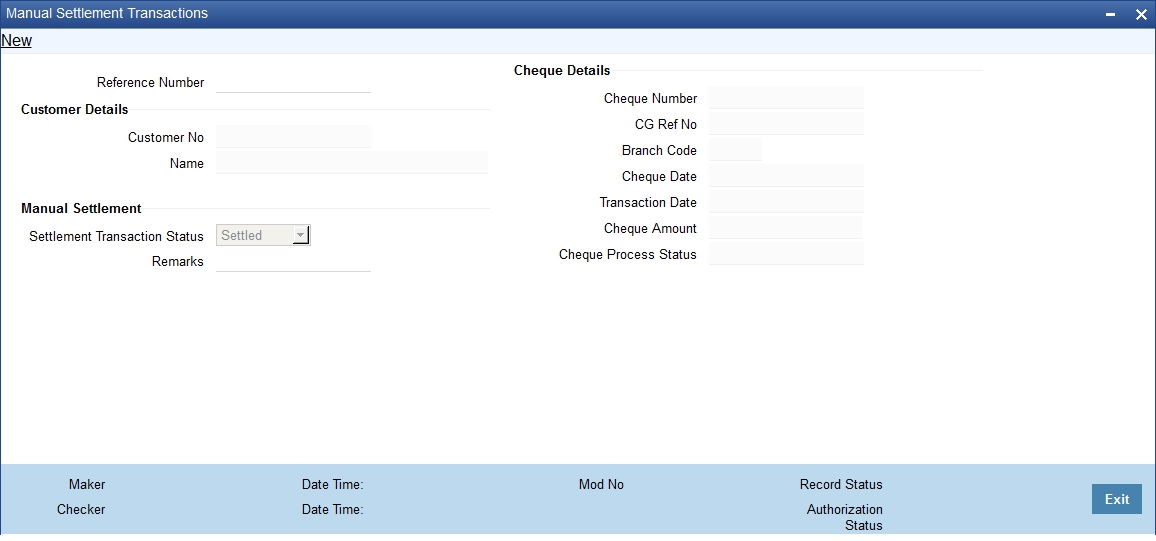
Specify the following here:
Reference No
System defaults the unique reference number to identify the manual settlement transaction.
Customer Details
Customer No
Select the customer number from the adjoining option list.
Customer Name
Specify the name of the customer.
Manual Settlement
Settlement Transaction Status
Select the settlement transaction status from the drop down list.
The options available are:
l Settled
l Not Settled
Remarks
Specify the remarks for the manual clearance.
Cheque Details
Cheque No
Select the cheque number from the adjoining option list.
CG Ref No
System defaults the clearing reference number based on the cheque number.
Branch Code
System defaults the bank code to which the cheque has been cleared.
Cheque Date
System displays the value date of the cheque transaction.
Transaction Date
System displays the date of transaction for the cheque.
Cheque Amount
System displays the cheque amount.
Cheque Process Status
System defaults the current cheque processing status.
The ‘Narrative Maintenance’ screen allows you to define the format of a Detailed Account Statement.
Invoke the ‘Narrative Maintenance’ screen, by typing ’ CSDSTNRT’ in the field at the top right corner of the Application tool bar and clicking the adjoining arrow button.
If you are defining the details of a new record, choose new from the Actions Menu, or click new icon from the toolbar. The ‘Narrative Maintenance’ screen is displayed without any details.

After you have entered all the details of a record, save the record using one of the following methods:
l Click Save icon in the toolbar
l Select Save from the Actions Menu
While maintaining narratives, if you choose the narrative type for a module the prompt codes maintained for this module are displayed. You can choose the relevant prompt code from the option list.
For the FT module, the prompt codes can be the following:
l FT-EVENTDESC
l FT-USERREFNO
For the above prompt codes you have to enter the descriptions in the desired language. For instance the description for FT-EVENTDESC can be maintained as EVENT DESCRIPTION in the English language.
The Account statement for the above maintenance will look like EVENT DESCRIPTION – REVERSAL, where reversal is the actual event happening. The word REVERSAL itself is picked up from the same screen for Event type of narratives.
Note
The same logic applies to the other type of narratives
This section contains the following topics:
l Section 3.3.1, "Maintaining Customer Instruction Details"
l Section 3.3.2, "Viewing Customer / Account Instructions on ‘F6’ Key-Press"
l Section 3.3.3, "Viewing Customer / Account Instruction Details in Override Screen"
l Section 3.3.4, "Viewing the Instructions Summary"
3.3.1 Maintaining Customer Instruction Details
‘Instructions Maintenance’ screen allows you to maintain instructions for customers / Accounts with the current branch as the local branch. You can capture the instructions for each customer or account. You can describe the instruction in ‘instruction Description’ field. Instruction pops-up when you press the hot-key ‘F6’.
Invoke this screen, by typing ‘CSDINSTR’ in the field at the top right corner of the Application tool bar and clicking the adjoining arrow button.
Click the new button on the Application toolbar.
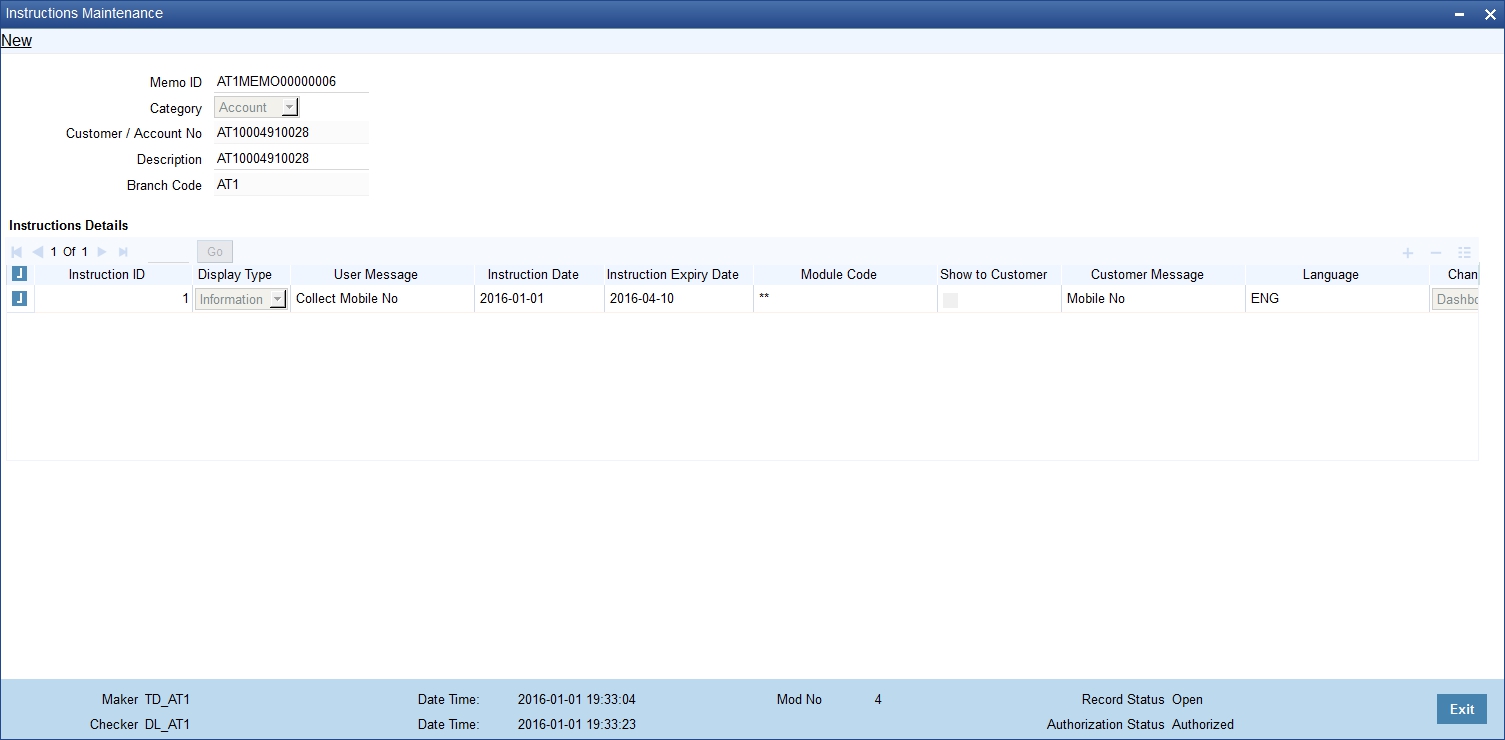
You need to specify the following details.
Memo ID
System displays a unique, system generated memo ID which is associated with customer or account.
Branch Code
System displays the branch code of the customer.
Category
Select ‘Customer’ to maintain the memo for the customer. Select ‘Account’ to maintain the memo for the account
Customer / Account Number
Specify the required Customer / Account Number from the list of values maintained.
Customer / Account Name
System displays the customer ID or account name in this field.
Instruction Id
Unique ID for the instruction is displayed here.
Display Type
Select appropriate display type from the drop-down list.
l If you select ‘Override’, then system displays all the memos with override category in override screen while saving and authorizing the transaction.
l If you select ‘informational’, then system displays the memo when you press the hotkey ‘F6’.
l If you select ‘Both’, then system displays the memo both in the override screen and on the key press.
Instruction Description
Describe the actual instruction here. You can describe the instructions in detail as there is no restriction over the number of lines. Described instruction pops-up when you press the hotkey ‘F6’.
Instruction Date
Specify the date on which the instruction is added. You can select the date from the adjoining calendar. System displays the application date here; however, you can modify the date to the future date.
Note
Instruction date cannot be a past date.
Instruction Expiry Date
Specify the date on which the instruction will expire. You can select the date from the adjoining calendar. The instruction will not be displayed if the expiry date is greater than the application date.
Note
You can query, modify and amend other branch transactions only through the summary screen
Counterparty Name
The system displays the name of the specified counterparty based on the details maintained at ‘Customer Maintenance’ level.
Module Code
Specify the module code for which memo instructions are maintained for a customer. Alternatively, you can select the module code from the option list. The list displays all valid module code maintained in the system.
You can maintain memo instruction for a customer either for a particular module or for all modules. To maintain memo instruction for all modules, select '**' from the option list.
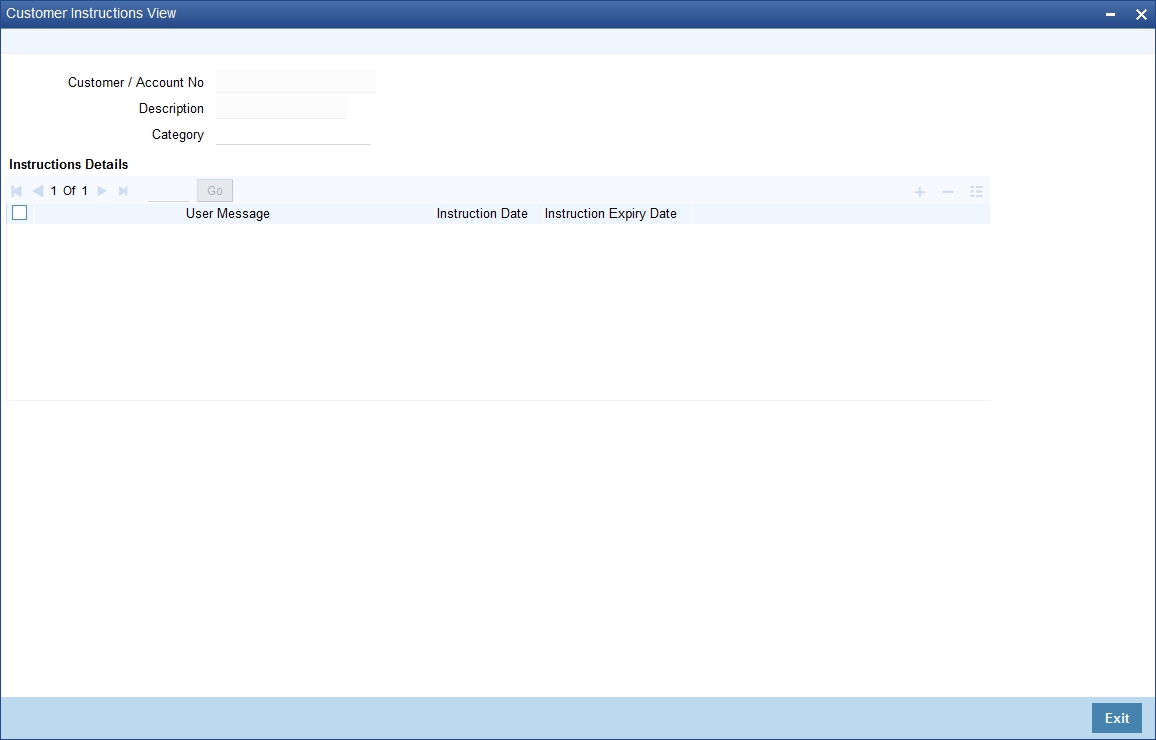
3.3.2 Viewing Customer / Account Instructions on ‘F6’ Key-Press
All the instructions maintained in the ‘Instructions Maintenance’ screen can be viewed in the ‘Customer Instructions View’ screen. To invoke this screen, press the hot-key ‘F6’ on customer Id / account number.
If you have selected ‘Display Type’ as ‘Informative’ or ‘Both’ in ‘Instruction Maintenance’ screen, then the instruction will be displayed in the following ‘Customer Instruction View’ screen by pressing the hot key ‘F6’ at the time of saving the input stage and authorizing the transaction.
In the ‘Instruction Maintenance’ screen, If you press ‘F6’ in the ‘Customer ID’ field, the system fetches all the instructions of the selected customer and module specified. If you press F6 in the‘Account Number’ field, the system fetches all the instructions of the contract.
The ‘Customer Instruction View’ screen will be launched with all the instructions maintained for the customer / account
The following Details can be viewed in this screen:
l Customer / Account Number
l Customer / Account Name
l Category
l Instruction Number
l Instruction Description
l Effective Date
l Instruction Expiry Date
3.3.3 Viewing Customer / Account Instruction Details in Override Screen
If you have selected ‘Display Type’ as ‘Override’ or ‘Both’ in ‘Instruction Maintenance’ screen, then the instruction will be displayed in the following ‘Override’ screen at the time of saving the input stage and authorizing the transaction.
Select the message and click ‘Post’ to over ride the message.
3.3.4 Viewing the Instructions Summary
You can view the summary of instructions in the ‘Instructions Summary’ screen. It displays the status of the records maintained, whether it is authorized, unauthorized or rejected.
You can invoke this screen by typing ‘CSSINSTR’ in the field at the top right corner of the Application tool bar and clicking on the adjoining arrow button.

In the above screen, you can base your queries on any or all of the following parameters and fetch records:
l Authorization Status
l Record Status
l Memo ID
l Customer/Account Number
l Category
l Branch Code
Select any or all of the above parameters for a query and click ‘Search’ button. The records meeting the selected criteria are displayed.
System displays the following details pertaining to the fetched records:
l Authorization Status
l Record Status
l Memo ID
l Customer/Account Number
l Category
l Branch Code
Note
You can query, modify and amend other branch transactions through the summary screen only.
This section contains the following topics:
l Section 3.4.1, "Maintaining Lead Details"
l Section 3.4.2, "Product Code Tab"
l Section 3.4.3, "Offer Details Tab"
3.4.1 Maintaining Lead Details
You can capture details of products and offers that are rendered to a customer and the response of the customer to the same in the ‘Lead Input’ screen. To invoke this screen, type ‘STDLEDMT’, in the field at the top right corner of the Application toolbar and click the adjoining arrow button.
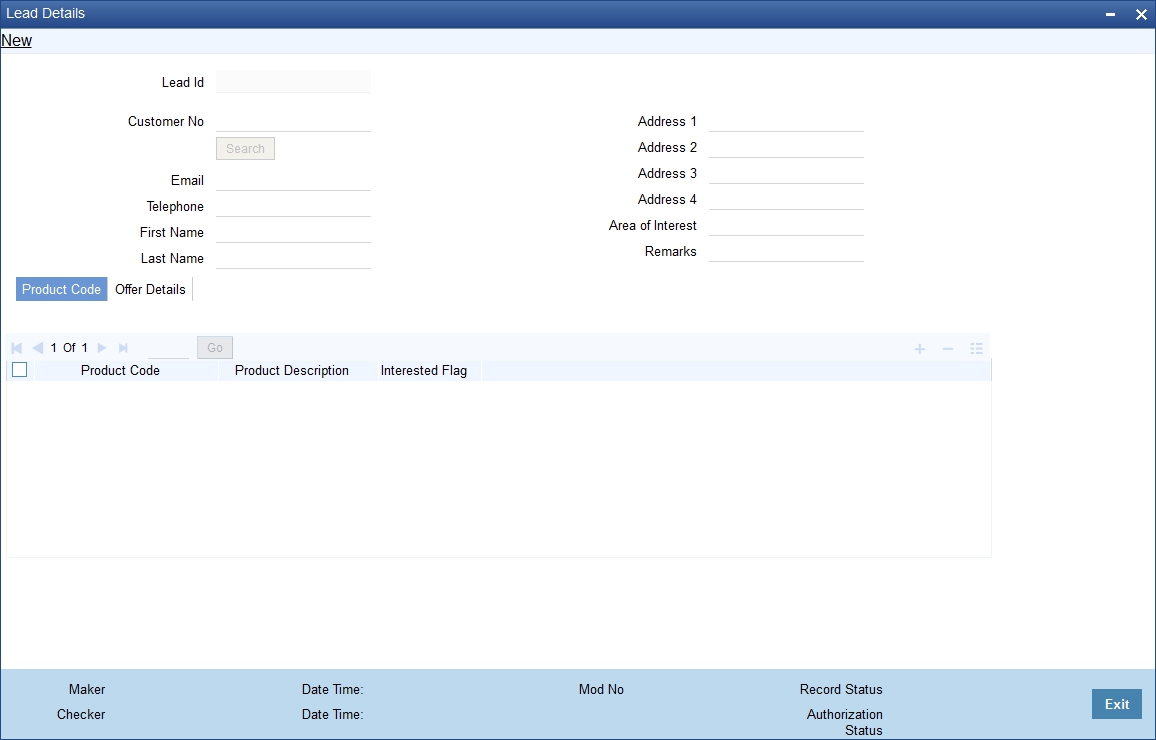
Specify the following details:
Lead Id
The system displays the lead identification number.
Customer No
Specify the customer identification number whose request is being maintained. The adjoining option displays all the customer numbers that are maintained in the system. You can choose the appropriate one.
The system will display the customer’s email address based on the customer number selected.
Telephone
The system will display the customer’s contact number based on the customer number selected.
First Name
The system will display the customer’s first name based on the customer number selected.
Last Name
The system will display the customer’s last name based on the customer number selected.
Address 1, 2, 3, and 4
Specify the address line 1, 2, 3, and 4.
Areas of Interest
Specify the area in which the customer is having interest.
Remarks
Specify any additional information, if any.
Specify the product details:
Product Code
Specify the product code which is to be associated to the customer. The adjoining option list displays all the product code that are maintained in the system. You can select the appropriate one.
Product Description
The system displays a brief description of the product.
Interested Flag
Check this box to indicate that the product that is selected should be included in the lead creation.
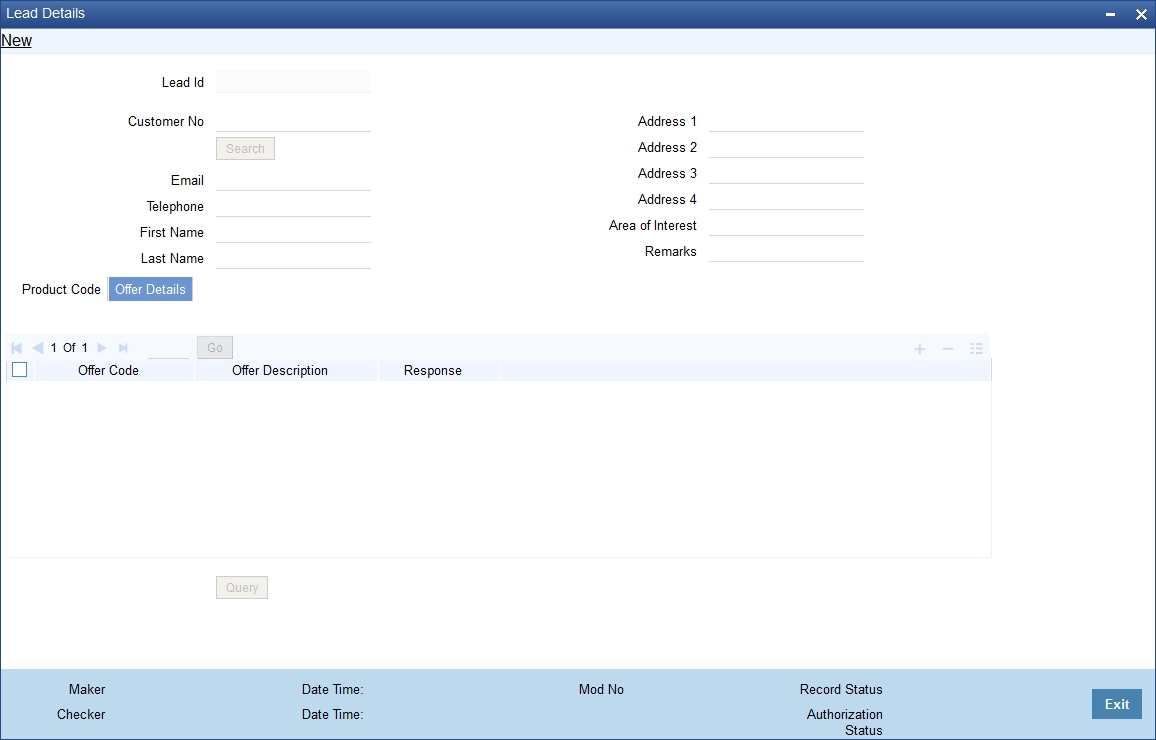
Specify the offer details:
Offer Code
Specify the offer code that is rendered to the customer. The adjoining option list displays all the offer code that are maintained in the system. You can select the appropriate one.
Offer Description
The system displays a brief description of the offers that are offered to the customer.
Response
Choose the offer response from the drop-down. The options available are:
l Accepted
l Rejected
l Interested
l Not interested
l Tell a friend
3.5 Service Request Maintenance
This section contains the following topics:
l Section 3.5.1, "Maintaining Service Request Input Details"
l Section 3.5.2, "Viewing Service Request Details"
3.5.1 Maintaining Service Request Input Details
You can maintain the customer and non-customer’s request\complaints in the ‘Service Request Input’ screen. To invoke this screen, type ‘STDSRQST’ in the field at the top right corner of the Application tool bar and click the adjoining arrow button.
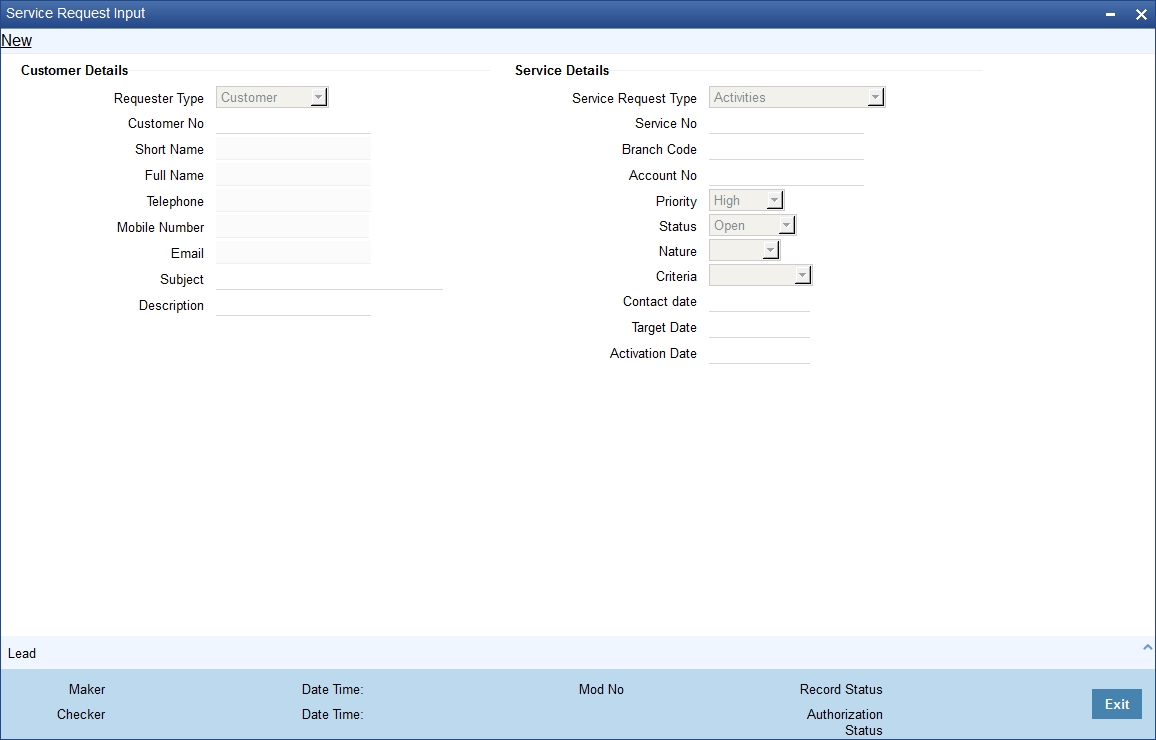
You need to maintain the following details:
Customer Details
Specify the following details:
Requestor Type
Select the type of requestor from the adjoining drop-down list. This list displays the following values:
l Customer
l Non- Customer
Customer No
Specify the customer identification number whose request is being maintained. The adjoining option displays all the customer numbers that are maintained in the system. You can choose the appropriate one. This field will be enabled only if the requestor type is selected as ‘Customer’.
Short Name
The system will display the customer’s short name based on the customer number selected.
Full Name
The system will display the customer’s full name based on the customer number selected.
Telephone
The system will display the customer’s contact number based on the customer number selected.
Mobile Number
The system will display the customer’s mobile number based on the customer number selected.
The system will display the customer’s email address based on the customer number selected.
Subject
Specify the subject matter of the request\complaint.
Description
Specify the brief description of the request\complaint.
Service Details
Specify the following details:
Service Request Type
Select the service request type from the adjoining drop-down list. This list displays the following values:
l Transactional
l Non Transactional
l Complaint
Service No
The system generates the service request number.
Branch Code
The system displays the branch
Account No
The system will display the customer’s account number based on the customer number selected.
Priority
Select the priority of the request\complaint from the drop-down list. This list displays the following values:
l High
l Medium
l Low
Status
Select the status of the request\complaint from the drop-down list. This list displays the following values:
l Open
l Pending
l Closed
l Escalated
Nature
Select the nature of the request\complaint from the drop-down list. This list displays the following values:
l Service
l Sales
Criteria
Select the criteria of the request\complaint from the drop-down list. This list displays the following values:
l Enquiry
l Channel
l Product
l Application
l Maintenance
Contact Date
Specify the date on when the request or compliant is made.
Target date
Specify the date on when the request or compliant is to be closed.
Activation Date
Specify the date on when the request or compliant is activated.
3.5.1.1 Lead Button
You can maintain both the customers and non –customer details in the ‘Lead Input‘ screen by clicking ‘Lead’ button in the ‘Service Request Input’ screen. The following screen will be displayed.
For more details on the Lead Input screen, refer the ‘Maintaining Lead Details’ section of this user manual.
3.5.2 Viewing Service Request Details
You can view the summary of service request details in the ‘Service Request’ screen. To invoke this screen, type ‘STSSRQST’ in the field at the top right corner of the Application tool bar and click on the adjoining arrow button.
The screen is as shown below:

You can query on records based on any one or all of the following criteria:
l Authorization Status
l Record Status
l Service No
l Service Request Type
l Customer No
l Account No
l Branch Code
l Requestor Type
l Status
l Contact date
l Target Date
l Telephone
Click ‘Search’ button. The system identifies all records satisfying the specified criteria and displays the following details for each one of them:
l Authorization Status
l Record Status
l Service No
l Service Request Type
l Customer No
l Account No
l Branch Code
l Requestor Type
l Status
l Contact date
l Target Date
l Telephone
3.6 Maintaining Location Details
While maintaining Customer Information details through the CIF Maintenance screen, in addition to indicating the name of the country in which your customer resides you can also choose to specify the name of the region or locality where your customer stays. For instance, Silas Marner, a customer of your bank is a Londoner, Great Britain is his country of residence. He lives in the northern part of London; therefore North London becomes the location where he resides.
Location codes, along with a brief description of the locality can be maintained through the ‘Location Details’ maintenance screen.
Invoke the ‘Location Maintenance’ screen, by typing ‘STDCULOE’ in the field at the top right corner of the Application tool bar and clicking the adjoining arrow button.

Location Code
You can capture a unique three-character code to identify the locality where the customer resides.
Note
While maintaining customer information details and associating a location code with a Customer and Country Code combination, a list of all the valid location codes you have maintained in this screen will be available in the option list for the Location Code field. You can select the appropriate code.
Description
You can also associate a brief description with the location code. This description is for information purposes only and will not be printed on any customer correspondence.
Note
While maintaining the Customer Short Name in the ‘CIF Details’ screen the system automatically appends the Location code to the customer short name when you associate the appropriate Location Code with the Customer Code.
3.7 Capturing Algorithm Details in Oracle FLEXCUBE
In Oracle FLEXCUBE, you can choose to generate check-digits for Customer Accounts based on the algorithm of your choice. You can define algorithms of your choice through the ‘Algorithm Maintenance’ screen. Invoke this screen by typing ‘CSDALGMN’ in the field at the top right corner of the Application tool bar and clicking the adjoining arrow button.

In this screen, you should specify the following details:
l The Name of the Algorithm. This will uniquely identify the algorithm in Oracle FLEXCUBE
l A brief description of the algorithm
Note
After you capture the details of a new algorithm you must ‘write’ the algorithm through the ‘Algorithm Procedure Generation’ screen
3.8 Generating Procedure for Algorithm
For every algorithm that you define through the ‘Algorithm Maintenance’ screen must write the algorithm generation rule through the ‘Algorithm Generation Input’ screen.
Invoke this screen by typing ‘ ‘CSDALGEN’ in the field at the top right corner of the Application tool bar and clicking the adjoining arrow button.
The screen is as shown below:

Since the access to this screen is restricted to only a few authorized users at your branch level, you will be allowed to invoke the screen only if you have the requisite rights.
In this screen, you can specify:
l The name of the algorithm for which you are writing the algorithm generation rule. A list of all the algorithms you have maintained through the ‘Algorithm Maintenance’ screen is displayed. You can select the appropriate
l The Function Type, which specifies the type of the function using the algorithm. The options available are:
– Validation - indicates that the function is using the algorithm to validate the ‘input’ string. For all such functions, the input string is validated as being True or False depending upon whether the validation was a success or a failure
– Check Digit Generation - indicates that the function is used for the generation of check digit using the algorithm. Such functions will take the input string without the check digit and return the check digit
You must enter the algorithm rule in the form of PL/SQL code. After writing the PL/SQL code, click ‘Execute’ button to compile the code. The algorithm rule is validated by the system and the success or failure message is shown in the Error editor. Click ‘Errors’ button to view the errors.
If any checks fail, you must alter the statement so that the validation can be made successfully. The algorithm is generated on Authorization of the rule.
Click the ‘Clear’ button, the Algorithm Rule editor and the Error editor will be cleared for you to enter a new rule in the field.
Note
The System provides two pre-defined key elements both for Check Digit Generation and Validation type of algorithms. They are:
l l_branch_code
l l_customer_no
You will not be allowed to enter the following keywords in an Algorithm Rule:
l ROLLBACK
l COMMIT
l DECLARE
l DELETE
l UPDATE
l INSERT
Once defined, you will not be allowed to unlock and amend the following fields:
l Algorithm Rule
l Algorithm Description
l Function Type
You can refer the Clearing user manual for more information
3.9 Maintaining Deposits Instructions
You can maintain deposits instructions for auto created deposits. The values you specify here will override the parameters you have maintained in the Account Class maintenance. Invoke the ‘Deposits Instruction’ screen from the Application Browser to maintain the deposits instructions specifically for the auto created deposits. To invoke this screen type ‘ICCINSTR’ in the field at the top right corner of the Application tool bar and click the adjoining arrow button.
The screen is as shown below:
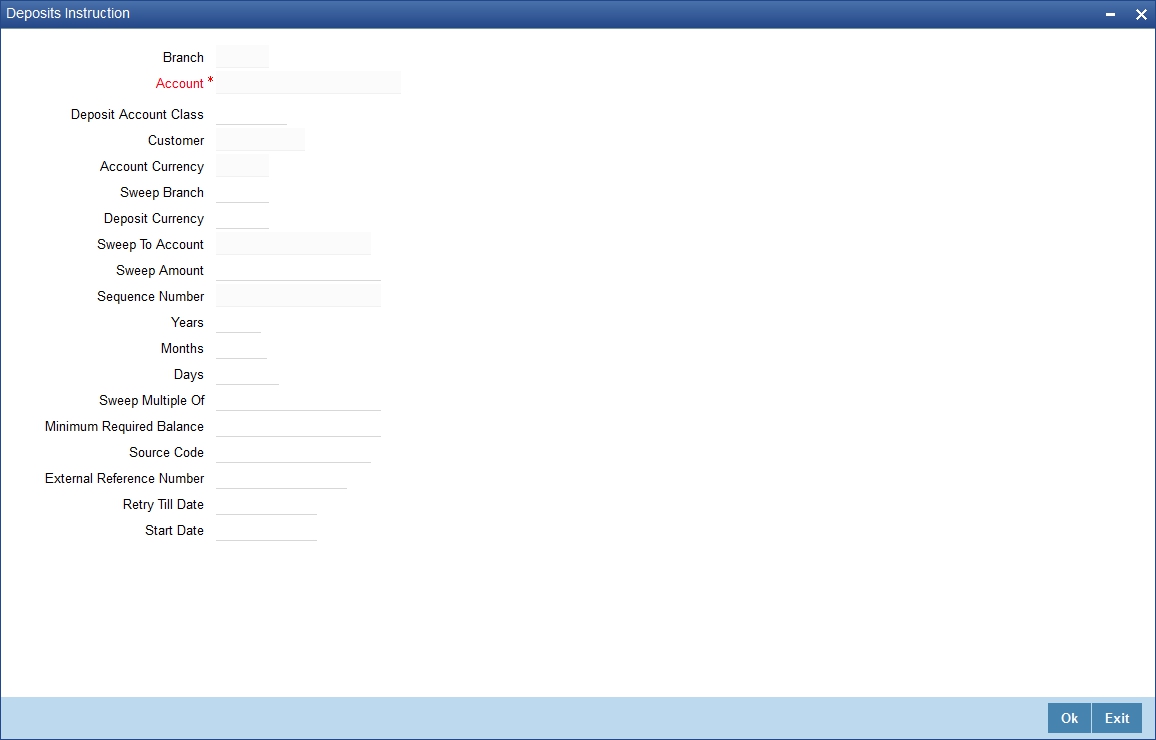
You can set the terms and a condition for a deposit as follows:
l Account Number – This is the account number of the deposit
l Account Class – This is the account class to which the account is linked
l Customer Number – The customer for whom you are maintaining the deposit instructions.
l Sweep to Account – Indicate the account to which the sweep is carried out
l Amount – This is the deposit amount
l Minimum Required Balance – The minimum balance indicates that only the amounts above this limit will be used for auto creating deposits
l Source Code – The code assigned for the sweep
l External Reference Number
l Start Date – The instructions will be valid from this date
l Branch Code – The branch code of the branch which is to be associated with the account
l Sequence Number – The system generated sequence number for the instruction you are maintaining
l Currency Code - The Currency of the particular account
l Deposit Currency – The currency in which the deposit is made
l Tenor – The tenor for the deposits that are opened under an account class
l Sweep Multiple of – The sweep can only be in multiples of the sweep specified
l Retry Till Date – The instructions specified will be invalid after this date. Any failed sweeps after this date will not be picked up for processing the next day