Add a Column based on a Database Query
If you choose Query as the data entry method, use these instructions to add a column to the Planning Sheet that will contain values extracted from the database. These values will be retrieved from the database only if they meet the conditions you specify. (In operation, you will be extracting data from the database and testing it to determine whether or not it should be included in this column.)
The Query option is only available if the data source you specify has been built on one of the following data definitions:
- SYS Numeric Datasource
- SYS Date Datasource
To create a query
- In the Data Source field, choose the field on the sheet that should show the value you retrieve from this query.
- In the Entry Method field, choose Query and click the Define button. The Query Definition window opens.
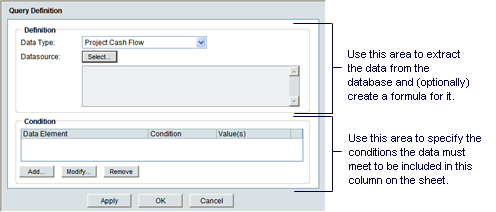
- In the Data Type field, select the functional area the data should come from.
This field is the first step in describing where the data resides in the database. For example, the data type could be a Cost BP, a fund allocation request, or a cash flow.
- In the Datasource field, click the Select button. The Formula Creation window opens, showing a list of the fields from the data type you selected.
You can drill down into the data type for other data sources by clicking the arrow beside this field and selecting other data source areas.
- (Optional) Create a formula using the field values in this data source, or field values and numeric operators, such as add, subtract, or multiply. Click OK to return to the Query Definition window.
- Specify the query condition as follows:
- Click Add. The Query Condition window opens.
- In the Data Element field, click Select to open the Data Element Picker.
- In the Data Source field, select the functional area the data should come from. The application displays a list of the fields from the data source you selected.
- From the list, select the field that contains the value you want to place conditions on and click OK.
- If the value meets the condition you specify, it will be included in this column on the sheet.
- If the field you select is a date field, the system will display an additional field, Timescale Units, in which you will need to specify the option that matches the column definition. For example, if the column is a yearly budget, you would select Years. If the column is to show a quarterly value, you would select Quarters.
- In the Condition field, select the condition the value must meet to be included on the Planning Sheet, such as equals, or does not contain. For example, the value in the data element must equal 10, or the value in the data element must not equal (that is, "is not") Yes.
- In the Values field, enter the value you want to test the condition on (or select the value from the list that appears when you click the Select button).
The Select button may or may not appear, depending on the data element you choose. For example, for a data source of "Business Process/Status," you could choose a status from the list of statuses associated with that BP. This would limit the column data to business process records of that status. - Click OK.
- On the Query Definition window, click OK.
Last Published Thursday, December 14, 2023