Working with Baselines
Before you update a schedule for the first time, you should create a baseline plan. The simplest baseline plan is a complete copy, or snapshot, of the original schedule. This snapshot provides a target against which you can track a project's cost, schedule, and performance. You can save a copy of the current project to use as the baseline or you can convert another project in the EPS hierarchy to a baseline for the current project.
To help categorize, or track, multiple baselines for a single project, you can assign each baseline a type that reflects its purpose, for example, initial planning baseline, What-if project baseline, customer sign-off, or midproject baseline.
Regardless of the number of baselines you store for a project, at any given time you can only select at most two baselines for use in making comparisons in P6. The project-level baseline is used for project/activity usage spreadsheets and profiles, as well as for earned value calculations.
You can convert another project in the EPS hierarchy to a baseline for use in comparisons with the current project. Before converting a project to a baseline, if you still want to have access to the original project, you should make a copy of it. Once you convert a project to a baseline, it is no longer available in the project hierarchy. You can restore a baseline, making it available again as a separate project in the project hierarchy, in order to modify it or update it.
If you choose to update a baseline, you have control over which data items are updated. For example you can choose to add new activities from the project to the baseline, but not to delete activities from the baseline which have been deleted from the project. You can also control which activities to update using a filter.
Note: You must have the Edit Project Details Except Costs/Financials and Assign Project Baseline project privileges to set the project baseline.
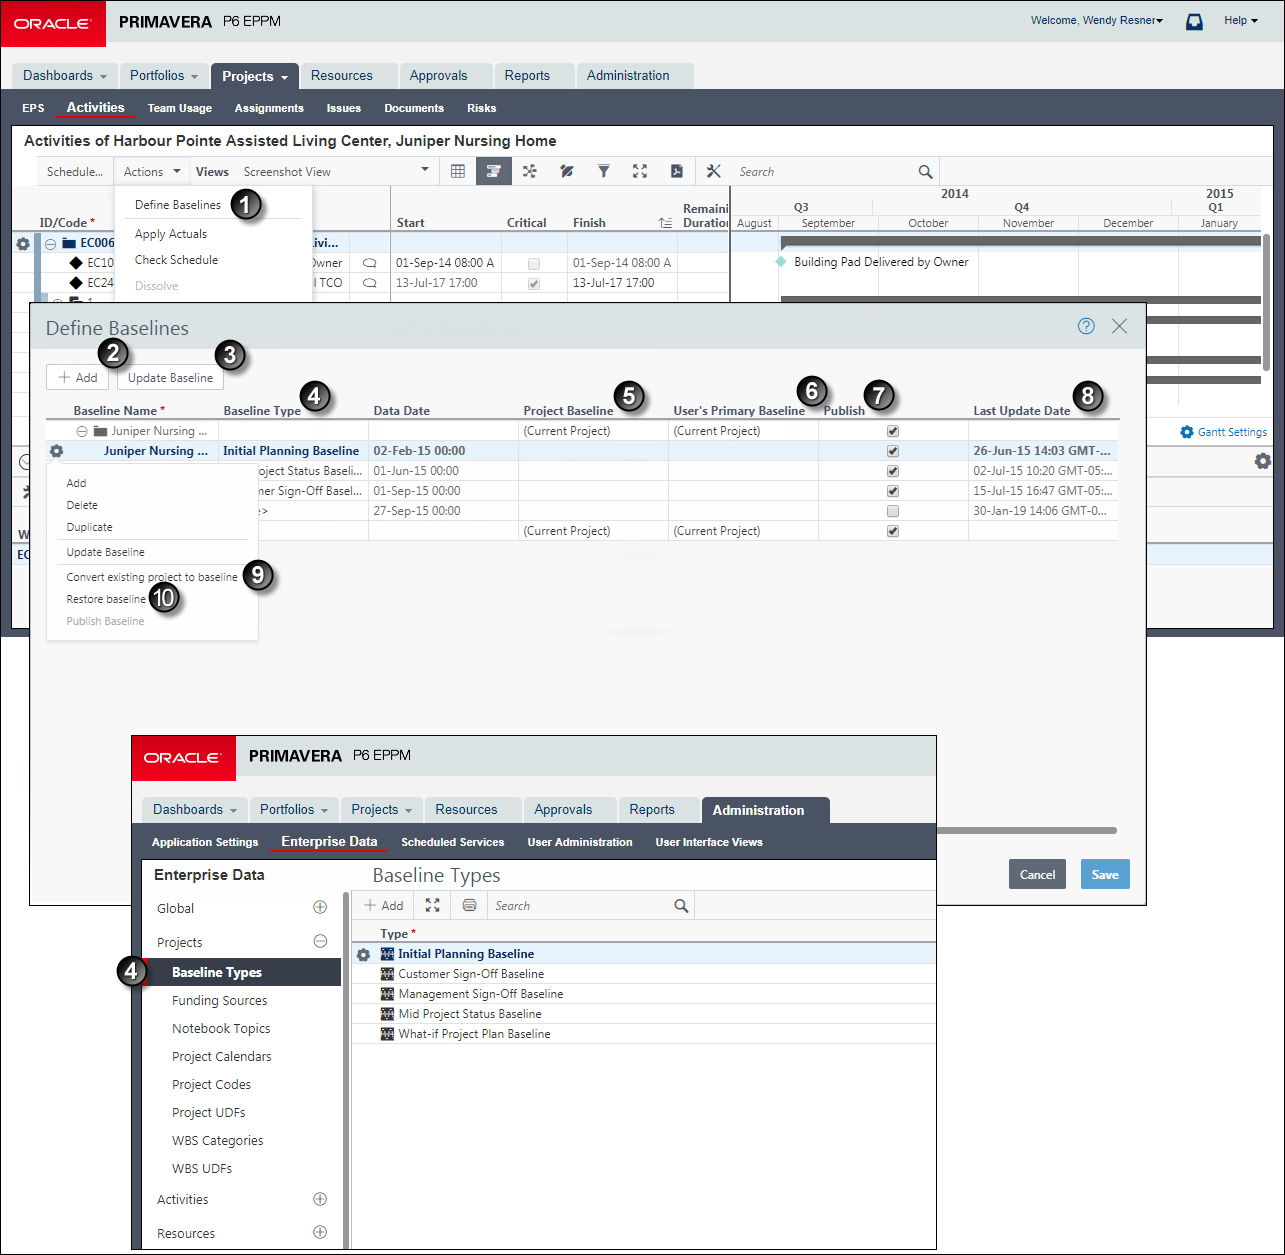
Table of Working with Baseline Elements
Item | Description |
|---|---|
| Define Baselines: Use Define Baselines to add and delete baselines and restore projects from baselines. |
| Add Baselines: When you add a baseline, give it a name, assign it a type, and decide if you want to make it the Project Baseline or User's Primary Baseline for the currently selected project. Baseline designations are made in the projects rows of the table highlighted in blue. |
| Update Baselines: Update the baseline with the latest data from the project. You can select which data to update. |
| Baseline Type: Assign baseline types to baselines to help categorize multiple baselines for a single project. Configure the available baseline types along with your other Enterprise Data settings. |
| Project Baseline: Lists the available baselines for the selected project. Select the baseline to use as the project baseline. If a baseline does not exist, the current project is the default value. |
| User's Primary Baseline: Select the user's primary baseline from the list of available baselines. If a baseline does not exist, the current project is the default value. |
| Publish: Select this option for all baselines that you want to publish for reporting purposes. You must publish a project before you can publish any of its baselines. |
| Last Update Date: The date that the baseline was last updated. |
| Convert Existing Project to Baseline: Save a copy of the baseline before you convert it. Convert a project to use it as a baseline for a current project. |
| Restore Baseline: Use restore a baseline to modify a baseline project. You must first unlink a baseline from its current project by restoring it as a separate project. You can then work with this restored baseline project as you would any other project in the EPS. |
Note: You can define up to three baselines for a project in P6 Professional.
Related Topics
Last Published Thursday, February 1, 2024