4. Creating Islamic Term Deposits
Any deposit with a fixed term or tenor is referred to as a Term Deposit (TD). To handle a TD in Oracle FLEXCUBE, you need to:
l Set up a suitable account class
l Set up a suitable IP product
l Maintain a TD account
l Define Profit Conditions and other parameters for the deposit account
Additionally, you need to maintain the following details for operating a Term Deposit (TD):
l Instructions
l Payin Parameters
l Closing Mode
This chapter contains the following sections:
l Section 4.2, "Term Deposit Account Class"
l Section 4.3, "Profit Preferences for TD"
l Section 4.5, "Input and Authorization Limit Validation for TD"
l Section 4.7, "Viewing TD Redemption Details"
l Section 4.8, "Redeeming TD Partially"
4.2 Term Deposit Account Class
This section contains the following topics:
l Section 4.2.1, "Maintaining Term Deposit Account Class"
l Section 4.2.2, "Specifying Deposit Preferences"
l Section 4.2.3, "Specifying the Auto Deposits"
4.2.1 Maintaining Term Deposit Account Class
To handle term deposits in Oracle FLEXCUBE, you have to set up an account class of type ‘Deposit’, in the ‘Islamic Account Class Maintenance’ screen. You can invoke the ‘Islamic Account Class Maintenance’ screen by typing ‘IADACCLS’ in the field at the top right corner of the Application tool bar and clicking the adjoining arrow button.

Refer the section ‘Maintaining Islamic Account Class’ in the chapter ‘Creating Islamic Accounts’ of this User Manual for details about setting up an account class.
Note
Typically, for every deposit scheme you offer at your bank, you would set up a Deposit Type Account Class.
4.2.2 Specifying Deposit Preferences
Click the ‘Deposit’ button to define the parameters for a deposit type account class. The ‘Deposit Account Details’ screen will be displayed.

Indicate the following details:
Allowing Auto Rollover of Deposits
You can opt to automatically rollover a deposit on its maturity date. Choose the ‘Auto Rollover’ option to automatically rollover deposits opened under the account class. Term deposits that are open and marked for Auto Rollover will automatically be rolled over during the Beginning of Day operations on the Maturity date. You can define the terms and conditions for the new deposit while maintaining the deposit account in the ‘Details for Deposit Type Account’ screen.
Close on Maturity
Check this field to close the term deposit account on maturity date and transfer the amount to the principal liquidation account. If you select this option, the principal liquidation account should be an account other than the term deposit account.
Month-end Maturity Deposit
Check this box to indicate that the deposit is a month-end maturing deposit, i.e., the deposit matures on the last working day of the month.
If this box is checked at the account class, then during deposit input, if the account opening date is the last working day of the month and the maturity date is the last day of the subsequent month, then you need to specify tenor in Months. If this box is un-checked, then the deposit is not considered as an month-end maturing deposit even though the deposit is opened on the last working day of the month and the tenor of the deposit is across months.
During TD opening, a deposit is considered as a month-end maturing deposit only if the following criteria are met:
l The start date of the deposit is the last working day of the month
l The tenor of the deposit is across months
l The ‘Month-end Maturity Deposit’ box should be checked
An account class with ‘Month-end Maturity Deposit’ box checked can also have deposits that are not month-end maturing deposits. A deposit is classified as an ordinary deposits (not month-end maturing deposit) if the following criteria are met:
l The deposit is not opened on the last working day of the month
l The tenor of the deposit is across months but not month-end maturing
l The deposit is opened on the last working day of the month, but the tenor is in Months and Days.
Note
– For month-end maturing deposits, holiday movement and movement across months is not applicable.
– During rollover, the deposit maturity date will be the last day of the month and if it is a holiday as per the applicable holiday calendar, then the maturity date movement is not applicable for month-end maturing deposits.
Auto Extension
You can specify whether prepayment needs to be allowed for the deposit accounts before the maturity date of the deposit. However, if this option is not checked, the system will not allow you to redeem the term deposit before the maturity date.
The system also allows you to indicate whether the deposit created on this account class has to be extended to one more tenure (principal only). If you check this, the term deposit will be closed on maturity, after the completion of the extended tenure.
4.2.2.1 Defining Specifications for Unclaimed Deposits
On the maturity date of a deposit, you can opt to:
l Liquidate the deposit
l Rollover the deposit
l Move it to an ‘unclaimed’ GL
Profit for the term deposits liquidated during the specified schedules is handled in two ways:
l If a customer account has been specified, profit is moved to the account during each liquidation event
l You can opt to move the profit to an ‘Unclaimed profit GL’. When claimed, the profit can be paid out of this GL
Similarly, on maturity, the principal can be moved to specified Principal Liquidation Account, if specified, or to an Unclaimed Principal GL.
Note
– If you select the Move to Unclaimed GL option, this specification takes precedence. That is, on maturity, the funds will be moved directly to the respective Unclaimed GLs.
– If ‘Move to Unclaimed’ is opted, then payout is not mandatory
– The Unclaimed profit and Principal GLs are specified while maintaining an profit and Charges (IP) Deposit Type product. The Accounting Roles for the GLs are ‘INT_UNCLAIMED’ and ‘PRN_UNCLAIMED’ respectively. When maintaining an IP-Deposit type product, you have to map these Accounting Roles to the appropriate GLs maintained at your bank.
Note
Rate Chart Allowed checkbox is implicitly unchecked by default.Deposit Amount Currency wise Limits
Deposit amount currency wise limits:
l Currency - Specify the currency for which the minimum / maximum / top-up units to be defined. The option list displays all active currencies maintained.
l Minimum amount - Specify the minimum amount for which deposit should be created under this account class. If the TD account is booked below the minimum amount then the system displays an error message: “Deposit amount is less than the minimum amount at account class”.
l Max amount - Specify the maximum amount for which deposit can be created under this account class. The system will display a configurable override if the deposit amount contravenes the specified amount range or if the maximum amount is not specified.
4.2.2.2 Re-pick up Account Class Tenor On Rollover
If you check this box, the rollover tenor will be defaulted as 'Account Class tenor' at TD account. During rollover the default account class tenor will be picked up.
You can change this preference anytime during the life cycle of TD. On changing this and saving the record, the system displays a configurable override message “Re-pick account class tenor on rollover restrictions exists at account class”.
4.2.2.3 Maintaining Holiday Treatment Details
Specify the following details:
Holiday Treatment
Holiday Calendar
Select the holiday calendar applicable to the account class from the adjoining drop-down list. This list displays the following values:
l Ignore - Select this option to ignore all other holiday parameters for the account class. By default, this option is selected
l Branch - Holiday calender will be based on the branch holiday maintenance of the respective branch
l Currency - Holiday calender will be based on the currency holiday maintenance done at bank level for the respective currency
l Both Branch & Currency - Holiday calender is based on both branch and currency holiday maintenance
The holiday calendar is used to arrive at the maturity date. The holiday calendar defined at the account class is applicable to all term deposits under the account class. You cannot modify the ‘Holiday Calendar’ if there are active accounts under the account class.
l Both Branch & Currency
For month-end deposits, if holiday calendar is applicable, then the account class holiday calendar options indicate the following:
l Ignore - Maturity date does not change even if it is a holiday, i.e., the maturity date will be last day of the month. If you select this option, then system ignores all other values.
l Deposit Branch Holiday - If the maturity date is a holiday as per the deposit branch calendar, then system moves the maturity date to the last working day of the same month.
l Deposit Currency Holiday - If the maturity date is a holiday as per the deposit currency calendar, then system moves the last working day to the same month.
l Both Deposit Currency and Branch Holiday - If the maturity date is a holiday as per the deposit currency and branch calendars, then system moves the maturity date to the last working day of the month.
Holiday Movement
Select the working day to which the holiday should be moved from the adjoining drop-down list. This list displays the following values:
l No Change - If you select this option, then there is no change in the maturity date. Also, system ignores the value selected for ‘Maturity Date Across Months’. By default, this option is selected.
l Previous Working Day - In case the computed maturity date is a holiday, then system moves the maturity date to the previous working day for the corresponding Holiday Calendar chosen.
l Next Working Day - In case the computed maturity date is a holiday, then system moves the maturity date to the next working day for the corresponding Holiday Calendar chosen.
Holiday movement is adjusting the next maturity date when the maturity date falls on a holiday, based on the Holiday Calendar chosen. 'Holiday Movement' is not applicable if you select 'Ignore' option for 'Holiday Calendar'.
Note
You cannot modify the 'Holiday Movement' if there are active account under the account class.
Maturity Date Movement Across Months
Select the maturity date movement across months from the adjoining drop-down list:
l Allowed - If the computed maturity date falls on a holiday, then the maturity date can be moved to the next/previous working day even it falls in a different month based on the Holiday Movement option.
l Previous/next working day of the same month - If the adjusted maturity date falls on the previous/next month, then the system moves the maturity date forward or backward to the next or previous working day of the same month.
l No change in maturity date - If the adjusted maturity date falls on next/ previous month, then the system ignores the movement and considers the computed maturity date as the maturity date even it falls on a holiday.
Maturity date across months is applicable only when the maturity date is adjusted to previous or next working day.
System displays an override message in the following cases:
l When allowed, the maturity date is moved across months
l when the maturity date is re-adjusted to the last working day of the month
l When the calculated maturity date is used in case the maturity date movement to the next month is not allowed
Whenever there is a change in the maturity date, system changes the rollover maturity date accordingly.
System ignores the value of 'Maturity date movement across months' if you select the 'No Change' option for 'Holiday Movement'.
Adhoc Holiday Change
Select the adhoc holiday change from the adjoining drop-down list. The adjoining drop-down list displays the following values:
l Change Maturity date and generate advice - System updates the maturity date and the rollover maturity date as par the TD holiday calendar maintenance, generates an advice to the customer.
l Generate Advice - System generates an advice on deposits having maturity date falling on a holiday.
l No Action - There will not be any change in the maturity date. The system does not generate any advices for the TD if this option is selected. By default, this option is selected.
The adhoc holiday change is the change in branch and currency holiday calendar after opening the TD due to adhoc change in holiday or branch transfer of the deposit. System ignores the value of ‘Adhoc Holiday Change’ if you select the ‘Ignore’ option for ‘Holiday Calendar’.
Applicable Deposit Tenor
Select the deposit tenor, applicable to the deposit for interest rate pick-up, from the adjoining drop-down list. This list displays the following values:
l Original Tenor - If you select this option, then system considers the tenor which is defaulted from the account class or modified at the account level. By default,
l Deposit Tenor - If you select this option, then system considers the tenor based on the adjusted maturity date.
Note
On saving a deposit, if there is a change in maturity date due to holiday treatment, then system displays the revised tenor as the deposit tenor due to the revision in maturity date.
4.2.2.4 Defining Redemption Details
Indicate the following preferences.
Profit Sharing
You can opt to consider all Mudarabah deposit accounts under this account class for Mudarabah profit-sharing purpose. If you wish to achieve this, check the option ‘Consider for Profit Sharing’. Once this option is checked, the profit sharing for Mudarabah deposit is done.
If ‘Consider for Profit Sharing’ is opted, then it is mandatory to specify the Mudarabah fund Id in Preferences sub-screen.
Redemption
A deposit can be redeemed in two ways at maturity:
l Principal component alone
l Principal and profit components
You can choose the appropriate option from the following values displayed in the drop-down list:
l Principal
l Principal+Profit
For all Mudarabah deposits that are considered for profit-sharing, the system allows only principal redemption on the maturity date. The deposits remain in the ‘Active’ status till the next profit distribution date. The profit is liquidated into the deposit only the next date of profit distribution.
Pre-Redemption
In case of Mudarabah deposits that are redeemed before maturity, you can indicate the components that should be paid at the time of redemption. You can choose from the following values displayed in the drop-down list:
l Principal
l Principal+Profit
For such Mudarabah deposits, on the date of redemption the system re-computes the profit for the period for which the profit has already been paid, using broken period rate. It then deducts the computed amount from the Mudarabah deposits principal amount. The system then credits the reduced principal amount to the payout account.
The deposit remains in the ‘Active’ status till the next profit distribution date from the date of redemption.
In the case of premature redemption, the profit gets liquidated only after the profit calculation and distribution has happened for that financial cycle. This is done by checking ‘Defer Liquidation’ option in the ‘Islamic Profit Distribution Product’ screen. The profit will finally get liquidated into the Payout account maintained.
4.2.3 Specifying the Auto Deposits
You can create an auto deposit in case the balance in the source account exceeds a certain threshold. The auto creation of deposits is carried out as an end of day process. Click ‘Auto Deposits’ button in the ‘Islamic Account Class Maintenance’ screen and invoke the following screen.
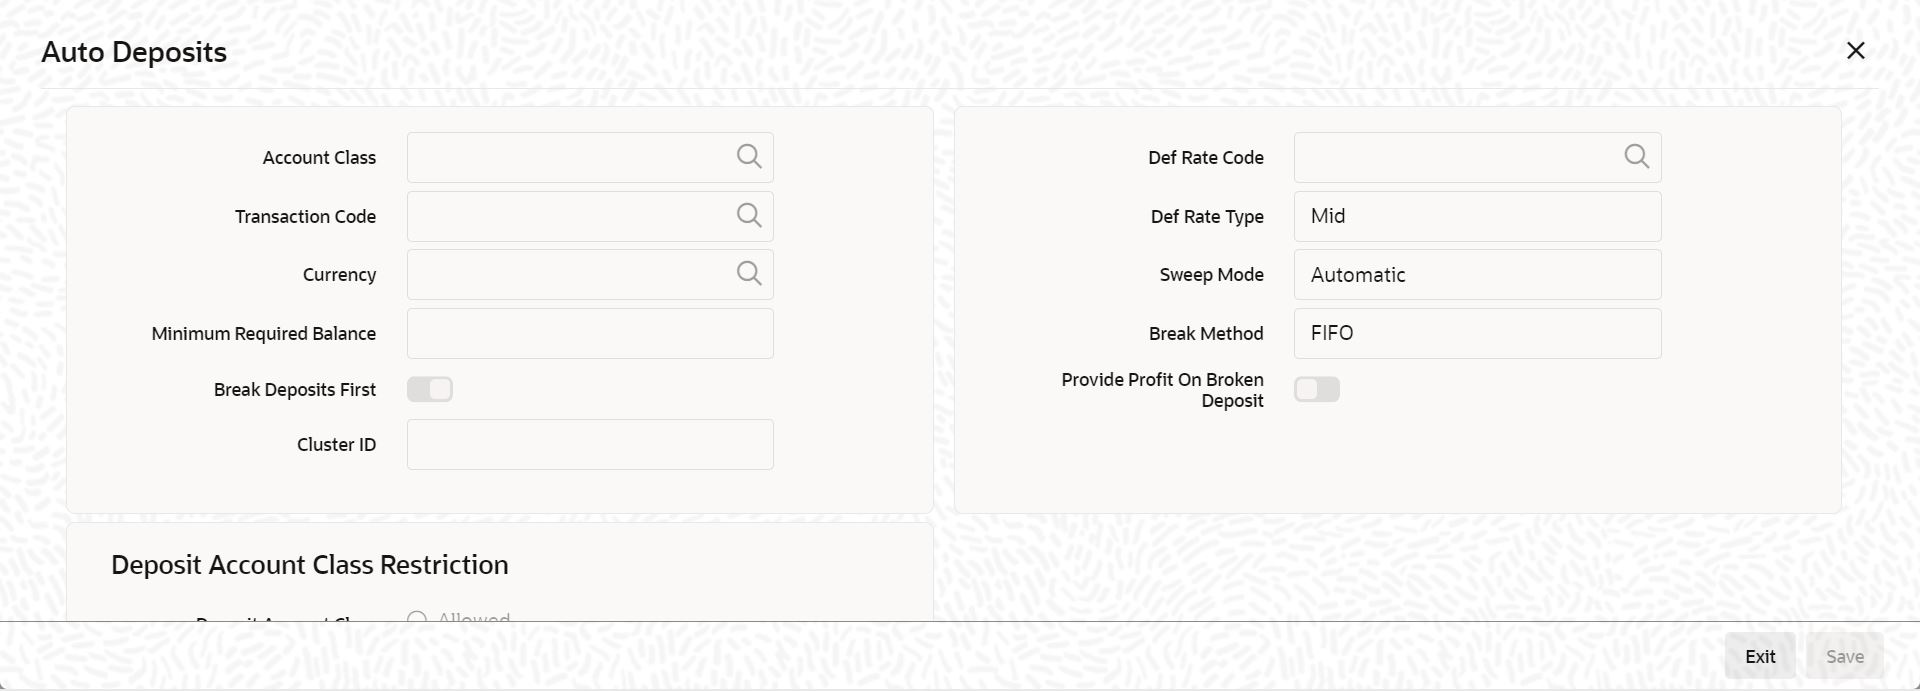
For creating an auto deposit, you have to maintain the following parameters:
Account Class
For creating an auto deposit, you have to specify an account class of the deposit. The tenor and profit conditions maintained for the selected account class will be defaulted.
Note
– You cannot create an auto deposit if the Account class you have chosen has expired, that is, surpassed the end date maintained for the account class. The system will log an exception in such a case.
Transaction Code
You have to specify the transaction code for the auto creation of the deposit.
Currency
Mention the currency in which the deposit is created.
Minimum Required Balance
The minimum balance indicates that only the amounts above this limit will be used for auto creating deposits. You have to specify the minimum amount that the customer can retain in the account.
Deposit Multiple Of
For an account you can indicate the amount, which will be the basis for the deposit amount wherein the deposit amount will be in the multiples of the amount you specify here.
Def Rate Code
Select the code of the differential rate from the adjoining option list
Def Rate Type
Select the type of differential rate code; whether ‘Mid’ or ‘Buy’ or ‘Sell’.
Break Deposits First
Check the box to indicate whether you want the funds to be moved by breaking deposits before breaking the deposit accounts. If you leave the box unchecked, the funds will be moved first from the linked CASA accounts.
Sweep Mode
You can indicate the pattern in which sweep outs are created by selecting any on of the two options:
l Auto – Here the amounts are automatically swept out at the end of day when minimum balance exceeds.
l Manual – You have to manually initiate the sweep. The sweep will execute only those instructions that are specified while account opening/ad hoc.
Break Method
You can choose to maintain the any of the following order of breaking deposits:
l LIFO (Last In First Out)– Indicates that the last created deposit will be broken first
l FIFO (First In First Out) – Indicates that the Earliest Deposit will be broken first
l MAXB (Maximum Balance) – Indicates that the Deposits are broken in descending order of available balance
l MINB (Minimum balance) – indicates that the order of breaking of Sweep / Auto deposit will be done for the Account / Deposit with the Minimum Balance
Provide Profit on Broken Deposits
You have to specify whether you want provide profit on deposits that were broken prematurely. Check the box to indicate that you want to give profit for the deposits. Leave it unchecked to indicate otherwise.
This section contains the following topics:
l Section 4.3.1, "Setting Up Profit Preferences for TD"
l Section 4.3.2, "Linking TD Account Class to Profit Product"
4.3.1 Setting Up Profit Preferences for TD
You need to set up a Profit/Charge product to handle the calculation of profit and charges on a TD. You can set up a product using the ‘Islamic Profit Distribution Product Maintenance’ screen, invoked from the Application Browser. You can invoke the ‘Islamic Profit Distribution Product Maintenance’ screen by typing ‘IADPRMNT’ in the field at the top right corner of the Application tool bar and clicking the adjoining arrow button.
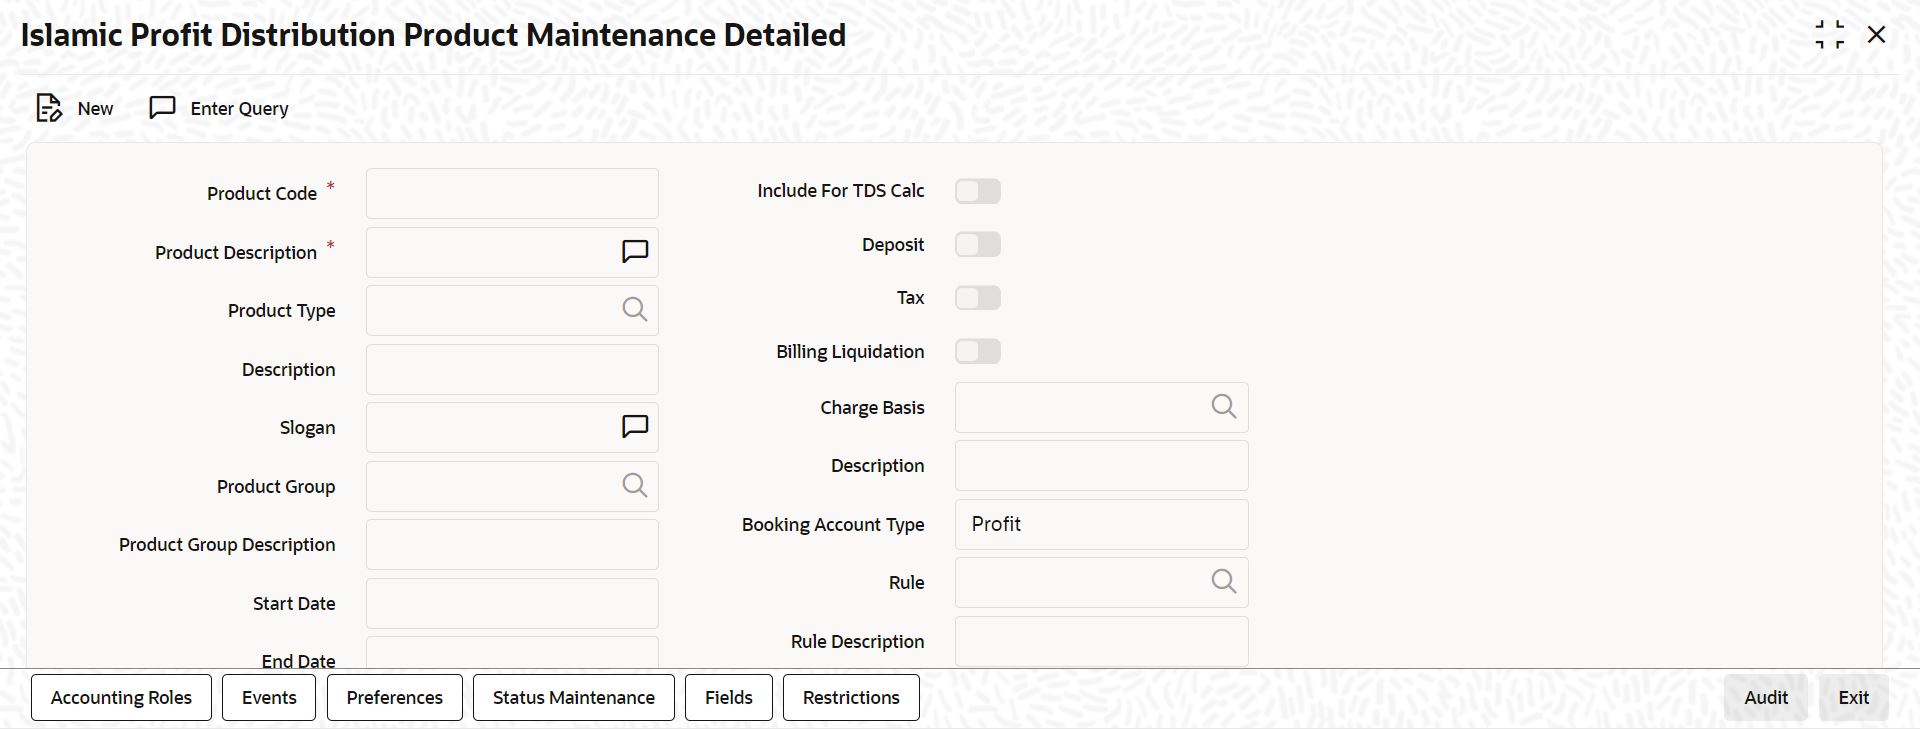
4.3.2 Linking TD Account Class to Profit Product
You can link the TD Account Class to the Profit product in the ‘Profit Preferences’ screen. Click ‘Preferences’ button on the ‘Islamic Profit Distribution Product Maintenance’ screen and invoke the following screen.
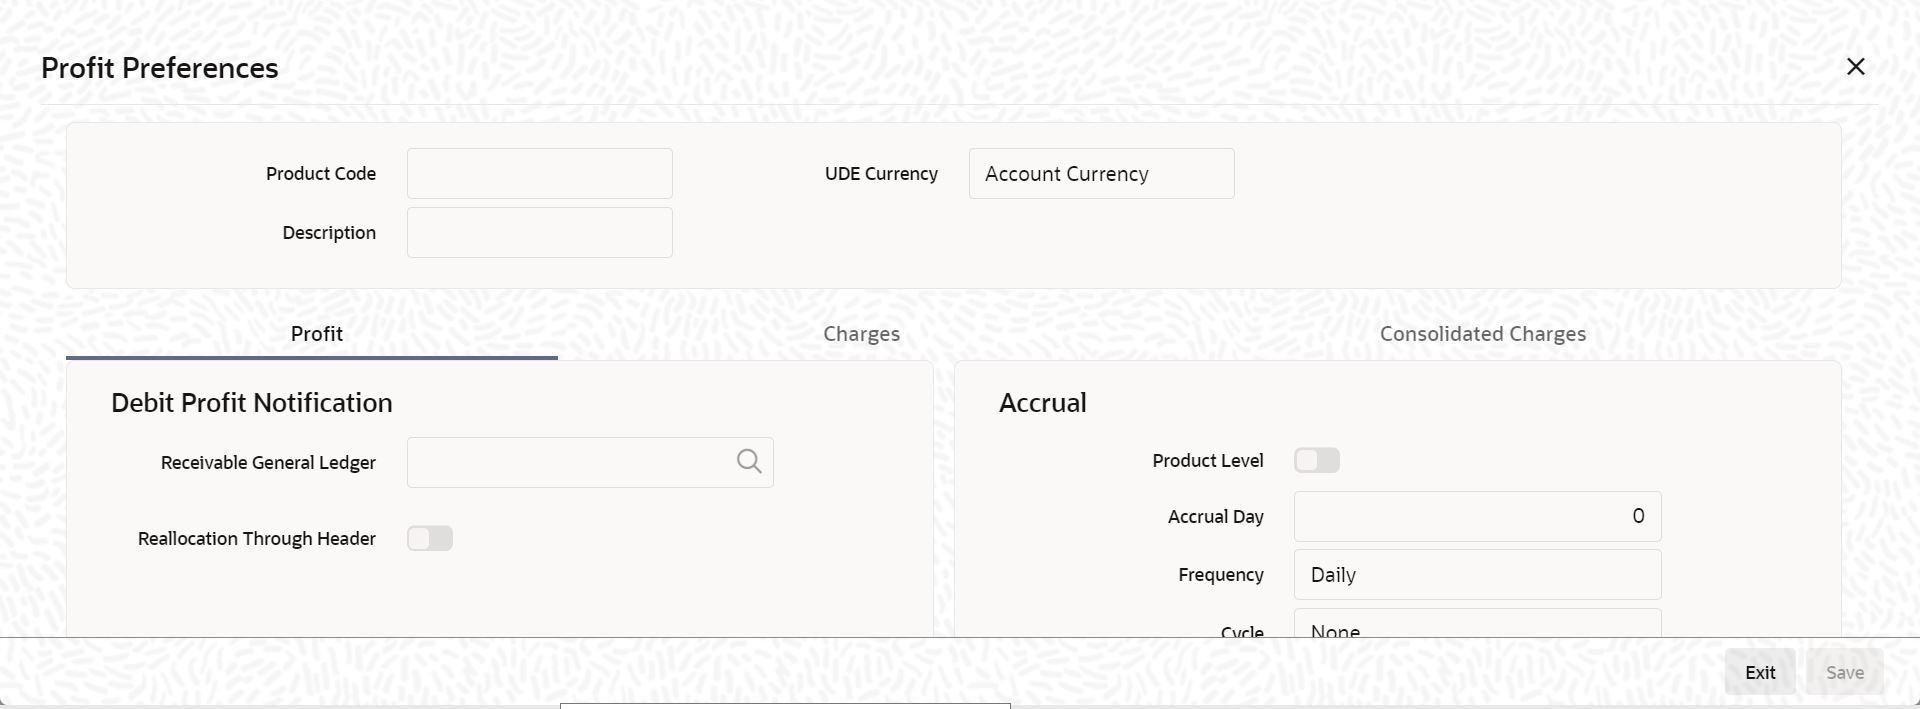
Here you can specify preferences for profit calculation and application on the accounts to which this product is applied.
Account Details
You can indicate the TD accounts on which this product should be applied.
Account Class
Specify the account class of ‘Deposit’ type that you have maintained for creating TDs. The adjoining option list displays all valid account classes maintained in the system. You can select the appropriate one.
All TDs created under this account class will inherit the profit parameters maintained in this screen.
Continue Variance on Rollover
Check this box to enable continued variance on rollover. If you check this, then the system will default account variance as current value to the rollover deposit for the next cycle
If you do not check this, then the account variance will not be carried forward to next rollover cycle
The field Continue Variance on Rollover cannot be modified at the product level after the first authorization.
Refer the chapter ‘Creating an Islamic Profit Distribution Product’ in this User Manual for details about setting up the product.
This section contains the following topics:
l Section 4.4.1, "Creating Islamic TD"
l Section 4.4.3, "Nominee Tab"
l Section 4.4.4, "Check List Tab"
l Section 4.4.5, "Deposit Tab"Section 4.4.6, "Capturing Additional Details"
l Section 4.4.7, "Specifying IP Special Condition Details"
l Section 4.4.8, "Specifying TD Payout Details"
l Section 4.4.9, "Rollover Details"
l Section 4.4.10, "Banking Channels Button"
l Section 4.4.11, "Viewing Islamic TD Account Details"
You can create a term deposit account using the ‘Islamic TD Accounts Maintenance’ screen. To invoke this screen type ‘IADCUSTD’ in the field at the top right corner of the Application tool bar and click the adjoining arrow button.

Specify the following details.
Branch Code
The system displays the branch code of the sign on branch.
Term Deposit Account Number
The system creates a unique reference number to identify the TD account number and displays it here, on saving the record.
Term Deposit Currency
Specify the currency of the TD. A list of all the currencies maintained in the system is displayed in the available option list. You can select the appropriate one.
SD User Reference
The system displays the SD user reference for the TD accounts.
Customer No
If you have included the CIF Number of the customer as part of the Account Mask, the system automatically defaults the CIF code of the customer in the respective field. You will not be allowed to modify this code.
However, while defining the Account Mask in the Account Parameters section of the Bank-wide Parameters screen, if you have specified that the CIF Number should not be a part of the account mask you will have to specify the customer code manually. A list of all the valid customer codes is displayed in the available option list. You can select the appropriate.
Customer Name
On entering the Customer No, the customer name is automatically displayed.
Account Class
In Oracle FLEXCUBE, you can classify the customer accounts of your bank into different groups. Each group is referred to as an account class and is maintained in the Account Class Maintenance screen. For each class, you have to define certain common attributes applicable to all accounts in the particular class.
While maintaining a specific account you have to identify the class to which the particular account belongs. You can select the appropriate account class from the list of all the valid account classes maintained in the system. Account classes that have surpassed their end date (expired) will not be displayed in the option list.
Details maintained in this screen are classified into four tabs:
|
Main |
Here you maintain the main attributes of the TD like the account number, customer code, the account class, account currency, type of account - single or joint, account status etc. |
|
Nominee |
Here you can capture nominee details for the TD. |
|
Check List |
Here you can view the checklist details. |
|
Deposit |
Here you specify deposit-specific details. |
By default, the ‘Main’ tab is displayed when you invoke this screen. The fields in the Main section are as follows:
Description
This is the description of the account. Here you can enter the nature of the account like current, savings, overdraft, and so on. If a customer has two or more accounts under one account class you can specify the purpose of that account.
Account type
You have to indicate whether the account is to be opened only by the account holder or whether it can be jointly operated.
Fund Id
Select the fund id of the fund to be considered for report generation from the adjoining option list. The system defaults the value of Default Mudarabah Fund as fund id.
Country Code
To define the country limits for each individual country you have to select the country code from the option list available.
Mode of Operation
Select the mode of operation from the drop-down list.
Account Open Date
You have to capture the date on which the account was opened.
Alternate Account Number
You have to define an alternate account number for the account you are defining. The alternate account number that you specify should be unique for each customer. You can capture the old account numbers used by your bank before installing the Oracle FLEXCUBE system. The old account numbers would be mapped with the new account numbers. This would facilitate quick tracking of the account and generating queries.
In the Data Entry Module, you can input a transaction using the alternate account number instead of the actual account number.
Clearing Bank Code
The clearing bank code for the customer account is generated automatically if you have opted for auto generation in the Branch parameters
Address
Specify the address of the customer.
Location
An address for a customer account is based on the ‘Location’ and ‘Media’ combination. Location codes maintained through the ‘Account Address Location Type Maintenance’ screen are made available against this field. The address maintained here is always the primary or the default address. Each customer can have several addresses for a particular media. To distinguish between one address of a customer from another for a given media, it is essential for you to specify a unique location for each address. Also, if you are amending an address here, the same gets updated in the ‘Customer Account Address - Detailed’ table after the validations are through.
Media
Select the media to communicate account related details to the customer, such as account maintenance related charges, fees, profit etc. from the option list. You can choose either of the following:
l Mail
l Telex
l SWIFT
l Fax
Linked Deposit Branch
Specify the linked deposit branch.
Linked Deposit Account
Specify the linked deposit account.
Zakat Exemption
When an account is opened in a branch, you need to clarify with the customer whether he or she will pay Zakat or will seek exemption. Check this box to indicate that the customer seeks exemption from Zakat charge.
Sanction Check Status
The system displays the status of the sanction check request.
Sanction check will not be sent for Child TD, TD creation from SF and Auto Deposit Creation.
Options
Indicate the following preferences.
Track Receivable
During liquidation of finance contracts as well as processing of retail teller contracts, if the system detects insufficient funds in the settlement account, then you can choose to block the subsequent credit that happens to the settlement account. In other words, the system will track the account for receivables (credits). As and when a credit happens, the funds will be allocated to the finance or retail teller contract, for liquidation. If the track receivable option is checked for the account, the system will track the receivables for the account if sufficient funds are not available in the account.
The allocation of funds will happen in a sequence that you specify at the account class level. This is explained in the section titled ‘Maintaining Account Classes’.
Replicate Customer Signature
The signature of the customer gets defaulted from the account class level to account level. This value is defaulted only if the customer type is individual with single mode of operation.
Intermediate
Intermediary Required
Check this box to link Intermediaries with Term Deposit.
Intermediary Code
Specify the intermediary code from the adjoining option list.
Intermediary Description
The system gives a brief description about intermediary code.
Intermediary Ratio
Specify the ratio of individual intermediary contribution against the Term Deposit account.
Sweep Required
Enable Sweep in
Check this box to enable sweep in functionality.
Enable Reverse Sweep in
Check this box to enable reverse sweep in functionality.
Click ‘Nominee’ tab in the ‘Islamic TD Accounts Maintenance’ screen. The following tab will be displayed.

Specify the following details:
Name
Specify the name of the nominee.
Date of Birth
Specify the date of birth of the nominee.
Relationship
Specify the relationship of the nominee with the customer.
Address 1 to 4
Specify the address of domicile of the nominee. Four lines have been provided for this. Each line can have a maximum of 105 alphanumeric characters.
Minor
Check this box if the nominee is a minor.
Guardian Name
If the nominee is a minor, specify the name of the guardian.
Relationship
Specify the relationship of the guardian with the minor.
Address 1 to 4
Specify the address of domicile of the guardian. Four lines have been provided for this. Each line can have a maximum of 105 alphanumeric characters.
Click ‘Check List’ tab on the ‘Islamic TD Accounts Maintenance’ screen. The following screen will be displayed.

Specify the following details:
Document Type
Specify the document type. The adjoining option list displays all the document types that are maintained in the system. You can select the appropriate one.
Mandatory
Check this box to indicate that the document specified here is mandatory.
Expiry Date
Specify the expiry date of the document provided by the customer.
Note
– Expiry date will always be greater than ‘Expected Date of Submission’ and ‘Actual Submission Date’.
– Expected Date of Submission will always be greater than current date.
Expected Date of Submission
System displays the expected date on which the customer is accepted to submit the required documents.
Actual Submission Date
Specify the actual date on which customer has submitted the required documents.
Document Reference
System defaults the document reference here.
Checked
Check this box to indicate that the received documents are acknowledged.
You cannot save and authorize an account if the mandatory documents are not confirmed as ‘Checked’.
Upload
Click on this button to upload the selected document type.
Delete
Click on this button to delete the selected document.
View
Click on this button to view the selected document.
Notification Details
System defaults notification details from the ‘Account Class Maintenance’ screen.
Send Notification
This check box indicates whether to send notifications or reminders for not submitting the mandatory documents.
Frequency (Notification)
System defaults the frequency of notification to be sent. The frequency can be one of the following:
l Daily
l Weekly
l Monthly
l Quarterly
l Half yearly
l Yearly
EMBED MSPhotoEd.3 - Note the following:
l Notification will be sent only if,
– The check box ‘Send Notification’ is checked in Account Class Maintenance’ screen.
– The account status is active and authorized.
– The mandatory documents are not submitted.
l Notifications will be sent based on the frequency specified.
l First notification will be sent on the expected date of submission or expiry date
l If notification date falls on a holiday then system will send the notification on next working day.
Days (Reminder)
System defaults the number of days left for the expiry or submission due date of the documents for sending the reminder.
System will send the following reminders:
l Reminder prior to the submission due date of the document.
l Reminder prior to the expiry date of the document.
l Overdue notifications after the due date if the document is not submitted based on the frequency.
l Notifications after the expiry date if the document is not submitted after the expiry date.
Note the following:
l Reminder will be sent only if,
– The mandatory documents are not submitted.
– The account status is active and authorized.
l Reminder will be sent only once.
l If reminder date falls on a holiday then system will send the notification on next working day.
l Reminder will be sent prior the number of days specified at the account level from expected date of submission or the expiry date.
l If there are more than one notifications or reminders of the same message type for which the notification schedule date falls on the same day for the same account, a single notification will be sent which will have the details of all the related documents.
Remarks
Specify the additional information, if required.
Click ‘Deposit’ tab on the ‘Islamic TD Accounts Maintenance’ screen. The following tab will be displayed.

Specify the following details:
Profit Start Date
Specify the date from which the profit accruals of TD account begins.
Deposit Tenor
The system calculates the tenor of the deposit account to the difference between Interest start date and Maturity date and displays it. In case of change in maturity date, the system changes the deposit tenor.
Note
System validates that the deposit tenor is within the minimum and maximum tenor allowed for the account class. If this validation fails, then system displays the error message, “Rollover tenor does not fall in the range of minimum and maximum tenor allowed”.
You cannot modify a TD tenor manually any time during life cycle. However, it can be modified before authorisation. You can maintain different rollover tenors for each rollover period.
If you specify the tenor, the system computes the maturity date. If the maturity date computed by the system falls on a holiday, then the system will adjust the maturity date as per the holiday treatment maintenance at Account Class level and update the new tenor.
Once the record is authorized, you cannot amend the tenor.
The deposit tenor is represented in terms of years, months and days. For example, if the deposit tenor is 185 days, it should be represented as 0 years, 6 months and 5 days. If you select independent tenor, the you need to specify the values in the appropriate fields.
Years
This indicates the number of years in the deposit tenor.
Months
This indicates the number of months in the deposit tenor.
Days
This indicates the number of days in the deposit tenor.
Original Tenor
This indicates the original tenor of the deposit. You cannot change the original tenor displayed. The system displays the default tenor or the tenor specified at account which is arrived before the holiday movement
The original tenor is represented in terms of years, months and days. For example, if the deposit tenor is 185 days, it should be represented as 0 years, 6 months and 5 days.
Years
This indicates the number of years in the original tenor.
Months
This indicates the number of months in the original tenor.
Days
This indicates the number of days in the original tenor.
Maturity Date
The system defaults the maturity date from the default tenor from the account class. However, you can modify this date. On this date the term deposit account gets.
Auto Rollover
Check this field to automatically rollover the deposit you are maintaining. You have to indicate ‘Rollover Type’ on selecting this option
Close on Maturity
Check this field to close the term deposit account on maturity date and transfer the amount to the principal liquidation account. If you select this option, the principal liquidation account should be an account other than the term deposit account.
Move Profit to Unclaimed
Check this field to move the profit amount to the unclaimed GL mapped at the IP product in the accounting roles on maturity date of the term deposit account. If you select this option, the principal liquidation account should be the term deposit account.
Move Principal to Unclaimed
Check this field to move the principal amount to the unclaimed GL mapped at the IP product in the accounting roles and liquidate the profit amount to the profit booking account on maturity date of the term deposit account. is moved and is liquidated. If you select this option, the principal liquidation account should be the term deposit account
Term Deposit Amount
Specify the amount, which is paid for the time deposit account in the account currency.
If you have specified the percentage in the Pay-In options, on clicking the ‘Compute’ button, the system computes the amount. And while saving, the system validates the sum of Pay-In Amounts against the ‘TD Amount’ keyed in.
Note
The system will validate for the following:
– The deposit amount should be equal or greater than minimum booking amount maintained at the ‘Deposits Cluster Maintenance’ screen, else the system will display the error message: as, “The deposit amount is less than the minimum booking amount.”
– The deposit amount should be a multiple of the booking unit maintained at the ‘Deposits Cluster Maintenance’ screen, else the system will display the error message: as, “The deposit amount must be in multiples of booking unit.”
Computed Amount
System displays the computed amount here.
Next Maturity Date
On selecting the rollover for the TD account, the system defaults the next maturity date from the previous tenor of the deposit.
The display of next maturity date is based on the rollover tenor selected.
Rollover Amount
If a special amount is to be rolled over, you have to specify the amount (less than the original deposit amount) in this field.
Stock Catalogue Code
The system displays the Stock Catalog Code of the TD certificate number.
Certificate Number
The system displays the TD certificate number in Deposit Tab.
Duplicate
This box remains checked if the certificate number issued is duplicate for this account.
is Pay-In mode in GL then the system displays only GLs and if the Pay-In mode is Account then only accounts are displayed in the option list.
Note
Customer account number, pay in account number, and payout account number should have different CASA account numbers. The following override message is displayed:
“Book TD with Single or Joint, Provide the IB, Pay-in and Payout Account as different customer”.
Recurring Deposit
Specify the following details:
Auto Payment Take Down
Check this field to allow the recurring deposit account to debit the payment account for the payment amount as per the installment frequency.
Move Maturities to Unclaimed
Check this field to move all the funds, on the maturity date, to the unclaimed GL mapped to the accounting role in the IP product.
Payment Branch
Specify the details for the branch to which the payment account belongs.
Payment Accounts
Specify the Payment Account; this can be either savings account or the current account from which the installment for the Recurring Deposit is collected as per the installment frequency
Installment Amount
Specify the installment amount that has to be collected from the payment account as per the installment frequency. This installment amount should be greater than the minimum amount mentioned at the account class.
Recurring Deposit Account
Check this field to indicate recurring deposit account.
Payment Date
Specify the date on which the payment needs to be done for recurring deposit account.
Payment Currency
Specify currency of the payment amount.
Note
– The system enables the offset account and branch detail fields only if the option to pay is selected as the savings account.
– The Unclaimed Profit and Principal GLs are specified while maintaining an Profit and Charges (IP) Deposit Type product. The Accounting Roles for the GLs are ‘INT_UNCLAIMED’ and ‘PRN_UNCLAIMED’ respectively. When maintaining an IP-Deposit type product, you have to map these Accounting Roles to the appropriate GLs maintained at your bank.
– The system allows you to select ‘Close on Maturity’ box, only when you specify the recurring deposit details. You have to maintain deposit transaction code as ‘DPN’ redemption transaction code as ‘RED’ and prepayment transaction code as ‘TRF’ for the recurring payments in the Branch Parameters for the Profit and Charges.
– All recurring deposit payments are part of IP batch beginning of day activity.
Installment Frequency
Specify the following details:
Move funds on Overdraft
Check this option to indicate whether the Recurring Deposit account funds should move to an unclaimed account if it is overdue
Days
Specify the installment frequency in terms of days.
Months
Specify the installment frequency in terms of months.
Years
Specify the installment frequency in terms of years.
4.4.6 Capturing Additional Details
You can capture additional details for the TD by clicking the following buttons in the ‘Islamic TD Accounts Maintenance’ screen:
|
Button |
Function |
|
IP Special Condition |
This invokes the ‘IP Special Condition’ screen. |
|
Charges |
This invokes the ‘Account level charges conditions’ screen. |
|
Linked Entities |
This invokes the ‘Linked Entities’ screen. |
|
Restrictions |
This invokes the ‘Products and Transaction Codes Restriction’ screen. |
|
MIS |
This invokes the ‘Management Information System’ screen. |
|
Statement |
This invokes the ‘Statement Details’ screen. |
|
Joint Holders |
This invokes the ‘Linked Entities’ screen |
|
Fields |
This invokes the ‘User Defined Fields’ screen. |
|
Account Signatory |
This invokes the ‘Signatory Details’ screen. You can view consolidated customer signature by invoking the ‘Customer Signature/Image Consolidated View’ screen. For more information on Account Signatory, refer to the section ‘Specifying Account Signatory Details’ in this User Manual. |
|
TD Payout Details |
This invokes the ‘Term Deposit Payout Details’ screen. |
|
Rollover History |
This invokes the ‘Rollover History’ screen. |
|
Rollover Details |
This invokes the ‘Rollover Details’ screen. |
|
Change Log |
This invokes the ‘View’ screen. |
|
Statistics |
This invokes the ‘Account Statistics’ screen. |
|
Banking Channels |
This invokes the ‘Banking Channels Subscription Details’ screen. |
Note
In Rollover History, for Rollover Type, P = PRINCIPAL, I = PRINCIPAL + PROFIT, T = PROFIT and S = SPECIAL AMOUNT.
For further information on Additional details, refer ‘TD Additional Details’ chapter of ‘Term Deposits’ User Manual.
4.4.7 Specifying IP Special Condition Details
To define profit and other parameters for a TD, click the IP Special Condition’ button in the ‘Islamic TD Accounts Maintenance’ screen. The ‘IP Special Conditions Maintenance’ screen is displayed.
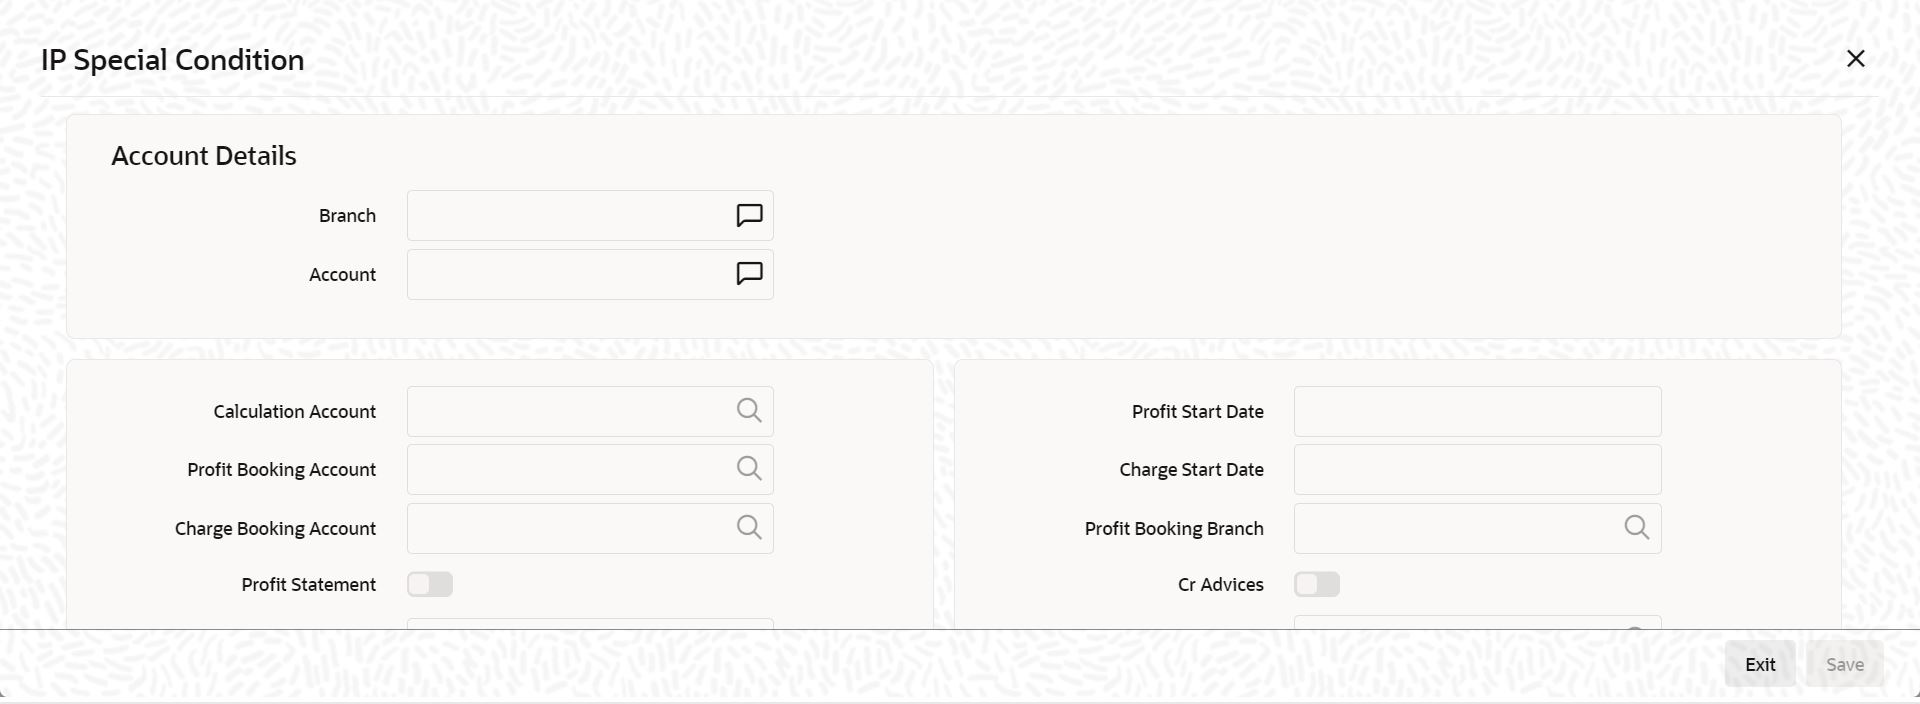
In this screen, you can specify the following TD related preferences:
Profit Booking Account
Specify the account into which profit on the TD should be booked for the customer.
Continue Variance on Rollover
The system defaults it based on the Profit and Charges product. However, you can modify this. If you modify this, during the save, the system will display a prompt ‘Continue variance on Rollover Flag is modified’.
You can check this box to enable continued variance on rollover. If you check this, then the system will default account variance as current value to the rollover deposit for the next cycle.
If you do not check this, then the account variance will not be carried forward to next rollover cycle.
UDE Values
Variance
Specify the variance profit value alone. The effective rate will be the sum of the TD rate code and the variance that you specify here.This value can be modified at any point of time.
Refer the section ‘Specifying Profit Details’ in the chapter ‘Creating Islamic Account’ in this User Manual for further details.
Refer the chapter ‘Creating Islamic Account’ in this User Manual for further details about the aforesaid buttons..
4.4.8 Specifying TD Payout Details
To define payout parameters for a TD account, click the ‘Term Deposit Payout Details’ button in the ‘Islamic TD Accounts Maintenance’ screen. The ‘Term Deposit Payout Details’ screen is displayed.
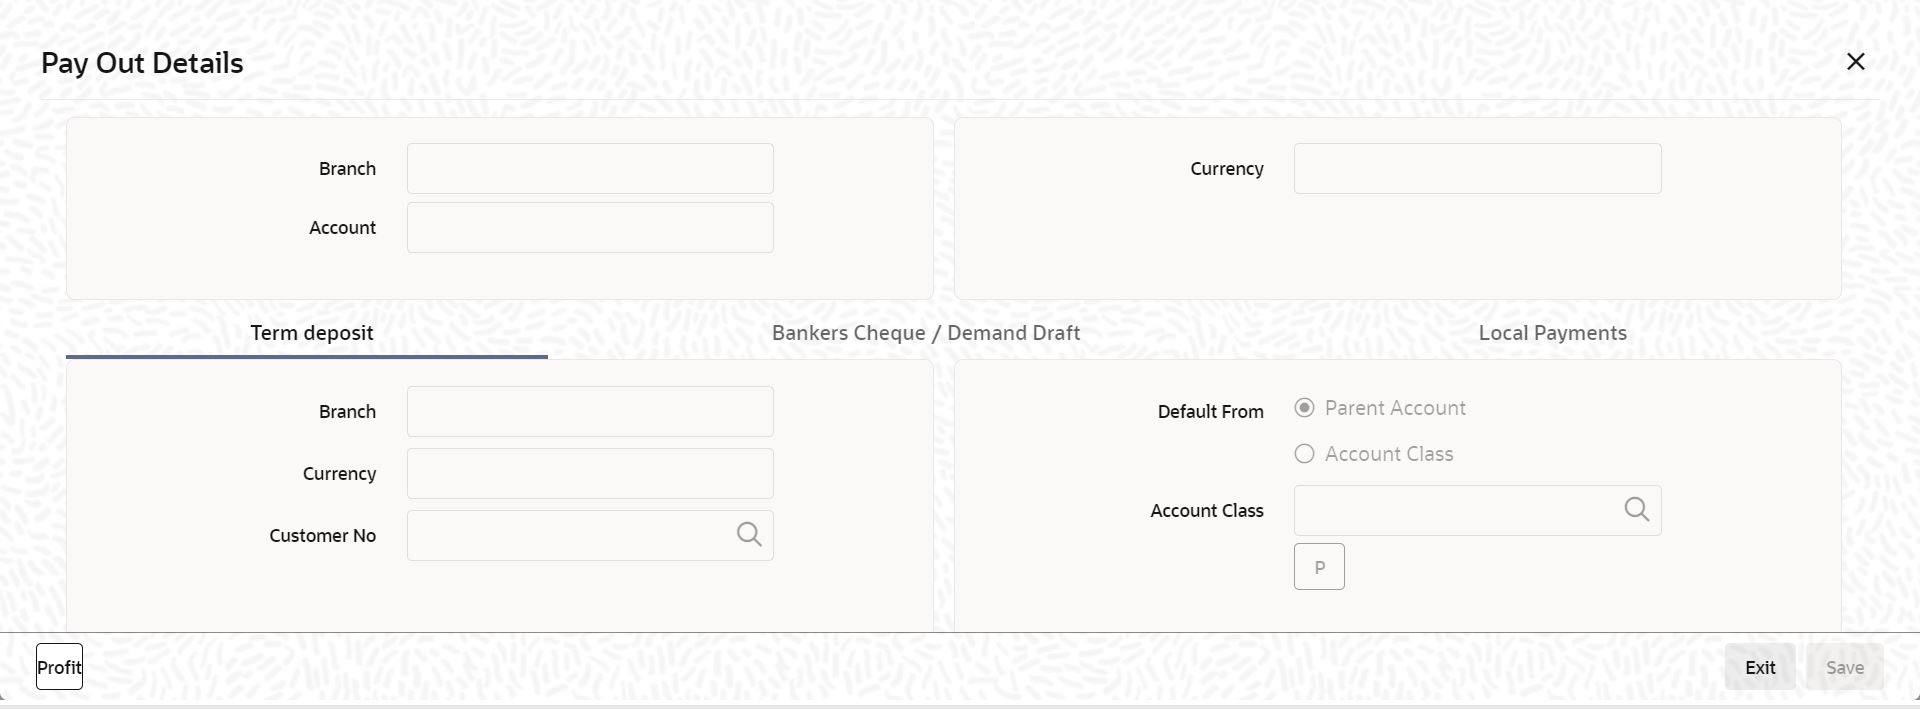
For further details related TD Payout Details, refer ‘TD Additional Details’ chapter of ‘Term Deposits’ User Manual.
4.4.8.1 Capturing Payout Profit Details for Child TD
If you have opted for creation of a child TD on maturity of the parent TD, you need to specify Profit details of the child TD. Click ‘Profit’ button on the ‘Term Deposit Payout Details’ screen and invoke the ‘Term Deposit Profit’ screen. In this screen, the system defaults all the parameters maintained for the parent TD. However, you can modify them.
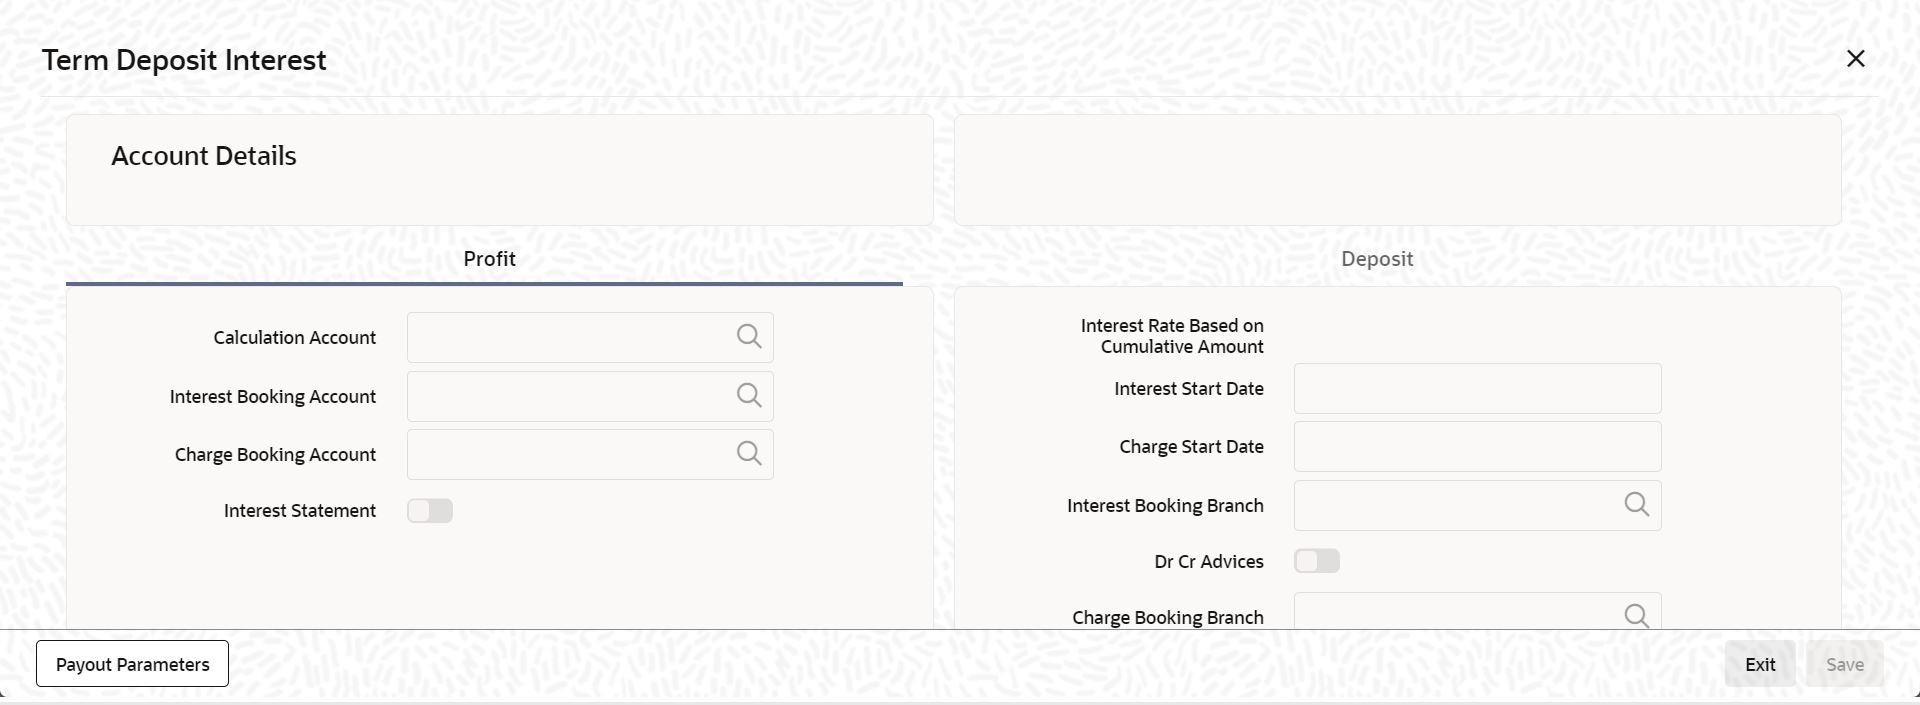
This screen comprises two tabs viz:
l Profit
l Deposit
4.4.8.2 Profit Tab (Profit Preferences for Child TD)
You need to capture the following details here:
Profit Booking Account
Specify the accounts for booking profits on transactions processed at your bank, from the adjoining option list.
Profit Start Date
The system displays the Maturity date of the parent TD as the profit start date for the child TD. However, you can modify it. Profit for this account will be calculated according to the special conditions that you define subsequently.
Booking Account Branch
The current branch of the customer’s account will be defaulted here. However, you can modify profit to a different account belonging to another branch also by specifying Profit Booking Branch from the adjoining option-list. The accounts maintained in the selected Booking Branch will be available in the option-list provided for Booking Account Branch.
Profit Statement
Check this box if you would like to generate a profit statement for the account. The Profit Statement will furnish the values of the SDEs and UDEs and the profit rule that applies on the account.
Cr Advices
Check this box to indicate that the system must generate payment advices when profit liquidation happens on an account. The advices are generated in the existing SWIFT or/and MAIL format. No advices will be generated if you leave this box unchecked.
The preference you have maintained in the Customer Account Class screen will be defaulted here. However, you can choose to change your preference to generate or suppress these Advices.
For further details related preferences for child TD, refer ‘TD Additional Details’ chapter of ‘Term Deposits’ User Manual.
While saving the transaction, if you had modified the interest rate at TD account level for TD booking or for creating Payout TD, the system displays configurable override messages.
These overrides are displayed during subsequent modifications of the interest rate. You can also configure overrides for Dual Authorization to be displayed at Contract and Maintenance level in the ‘Override Maintenance’ screen.
For more information about configuring overrides, refer to the section ‘Override Maintenance’ in the chapter ‘Configuring Overrides’ in the Core Services User Manual.
Click ‘Rollover Details’ button in the ‘Islamic TD Accounts Maintenance’ screen to invoke the following screen.

Indicate the rollover tenor for the TD account. You can select one of the following options:
l Account class tenor - If you select this, the rollover tenor in days, months and years is set to null. You cannot modify this. The system will not display the next maturity date, as the default account class tenor is subject to change. During rollover, the system updates it as the default account class tenor at the time of rollover.
l Account tenor - This is the default value. If this option is selected, the system populates the original tenor of the parent TD as the rollover tenor. The system displays the tenor in days, months and years. You cannot modify this. The next maturity date will be populated by adding the account tenor to the maturity date of child TD.
l Independent tenor - If you select this, you can specify the deposit tenor in days, months and years. The default value of the independent tenor will be null. The next maturity date will be populated by adding the independent tenor to the maturity date of child TD.
The tenor specified should be within the minimum and maximum tenor specified at account class. The tenor in months cannot be greater than 11 months. If tenor months are specified, then tenor days cannot be greater than 30 days.
The account tenor is defaulted as the deposit and rollover tenor for the child TD after the account class is populated.
Years
Specify the number of years in the rollover tenor.
Months
Specify the number of years in the rollover tenor.
Days
Specify the number of years in the rollover tenor.
Rollover Type
Select the rollover type. The following options are available.
l Principal
l Principal + Interest
l Special Amount
l Interest
l Principal + Profit
l Profit
Rollover Amount
If a special amount is to be rolled over, you have to specify the amount (less than the original deposit amount) in this field.
Term Deposit Additional Funds Pay in Option
You can view the following details of the deposit:
Term Deposit Pay-in Option
Indicate the method for initial funding during account creation. Choose one of the following options:
l Pay In By Account
l Pay In By GL
Percentage
Specify the percentage of add payin for each pay in option specified.
Amount
Specify the additional amount to be considered on rollover of a deposit.
Offset Branch
The system populates the branch code of the account from which fund is transferred to TD account.
Offset Account
Specify the account number/ GL from which the fund is transferred to TD account. This field returns the branch code if the account is selected and NULL is returned if GL is selected.
4.4.10 Banking Channels Button
The system defaults the common channel information captured at CIF and account class levels during TD account creation.

Specify the following details:
Banking Channels
Specify the banking channels code. Alternatively, you can select the list of channels from the option list. The list displays the channels maintained in the system.
Banking Channel Name
The system displays the name of the banking channel.
Remarks
Specify remarks for the banking channel subscription.
Note
– While populating the channels to the Customer Account screen, the system populates only the channels which are allowed in primary CIF and Account Class. The system defaults the remarks maintained at customer level to the account. You can modify it.
– You can delete the channels which need not be allowed at the customer account level, but you cannot add the channels which are disallowed at the customer or account class level. The system will display only those channels which are available in both CIF and account class levels.
– You can add channels which are mapped at both CIF and Account Class levels. You cannot delete a channel at CIF/Account Class level, which is already mapped to accounts (authorized or unauthorized) belonging to the CIF/Account Class. The system checks only for active accounts. You can delete the channels from customer/account class level only if the account is closed. During reopen of the account, the system validates whether the linked channels are available at Customer and Account Class level.
– When an account is created automatically from Customer Creation screen, the channels maintained at both Customer and Account Class is defaulted to the account. If no maintenance is performed at CIF/account class levels for channels, the system does not populate any channels at account.
– When account class transfer happens during batch, the system deletes the existing channels attached to the account and repopulates from the new Account Class and Customer.
During authorization of the account, the system does not repopulate the channel details. While authorizing primary party change, the system defaults the existing channels which are attached to the account and repopulates from the new Customer and Account Class. You can modify the channel information from the main screen for Customer Account Creation.
During save, the system defaults the channel details from Customer and Account Class of the account. You can modify the details in the Account Creation screen (IADCUSTD).
4.4.11 Viewing Islamic TD Account Details
You can view the Islamic TD accounts details maintained in the ‘Islamic TD Accounts Maintenance’ screen using the ‘Islamic TD Accounts Summary’ screen. You can invoke this screen by typing ‘IASCUSTD’ in the field at the top right corner of the Application tool bar and clicking on the adjoining arrow button.

In the above screen, you can base your queries on any or all of the following parameters and fetch records:
l Authorization Status
l Branch Code
l Record Status
l Account
l Customer Number
l Term Deposit Currency
l Stock Catalog Code
l Certificate Number
Select any or all of the above parameters for a query and click ‘Search’ button. The records meeting the selected criteria are displayed.
Note
You can query or modify the account details of the customers whose accounts are permitted to you for the query/modification in the ‘Group Code Restriction’ screen.
If you are allowed to query customer information, system displays the following details pertaining to the fetched records:
l Authorization Status
l Record Status
l Branch Code
l Account
l Description
l Customer Number
l Currency
l Account Class
l No Debits
l No Credits
l Stop Payments
l Dormant
l Account Open Date
l Alternate Account Number
l Cheque Book
l Passbook
l Account Number
l Account Type
l Frozen
4.5 Input and Authorization Limit Validation for TD
The role level limit set up for a user in ‘Role Limits Maintenance’ (SMDRLMNE) screen is applicable for transactions on Islamic Term Deposit accounts. If the user has auto authorization rights, while saving the transaction, input limit is validated first. If the input amount is within the input limit then subsequently the authorization limit is validated.
At the time of input/authorization of a deposit transaction, if there is a breach of limit then system displays a configurable override message.
Note
– The role level limit set up done in SMDRLMNE screen is not applicable for branch screens.
– You can set up a common limit for each channel and for all the deposit transactions done through a channel validation is done against that limit.
– Limit restrictions will not be validated during deposit amendment.
– Limit validations are applicable for excel upload.
Limit restrictions are not applicable for all type of simulation screens.Limit validation is not be applicable for the following types of deposits:
l Auto Deposit
l Sweep
l Structured Deposit.
Limit validation is applicable for the following types of transactions:
l Term Deposit Opening – Term Deposit amount (Principal amount/Deposit Amount) is considered as the transaction amount.
l Term Deposit Redemption – The transaction amount is inclusive of Term Deposit amount + Interest earned. Interest amount refers to the total interest earned before deducting tax and penalty amount if any.
l Limit control is applicable for partial redemption as well as for full redemption.
l Manual renewal – In case of manual renewal the total renewal amount is validated against the limit.The role level limit control should be applicable for the Term Deposit transactions made through the following fast paths.
The role level limit control is applicable for the Term/Recurring Deposit transactions made through the following screens:
l IADCUSTD - Term Deposit Opening
l IADREDMN - Term Deposit Redemption & Renewal
This section contains the following topics:
l Section 4.6.1, "Redeeming TD"
l Section 4.6.2, "Bank - Cheque Tab"
l Section 4.6.3, "Savings Tab"
l Section 4.6.4, "General Ledger Tab"
l Section 4.6.5, "Additional Payin Details Tab"
l Section 4.6.6, "Authorizing Transaction"
The redemption option enables you to redeem a term deposit. Using this option, you can do a premature redemption, either in full or in part and also complete redemption on maturity of the deposit. This screen also allows you to renew the TD. However, renewal of the TD is enabled only if you have specified ‘Grace period for Renewal’ option for the account.
You can do this, by accessing the TD Redemption screen. You can invoke the ‘Term Deposits Redemption Input’ screen by typing ‘IADREDMN’ in the field at the top right corner of the Application tool bar and clicking the adjoining arrow button.
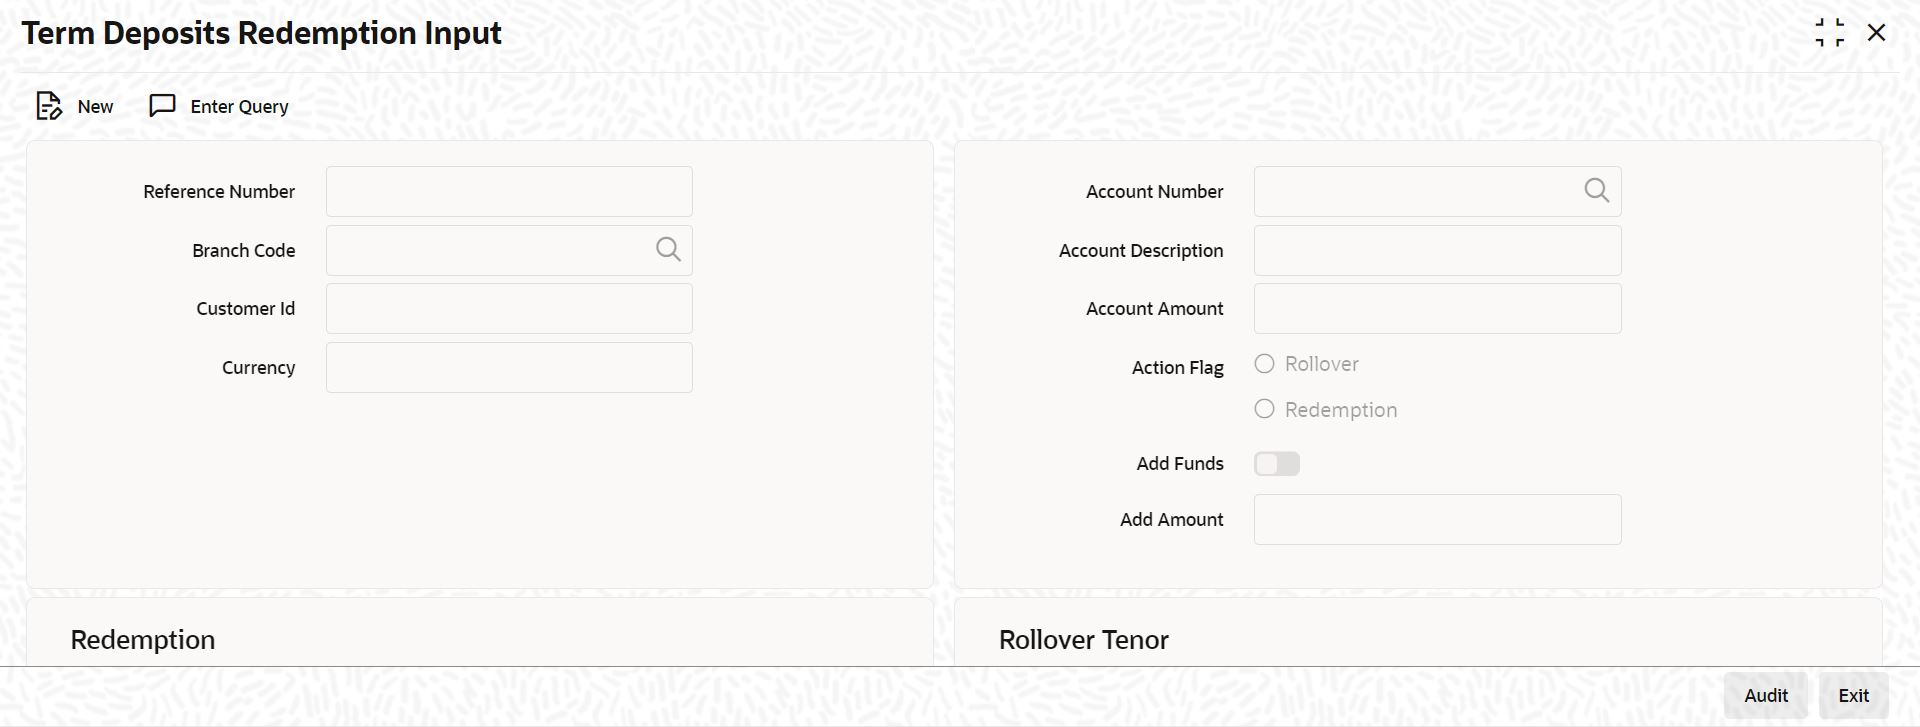
Only unclaimed TD accounts in grace days can be renewed. If you try to renew a TD which is not in grace period, the system displays an error message “Only matured TD account can be renewed”.
You have to specify the following fields for redeeming the TD.
Reference Number
The system displays the reference number here.
Note
This field will be enabled only for the query mode.
Branch
Specify the branch where the TD resides. The adjoining option list displays all valid branch codes maintained in the system. You can select the appropriate one.
Customer Identification
The customer identification (CIF) of the customer for whom TD needs to be renewed or redeemed is displayed based on the TD account number.
Term Deposit Account Number
Specify the TD Account Number. You can also choose the appropriate one from the option list. The option list displays the deposit type of accounts maintained in the system.
Note
The option list does not display auto deposit type of accounts. The TD account number and pay-in or payout account number should have different CASA account numbers, else an override message is displayed.
Account Currency
The TD currency is displayed here based on the TD account number.
Account Description
A description of the TD is displayed here based on the TD account number.
Account Balance
The account balance is displayed here based on the TD account number.
Rollover/Redemption
Choose ‘Renewal’ option to renew the accounts that are within the grace period days. Choose ‘Redemption’ to redeem the term deposit.
Note
– When a term deposit is moved to unclaimed on maturity date, you have to manually renew or roll over the same term deposit. Once you choose the option, ‘Renewal’ the ‘Term Deposit Account Number’ field displays those accounts whose balances are moved to unclaimed GL.
– The accounting entries for redemption/renewal are passed only on authorization.
Rollover
Indicate the rollover tenor for the TD account. You can select one of the following options:
l Account Class Tenor - If ‘Recompute Maturity Date on Rollover’ is checked at the account class level, then by default, this option is selected. If you select this option, then the following are applicable:
– The value of ‘Default Tenor’ at account class is considered as the ‘Rollover Tenor’ during deposit rollover
– During opening or modification within the term of the deposit, if you change the defaulted value for ‘Rollover Tenor’ from ‘Account Class Tenor’ to ‘Account Tenor’ or ‘Independent Tenor’, then on save system displays the override message, “Recompute Maturity Date on Rollover restrictions at account class will be ignored”.
– On save, the system displays the ‘Next Maturity Date’.
l Account Tenor - If ‘Recompute Maturity Date on Rollover’ is unchecked at the account class level, then by default, this option is selected. If you select this option, then the following are applicable:
– The value of ‘Original Tenor’ of the deposit account is considered as the ‘Rollover Tenor’ during deposit rollover.
– During opening or modification within the term of the deposit, if you change the defaulted value for ‘Rollover Tenor’ from ‘Account Tenor’ to ‘Account Class Tenor’, then on save system displays the override message, “Recompute Maturity Date on Rollover restrictions at account class will be ignored”.
– On save, system updates the ‘Next Maturity Date’ with the sum of maturity date and original tenor of the deposit.
l Independent Tenor - Select this option to provide a different tenor, rather than default from account class or account tenor. On selecting this option, you can specify the Rollover Tenor in years, months and days combination. On save, system updates the ‘Next Maturity Date’ accordingly.
Years
Specify the number of years in the rollover tenor. You can edit this only in the case of Independent tenor.
Months
Specify the number of years in the rollover tenor.
Days
Specify the number of years in the rollover tenor.
Next Maturity Date
On selecting the rollover for the TD account, the system defaults the next maturity date from the previous tenor of the deposit.
Continue Variance on Rollover
The system defaults it based on the flag availability in the TD account level. However, you can modify this flag.
If you check this, then the system will default account variance as current value to the rollover deposit for the next cycle.
If you do not check this, then the account variance will not be carried forward to next rollover cycle.
Redemption
Indicate the following details if you have chosen ‘Redemption’.
Redemption Mode
Select the mode of redemption from the following options.
l Full Redemption - In this case, you can redeem the complete deposit balance of the account. On save, the redemption amount will be equal to the account balance. Full redemption will update the status of the deposit amount as closed. On complete redemption profit along with principal is redeemed. The redemption amount is equal to the total of principle and profit amounts subtracted by penalty and tax amounts.
l Partial Redemption - In this case you have to specify the redemption amount. Ensure that that the redemption amount is less than the account balance. On partial redemption only the principal amount is withdrawn where as the profit amount is liquidated only on liquidation cycle.
Redemption Amount
Specify the redemption amount for the partial redemption. Ensure that that the redemption amount is less than the account balance.
Note
The system will validate for the following:
– During partial redemption the withdrawal amount should be a multiple of withdrawal unit maintained at the ‘Deposits Cluster Maintenance’ level, else the system will display the error message as, “Withdrawal amount must be multiples of withdrawal unit.”
– Withdrawal amount should be greater than minimum booking amount maintained at the ‘Deposits Cluster Maintenance’ level, else the system will display the error message as, “Withdrawal exceeds minimum balance level.”
Waive Compensation
Check this field to waive any compensation related to the deposit redemption.
Waive Profit on Full Redemption
Check this box to waive of a particular profit that has been specified.
Tenor
Specify the following details for TD tenor in case you are renewing the TD.
Days
Specify the renewal tenor in terms of days.
Months
Specify the renewal tenor in terms of months.
Years
Specify the renewal tenor in terms of years.
Redemption By
Select the means of redemption from the following options:
l Savings
l General Ledger
l Bank Check
By default, this tab is displayed when the screen is invoked. You can capture the following details:
Cheque Details
Specify the following cheque details.
Bank Code
Specify the bank code of the Bankers cheque.
Cheque Date
Specify the cheque date for the redemption.
Cheque Currency
Specify the currency in which the cheque is drawn. The adjoining option list displays all valid currency codes maintained in the system. You can select the appropriate one.
Cheque Amount
The amount being liquidated for the TD is displayed in the cheque currency.
Exchange Rate
In case the TD currency is different from the cheque currency; the exchange rate used to convert TD currency into cheque currency is displayed here, based on the rate maintained for the currency pair.
Beneficiary Details
Indicate the following details.
Beneficiary Name
Specify the name of the beneficiary for the redemption.
Passport Number
Specify passport details for the beneficiary.
Narrative
Give a brief description for the redemption.
Address Line 1 to 2
Specify the address of the beneficiary for the redemption.
If means of redemption is ‘Savings’, then click ‘Savings’ tab.
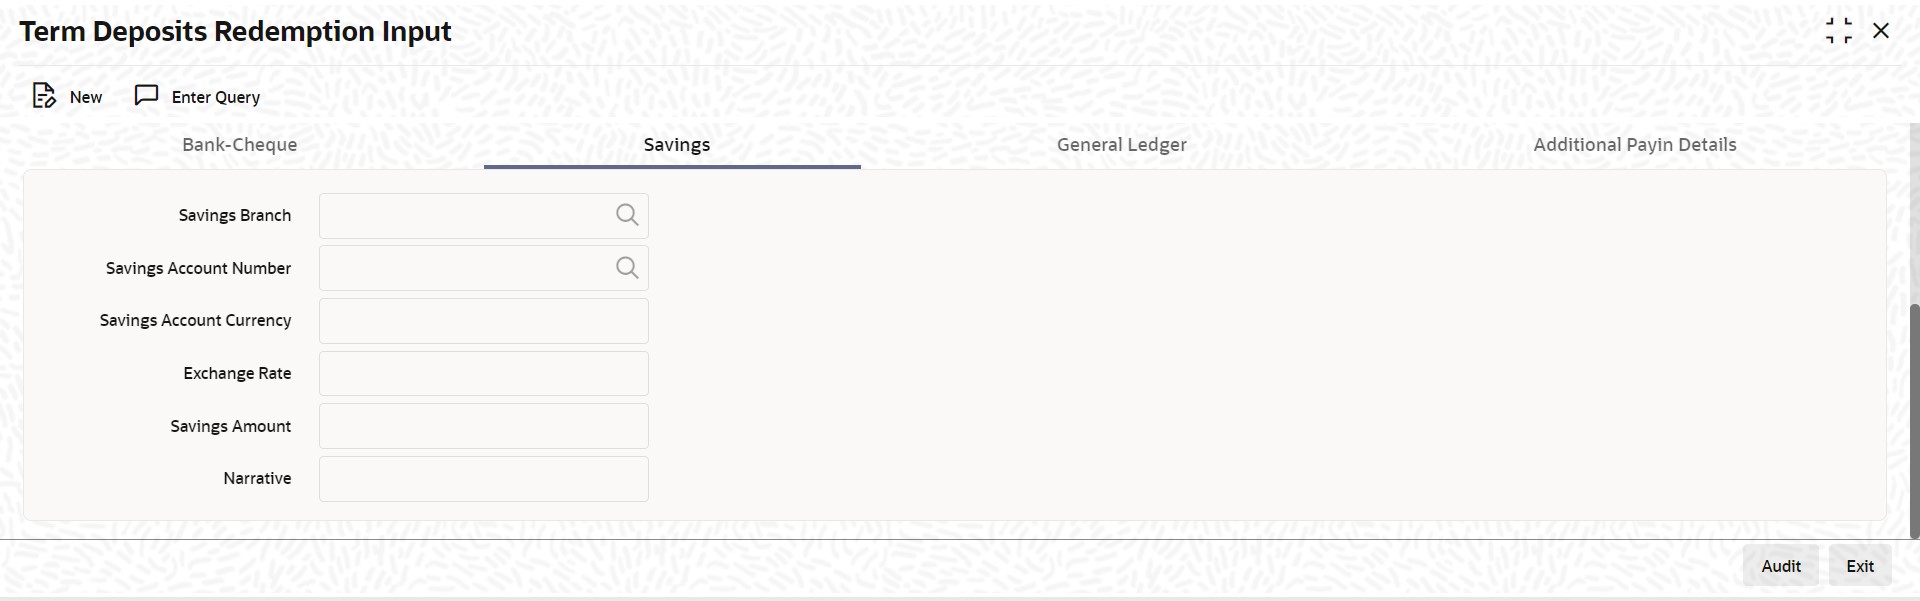
You can capture the following details:
Savings Branch
The system displays the savings branch code of the account to which fund is transferred from TD account.
Savings Account Number
Specify the account number into which the TD has to be liquidated. The adjoining option list displays all valid savings accounts maintained in the system. You can choose the appropriate one.
Savings Account Currency
Based on the account number specified, the account currency is displayed here.
Exchange Rate
In case the TD currency is different from the account currency, the exchange rate used to convert TD currency into account currency is displayed here, based on the rate maintained for the currency pair.
Savings Amount
The amount being liquidated for the TD is displayed in the account currency.
Narrative
Give a brief description for the transaction, if required.
If you have indicated the means of redemption as ‘General Ledger’, then click the ‘General Ledger’ tab on the ‘Term Deposits Redemption Input’ screen.
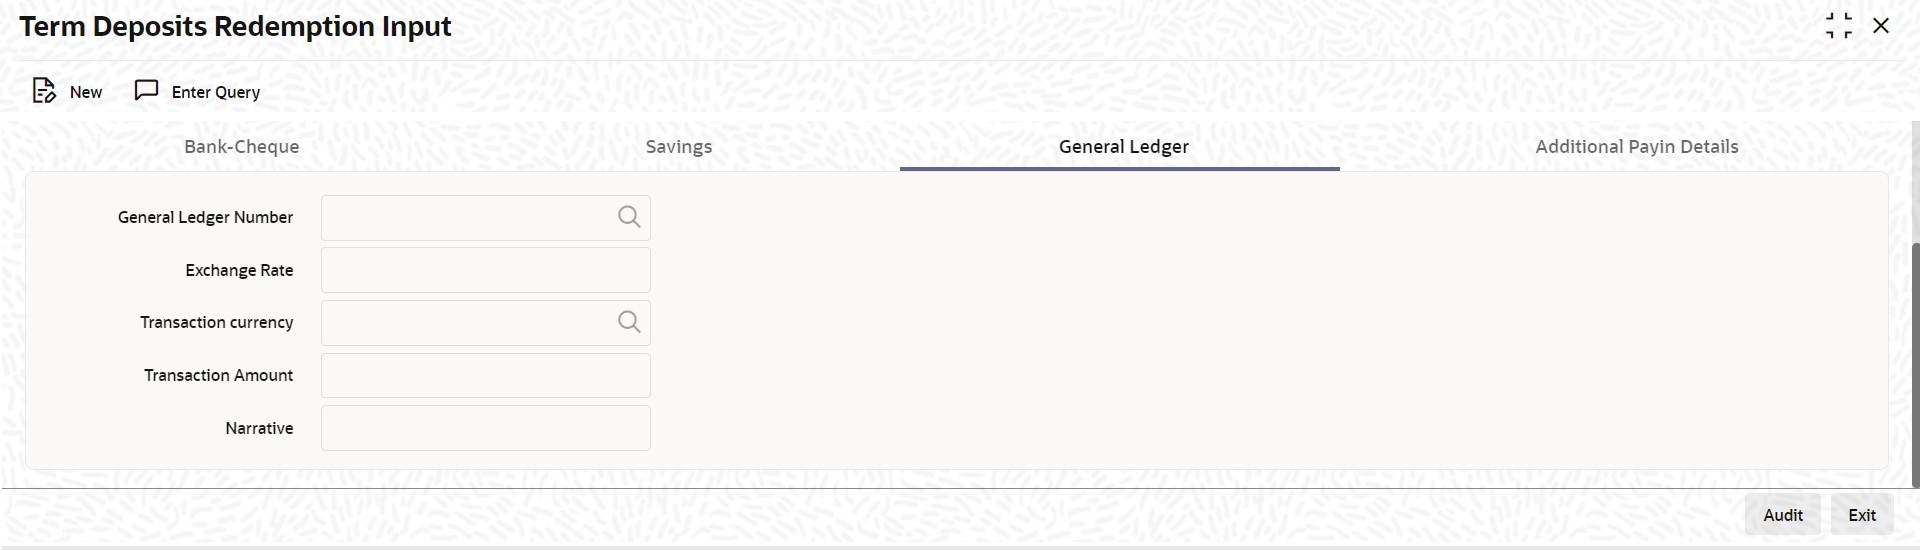
Specify the following details:
General Ledger Number
Specify the GL into which the TD has to be liquidated. The adjoining option list displays all valid GLs maintained in the system. You can choose the appropriate one.
Exchange Rate
In case the TD currency is different from the transaction currency, the exchange rate used to convert TD currency into transaction currency is displayed here, based on the rate maintained for the currency pair.
Transaction Amount
The amount being liquidated for the TD is displayed in the transaction currency.
Transaction Currency
Specify the currency in which the TD should be liquidated. The adjoining option list displays all valid currency codes maintained in the system. You can select the appropriate one.
Narrative
Give a brief description for the transaction, if required.
4.6.5 Additional Payin Details Tab
Click on Additional Payin Details tab to view the payin details screen.

Select the Payin Details for debiting the additonal amount for rollover from the drop down list. The list displays the following values:
l GL - In case of pay-in through GL, the GL maintained at ‘TD Payin Parameters’ screen (STDTDPAY) should be specified. If the offset GL account is not specified, the GL maintained at 'TD Payin Parameters' (STDTDPAY) screen will be defaulted on save.
l Account - In case of pay-in from savings account, it is mandatory to specify the offset account. If it is not specified, the system displays an error on saving the TD account.
Percentage
Specify the percentage of add payin for each pay in option specified.
Amount
Specify the additional amount to be considered on rollover of a deposit.
Offset Branch
The system displays the branch code of the account to which fund is transferred from TD account.
Offset Account
Specify the account number/ GL from which the fund is transferred to TD account on rollover. This field will return the branch code if the account is selected and NULL will be returned if GL is selected. If pay-out mode is GL then the system displays only GLs in the option list. If the pay-out mode is Account then the system displays only accounts in the option list.
Note
– On manual renewal, new event MROL will be fired debiting the additional funds pay in accounts for additional amount.
– If add funds pay in is through account, then offset account is mandatory. Else, on save, the system displays an error message as 'Offset account is mandatory'.
– If the offset account does not have sufficient funds, then on save, the system displays an override message as 'Insufficient balance in the pay in account. Before rollover date, the customer has to operationally verify that funds are available in offset account, else rollover will be failed.
– If offset account provided has limits attached, then on save, the system displays an override message as 'The limits / collateral attached is used for pay-in'. Override message will be generic for both TD opening and additional funds rollover pay-in.
For the transaction to be authorized, click ‘Authorize’ button.
Note
The accounting entries for redemption/renewal are passed only on authorization.
4.7 Viewing TD Redemption Details
You can view the details of TDs redemption using the ‘Term Deposit Redemption Summary’ screen. To invoke this screen, type ‘IASREDMN’ in the field at the top right corner of the Application tool bar and click the adjoining arrow button.
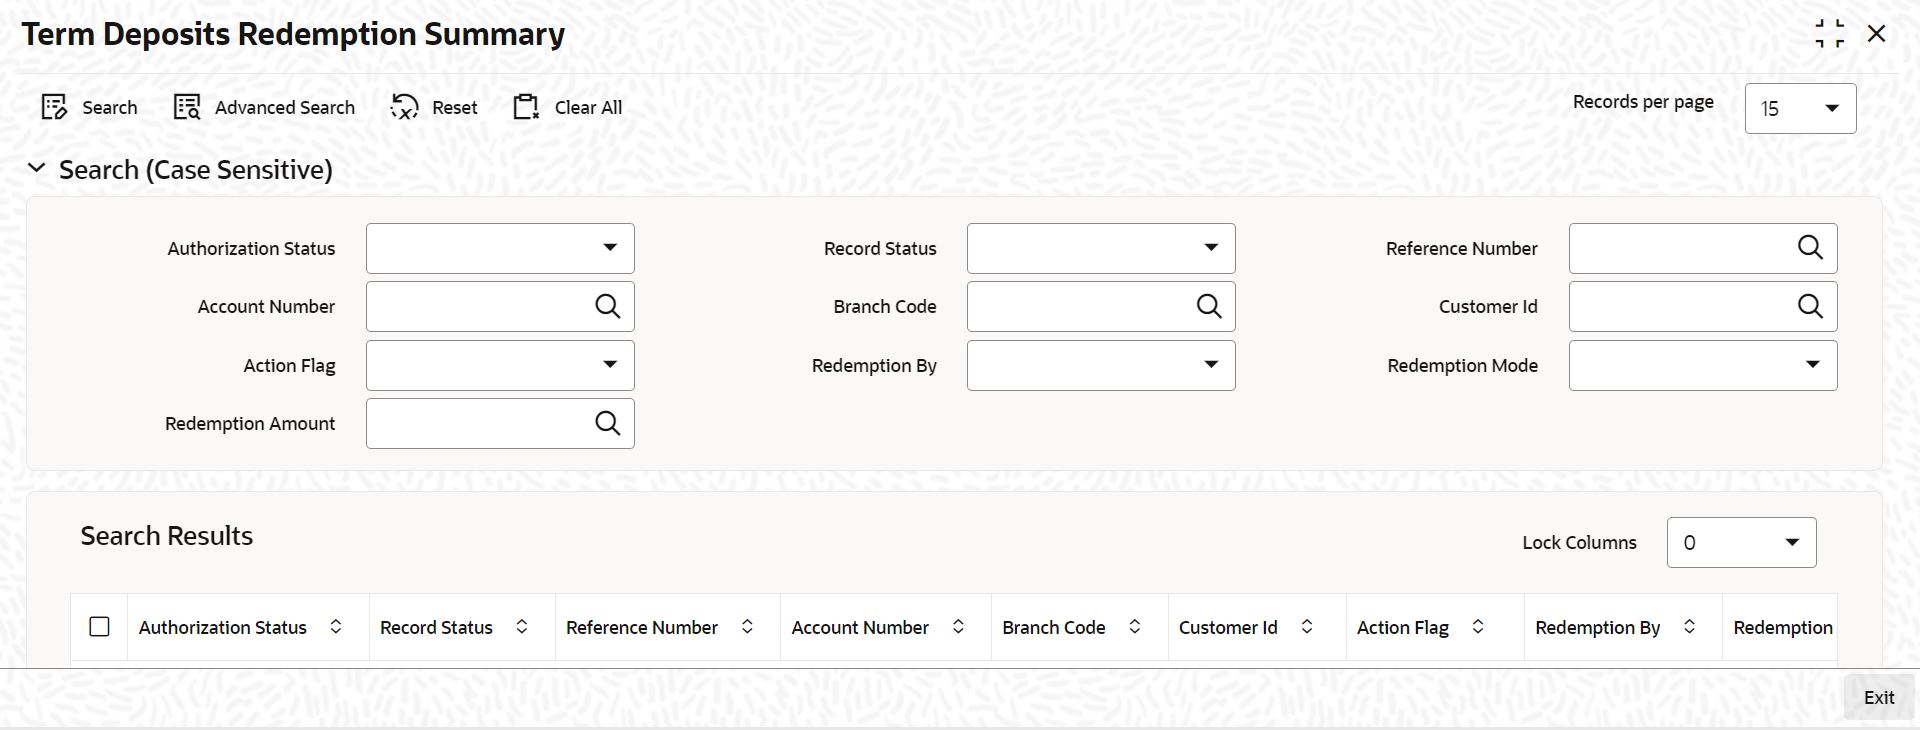
You can query on records based on any one or all of the following criteria:
l Authorization Status
l Record Status
l Reference Number
l Account Number
l Branch Code
l Customer Id
l Action Flag
l Redemption By
l Redemption Mode
l Redemption Amount
Click ‘Search’ button. The system identifies all records satisfying the specified criteria and displays the following details for each one of them:
l Authorization Status
l Record Status
l Reference Number
l Branch Code
l Account Number
l Customer Id
l Action Flag
l Redemption By
On partial redemption of a TD, the system credits the redemption amount to the customer payout account and debits it from the TD account. It recalculates the tenor for the redemption amount i.e. completed tenor from the TD value date till the partial redemption date in months. This indicates the reduced tenor.
It also recalculates the profit for the previous periods including the current period (till partial redemption date) by considering the redemption amount as the TD amount for the reduced tenor. It applies the broken weight during profit recalculation and arrives at a certain amount - say Amount1.
It recalculates the profit for the remaining amount from TD start date till the last liquidation period by considering the remaining amount as TD balance for the original tenor of TD and arrives at another amount – say Amount2.
In case of TD pay-outs, the system captures the profit amount paid to the customer till date – say Amount3.
If the profit for the previous periods has been already paid to the customer, then the customer will be debited with the difference amount between already liquidated amount till the last liquidation date and the newly recalculated profit (for redemption amount and remaining amount). This means, the customer will be debited with [Amount3 – (Amount1 + Amount2)].
The balance amount after partial redemption will be considered as the new TD with the original TD tenor by the system.