- DSR or SDS NOAM Failover
- Failover Procedures
- Demoting the Active NOAM from Primary to Secondary
4.1 Demoting the Active NOAM from Primary to Secondary
Perform the following steps on Primary NOAM VIP to
stop the Application Software on Primary and DR NOAM.
- Launch an HTML5 compliant browser and connect to the XMI Virtual IP address
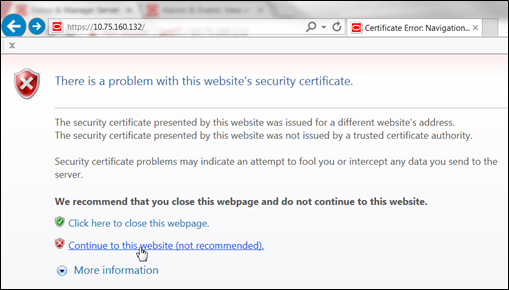
(VIP) assigned to Primary Active NOAM site.If a Certificate Error is received, click on Continue to this website (not recommended) link.
Figure 4-1 Certificate Error
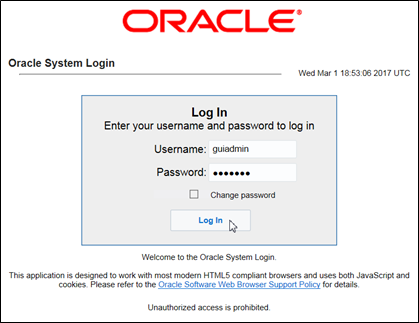
The login screen appears.
- Log in to the GUI using a User account with Administrator privileges.
Figure 4-2 Login Screen
The Product Main Menu appears.
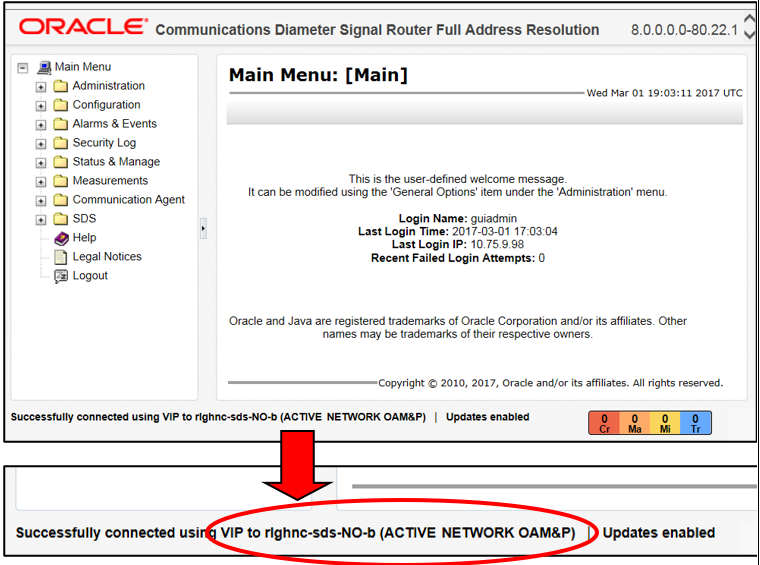
- Verify that the message shown at the bottom of the panel indicates that the
browser is using the VIP to connect to the ACTIVE NETWORK
OAM&P.
Figure 4-3 Main Menu
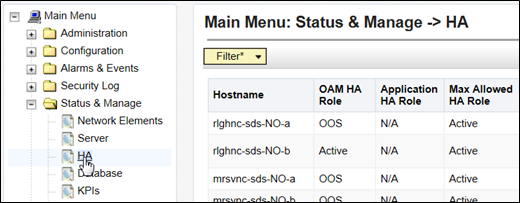
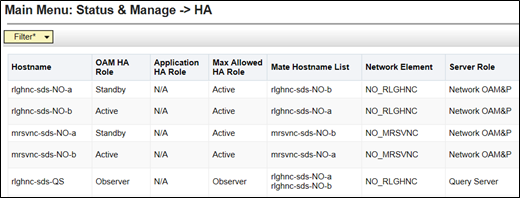
- Go to Main Menu, and then Status & Manage. Then, select HA.
Figure 4-4 Main Menu - HA
- Use the Server hostname shown in the bottom banner for the ACTIVE
NETWORK OAM&P to identify the current Primary
NOAM site.

Note:
The server hostname of the ACTIVE NETWORK OAM&P identifies the current Primary NOAM site. For example, rlghnc. - As the Primary NOAM site is identified, next identify the Primary Active,
Primary Standby, Secondary Active (DR) and Secondary Standby NOAM Servers.
Note:
Active or Standby states for each NOAM server must be recorded as it is critical that the SW on each server be stopped in the exact order specified in Steps 8 - 12 of this procedure. - Record the hostnames of the Active/Standby NOAM servers at the Primary and
Secondary (DR) NOAM sites in the space provided.
Site_1 = Primary_NOAM  (Active)  = _________________________
Site_1 = Primary_NOAM (Standby)  = _________________________
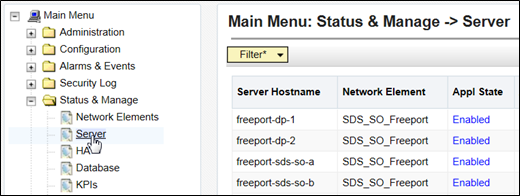
Site_2 = DR_NOAM (Active) = _________________________ Site_2 = DR_NOAM (Standby) = _________________________ - Go to Main Menu, and then Status & Manage. Manage, and then select Server.
Figure 4-5 Main Menu - Server
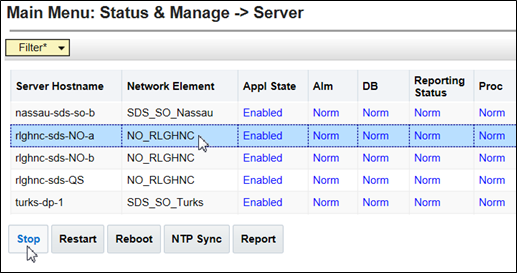
- Based on the information recorded in Step 6 of this procedure,
perform the following steps on the Primary NOAM Standby
server:
- Select the server in the right panel.
- Click Stop.
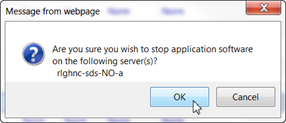
- Click OK in the pop-up confirmation
box.
Note:
Alarms begin to generate at this time including but not limited to Event ID(s): 10008, 10075 & 31201. - After the screen refreshes, verify that the server now shows an Appl State
value of Disabled and a Proc value of
Man.
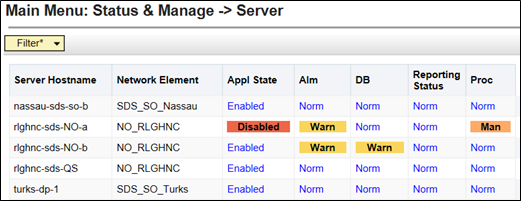
Note:
Although the screen automatically refreshes after several seconds, the user may refresh it immediately if desired by re-selecting the left menu option for the Main Menu: Status & Manage, and then Server.Note:
- To stop the SW on the Primary NOAM Active server, refer to Steps 8 - 9 of this Procedure for the Primary NOAM “Active” Server.
- To stop the SW on the DR NOAM Standby Server, refer to Steps 8 - 9 of this Procedure for the DR NOAM Standby Server.
- To stop the SW on the DR NOAM Active server, refer to Steps 8 - 9 of this Procedure for the DR NOAM Active server.
- Access the command prompt (CLI) and log in to the server as the
admusr user.
rlghnc-sds-NO-b login: admusr
Password: <admusr_password>
Note:
The password does not appear on the screen as you type the characters.Output received is similar to that shown below, as the server returns to a command prompt.
*** TRUNCATED OUTPUT ***PRODPATH= RELEASE=8.6.0 RUNID=00 VPATH=/var/TKLC/rundb:/usr/TKLC/appworks:/usr/TKLC/awpcommon:/usr/TKLC/comagent-gui:/usr/TKLC/comagent-gui:/usr/TKLC/comagent:/usr/TKLC/sds PRODPATH=/opt/comcol/prod [admusr@rlghnc-sds-NO-b ~]$ - Confirm that you are connected to the Primary Active
NOAM server by verifying that the server hostname matches the
entry showing VIP Act/Act.
[admusr@rlghnc-sds-NO-b ~]$ hostname rlghnc-sds-NO-b [admusr@rlghnc-sds-NO-b ~]$ ha.mystate -i |grep VIP VIP Act/Act rlghnc-sds-NO-b 0 0302:235736.946 [admusr@rlghnc-sds-NO-b ~]$ - Verify that the current value for myClusterRole is
Primary.
[admusr@rlghnc-sds-NO-b ~]$ top.myrole myNodeId=A0907.121 myParentClusters=( ) myClusterRole=Primary myRecognizedPrimary=A0907 myRecognizedSecondary=A1103 [admusr@rlghnc-sds-NO-b ~]$ - Set the value for myClusterRole to
Secondary.
[admusr@rlghnc-sds-NO-b ~]$ top.setSecondary - Using my cluster: A0907 - New Secondary Timestamp: 03/03/17 00:19:07.181 - Updating To A0907.060: rlghnc-sds-NO-a - Updating To A0907.113: rlghnc-sds-QS - Updating To A0907.121: rlghnc-sds-NO-b - Updating To A1103.165: mrsvnc-sds-NO-b - Updating To A1103.223: mrsvnc-sds-NO-a [admusr@rlghnc-sds-NO-b ~]$ - Verify that the value for myClusterRole is now
Secondary.
[admusr@rlghnc-sds-NO-b ~]$ top.myrole myNodeId=A0907.121 myParentClusters=( ) myClusterRole=Secondary myRecognizedPrimary=A0907 myRecognizedSecondary=Unknown [admusr@rlghnc-sds-NO-b ~]$ - Verify the current PID for the apwSoapServer
process.
[admusr@rlghnc-sds-NO-b ~]$ pl |grep Server A 946215 apwSoapServer Up 03/02 23:52:31 3 !CMNOSIGCHK=1 apwSoapServer [admusr@rlghnc-sds-NO-b ~]$ - Restart the apwSoapServer process.
[admusr@rlghnc-sds-NO-b ~]$ sudo pm.kill apwSoapServer [admusr@rlghnc-sds-NO-b ~]$ - Verify that the PID for the apwSoapServer process has
changed from the previous value shown in the previous step of this
procedure.
[admusr@rlghnc-sds-NO-b ~]$ pl |grep Server
A 951908 apwSoapServer     Up    03/02 23:52:31 3 !CMNOSIGCHK=1 apwSoapServer
[admusr@rlghnc-sds-NO-b ~]$
Note:
Post completion of this procedure, return to Figure 2-1.