2.4 Creating SDS Guests from OVA (OVM-S or OVM-M)

This section provides procedure to import SDS OVA and prepare for VM creation.
Pre-requisites:
Provide values for the following variables:
  • <OVM-M IP>: IP address to access a sh prompt on the OVM server.
  • <URL to OVA>: Link to a source for downloading the product image (.ova).
  • <MyRepository name>: Name of the repository in the OVM to hold the product image (.ova).
  • <Virtual Appliance OVA ID>
  • <OVA VM name_vm_vm>
  • <OVM network id for (each subnet)>
  • <OVM network name for (each subnet)>
  1. To access command line of OVM, perform the following steps:

    Note:

    Refer to Common OVM-Manager Tasks (CLI) for setting up the platform.
    1. Retrive the site-specific values for these variables.
      <OVM-M IP> = 100.64.62.221
    2. Use the respective value for <OVM-M IP> into the command.
      ssh -l admin <OVM-M IP> -p 10000
      For example:
      ssl –l admin 100.64.62.221 –p 10000
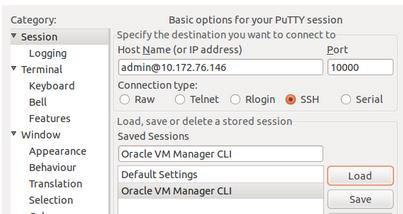
      Alternatively, use a terminal emulation tool like putty.

      Figure 2-1 Terminal Emulation Tool


      Terminal Emulation Tool

  2. To import the OVA, using OVM-M CLI perform the following steps:
    1. Retrieve the site-specific values for these variables.
      <URL to OVA> = http://10.240.155.70/iso/SDS/8.6/ova/SDS-8.6.0.0.0_95.14.0.ova
      <MyRepository name> = XLab Utility Repo01
    2. Add the respective values for <MyRepository name> and <URL to OVA> in the command.
      OVM>importVirtualAppliance Repository name=’<MyRepository name>’ url="<URL to OVA>”
      For example:
      OVM> importVirtualAppliance Repository name='XLab Utility Repo01' url=http://10.240.155.70/iso/SDS/8.6/ova/SDS-8.6.0.0.0_95.14.0.ova
    3. To validate success and examine the screen results to find site-specific text for variables in these locations, run the following command:
      importVirtualAppliance Repository name='XLab Utility Repo01' url=http://10.240.155.70/iso/SDS/8.6/ova/SDS-8.6.0.0.0_95.14.0.ova
      Status: Success
      Time: 2017-04-18 15:23:31,044 EDT
      JobId: 1492543363365
      Data: id: 1128a1c6ce name: SDS-8.6.0.0.0_95.14.0.ova
    4. Add the respective values for the following variable:
      <Virtual Appliance OVA ID> = 1128a1c6ce
  3. To get the virtual appliance ID, using OVM-M CLI perform the following steps:

    Note:

    The virtual appliance OVA ID is used in later steps.
    1. Retrieve the site-specific text for these variables.
      <Virtual Appliance OVA ID> = 1128a1c6ce
    2. Add the respective values for <Virtual Appliance OVA ID> in the command.
      OVM> show VirtualAppliance id=<Virtual Appliance OVA id>
      For example:
      OVM> show VirtualAppliance id=1128a1c6ce
    3. To validate success and examine the screen results to find site-specific text for variables in these locations, run the following command:
      show VirtualAppliance id=1128a1c6ce
      Status: Success
      Time: 2017-04-18 15:23:53,534 EDT
      Data:
      Origin = http://10.240.155.70/iso/SDS/8.6/ova/SDS-8.6.0.0.0_95.14.0.ova
      Repository = 0004fb0000030000da5738315337bfc7 [XLab Utility Repo01]
      Virtual Appliance Vm 1 = 11145510c0_vm_vm [vm]
      Virtual Appliance VirtualDisk 1 = 11145510c0_disk_disk1 [disk1]
      Id = 11145510c0 [SDS-8.6.0.0.0_95.14.0.ova]
      Name = SDS-8.6.0.0.0_95.14.0.ova
      Description = Import URL: http://10.240.155.70/iso/SDS/8.6/ova/SDS-8.6.0.0.0_95.14.0.ova
      Locked = false
    4. Add the respective values for this variable.
      <OVA VM name_vm_vm> = 11145510c0_vm_vm
  4. To determine the OVM network IDs, using OVM-M CLI perform the following steps:

    Note:

    This is established during the platform installation.
    OVM> list Network
    1. Run the following command and validate success for:
      • <OVM network ID>
      • <OVM network name>

      Note:

      This screen results data is required to be referred in later steps.
      list network
      Status: Success
      Time: 2017-04-19 18:51:42,494 EDT
      Data:
      id:10486554b5 name:XSI-7 (10.196.237.0/25)
      id:10f4d5744c name:XMI-11 (10.75.159.0/25)
      id:10775cf4e5 name:IDIH Internal
      id:102e89a481 name:IMI Shared (169.254.9.0/24)
      id:c0a80500 name:192.168.5.0
      id:10d8de6d9a name:XSI-6 (10.196.236.128/25)
      id:10806a91fb name:XSI-8 (10.296.237.128/25)
      id:10a7289add name:Control DHCP
      id:1053a604f0 name:XSI-5 (10.196.236.0/25)
      id:10345112c9 name:XMI-10 (10.75.158.128/25
    2. Examine the screen results to find site-specific OVM values for each subnet.
    3. Add the respective values for network ID variables. Then, change the examples as shown in the following table according to the values.
        OAM (XMI) Local (IMI)
      <OVM network name> XMI-10 IMI Shared
      <OVM network ID> 10345112c9 102e89a481