Providing Non-REST Web Services
The Provide Web Services component (IB_WSDLEXP_SRCH) features a wizard you can use to provide web services. This section focuses on providing non-REST web Services.
A non-REST service will produce a WSDL document.
Note: For a service to be available to provide, an any-to-local routing must exist for the service. In addition, there must be a minimum of one service operation associated with the service.
You can use the Provide Web Service wizard to select one or more services for which to generate documents. A separate document is generated for each service.
The first step is to search for and select the services that contain the service operations to include the WSDL documents that you generate. To access the page select
To access the page select
This example illustrates the Provide Web Services - Select Services page.
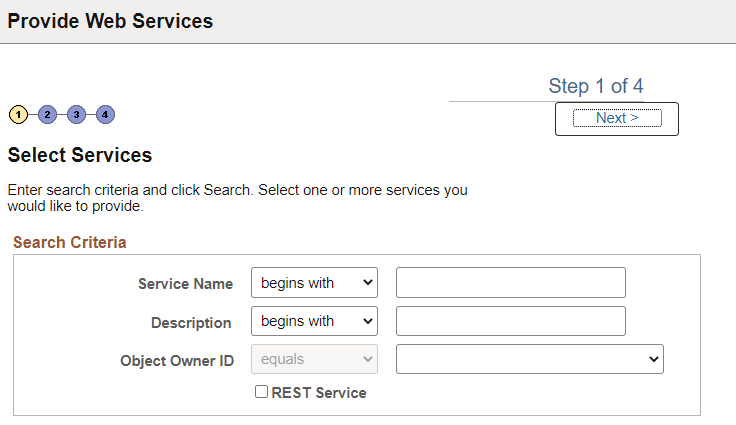
You can search by the full or partial service name and service description. You can also search by object owner ID, if one is defined for the service. You can enter one or more of these criteria when performing your search.
|
Field or Control |
Description |
|---|---|
|
Service Name |
Enter a full or partial service name. |
|
Description |
Enter the full or partial description of the service. |
|
Object Owner ID |
Select the object owner of the service to provide. |
|
REST Service |
Make sure this box is cleared for a non-REST Service. |
Click the Search button.
Select the check box next to each name of the services to provide.
Click the Next button to proceed to the next step in the wizard, selecting service operations.
Use the Select Service Operations page (IB_WSDL_EXP_OPER) of the Provide Web Service Wizard to select service operations to provide.
This example illustrates the Select Service Operations page for a non-REST service.

|
Field or Control |
Description |
|---|---|
|
Use Service Alias in WSDL |
Select this checkbox to specify that the system use the service alias name in the generated WSDL, rather than the actual service name. |
|
Use Secure Target Location |
Select this checkbox if you want to export the WSDL to the URL specified in the Secure Target Location field on the Service Configuration page. If you do not select this option, WSDL is exported to the URL specified in the Target Location field defined on the Service Configuration page. |
|
Generate WSDL 2.0 |
By default, the system generates WSDL in WSDL 1.1 format. Select this checkbox to generate WSDL in WSDL 2.0 format. |
If you are attempting to provide a different version of an existing WSDL document, the Service System Status mode set, Production or Development, may impact your results.
See WSDL Document and WADL Document Versioning.
Click the Next button to proceed to the next step in the wizard.
Use the View WSDL page (IB_WSDLEXP_PVIEW) to preview the WSDL.
This example illustrates the View WDSL page for a non-REST service.
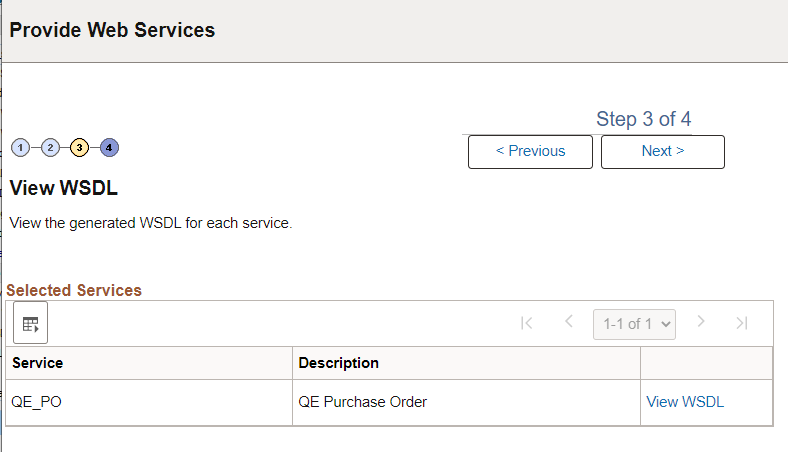
Each service for which a WSDL document will be generated is listed. Click theView WSDL link to view the WSDL document for each service that you have selected.
This example illustrates the WSDL Viewer page. The example shows generated WSDL for the QE_PO service.

Click the Return button to return to the View WSDL page.
Click the Next button to proceed to the next step in the wizard.
After you preview the WSDL document, use the Specify Publishing Options page (IB_WSDLEXP_LOC) to specify the publish location of the generated documents.
This example illustartes the Specify Publishing Options page.
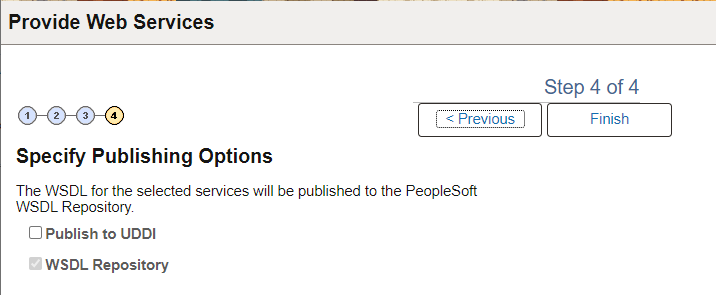
By default the system publishes WSDL documents to the PeopleSoft WSDL repository.
Select the Publish to UDDI check box to publish the WSDL to a UDDI repository in addition to the PeopleSoft WSDL repository.
Providing WSDL Documents to UDDI Repositories
Before providing a WSDL document to a UDDI repository, you must configure the UDDI repository in the PeopleSoft system.
See Understanding Specifying UDDI Repositories in PeopleSoft Systems.
When you select the Publish to UDDI check box, the Select UDDI Servers box appears where you specify the UDDI repository to which to publish the WSDL.
This example show the Specify Publishing Options page when Publish to UDDI is selected.
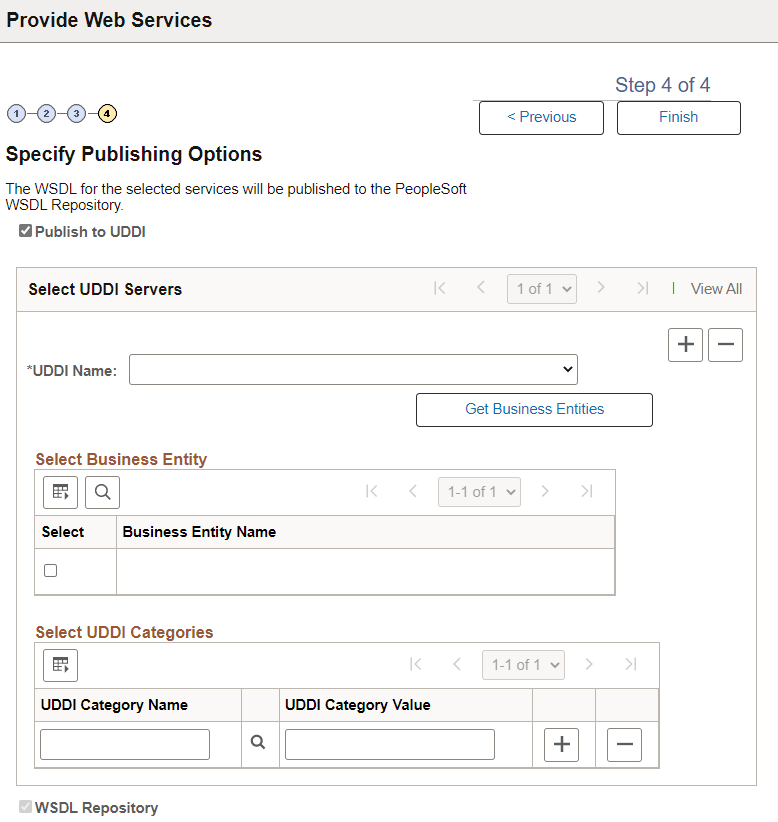
To provide a WSDL document to a UDDI repository:
From the UDDI Name drop-down list box, select the UDDI server to which you are publishing the WSDL.
Click the Get Bus. Entities button.
The Select Business Entity section lists the business entities that are available to select for the UDDI server.
Select the check box next to each business entity name to include.
Click the UDDI Category Name lookup button to display a list of UDDI categories and select a UDDI category. Click the OK button.
In the Category Value field, enter a value for the category.
To add additional categories, in the Select UDDI Categories section, click the Add a Row button (+) to add a row and repeat step 5 and step 6.
Click the Finish button.
The Results page appears and displays the WSDL generation log.
Use the Confirm Results page (IB_WSDLEXP_RSLTS) to view the WSDL Generation Log:
This example illustrates the Confirm Results page for a non-REST service.
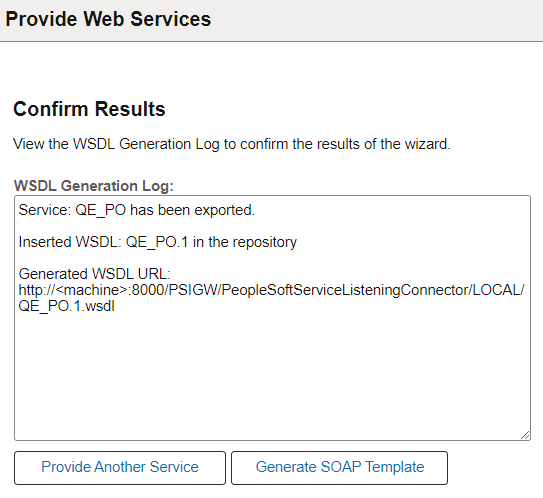
The WSDL Generation Log provides the name of the services and URL for each WSDL document generated.
You can cut and paste the URL into a browser to access the document. You can also access the document using the WSDL repository.
To provide another service, click the Provide Another Service button and return to step 1 of the wizard.
When providing non-REST service operations, a Generate SOAP Template link appears on the page. Click the link to access the Generate SOAP utility to generate SOAP message templates for request messages, response messages and fault messages found in the WSDL document. You can then use the templates to test SOAP messages in the Handler Tester, Transformation Test Tool and Send Master utilities.