Managing Homepages
This section discusses how to:
Create and configure homepage definitions.
Set homepage permissions.
Specify the pagelets or tiles that can appear on a homepage.
(Classic only) Arrange pagelets on classic homepages.
(Fluid only) Arrange tiles on fluid homepages.
(Fluid only) Publish additional tiles to already personalized homepages (using the Tile Publish page or using a PeopeCode program).
Specify the homepage sequence.
(Fluid only) Publish personalizations as a new fluid homepage.
(Fluid only) Restricting fluid homepage and NavBar personalization.
Use the Content Ref Administration page (PORTAL_CREF_ADM) to create and maintain homepage definitions.
Navigation:
Select .
Continue to navigate through the folder structure depending on the homepage type:
For classic homepages, select .
For fluid homepages, select .
Click the Add Content Reference link.
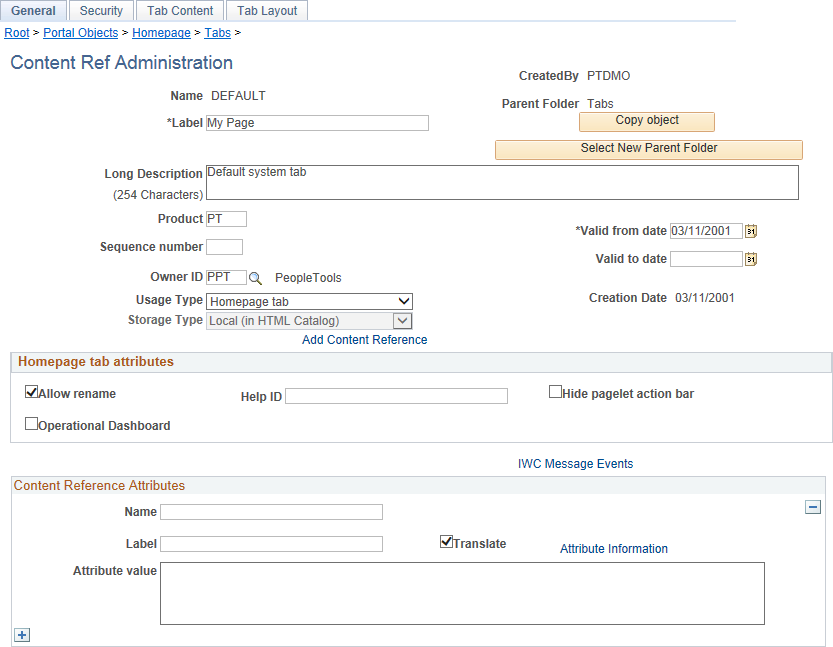
This example illustrates the fields and controls on the Content Ref Administration page for a classic homepage definition. You can find definitions for the fields and controls later on this page.
This example illustrates the fields and controls on the Content Ref Administration page for a fluid homepage definition. You can find definitions for the fields and controls later on this page.

Field or Control |
Description |
|---|---|
Name |
Enter a unique ID for the homepage definition. The value that you specify in the Name field can consist of up to 50 letters, digits, and underscores ( _ ). It cannot contain any spaces and cannot begin with a digit. |
Label |
Enter the label that users will see for the homepage. |
Long Description |
Enter a long description for the homepage. |
Product |
Portal-aware applications can use this field for group processing. All PeopleTools objects have the product name PT. |
Sequence number |
Enter a value to designate the order of the homepage when multiple homepages are defined. The sequence number determines the order in which the homepages appear. The homepages appear with the lowest sequence number first. If any numbers are identical, then the order is alphanumeric. No value is equivalent to specifying 0. Important! Therefore, the homepage with the lowest sequence number becomes the default homepage. |
Valid from date |
Enter the date that the homepage becomes visible to users. |
Valid to date |
Enter an optional date that the homepage is removed from use. |
Owner ID |
Select the object owner ID. |
Usage Type |
Select a usage type depending on the definition:
|
Storage Type |
Displays Local (in HTML Catalog), which cannot be modified. |
Note: The ALLOW_NAVBAR_TILES content reference attribute found on some fluid homepage definitions is not a valid attribute and is ignored.
Homepage Tab Attributes
Field or Control |
Description |
|---|---|
Allow rename |
Select to enable the user to personalize the homepage label. Note: When a portal administrator updates the label for a fluid homepage or a fluid dashboard, the PeopleSoft system propagates the new label to homepages or dashboards that have not been personalized and to personalized homepages or dashboards that also retain the original label. If a user has personalized the label, then the user's personalization is retained. |
Help ID |
Enter the help ID for the homepage. When users click the Help link, the PeopleSoft system opens a new window displaying online help documentation for this item. Note: You must also configure a help URL on the Web Profile Configuration - General page. |
(Classic only) Hide pagelet action bar |
Select to hide the pagelet title bars on all pagelets on the homepage tab. This option overrides all properties for pagelets used on this tab. |
Operational Dashboard |
Select to use the homepage as a dashboard page, which hides the homepage so that it does not appear when users sign in. Important! If you use the Dashboard Administration pages to create dashboards, then the system creates the homepage content reference, selects this check box, and creates a content reference link automatically. However, if you manually select this check box, you must manually create a content reference link to the dashboard, which you position in the menu structure. |
(Fluid only) Behavior |
Select one of the following:
|
Use the Content Reference Security page (PORTAL_CREF_SEC) to define the portal registry security for the homepage definition.
Navigation:
From the Content Ref Administration page, select the Security page tab.
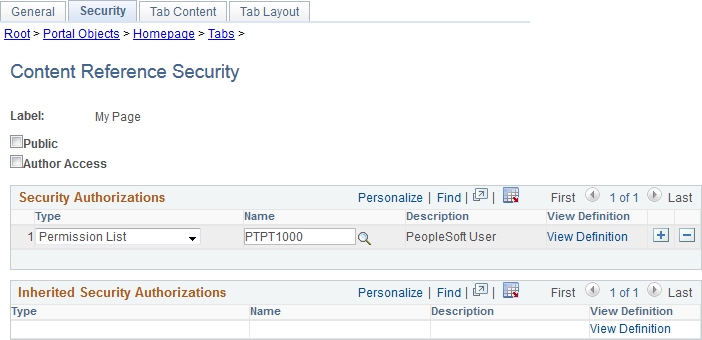
This example illustrates the fields and controls on the Content Reference Security page (a classic homepage definition is shown). You can find definitions for the fields and controls later on this page.
Field or Control |
Description |
|---|---|
Public |
Select to make the homepage available to all users. When this check box is selected, all other fields except Label are hidden. |
Author Access |
Select to indicate that the creator of the homepage definition can access the homepage in the future, regardless of how other permissions are set. |
Security Authorizations
You can base homepage security on roles or permission lists. You can specify any combination of roles and permission lists that allow homepage access.
Field or Control |
Description |
|---|---|
Type |
Select from these types:
|
Name |
Select the permission list or role that you want have access to this homepage. |
View Definition |
Click to access the security administration component for the permission list or role specified on the current row. |
Use the Tab Content - Tab Content page (PORTAL_TAB_CON_ADM) or the Tile Content: Tab Content page (PORTAL_TAB_LANDING) to select which pagelets or tiles are available to users who have access to this homepage.
Navigation:
For a classic homepage, from the Content Ref Administration page, select the Tab Content page tab.
For a fluid homepage, from the Content Ref Administration page, select the Tile Content page tab.
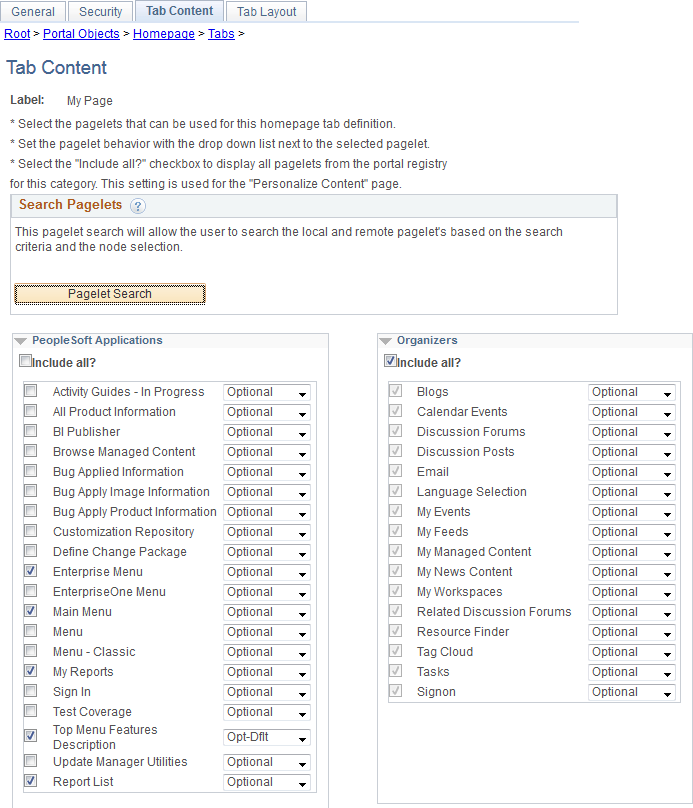
This example illustrates the fields and controls on the Tab Content - Tab Content page. You can find definitions for the fields and controls later on this page.
This example illustrates the fields and controls on the Tile Content - Tab Content page. You can find definitions for the fields and controls later on this page.
Important! While this page still determines which tiles are displayed as required, fixed, or by default, the restrictive function of this page does not apply to fluid homepages—that is, all tiles can be added to any fluid homepage by any user with permissions to that tile regardless of whether the tile has been explicitly allowed on this page.
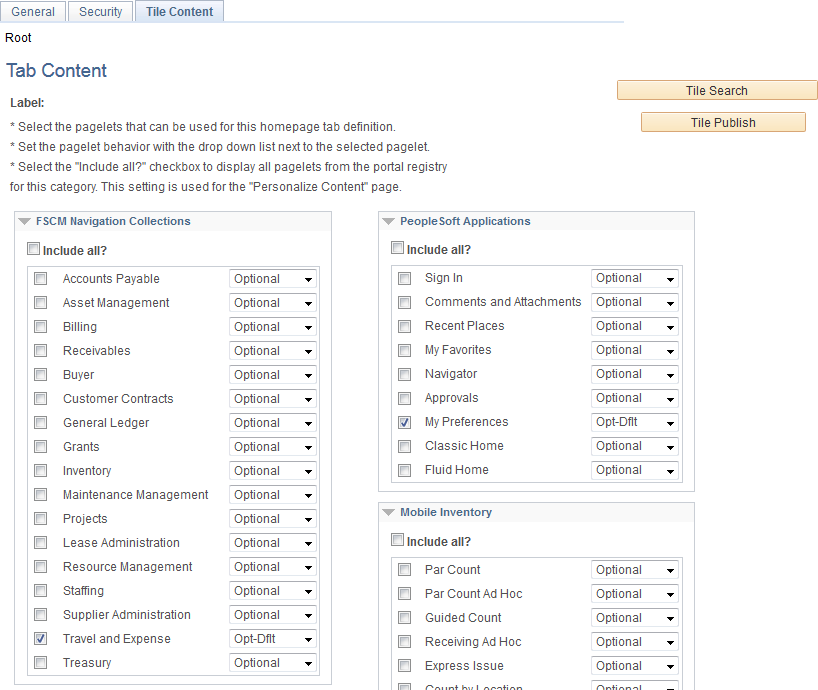
To select the pagelets or tiles that can be displayed on this homepage:
Expand any collapsed group boxes and then select the check box to make the pagelet or tile available for this homepage.
Select the Include All? check box to select all pagelets or tiles in that category.
Note: A user must also have security access to the pagelet or tile definition for the item to be displayed on the homepage.
-
In addition:
For classic homepages, you can click the Pagelet Search button and select a pagelet from the Pagelet Search page to add it to the homepage tab definition.
See Searching for and Importing Pagelets and Tiles for more information on searching for pagelets on local and remote nodes.
For fluid homepages, you can click the Tile Search button and select a pagelet from the Tile Search page to add it to the homepage tab definition.
See Searching for and Importing Pagelets and Tiles for more information on searching for tiles on local and remote nodes.
Use the drop-down list box to select the pagelet behavior. Values are:
Field or Control
Description
Opt-Dflt (optional default)
The pagelet or tile is visible to all users by default for users that have permissions to the pagelet or tile; users can move or delete the pagelet or tile.
Note: You must select the Opt-Dflt setting if you wish to publish additional tiles to users who have already personalized this homepage. See (Fluid only) Using the Tile Publish Page to Publish Additional Tiles and (Fluid only) Using a PeopleCode Program to Publish Additional Tiles for more information.
Optional
The pagelet or tile is available to all users for users that have permissions to the pagelet or tile, but it is not visible by default; users can add, move, or delete the pagelet or tile.
Note: However, since all tiles are already available to all users that have permissions to the tile, this selection is unnecessary for tiles.
Req-Fix (required fixed)
The pagelet or tile is visible to all users by default for users that have permissions to the pagelet or tile; however, users cannot move or delete the pagelet or tile.
Note: A tile that is designated as fixed cannot be moved directly. If a fixed tile is also the first tile, no other tiles can be moved in front of it. However, if non-fixed tiles precede the fixed tile, other tiles can be moved in front of the fixed tile thereby rendering the fixed setting moot.
Required
The pagelet or tile is visible to all users by default for users that have permissions to the pagelet or tile; users can move the pagelet or tile, however, they cannot delete it.
Click the Save button.
Use the Tab Layout page (PORTAL_TAB_LAY_ADM) to specify the initial layout of columns and pagelets for a classic homepage.
Navigation:
From the Content Ref Administration page, select the Tab Layout page tab.
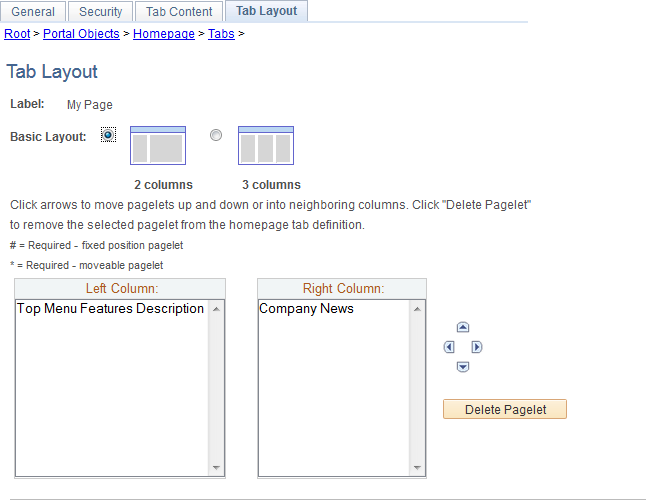
This example illustrates the fields and controls on the Tab Layout page for classic homepages. You can find definitions for the fields and controls later on this page.
Field or Control |
Description |
|---|---|
Label |
Displays the label information from the Content Ref Administration page. |
Basic Layout |
Select to display the pagelets in either two or three columns on the homepage. To specify the three-column layout, be sure that at least one pagelet does not have the Req-Fix behavior option selected on the Tab Content page. |
Columns |
Displays the pagelets selected on the Tab Content page in the column sections. If the basic layout is two columns, the pagelets are divided into left and right columns. If the basic layout is three columns, the pagelets are divided into left, center, and right columns. Note: A pound sign (#) indicates a pagelet with the Req-Fix behavior option selected on the Tab Content page. An asterisk (*) indicates a pagelet with the Required behavior option selected on the Tab Content page. For example, #Signon would indicate that the Signon pagelet cannot be moved to a different location on the homepage. |
|
Use the Move icons to position the pagelets. Highlight a pagelet, and then click the directional arrow buttons to move the selected pagelet above a pagelet, below a pagelet, to the next column to the right, or the next column to the left. |
Delete Pagelet |
Highlight a pagelet and then click to delete it from the homepage. |

To arrange the tab layout:
Select a basic layout option.
Select the pagelet name.
Click the directional arrow buttons to position the pagelets in the columns.
Click the Save button.
Note: As the portal administrator, you determine the amount of flexibility that you give users to change the layout of the pagelets. The settings that you select on both the Tab Content and Tab Layout pages determine the degree of flexibility. Grant the end user as much or as little flexibility as your organization demands.
There is no specific page that allows the portal administrator to arrange or order the tiles on a fluid homepage. Instead, the sequence number for each tile determines the initial order of tiles on a fluid homepage. Tiles appear in order with the lowest sequence number first. If any sequence numbers are identical, then the order is alphanumeric. If no sequence number is specified, the default value of zero is used for that tile.
To rearrange the tile order:
Select
Continue to navigate through the folder structure; select .
Click the link for the folder that contains the tile that you want to reorder.
Click the Edit link for each tile that you want to reorder.
Enter a number in the Sequence field.
Click Save.
If you have the Portal Administrator role, you can use the Tile Publish page to publish tiles to already personalized homepages or dashboards. Otherwise, you can write a PeopleCode program to publish tiles to already personalized homepages or dashboards; for more information, see the following section.
Use the Tile Publish page to publish additional tiles to users who have already personalized this homepage or dashboard.
This example illustrates the fields and controls on the Tile Publish page.
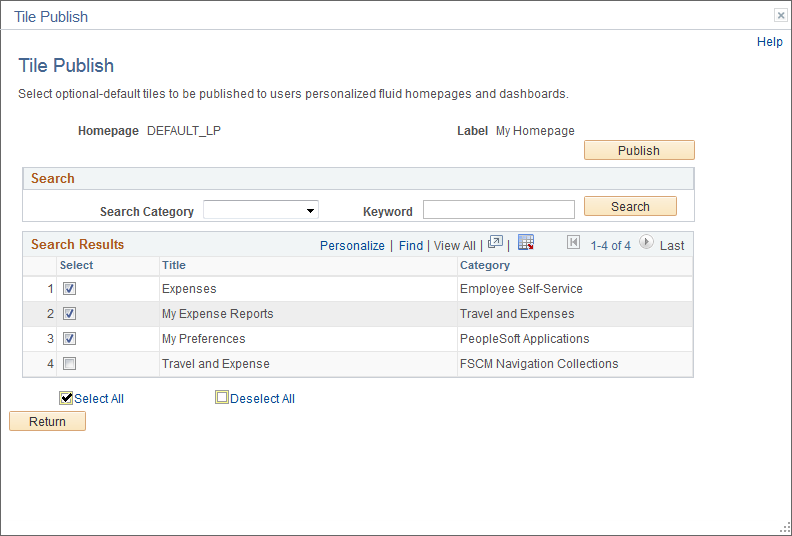
To publish additional tiles to users who have already personalized this homepage or dashboard:
On the Tile Content - Tab Content page, select the additional tiles for this homepage or dashboard.
Select Opt-Dflt for each of these tiles.
Save the homepage definition (or dashboard definition).
Click the Tile Publish button.
The Tile Publish page is displayed listing all new and existing tiles that have been marked as Opt-Dflt.
Select which tiles are to be published to users who have already personalized this homepage or dashboard.
Note: Tiles that are not selected and tiles that have been previously published for this homepage or dashboard are not removed by this process.
Click the Publish button.
A confirmation message indicates how many tiles have been published.
Click OK.
Make note of the process ID in case you need to use Process Monitor to review the status of this PT_TILE_PUB process.
Note: Process Scheduler must be running on your system to complete this process. After the process successfully completes, the updates will be visible to users when they sign in next or after they refresh the homepage or dashboard.
Click the Return button to return to the Tile Content - Tab Content page.
You can also write a PeopleCode program to call the delivered PublishToHomepage function, which runs the same PT_TILE_PUB Application Engine program that is invoked from the Tile Publish page. This methodology provides users that do not have the Portal Administrator role a way to publish tiles to already personalized fluid homepages or dashboards. If already personalized homepages or dashboards are found that do not include the tiles to be published, the initiator of this action will be prompted to continue before the PT_TILE_PUB program is submitted to the Process Scheduler; otherwise, the PT_TILE_PUB program is not submitted.
Note: To run the PT_TILE_PUB program, at least one of the user’s permission lists must also include the TLSALL process group.
Syntax
PublishToHomepage(HP_name, tile_list, behavior, run_now, run_DT)Description
Use the PublishToHomepage function to add and then publish tiles to personalized fluid homepages or dashboards.
Parameters
Field or Control |
Description |
|---|---|
HP_name |
Specifies the content reference name (ID) for the fluid homepage or dashboard as a string value. |
tile_list |
Specifies one or more content reference names (IDs) for tile definitions as a comma-delimited string value. |
behavior |
Specifies the tile behavior for all tiles in the tile list as a string value:
Note: If a specified tile is already configured for the homepage or dashboard and its current behavior differs from what is specified here, then the behavior will be updated when the program is executed. |
run_now |
Specifies a boolean value indicating whether to submit the Application Engine program to the Process Scheduler immediately. |
run_DT |
Specifies the date and time to submit the Application Engine program as a datetime value. If run_now is True, this value is ignored. |
Returns
A Record object in the format of the PT_TILEPUB_WRK2 record definition with the following fields:
PROCESSINSTANCE (number): The process request number if the request was submitted successfully.
PTSCHEDULESTATUS (number): 0 indicates the process was submitted successfully; a non-zero number indicates that the submit function failed.
STATUS (string): 0 indicates that the process was not required to be scheduled because there were no user personalizations to this homepage. Y indicates that the operator clicked Yes to submit the process; N indicates that the operator clicked No to decline submitting the process.
Example
Declare Function PublishToHomepage PeopleCode PT_TILE_PUB_WRK.FUNCLIB FieldFormula;

&rec = PublishToHomepage("DEFAULT_LP", "TILE_CREF_1, TILE_CREF_2", "3DEF", True, DateTimeValue("2020-06-30 22:30:00"));

If &rec.STATUS = "Y" Then
   If &rec.PTSCHEDULESTATUS.Value = "0" Then
      MY_WRK.PROCESSINSTANCE = &rec.PROCESSINSTANCE;
      MessageBox(0, "", 99999, 101, "Publish process submitted. Process ID: " | &rec.PROCESSINSTANCE);
   Else
      MessageBox(0, "", 99999, 102, "Process could not be scheduled.");
   End-If;
End-If;
The sequence number determines the order in which the homepages appear. Homepages appear in order with the lowest sequence number first. If any sequence numbers are identical, then the order is alphanumeric. If no sequence number is specified, the default value of zero is used for that homepage.
Important! Therefore, the tab with the lowest sequence number becomes the default homepage.
To rearrange the homepage order:
Select
Continue to navigate through the folder structure depending on the homepage type:
For classic homepages, select .
For fluid homepages, select .
Click the Edit link for each homepage that you want to reorder.
Enter a number in the Sequence field.
Click Save.
If caching is turned on for the portal, the tab order change does not take effect until the cache is recycled or the web server is restarted.
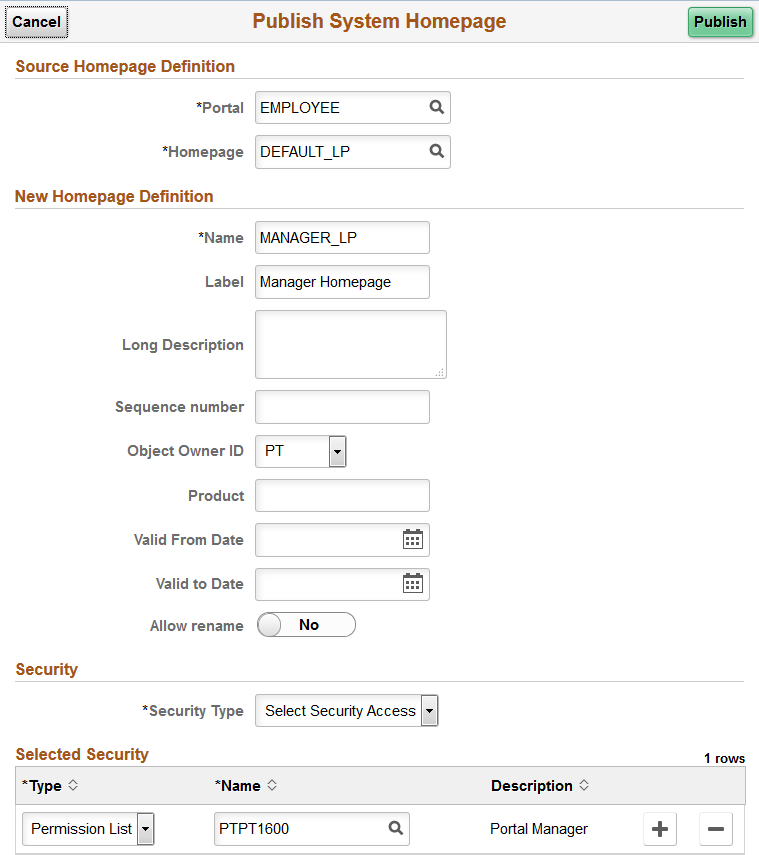
Use the Publish System Homepage page (PTPHP_PUBLISHHP) to publish an administrator created or personalized homepage as a new fluid homepage.
Note: Only users with the PTPT1600 (Portal Manager) permission list can access this page to publish a personalized homepage.
Navigation:
View the personalized fluid homepage that you want to publish as a new fluid homepage.
From the Actions menu, select Publish Homepage.
This example illustrates the fields and controls on the Publish System Homepage page. You can find definitions for the fields and controls later on this page.
Source Homepage Definition
Field or Control |
Description |
|---|---|
Portal |
Select the portal registry in which this definition is stored. The current portal name is displayed by default. |
Homepage |
Displays the ID of the copied homepage definition. |
New Homepage Definition
Field or Control |
Description |
|---|---|
Name |
Enter a unique ID for the homepage definition. The value that you specify in the Name field can consist of up to 50 letters, digits, and underscores ( _ ). It cannot contain any spaces and cannot begin with a digit. |
Label |
Enter the label that users will see for the homepage. |
Long Description |
Enter a long description for the homepage definition. |
Sequence number |
Enter a value to designate the order of the homepage when multiple homepages are defined. The sequence number determines the order in which the homepages appear. The homepages appear with the lowest sequence number first. If any numbers are identical, then the order is alphanumeric. No value is equivalent to specifying 0. Important! Therefore, the homepage with the lowest sequence number becomes the default homepage. |
Object Owner ID |
Select the object owner ID. |
Product |
Portal-aware applications can use this field for group processing. All PeopleTools objects have the product name PT. |
Valid From Date |
Select or enter the date that the homepage becomes visible to users. |
Valid to Date |
Select or enter an optional date that the homepage is removed from use. |
Allow Rename |
Select to enable the user to personalize the homepage label. Note: When a portal administrator updates the label for a fluid homepage or a fluid dashboard, the PeopleSoft system propagates the new label to homepages or dashboards that have not been personalized and to personalized homepages or dashboards that also retain the original label. If a user has personalized the label, then the user's personalization is retained. |
Security
Field or Control |
Description |
|---|---|
Security Type |
Select the type of security that you want to assign to the homepage definition. Options are:
|
Selected Security
Field or Control |
Description |
|---|---|
Type |
Select from these types:
|
Name |
Select the permission list or role that you want have access to this homepage. |
You can change the access to certain PeopleTools-delivered definitions to restrict certain ways in which users can personalize fluid homepages, the NavBar, or both. The delivered PTPT1400 (PeopleSoft Guest) permission list has some of these personalization features turned off by default. See the following table for a list of personalization features, the PeopleTools definition that provides access to that feature, and whether the feature is enabled in PTPT1400.
Important! Do not modify the delivered PTPT1400 permission list. Create a custom permission list or clone PTPT1400 as a starting point if you wish to restrict personalization for users other than guest users.
|
Feature |
PeopleTools Definition |
Enabled in PTPT1400 |
|---|---|---|
|
Personalize fluid homepages and dashboards:
|
Menu:Component:Page permissions — PORTAL_PERS_HOMEPAGE:PORTAL_HOMEPAGE:Personalize Content |
N |
|
Display the Add To links in the Actions menu:
|
Web library:Function permissions — WEBLIB_PTNUI:PT_BUTTON_PIN.FieldFormula.IScript_SavePin |
N |
|
Hide the Sign Out link in the Actions menu. |
Web library:Function permissions —WEBLIB_PORTAL.PT_PORTAL_HDRLINK.FieldFormula.IScript_HideSignOutLink |
N |
|
Display the Notifications feature (badge in the banner or link in the Actions menu). |
Menu:Component:Page permissions — PTPNEVENTS:PTPN_POPUP_WINDOW:Notification Window |
N |
|
Display the NavBar. |
Menu:Component:Page permissions — NUI_FRAMEWORK:PTNUI_NAVBAR:NavBar |
Y |
|
Personalize the NavBar. |
Menu:Component:Page permissions — NUI_FRAMEWORK:PTNUI_NAVBAR:Personalization |
N |
|
Add tiles to the NavBar. |
Menu:Component:Page permissions — NUI_FRAMEWORK:PTNUI_NAVBAR:Grouplet Search |
N |