Viewing PUM Automated Merge Sessions
The PUM Automated Merge Session displays how the code is automatically merged based on the merge rules. This page can be used if the merge steps in the template fail or to review how the code was merged.
To access a merge session from a Change Assistant job, right-click on the step Running Object Merge and select View Merge Session.
To access a Merge Session in Change Assistant:
From the menu, select Change Action.
If the Welcome page is displayed, click Next.
Select View PUM Automated Merge Sessions and click Next.
Select Open Existing Merge Session and click Finish.
Select the PUM Source Database and click OK.
Select the Merge Session.
This example illustrates the fields and controls on the Merge Session page. You can find definitions for the fields and controls later on this page.
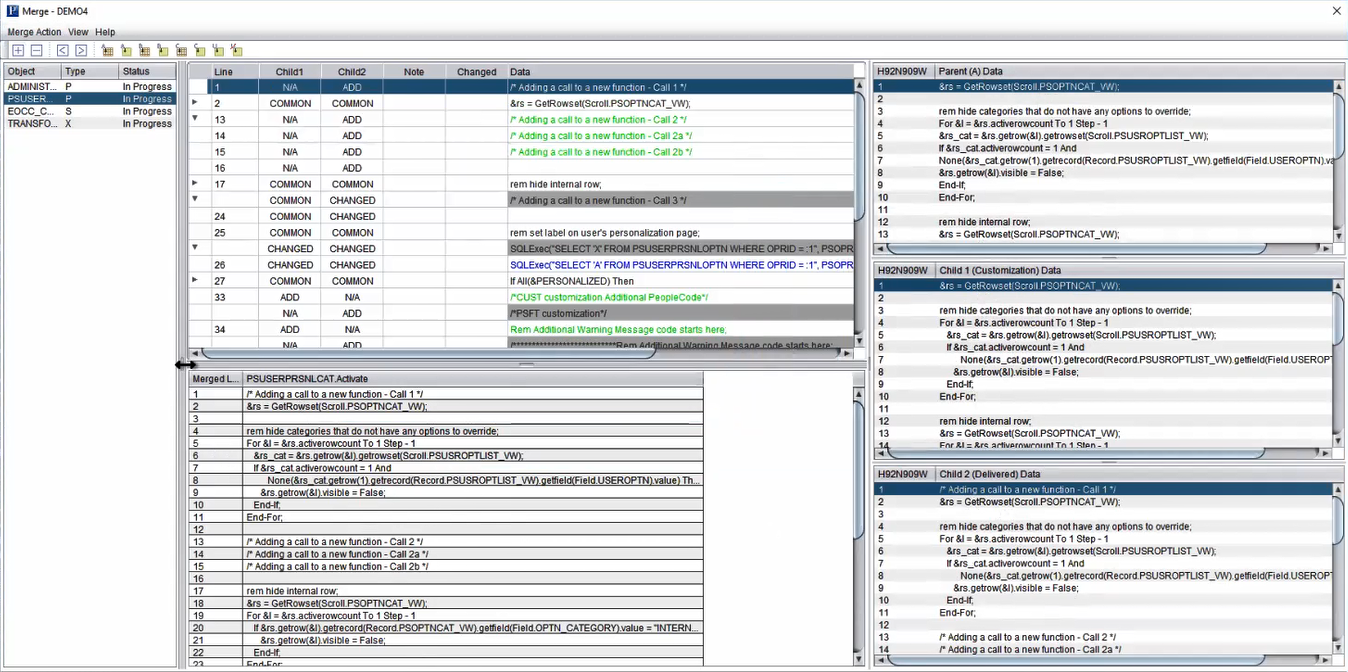
The Merge page contains these panes:
Object list
Merge edit pane
Merge output pane
Parent (A) Data
Child 1 (Customization) Data
Child 2 (Delivered) Data
Merge Menu
Field or Control |
Description |
|---|---|
Save Session |
Select to save session. |
Set Merge Rules |
Select to change merge rules. |
Exit |
Select to exit. |
Object List
Field or Control |
Description |
|---|---|
Object |
Mergeable object name. |
Type |
Object type:
|
Status |
Object Status:
|
Merge Edit Pane
Change Assistant displays the comparison in the merge edit pane. Lines from Child 1 and Child 2 are listed in the merge pane and in the output pane according to the merge rules.
In the merge edit pane, the Child1 and Child 2 column shows the state of the line and the database to which it belongs. The lines are also color coded to show the state of each line. The color codes are, by default:
|
Action |
Color |
|---|---|
|
COMMON |
Black |
|
ADDED |
Green |
|
CHANGED |
Blue |
|
DELETED |
Red |
|
COMMENT |
Gray |
|
READ ONLY |
Black |
Common lines are grouped in collapsed sections. Click the expand icon to expand each section.
Click in the text area of a line to edit the text.
To add lines to the merge edit pane from the individual data panes :
Highlight a line in the data pane.
Highlight a line in the merge edit pane.
The new line will be inserted below the highlighted line.
Click an action icon to either insert the line or insert it as a note.
To add a blank line or delete a line, select the line and click the Add line icon or the Delete line icon on the Merge toolbar.
The Merge toolbar contains these options:
Field or Control |
Description |
|---|---|
|
Add line. |
|
Delete line. |
|
Previous difference. |
|
Next difference. |
|
Insert Parent line. |
|
Insert Parent line as note. |
|
Insert Child 1 line. |
|
Insert Child 1 line as note. |
|
Insert Child 2 line. |
|
Insert Child 2 line as note. |


Merge Output Pane
The output pane displays the current merge results. Initially, the output pane displays the results of the comparison based on the merge rules. When you apply changes, the new merge appears in the pane.
Data Windows
When you select a program, Change Assistant displays the three versions of the program in the respective Parent (A) Data, Child 1 (Customization) Data, and Child 2 (Delivered) Data windows.