Creating a New Application Service
To create an Application Service:
Create an Application Class that extends the PTCBAPPLSVCDEFN:ApplicationServiceBase application class and then implement the invokeService() method.%this.ServiceAPI property is the delivered API to read and write parameters, headers and access other metadata.
Create Application Service.
The General Information page defines the App Service ID, Service URL ID and a description.
Create or import a root resource.
Add URI templates.
Add base template parameters to URI Template.
Add method to URI template.
Add input and output parameters to method.
Optionally assign headers for the method.
Define result states for the method.
To create a new Application Service:
Select .
Click Create Application Service.
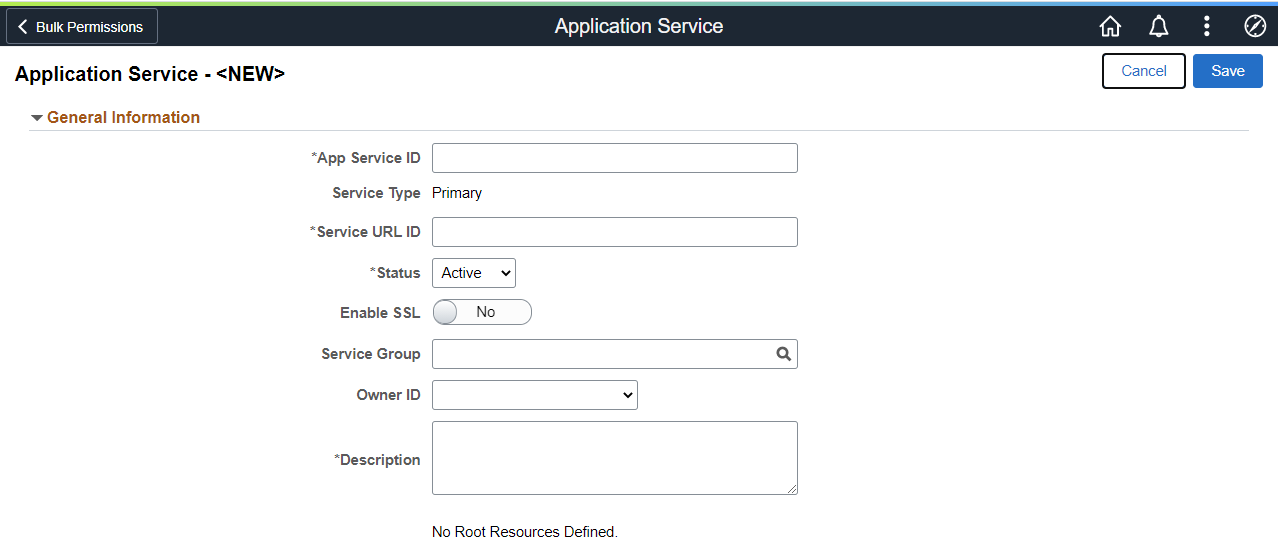
This example illustrates the fields and controls on the Application Services – General Information page. You can find definitions for the fields and controls later on this page.
|
Field or Control |
Description |
|---|---|
|
App Service ID |
Service ID for the Application Service. |
|
Service Type |
When you create a new Application Service, the default Service Type is Primary. When you create an Alias from an existing Application Service, the default Service Type is Alias. |
|
Service URL ID |
Service URL ID forms a part of the endpoint URL. It identifies the service to be executed. |
|
Service Group |
Used to group services together for search. Also used as part of the Discovery Service for module name for grouping of services. |
|
Export Service |
Indicates if the service has been exported. |
|
Enable SSL |
Requires SSL for the Service to be invoked. |
|
Owner ID |
Owner of the Application Service. |
|
Description |
A description for the Application Service. |
The Save action will perform the following:
Verify that the Service URL ID value meets the Oracle standard for an URL value. If valid, the value will then be checked against Integration Broker Service Alias's to insure it is unique. If the value does not meet this criteria, a pop up message will be displayed.
This example illustrates the Service URL ID validation message.

Correct the Service URL ID and save the application service.
When the Service URL ID is valid, save processing will generate the necessary IB metadata, update the Service Name and enable the Create Root Resource and Import Root Resource buttons.
This example illustrates the fields and controls on the Application Service page after Save. You can find definitions for the fields and controls later on this page.
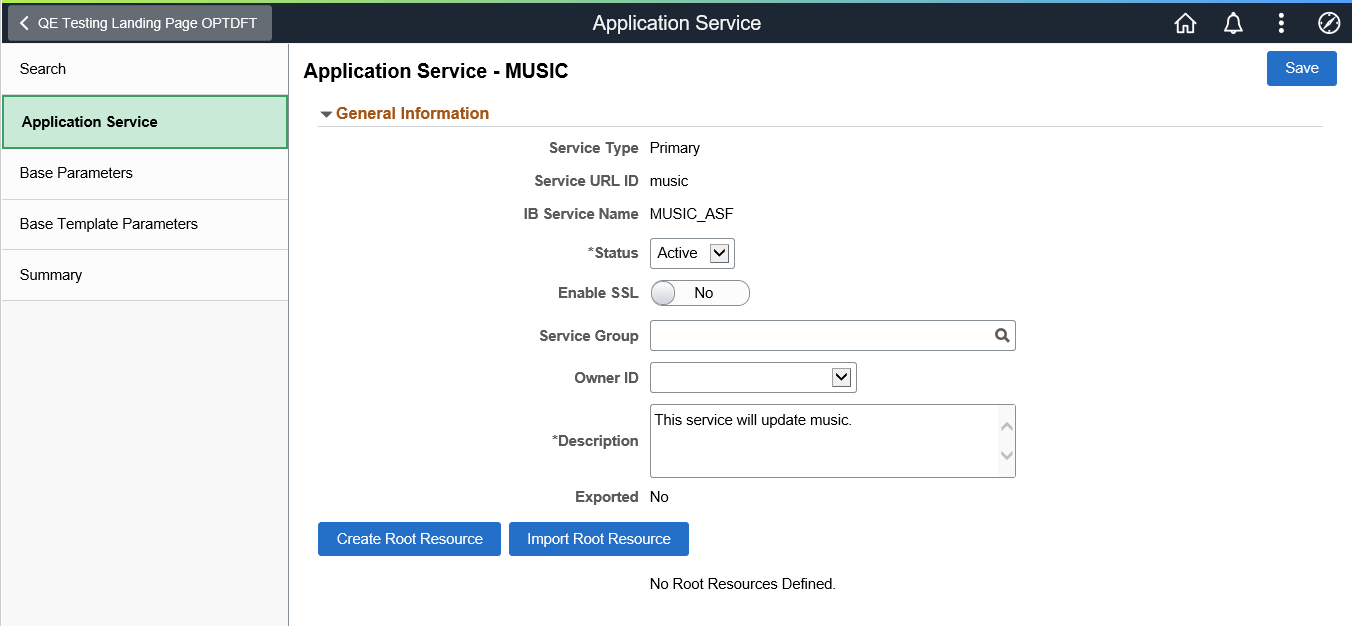
The developer can select whether to create a new root record or import an existing root resource.
|
Field or Control |
Description |
|---|---|
|
Create Root Record |
Select this button to create a new root record. |
|
Import Root Record |
Select this button to import a root resource from another Application Service or the same Application Service. |
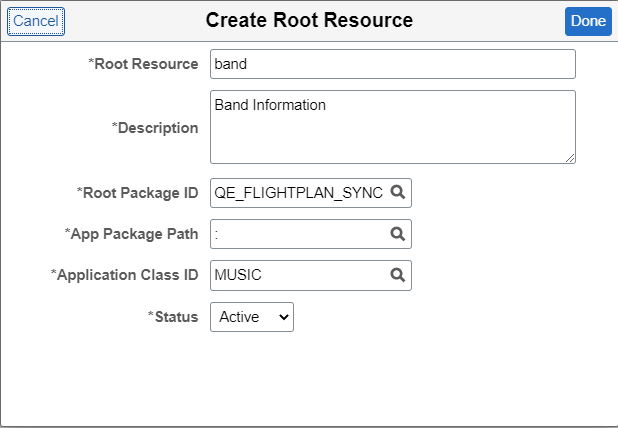
Use the Create Root Resource page to create a new root resource.
This example illustrates the fields and controls on the Create Root Resource page. You can find definitions for the fields and controls later on this page.
|
Field or Control |
Description |
|---|---|
|
Root Resource |
The name of the Root Resource that will be part of the generated URL. |
|
Description |
A description for the root resource. |
|
Root Package ID |
The application package that contains the application logic to execute. The drop-down list displays all the application packages that extend the PTCBAPPLSVCDEFN:ApplicationServiceBase application class. |
|
App Package Path |
The qualified sub package or class path. |
|
Application Class ID |
The corresponding Application Class ID. |
|
Status |
Status for the Root Resource. When a new Root Resource is created, the default Status is Active. |
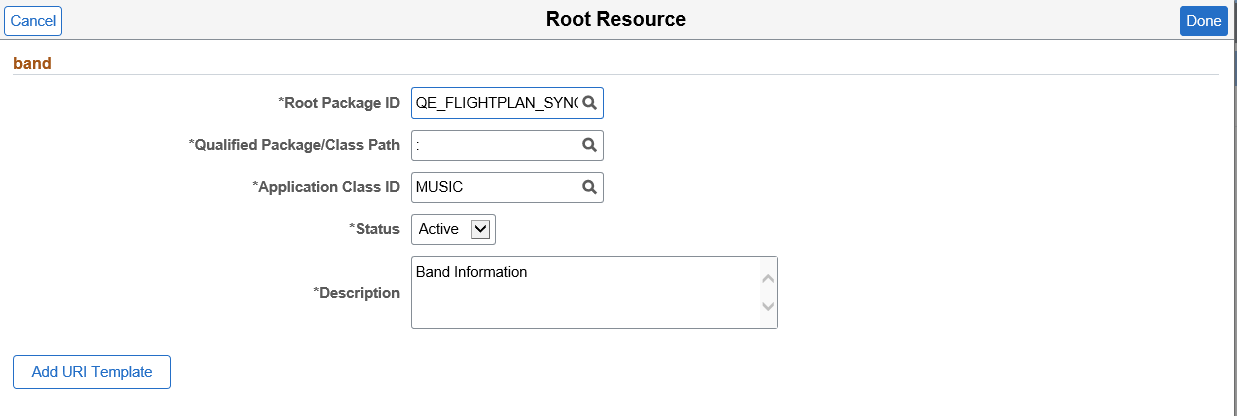
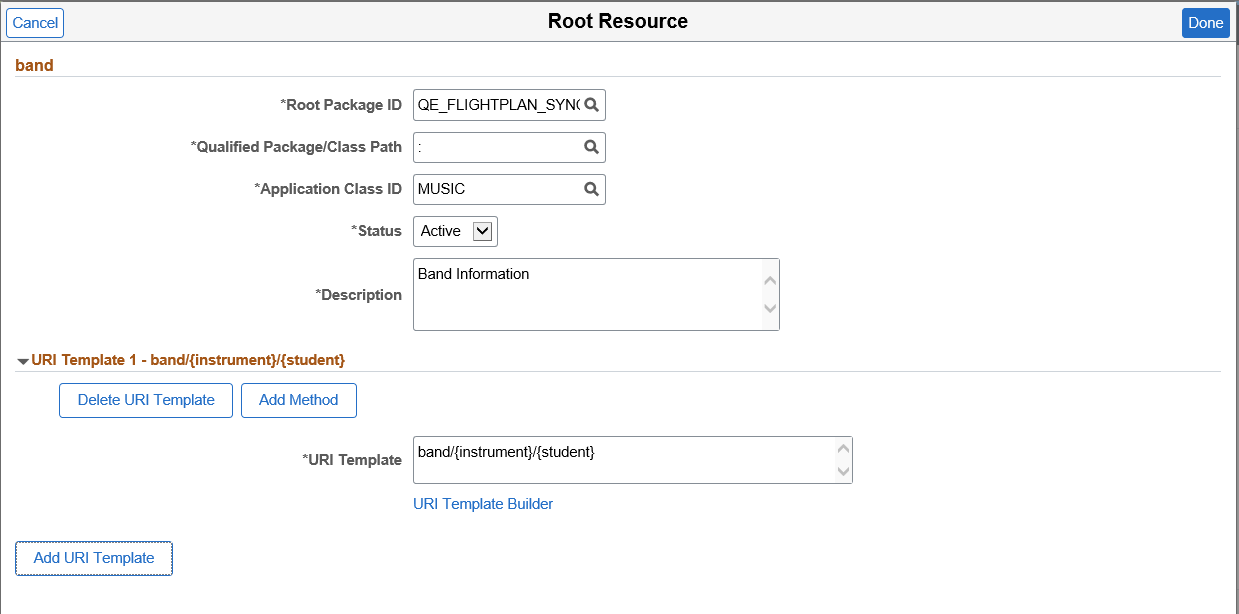
After the root resource is created, you can add the URI template. When you select the root resource name, the Root Resource page will contain a push button to Add URI Template.
This example illustrates the fields and controls on the Root Resource page. You can find definitions for the fields and controls later on this page.
|
Field or Control |
Description |
|---|---|
|
Root Package ID |
Select the application package that contains the application logic to execute. The drop-down list displays all the application packages that extend the PTCBAPPLSVCDEFN:ApplicationServiceBase application class. |
|
Qualified Package/Class Path |
The qualified sub package or class path. |
|
Application Class ID |
The corresponding Application Class ID. |
|
Status |
The status for the Root Resource. When you create a new Root Resource, the default status is Active. |
|
Description |
Description of the root resource. |
|
Add URI Template button |
Select to create the URI Template. |
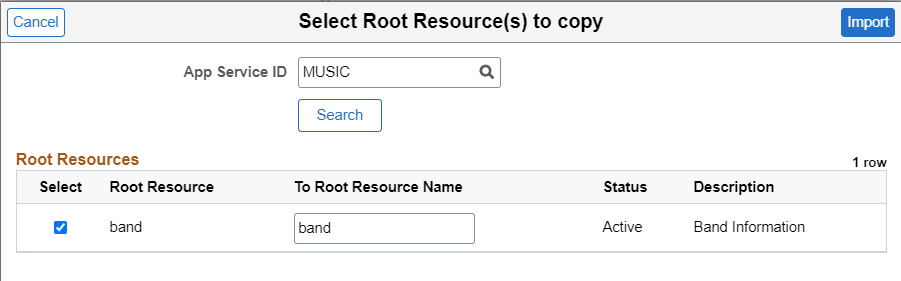
Use the Import Root Resource button to import a root resource from another Application Service or the same Application Service.
This example illustrates the fields and controls on the Select Root Resource(s) to copy page. You can find definitions for the fields and controls later on this page.
|
Field or Control |
Description |
|---|---|
|
App Service ID |
Select the Application Service by either entering the Application Service ID directly or using the Search Button. |
|
Search |
Selection of the desired App Service ID will display all the Root Resources for that Application Service. |
|
Select |
Select for the root resource you want to import. |
|
Root Resource |
Root resource. |
|
To Root Resource Name |
Optionally, you can change the name for the root resource. |
|
Status |
Root resource status. |
|
Description |
Description. |
|
Import Button |
Select the import button to copy all the metadata except for the Application Class information from the Root Resource over to the Application Service. All template parameters defined for the root resource are copied to the Base Template page. The root resource is displayed in the Root Resources section of the Application Service. The Application Class information for the imported root resource will be blank. |
URI templates are strings that can be transformed into URIs after embedded variables are substituted. URI templates use a simple syntax where braces denote variables to be replaced when the templates are converted to actual URLs. Application Services only supports direct variable substitution.
The denoted variables identified with the { } are replaced with the actual value as defined on the Base Template Parameters page. When the Base Template Parameters page is saved, a restricted document is created defining the primitives used for value replacement within the URI template. The Document will only contain primitives and collections of these primitives. The following naming convention is used:
Document Package: ASF_SERVICE Document: <App Service ID>_ASF Version: v1The string entered for the template will be validated to insure that there is no equivalent or ambiguously defined template currently entered on the grid. Moreover the values used within the { } must be defined on the Base Template Parameters page.
For more information on REST resources, see Understanding REST Resource Definition Concepts.
Note: The document created for the application service will be in restricted mode. For more information on the document created see Using the Document Tree to View Document Information.
Use the Add URI Template button on the Root Resource page to access the URI Template Builder.
This example illustrates the fields and controls on the Add URI Template page. You can find definitions for the fields and controls later on this page.
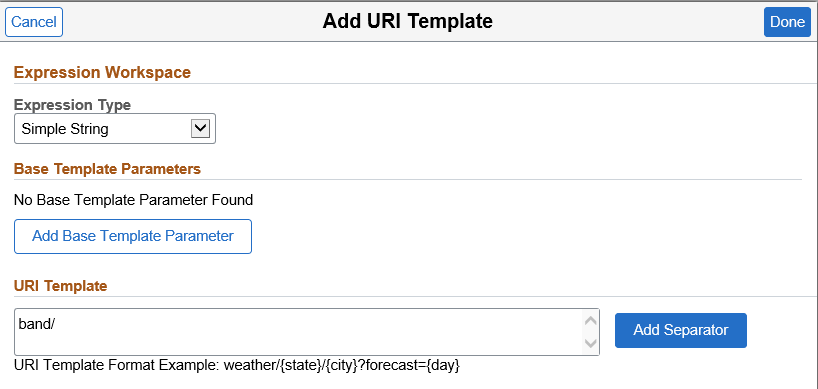
The URI Template Builder is divided into 2 sections: Expression Workspace and URI Template.
|
Field or Control |
Description |
|---|---|
|
Expression Type |
Simple String is the default. Currently Application Services are provider only REST web services. Other styles are available from the drop down list. |
|
Add Base Template Parameters button |
Select to add additional base parameters. See Adding Base Template Parameters. Parameters defined on the Base Template Parameters page can be selected to build out the URI. |
|
URI Template |
The Root Resource must always be the first string defined for the URI Template. |
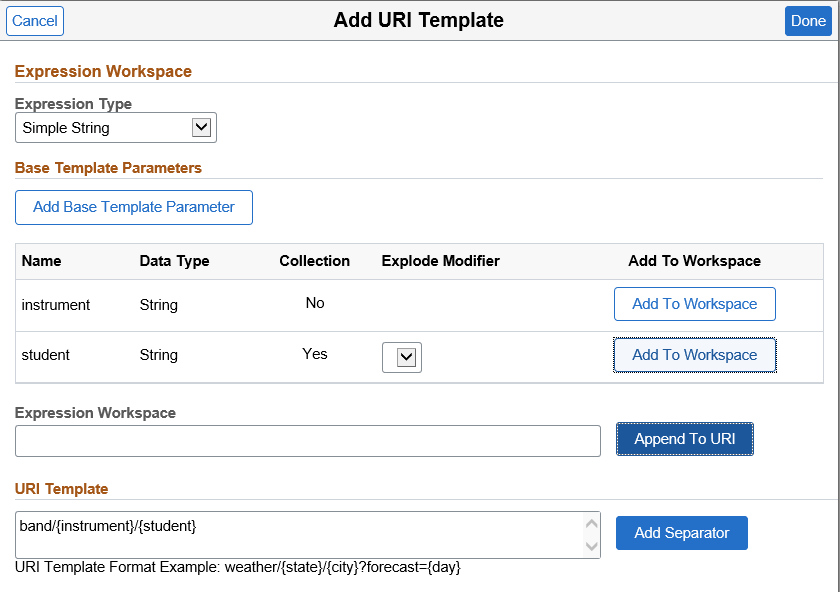
After creating the base template parameters, they are available to build the URI Template.
To build the URI template:
Select the Add To Workspace button for the parameter.
The parameter will be displayed in brackets in the Expression Workspace.
Click the Append to URI button to add the parameter to the URI template.
Use the Add Separator button to add a separator (/) to the URI template.
When the URI Template is complete, click Done.
This example illustrates the fields and controls on the Add URI Template page. You can find definitions for the fields and controls later on this page.
|
Field or Control |
Description |
|---|---|
|
Expression Type |
Select the expression type from the drop-down list. |
|
Add Base Template Parameter |
Select to add a base template parameter. |
|
Name |
Name of available base template parameter. |
|
Data Type |
Data type for the parameter. |
|
Collection |
Yes indicates that this parameter is a collection. |
|
Explode Modifier |
For a parameter defined as a collection you can add the Explode Modifier by selecting * from the drop down list. |
|
Add To Workspace |
Select to the add the parameter to the Expression workspace. Note: Only one parameter can be added at a time. |
|
Expression Workspace |
Displays the parameter add to the workspace in brackets. |
|
Append to URL |
When you select this button, the parameter will be added to the URI template. |
|
URI Template |
This section will display the formatted template. You can manually add separator (/) or select the Add Separator button to add separators as needed for the URI. |
Once the URI Template is defined, it is added to the Root Resource page. Select the root resource from the Application Service page.
This example illustrates the fields and controls on the Root Resource page with URI Template. You can find definitions for the fields and controls later on this page.
|
Field or Control |
Description |
|---|---|
|
Delete URI Template |
Select to delete the URI template. |
|
Add Method |
Select to add the method. |
|
URI Template Builder |
Select to modify the existing URI template. |
|
Add URI Template |
Select to add another URI template. |
Adding Method
Select the Add Method button.
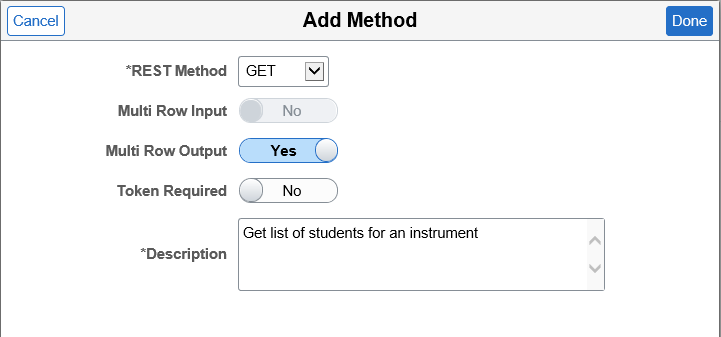
This example illustrates the fields and controls on the Add Method page. You can find definitions for the fields and controls later on this page.
|
Field or Control |
Description |
|---|---|
|
REST Method |
Select type of HTTP method. |
|
Multi Row Input |
If you have multiple rows of input, select Yes; otherwise select No. |
|
Multi Row Output |
If you have multiple rows of output, select Yes; otherwise select No. |
|
Token Required |
Indicates that a Token (PSFT Token, oAuth2 or Basic Authentication) is required to invoke the service. oAuth2 is the default. |
|
Description |
Description of the method implementation. |
REST Methods
REST methods determine the HTTP method for manipulating the resources defined in the Application Service.
|
HTTP Method |
Description |
|---|---|
|
GET |
Use to retrieve a representation of a resource. GET is a safe and idempotent method. It must not be used to change a resource, create a resource or delete a resource. |
|
POST |
Use to create new resource to an existing URL. |
|
PUT |
Use to create a new resource to a new URL, or modify an existing resource to an existing URL. PUT requests are idempotent. That is, calling the same PUT request multiple times will always produce the same result. |
|
PATCH |
Use to update a portion of a document resource. |
|
DELETE |
Use against a singular resource to delete a document resource. DELETE doesn’t need a request body (Input parameters are optional). DELETE is not safe, but it must be idempotent. Note: DELETE without a request body will be flagged in OpenAPI 3.0 as an error. The specification does not explicitly allow or disallow it. |
Root Resource with URI Template Defined
After you add a method to the URI template, you can expand the URI Template.
This example illustrates the fields and controls on the Root Resource with URI Template page. You can find definitions for the fields and controls later on this page.
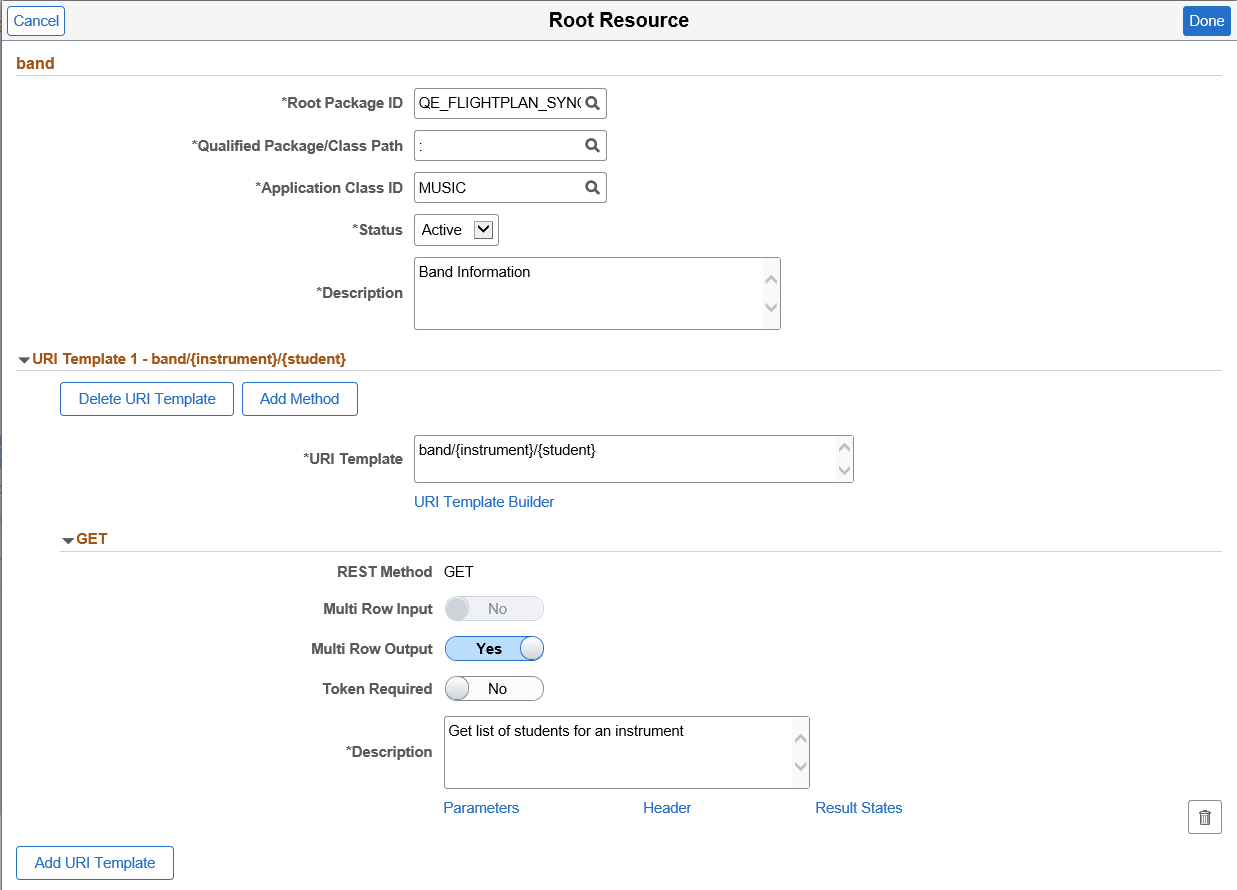
For the expanded method the following links are available.
|
Field or Control |
Description |
|---|---|
|
Parameters |
Select this link to maintain the available input and output parameters. |
|
Header |
Optionally headers can be assigned for the Request or Response. Selection of the Headers link will bring up the Headers page. These headers will be part of the Open API documentation for the 3rd party to set (Request) or read (Response). See Defining Headers. |
|
Result States |
Selection of this link will bring up the Results State page. By default a single Result State will be created indicating a success (with a Status Code of 200). |
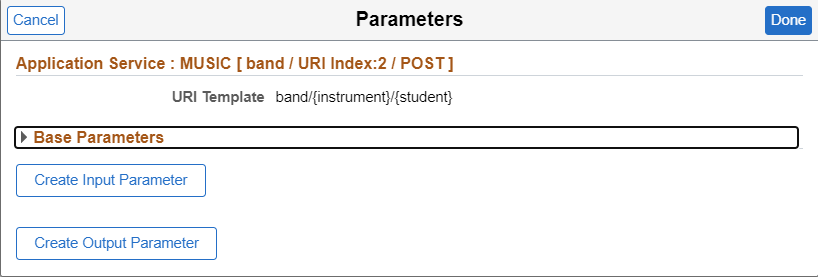
Select the Parameters link for the URI method on the Root Resources page.
Note: Methods except GET and possibly DELETE, potentially require input and output parameters.
Warning! For output parameter data types Compound, Compound Array, Custom, String List, the values entered to populate the object or list in PeopleCode should be properly escaped. Use this PeopleCode method to perform the escaping of the values:
 &EscapedValue =
            %IntBroker.JSONEscapeCharacters(<string value>);
Use the Create Input Parameter and Create Output Parameter buttons to add additional parameters.
|
Field or Control |
Description |
|---|---|
|
Base Parameters |
Expand the Base Parameters section to use any existing base parameters. |
|
Create Output Parameter |
Select to create a new input parameter. |
|
Create Input Parameter |
Select to create a new out parameter. |
Selecting Base Parameters
Base parameters can be defined once and used as inputs or outputs in multiple URIs. Expand the Base Parameters section to select an existing base parameter.
This example illustrates the fields and controls on the Parameters page. You can select to use the existing parameters as input or output..
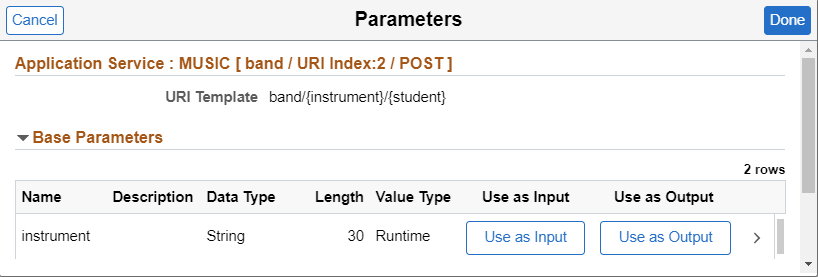
When you select Use as Input or Use as Output, the parameter is added in the appropriate section.
This example illustrates using base parameter as input. You can find definitions for the fields and controls later on this page.
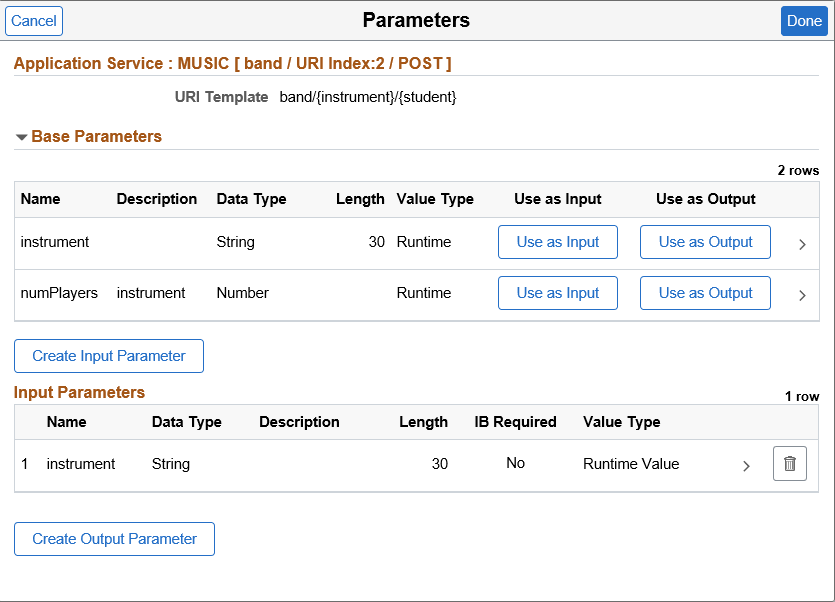
The parameter is added as input or output depending on the option selected. To view or modify the parameter details for this URI select the > icon.
This example illustrates the fields and controls on the Parameter Details. You can find definitions for the fields and controls later on this page.
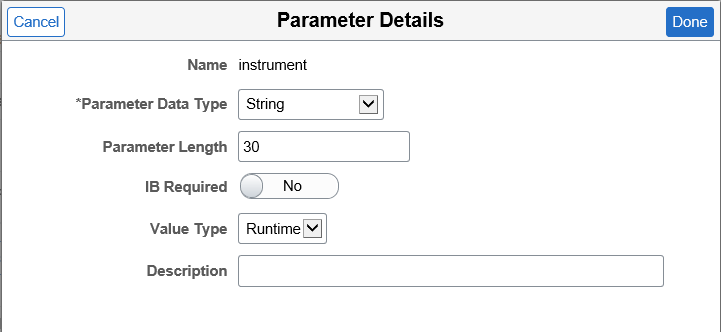
Depending on the Data Type selected, the fields appropriate fields for the data type are displayed, however the following fields will always appear.
|
Field or Control |
Description |
|---|---|
|
Parameter Data Type |
Displays the parameter data type of the base parameter. The data type can be changed for this URI, however if you try to update the base parameter with that change a warning message will be displayed. |
|
IB Required |
Select Yes to indicate this is a mandatory parameter. |
|
Value Type |
For output parameter, the value is read only and will always be Runtime. For input parameter, select Runtime or Fixed. If Fixed is select, a field to enter the Parameter Value is displayed. |
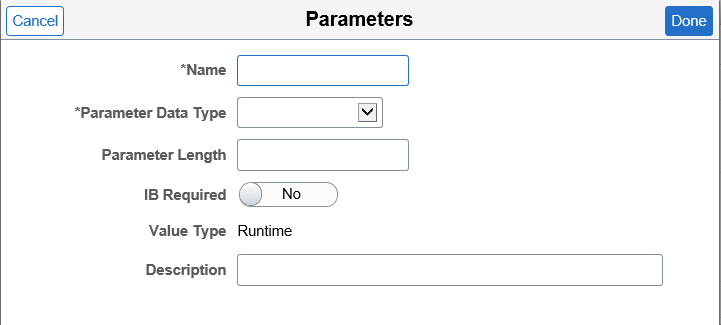
Adding New Input or Output Parameters
When you select to add a new input or output parameter page, the Parameter Details page is displayed.
This is an example of the parameters page for a new output parameter.
|
Field or Control |
Description |
|---|---|
|
Parameter Data Type |
Displays the parameter data type of the base parameter. The data type can be changed for this URI, however if you try to update the base parameter with that change a warning message will be displayed. |
|
IB Required |
Select Yes to indicate this is a mandatory parameter. |
|
Value Type |
For output parameter, the value is read only and will always be Runtime. |
This example illustrates the fields and controls on the Parameter page that includes input and output parameters. You can find definitions for the fields and controls later on this page.
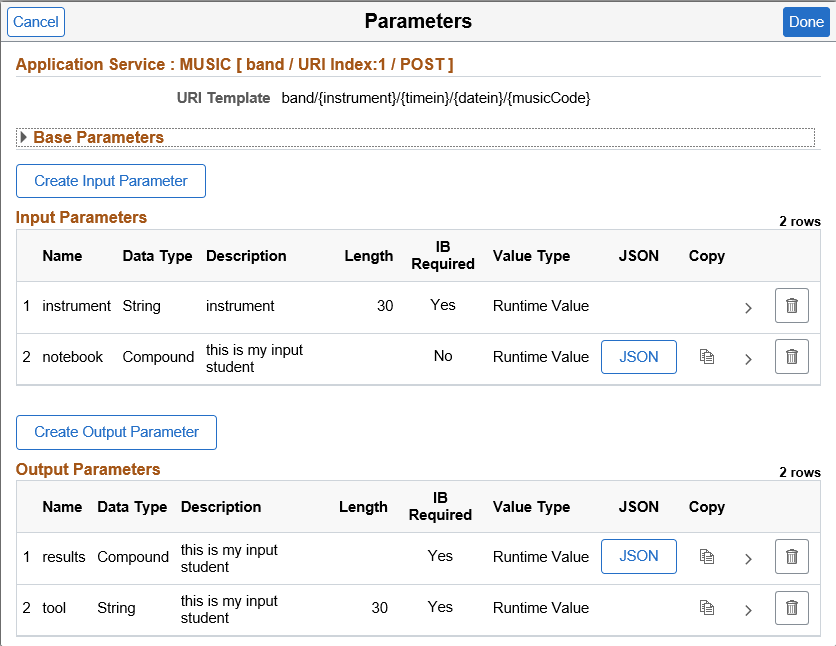
Use the Copy icon to add the new parameter to the Base Parameters. If the parameter already exists in base parameters, the copy icon is not available.
Select the Results States link for the URI method on the Root Resources page.
By default a single Result State will be created indicating a success (with a Status Code of 200).
This example illustrates the fields and controls on the Result States page. You can find definitions for the fields and controls later on this page.
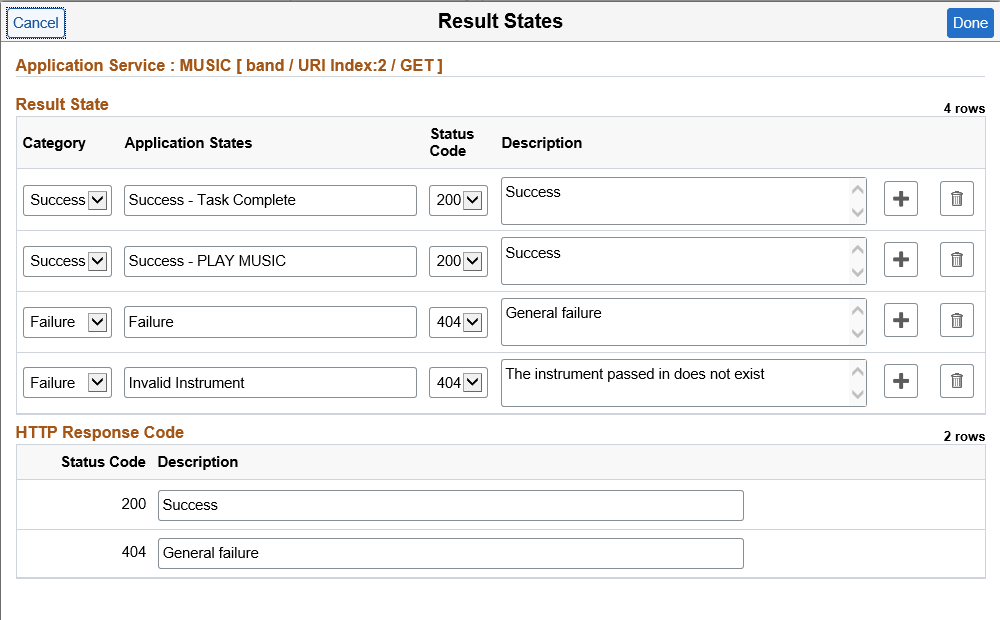
Result State Section
|
Field or Control |
Description |
|---|---|
|
Category |
Result category for the Application Service state. Default values are: Success and Failure. |
|
Application States |
Application Server State. Used to set the desired state in developers implementation application class. For example: |
|
Status |
HTTP response code defined for the result state. |
|
Description |
Description for the Application Service state. |
The HTTP Response Code grid is used to generate the Open API document for a 3rd party. Each unique HTTP Status Code that was defined on the Result State grid will be shown on the HTTP Response Code Grid. The developer should add a description which will be part of the Open API definition to provide additional information to the 3rd party.
HTTP Response Codes
An HTTP response code must be used to indicate the result of the HTTP request. The usage of these codes must follow the HTTP specification. Specifically, when there is a validation error in the request, such as mandatory field is not provided, or a field has invalid value, then the error code in 4xx range must be returned.
Selectable Response Codes include:
200 OK: Request successfully executed and the response has content.
201 Created: Resource successfully created. The response contains the created resource and possibly a location header that points to the new resource.
202 Accepted: Request has been accepted for processing but processing has not been completed. This is required for resource that supports asynchronous process.
204 No Content: Request successfully executed and the response doesn't have content.
400 Bad Request: The request could not be understood by the server due to malformed syntax.
401 Unauthorized: request has not been applied because it lacks valid authentication credentials for the target resource.
403 Forbidden: server understood the request but refuses to authorize it. If authentication credentials were provided in the request, the server considers them insufficient to grant access.
404 Not Found: The requested resource was not found.
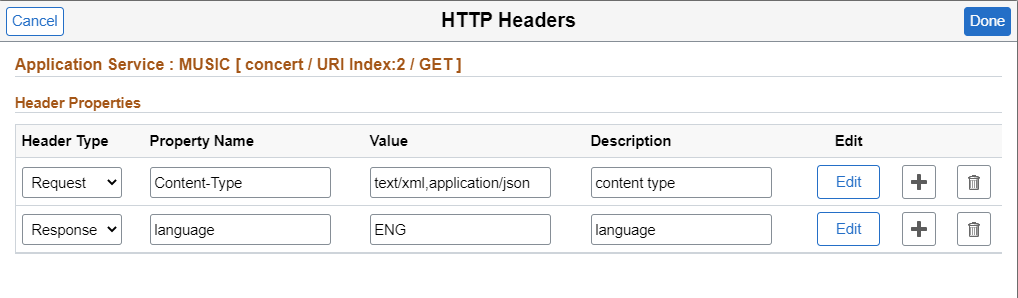
Optionally headers can be assigned for the Request or Response. These headers will be part of the Open API documentation for the 3rd party to set (Request) or read (Response).
Select the Headers link for the URI method on the Root Resources page.
This example illustrates the fields and controls on the HTTP Headers page. You can find definitions for the fields and controls later on this page.
|
Field or Control |
Description |
|---|---|
|
Header Type |
Indicate if this is a Request or Response header. |
|
Property Name |
Name of the header. |
|
Value |
Optional value for the header. |
|
Description |
Description of the header. |
|
Edit button |
Select to edit the header. |
|
Add icon |
Select to add a new header. |
|
Delete icon |
Select to delete a row. |
See Defining Routing Header Properties for Provider REST Service Operations