Defining Absence Take Elements
Use the Absence Take (GP_ABS_TAKE) component to create an absence take element for each type of absence that your organization recognizes. For example, if you have separate rules for compensating sick time, vacation time, leaves of absence, and so on, create a separate take element for each.
|
Page Name |
Definition Name |
Usage |
|---|---|---|
|
GP_PIN |
Name the element and define basic parameters. |
|
|
Forecasting for Element <name> |
GP_FORECAST_SEC |
Enable forecasting rules to be entered on the Absence Take - Forecasting page. |
|
GP_ABS_TAKE |
Define general calculation rules for take elements, select the absence type, link entitlement elements, and specify whether absence events require online approval. Also contains user-defined fields. |
|
|
GP_ABS_TAKE2 |
Specify the day formula for calculating the day count; linked earning and deduction elements; conditions for reducing the beginning entitlement balance; and mapped take elements. |
|
|
GP_ABS_TAKE3 |
Define eligibility, minimum absence, or wait per absence requirements. Link related absences. |
|
|
GP_ABS_TAKE4 |
Define negative balance rules (what happens when the entitlement balance is not sufficient to cover an absence). |
|
|
GP_ABS_TAKE5 |
Specify if users can enter more than one absence for a payee for the same day and to assign a priority to absence takes if only one type of absence is allowed each day. |
|
|
GP_ABS_TAKE6 |
Specify the formula to use for absence forecasting and the list of elements that are displayed by the Absence Forecasting process. |
|
|
GP_ABS_TAKE7 |
List the elements that are displayed by the Balance Inquiry process. |
|
|
GP_ABS_TAKE8 |
Select the user-defined fields that can be overwritten by a system element during processing. |
|
|
GP_ELM_DFN_SOVR |
Override the value of a bracket, date, duration, formula, or variable element that is used in the definition of the take element. |
This topic discusses:
Mapping.
Eligibility, minimum absence, and wait period criteria.
Linked absence takes.
System elements for overwriting daily data from user-defined fields.
Mapping
You can instruct the system to generate a matching absence for another take element (such as TAKE2) when a user enters an absence for this take (for example, TAKE1). When you run the Take process, the system creates additional days in the daily absence results for TAKE2, using the same data that you entered for TAKE1, but applying the take rules that you defined for TAKE2. This feature enables you to evaluate a single absence event using more than one set of entitlement and take rules.
For example, your organization offers a supplemental sick plan in addition to the statutory sick plan. For payees to receive benefits from both plans when you enter sick time, you map the take element for your statutory plan (let's call it SICK) to the take element for the supplemental plan (let's call it SUPP SICK). Now, when a user enters an absence event for SICK, the system creates additional absence days for SUPP SICK. When the Take processing is complete, you can see these additional days in the daily absence results (GP_RSLT_ABS), but not in the absence event record (GP_ABS_EVENT). Define a linked absence take on the Absence Take - Day Formula page.
Eligibility, Minimum Absence, and Wait Period Criteria
When you define an absence take element, you can select up to three time periods that must be met before an absence can qualify for payment:
Minimum absence
Define the number of calendar days that an absence must last before it can be paid. If the minimum is not satisfied, the entire absence is unpaid.
Eligibility period
Specify the date that must be reached before an absence can be paid.
Wait per absence
Define a minimum waiting period per absence. An absence qualifies for payment only after the wait period has been satisfied. Only the days that exceed the wait period qualify. If you link related absences, you can specify that one wait period applies to all linked events or that a separate wait period applies to each event.
When you run the Take process, the system resolves the day formula, evaluates the day, and checks to see whether the period requirements have been met, in the order listed above. If the minimum pay period is not met, no further processing is done for that day, and the day count that is returned by the day formula is considered unpaid. If the minimum period is met, the system checks to see whether the eligibility period is met, and then the wait period. Define the criteria for eligibility, minimum absence, and wait periods on the Absence Take — Period page.
Linked Absences Takes
You can instruct the system to link related absences that fall in a defined period of time. When occurrences of the same absence are linked, they can share the same per-absence entitlement or the same wait period. Define the criteria for linked absences on the Absence Take - Period page.
When you run the Take process, the system determines whether the new absence falls within the valid linking period. If it does, the system sets the system element named LINK YES-NO, which is associated with the new event, to YES. The per absence formula element (selected on the Absence Entitlements - Calculation page) refers to the value of the LINK YES-NO element to determine whether to resolve entitlement or to use the existing entitlement balance.
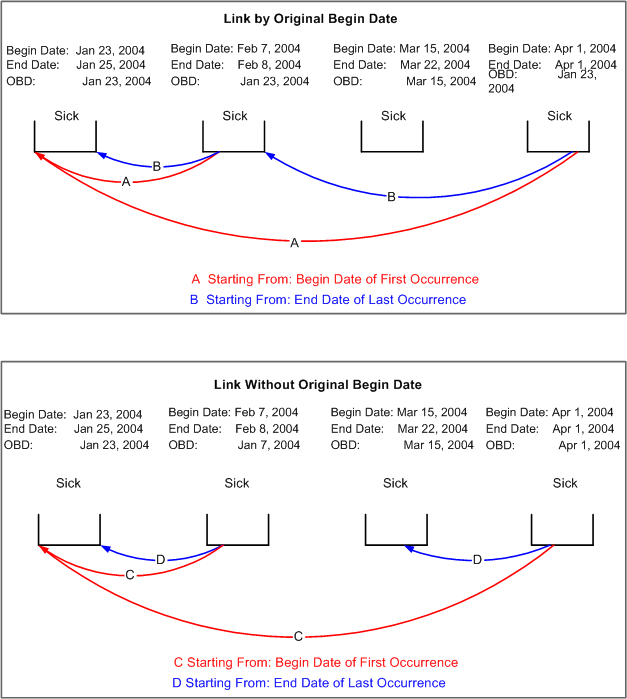
The system always compares the start date of the current event to the last matching absence event to determine whether the event falls within the linking period. You define what qualifies as the last matching event. If you specify that the Original Begin Date field on the Absence Event Entry page is used to identify linked absence, absence entries with the same absence type and original begin date are treated as one absence period.
For example, if a payee is out from January 23 to January 25 because of a broken leg and is out again from February 7 to February 8 for the same reason, this table shows how the absence is entered for the person on the Absence Event Entry page:
|
Absence Type |
Reason (not entered online) |
Begin Date |
End Date |
Original Begin Date |
|---|---|---|---|---|
|
Sick |
Broken leg |
January 23 |
January 25 |
January 23 |
|
Sick |
Broken leg complications |
February 7 |
February 8 |
January 23 |
This diagram gives examples of how linking works.
System Elements for Overwriting Daily Data from User Defined Fields
You can use up to 16 system elements to overwrite absence data that's entered into the user-defined fields (labeled Date 1, Date 2, Decimal 1, Decimal 2, and so on) on the Absence Event Input Detail page. When you run the Take process, the system writes the values that are assigned to the system elements to the daily data in the Absence Results (GP_RSLT_ABS) table in place of the user-entered values. You can use system elements to overwrite data for every day of an absence event or for selected days.
The following table lists the system elements, the corresponding fields that they overwrite in the Absence Results table, and the labels for the user-defined fields on the Absence Event Input Detail page:
|
System Element |
Field Overwritten in Absence Results Table |
Field Labels on Absence Event Input Detail Page |
|---|---|---|
|
EVT CONFIGx DT UPD |
EVT CONFIGx DT |
Date 1, 2, 3, 4 |
|
EVT CONFIGx DC UPD |
EVT CONFIGx DC |
Decimal 1, 2, 3, 4 |
|
EVT CONFIGx CH UPD |
EVT CONFIGx CH |
Character 1, 2, 3, 4 |
|
EVT CONFIGx MN UPD |
EVT CONFIGx MN |
Monetary 1, 2, 3, 4 |
where x = 1, 2, 3, or 4
For example, say that a user enters a value of 100 USD in the Monetary 1 field (EVT CONFIG1 DC) on the Absence Event Input Detail page. Using the EVT CONFIG1 DC UPD system element, you can have the system write 150 USD to the result table for the first day of the absence event, and use the value entered by the user for the remaining days of the event
To use the system elements:
Specify which user-defined fields can be overwritten.
Select these fields on the Absence Take - User Defined Result Fields page.
Use a formula or rule to define the conditions for assigning a value to the system elements.
Use the Absence Take Name page (GP_PIN) to name the element and define basic parameters.
Navigation:
This example illustrates the fields and controls on the Absence Take Name page.
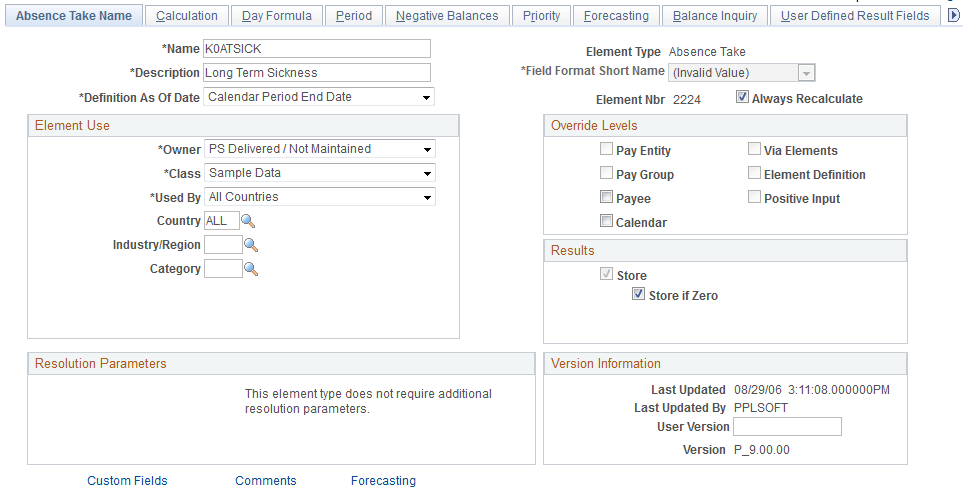
You must name every element and define its basic parameters on an Element Name page. All element components in Absence Management share the same first Element Name page (GP_PIN).
Enabling Configuration of Forecasting
Before you can define forecasting rules for a take element on the Absence Take - Forecasting page, you need to enable the take element for forecasting. To do this, click the Forecasting link at the bottom of the Absence Take Name page to access the Forecasting page. Select the Forecasting Used check box. Select the Forecasting Required check box if users are required to run the forecasting process before entering an absence through the Absence Event Entry page.
To avoid degrading system performance, enable the forecasting feature only for those takes that you're interested in forecasting.
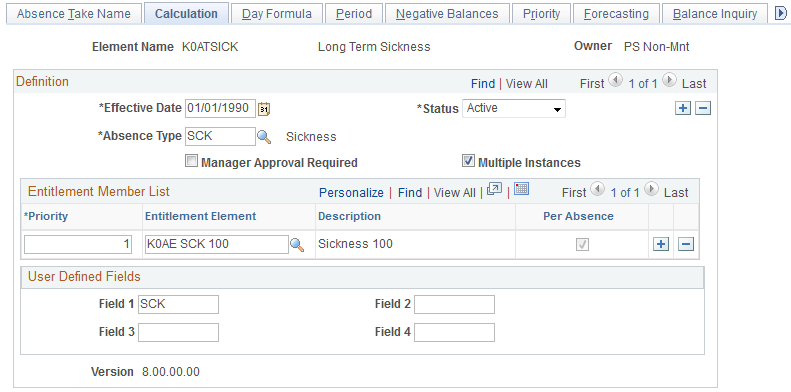
Use the Absence Takes - Calculation page (GP_ABS_TAKE) to define general calculation rules for take elements, select the absence type, link entitlement elements, and specify whether absence events require online approval.
Also contains user-defined fields.
Navigation:
This example illustrates the fields and controls on the Absence Takes - Calculation page.
Field or Control |
Description |
|---|---|
Absence Type |
Select the absence type. You define absence types on the Absence Types page. |
Manager Approval Required |
Select if a manager must approve every absence that is associated with this take. When a user enters an absence, someone must select the Manager Approved check box on the Absence Event Input Detail page, or the event will not be processed when you run the Take process. The system does not verify that the user who selects the check box is a manager. Note: This field does not apply to absence requests entered through the self service pages. Fields on the self service setup pages control the approval requirements for these requests. |
Multiple Instances |
Select to have the system create a separate bundle for the instances of positive input that are generated for the earning or deduction elements (associated with this take element). For example, say that a payee is sick on two separate occasions during the January processing period:
If Multiple Instances is selected, the system creates one row of positive input for Event 1 and one row of positive input for Event 2, enabling you to report the two events separately. Both Absence Begin Date and Absence Period Begin Date are populated when you select this check box, so select it if these dates are significant to your earning and deduction processing rules. If this check box is cleared, the system bundles the positive input that is generated for all absence events that occur for this take during the same period. A single row of positive input will represent the consolidated absence events. |
Entitlement Member List
Use these fields to link the take element to one or more entitlement elements. When you run the Take process, the system reduces entitlement balances in the order that you specify. For example, if you link vacation take to entitlement for floating holidays and then to vacation entitlement, the system uses the floating holiday entitlement until it's depleted and then reduces vacation entitlement.
All entitlement elements that you add to the Entitlement Member List must be of the same type: per-absence entitlement or frequency-based entitlement. The first element that you add to the list limits the choice of entitlement elements that you can add in subsequent rows.
Field or Control |
Description |
|---|---|
Priority |
Enter up to three digits to identify the relative order in which the absence take should be applied to the entitlement element. |
Entitlement Element |
Select the entitlement element that you want to link to the take element. If you've already added a row for an entitlement element, you can select only absence-based or frequency-based entitlement elements, depending on the Specify Frequency option selected on the Calculation page. |
Per Absence |
If the entitlement is absence-based (the Calculate When Absence Occurs option is selected on the Calculation page), the system selects this check box. The value that you select for the first row determines the type of entitlement elements that you can select in additional rows. |
User Defined Fields
The system provides four user defined fields that you can use to add any information you want to the take definition. When you run the Take process, the data that you enter populates the TAKE CONFIG1 through TAKE CONFIG4 system elements.
Field or Control |
Description |
|---|---|
Field 1: through Field 4: |
Enter up to 10 alphanumeric characters in each field. |
Use the Absence Takes - Day Formula page (GP_ABS_TAKE2) to specify the day formula for calculating the day count; linked earning and deduction elements; conditions for reducing the beginning entitlement balance; and mapped take elements.
Navigation:
This example illustrates the fields and controls on the Absence Takes - Day Formula page.

Beginning Balance Offset
If the take element is linked to a per-absence entitlement, select a formula that defines the conditions under which the beginning entitlement balance is reduced. The system executes the beginning balance offset formula only if the entitlement element is resolved (the conditional resolution formula is true).
You might use this feature to reduce entitlement when a payee has already received entitlement for related absences that occurred in the past. For example, you could use the beginning balance offset to reduce a sickness entitlement amount by the number of days that were used during the last 12 months.
Field or Control |
Description |
|---|---|
Offset Formula Element |
Select the formula that the system is to execute. The formula is executed each day of the period that you define in the Date From and Date To fields, but only if the entitlement element is resolved. It should return the number of units that you want the system to subtract from the beginning entitlement balance. When the formula is executed, the system loops through the daily absence rows that are defined by the Date From and Date To fields and resolves the formula per row for every take element. For example, your formula assigns a unit amount to each row (or day) that is associated with the variable SICK_PD_TAKEN. If the variable is a member of the entitlement balance accumulator and has an action of subtract, then each day that it resolves, it contributes to the accumulator and subtracts from the beginning entitlement balance. It's important that the formula specify which take elements and events you want the system to consider. Your formula can look at any information in the daily absence rows. |
From Type, To Type, Date From and Date To |
Select the type of element that defines the begin (From) date or end (To) date of the period to which the formula is applied. Values are Bracket-Date, Calendar Date, Date, Formula-Date, System Element-Date, and Variable-Date. (Calendar Date enables you to select a date; Date enables you to use a Date element.) In the Date From and Date To fields, select the name of the element that defines the date. Or, if you selected Calendar Date, select a date in this field. |
Mapped To Element |
For the system to generate take for another take element at the same time that it generates take for this element, select the name of the linked element. When the Take process resolves the element, it inserts a row of duplicate absence daily data for the current day that is being processed, but alters the take element and the take user-defined fields. Important! The order in which you add mapped take elements to the take process list is critical. The element that you select in this field is always processed after its source element. Otherwise, the linked take element is not resolved. |
Conditional Element |
If you completed the Mapped To Element field, select a conditional formula that is executed for each day of the absence event to determine whether to generate a duplicate entry for the linked element. If the formula returns an amount other than zero, or if you leave this field blank, a duplicate row is created. |
Day Formula Element |
Select the formula element that the system uses to evaluate each day of the absence event. The goal of the formula is to return the units for the absent day to compare to the absence entitlement balance. The Take process uses the take rules, the beginning balance, and the absent units to calculate the paid and unpaid units to pass to payroll. The day formula interprets each absent day in any way that your plan requires. For example, if a payee is scheduled to work 8 hours but works only three hours, the day count formula determines whether this constitutes absence for a full day, half a day, no days, or five-eighths of a day. For example, your day formula might look like this: Assume that a payee is on vacation from February 1 to 5: Wednesday, February 1, 8 hours Thursday, February 2, 8 hours Friday, February 3, 8 hours Saturday, February 4, 0 hours Sunday, February 5, 0 hours The day formula evaluates each day. When the system processes February 1, it populates the system element, SCHED HRS, and the day formula, WRK DAY, resolves to 1. On January 4, the payee is not scheduled to work. The system populates SCHED HRS with 0, so WRK DAY resolves to 0. |
Generate Positive Input Member List
Complete these fields to have the Take process generate positive input for one or more earning and deduction elements with a calculation rule of Rate × Units or Rate × Units × Percent. Specify the supporting element that returns a value for the Units component of the calculation rule. You can also select the supporting elements that will return the percent, rate, and amount values.
Common Page Information
Field or Control |
Description |
|---|---|
Order |
Enter up to three digits to specify the order in which the Take process should generate positive input for the earning or deduction elements when performing the day-by-day processing for this take. The lower the number, the sooner the element will be processed. Order is important only if there are dependencies between the elements. For example, if data generated by Earning 1 is needed to resolve Earning 2, assign Earning 1 a lower order number. |
Element Type |
Select the type of element positive input that is to be generated when you run the Take process: Deduction or Earning. |
Element |
Select the name of the earning or deduction element for which the positive input should be generated. Only earnings and deductions with a calculation rule of "Rate x Unit", or "Rate x Unit x Percent" are allowed. |
Units
Field or Control |
Description |
|---|---|
Unit Element Type |
Select the type of supporting element that returns the value of the paid or unpaid units that are associated with the earning or deduction. The elements are: Accumulator, Bracket, Formula, SystemElem, or Variable. For example, to return the number of paid units that are calculated by the day formula, you could select the system element DAY COUNT PD. Or, to return the number of unpaid units, you could select DAY COUNT UNPD. To convert the units that are returned by the day formula—from days to hours, for example—use a formula element that uses the following system elements:
Note: For absence take elements that do not have associated absence entitlement elements, the system does not generate the paid and unpaid elements. You must use DAY COUNT. |
Unit Element |
Select the name of the supporting element that returns the units that are associated with the earning or deduction element. |
Rate
Select the Rate tab.
Field or Control |
Description |
|---|---|
Rate Element Type |
Select the type of supporting element that returns the value of the Rate component. Values are: Bracket, Formula, SystemElem, or Variable. The take process applies the instructions that you enter day by day. If the value of the Rate component changes (during the absence period, for example) the change is applied on the correct day. For example, if payees receive 100 percent of their payment for an illness and the rate changes due to seniority, you might use a system element to retrieve the correct rate for the generated positive input. |
Rate Element |
If you selected an element type, select the name of the supporting element that returns the value of the Rate component. |
Percent
Select the Percent tab.
Field or Control |
Description |
|---|---|
Percent Element Type |
If the calculation rule for the earning or deduction element is defined as Rate x Unit x Percent, select a supporting element that returns the value of the Percent component. Values are Bracket, Formula, SystemElem, and Variable. The Take process applies the instructions that you enter day by day. If the value of the percent components changes (during the absence period, for example), the change is applied on the correct day. For example, if payees receive 100 percent of their pay for the first 30 days of an illness and 75 percent for each day thereafter, you might use a bracket element that returns the appropriate percent, based on the length of the absence. |
Percent Element |
If you selected an element type, select the name of the supporting element that returns the value of the Percent component. |
Amount
Select the Amount tab.
Field or Control |
Description |
|---|---|
Amount Element Type |
Select an element that returns the value of the amount component for the earning or deduction element. The amount overrides any values returned by other components of the element's calculation rule. Although you can still select elements to return the rate or percent, the values of these components are not used for calculations. Values are Accumulator, Bracket, Formula, SystemElem, or Variable. |
Amount Element |
Select the name of the element that returns the value of the Amount component. |
Use the Absence Takes - Period page (GP_ABS_TAKE3) to define eligibility, minimum absence, or wait per absence requirements.
Link related absences.
Navigation:
This example illustrates the fields and controls on the Absence Takes - Period page.
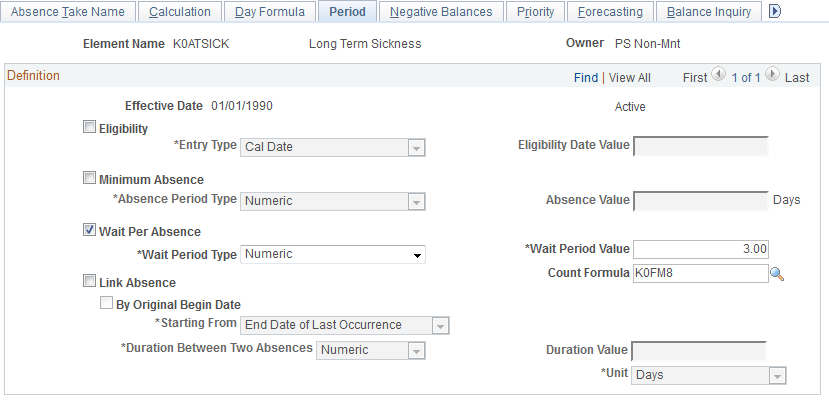
Eligibility
Complete the Eligibility, Entry Type, and Eligibility Date Value fields if payees are eligible to use entitlement only on or after a certain date.
Field or Control |
Description |
|---|---|
Eligibility |
Select to define an eligibility period for this take. |
Entry Type and Eligibility Date Value |
In the Entry Type field, select the type of supporting element that defines the eligibility date. The Take process treats days that are taken before the eligibility date as unpaid units. Absences that are taken on or after this date can be applied against the entitlement balance. For example, if the eligibility date is June 1, an absence on June 1 qualifies for payment. Values are Bracket, Cal Date, Date, Formula, System Element, and Variable. (Cal Date enables you to select a specific date; Date enables you to select a date element.) In the Eligibility Date Value field, select the name of the element that defines the date. Or, if you selected Calendar Date in the Entry Type field, select the appropriate date. |
Minimum Absence
Complete the Minimum Absence, Absence Period Type, and Absence Value fields if payees must be absent a minimum number of calendar days before an absence event is paid. If the absence event is longer than the minimum period, the entire absence qualifies for payment. If the minimum period is not met, the entire absence is unpaid. (The system does not consider linked absences when determining whether the minimum period has been met. Linked absences are described below.)
The system refers to the end date of an absence to determine whether the minimum period has been met—even when the end date falls in a different calendar period.
Field or Control |
Description |
|---|---|
Minimum Absence |
Select to define a minimum absence rule for this take. |
Absence Period Type and Absence Value |
In the Absence Period Type field, select the type of supporting element that defines the minimum absence period. The period must be in calendar days. Values are Accumulator, Bracket, Duration, Formula, Numeric, System Element, and Variable. In the Absence Value field, select the name of the element. Or, if you selected Numeric in the first field, enter up to 8 digits in this field. For example, if an absence of less than 4 days is unpaid, select Numeric in the first field and type 4 in the field to the right. |
Wait Per Absence
Complete the Wait Per Absence, Wait Period Type, Wait Period Value, and Count Formula fields if each absence event must satisfy a minimum waiting period before it can be paid. When the minimum wait period is met, the payee can be paid only for the period of time that exceeds the wait period.
If you define a Wait Per Absence and also select the Link Absence check box on this page, you can create a formula that enables linked events to share the same waiting period.
Field or Control |
Description |
|---|---|
Wait Per Absence |
Select to define a minimum waiting period for each absence. |
Wait Period Type and Wait Period Value |
In the Wait Period Type field, select the type of supporting element that defines the number of remaining wait units the payee must be absent before the event can be paid. This element is resolved on the first day of the absence event. Values are Accumulator, Bracket, Duration, Formula, Numeric, System Element, and Variable. In the Wait Period Value field, select the name of the element. Or, if you selected Numeric in the first field, enter up to 8 digits in this field. For example, if you select Numeric, and you enter 3 in the field to the right, the first three days of the absence are not paid. If you select the Link Absence check box to link related events, you can have the value that is returned by a Period formula apply to the linked absence period, rather than to each event. In a Period formula, you can reference one of the following system elements:
|
Count Formula |
If you selected Wait Per Absence, select a formula in this field. The count formula interprets the days that are to be counted against the wait period. This formula is similar to, and usually the same as, the day formula, though this is not a requirement. For example, you might want the day formula to consider workdays and the count formula to consider calendar days. The count formula is resolved each day of the absence event until the wait period is met. Note: For payees to be compensated for partial hours worked on the day that the waiting period is met, the count formula must be the same as the day formula. |
Linking
Field or Control |
Description |
|---|---|
Link Absence |
Select to have the system link related absences. |
By Original Begin Date |
Select to have the system link the current absence event to the last absence event with the same original begin date. If you do not select this check box, the system treats the event begin date as the original begin date. |
Starting From |
Specify the start date that the system uses to determine if a linked absence falls within the allowed period. When you run the Take process, the system compares the first day of the current absence event to the date that you specify in this field. If the period is greater than that defined by the Duration Between Two Absences field, the absences are not linked. Values are: End Date of Last Occurrence: The system looks at the end date of the last matching event. (If you selected By Original Begin Date, the last matching event is the last event with the same original begin date.) Begin Date of First Occurrence: The system looks at the begin date of the first matching event. |
Duration Between Two Absences, Duration Value and Unit |
In the Duration Between Two Absences field, select the type of element that defines the duration period. Values are Accumulator, Bracket-Numeric, Duration, Formula-Numeric, Numeric, System Element-Numeric, and Variable-Numeric. In the Duration Value field, select the name of the element that defines the duration period. If you selected Numeric in the Duration Between Two Absences field, enter the number of units here. In the Unit field, select the unit of measurement you want to use. Values are Days, Months, and Weeks. |
Use the Absence Takes - Negative Balances page (GP_ABS_TAKE4) to define negative balance rules (what happens when the entitlement balance is not sufficient to cover an absence).
Navigation:
This example illustrates the fields and controls on the Absence Takes - Negative Balances page.
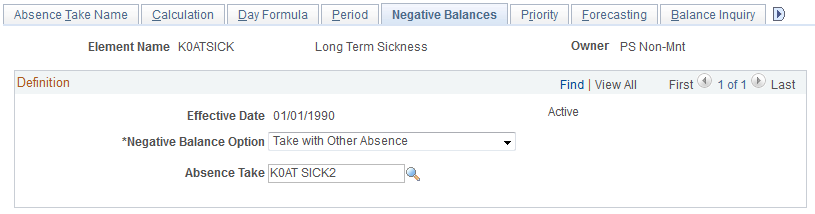
On this page, you specify what the system is to do if a payee's absence take exceeds the entitlement balance; that is, if the entitlement balance drops below zero. You can allow payees to:
Carry a negative balance up to the limit that you specify.
Take the absence as unpaid time.
Use the accrued entitlement that is associated with another type of absence.
Negative balance rules do not take effect until the payee has depleted all the linked entitlements that are defined on the Calculation page.
Field or Control |
Description |
|---|---|
Negative Balance Option |
Specify what the system is to do if a payee's absence take exceeds the entitlement balance; that is, if the entitlement balance drops below zero. Valid values are:
|
Limit Type and Limit Value |
These fields are only available if the Negative Balance Option selected is Allow Negative Balance. To limit the amount of negative entitlement balance allowed, select the supporting element that defines the limit. Any take that exceeds the limit will populates the DAY COUNT UNP system element. A limit of 3, for example, indicates that up to three days will be paid. In the Limit Value, select the name of the element. If you selected Numeric in the first field, enter a number in this field. |
Absence Take |
These fields are only available if the Negative Balance Option selected is Take with Other Absence. Select the take element that is associated with the entitlement that you want to use. |
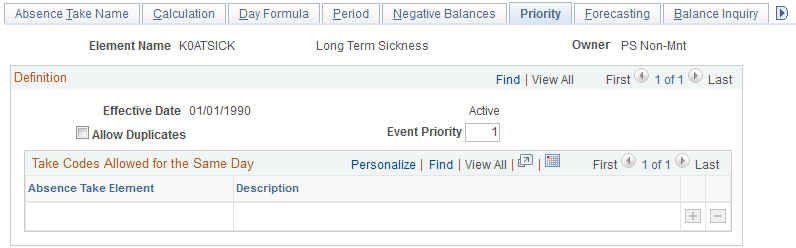
Use the Absence Takes - Priority page (GP_ABS_TAKE5) to specify if users can enter more than one absence for a payee for the same day and to assign a priority to absence takes if only one type of absence is allowed each day.
Navigation:
This example illustrates the fields and controls on the Absence Takes - Priority page.
Field or Control |
Description |
|---|---|
Allow Duplicates |
Select to enable users to enter more than one absence for the same day on the Absence Event Entry page. For example, if an employee has a two-hour union meeting in the morning and takes six hours of vacation on the same day, select Allow Duplicates to enable the user to enter and save the two absences for the same day. Clear this check box to prevent users from entering more than one absence for the same day. When a user enters multiple events for the same day on the Absence Event Entry page and tries to save the entries, the system displays a message. If the user clicks OK, the system applies the take definition with the highest priority for the date in conflict (that is, the event with the lowest priority number). You designate the priority of the take element in the Event Priority field. The priority number appears on the Absence Event Entry page when you enter an absence using this take element. Using the same example, if you want the system to display the above message when a user tries to save the entries for a union meeting and vacation that occur the same day, do not select Allow Duplicates. |
Event Priority |
You can specify the priority of this absence take element in relation to others by entering a unique number of up to three digits in this field. Lower numbers represent higher priority. When a user tries to enter more than one type of absence for the same day, and duplicates are not allowed, the system displays a message that provides information about take priorities. It also enables the user to invoke a process that causes the system to use the take definition with the highest priority for the date in conflict. |
Take Codes Allowed for the Same Day
Field or Control |
Description |
|---|---|
Absence Take |
If you selected Allow Duplicates, specify the types of absences that can be taken the same day. Add a row for each allowable absence take element. Select at least one element. When you run the Take process, the system calculates total partial hours that were written to the results table for events that occurred on the same day. It returns the total to the system element named ABS CUM PARTIAL HR. (You might consider creating a formula that generates an error if scheduled hours exceed total partial hours.) |
Use the Absence Takes - Forecasting page (GP_ABS_TAKE6) to specify the formula to use for absence forecasting and the list of elements that are displayed by the Absence Forecasting process.
Navigation:
This example illustrates the fields and controls on the Absence Takes - Forecasting page.
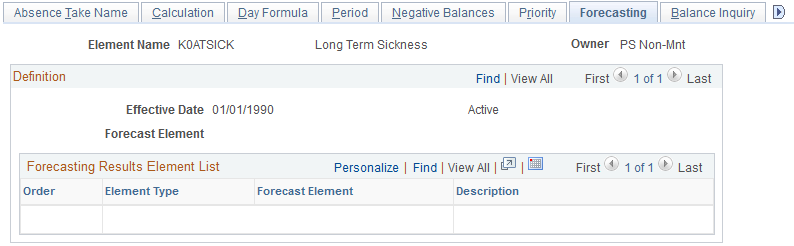
Complete the Forecasting page if you want users to be able to run the Forecast process when entering absences.
Note: To enter information on this page, the Forecasting Used check box must be selected on the Forecasting page that you access through the link at the bottom of the Absence Take – Name page.
Field or Control |
Description |
|---|---|
Forecast Element |
Select the formula that you want the system to resolve during the Forecasting process. Only formulas with a field type of character are allowed. The system resolves this formula for each day of the absence event immediately after the day is evaluated (after the DAY COUNT, DAY COUNT PD, and DAY COUNT UNPD elements are resolved). It stores the last resolved value. As an example, say you want your formula, named FM ELIG, to return a value of ELIGIBLE or NOT ELIGIBLE depending on whether a payee has enough entitlement to cover an absence. Your forecast formula might look like this: |
Forecasting Results Element List
This group box controls what appears on the Absence Forecast Results page (in the Absence Event Entry component) after you run the Forecasting process. Select the elements for which you would like to view results. For example, you may want a duration element to display the length of the absence and an accumulator element to display the entitlement balance.
The elements that you select should be those that are normally resolved during absence processing. Element types are: Accumulator, Bracket, Date, Duration, Formula, System Element, and Variable.
Use the Absence Takes - Balance Inquiry page (GP_ABS_TAKE7) to list the elements that are displayed by the Balance Inquiry process.
Navigation:
This example illustrates the fields and controls on the Absence Takes - Balance Inquiry page.
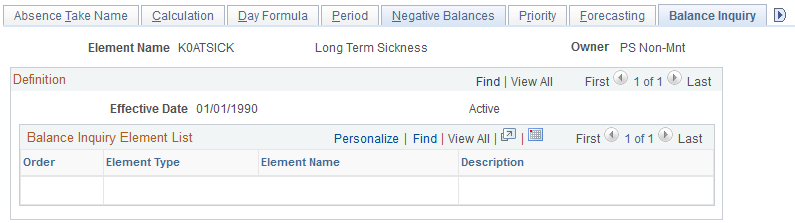
Note: To enter information on this page, the Forecasting Used check box must be selected on the Absence Take Name page.
Balance Inquiry Element List
This group box controls what appears on the Forecast Balance page after you run the Balance Inquiry process. Select the elements for which you would like to view results; for example, accumulators that track entitlement balances for the take, and system elements that help explain the balances.
Element types are: Accumulator, Bracket, Date, Duration, Formula, System Element, and Variable.
Use the Absence Takes - User Defined Result Fields page (GP_ABS_TAKE8) to select the user-defined fields that can be overwritten by a system element during processing.
Navigation:
This example illustrates the fields and controls on the Absence Takes - User Defined Result Fields page.
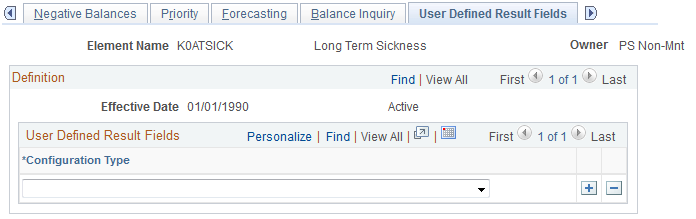
In the Configuration Type field, select the user-defined fields that can be overwritten by a system element. During batch processing, the value that's assigned to the corresponding system element will overwrite the user-entered value in the absence results table (GP_RSLT_ABS). Select only those fields that you will use in your rules.
For example, to specify that the value a user enters in the Date 3 field on the Absence Event Input Detail page can be overwritten, select User Defined Date 3 in the Configuration Type field.
Use the Absence Take - Supporting Element Override page (GP_ELM_DFN_SOVR) to override the value of a bracket, date, duration, formula, or variable element that is used in the definition of the take element.
Navigation: