Defining Self Service Absence Rules by Country
To define country-specific rules for using the absence self service pages, use the Country Configuration (GP_ABS_SS_CNTRY) component.
Video: Image Highlights, PeopleSoft HCM Update Image 43: Absence Balance and Forecast Enhancements
|
Page Name |
Definition Name |
Usage |
|---|---|---|
|
GP_ABS_SS_CNTRY1 |
Select the entitlement fields that appear on the View Absence Balances page. |
|
|
GP_ABS_SS_CNTRY2 |
Select the history fields that appear on the View Absence Requests page. |
|
|
GP_ABS_SS_CNTRY3 |
Select forecasting options and fields to display on the View Forecasting Details page. |
|
|
GP_BAL_ELIG_SS |
Enter balance elements and select display options on the View Absence Entitlement Balance page. |
|
|
GP_ABS_EVT_ENTRY |
Select deletion options to allow absent entries to be deleted on the Absence Event Entry page. |
Use the Entitlement Grid page (GP_ABS_SS_CNTRY1) to select the entitlement fields that appear on the View Absence Balances page.
Navigation:
This example illustrates the fields and controls on the Entitlement Grid page.
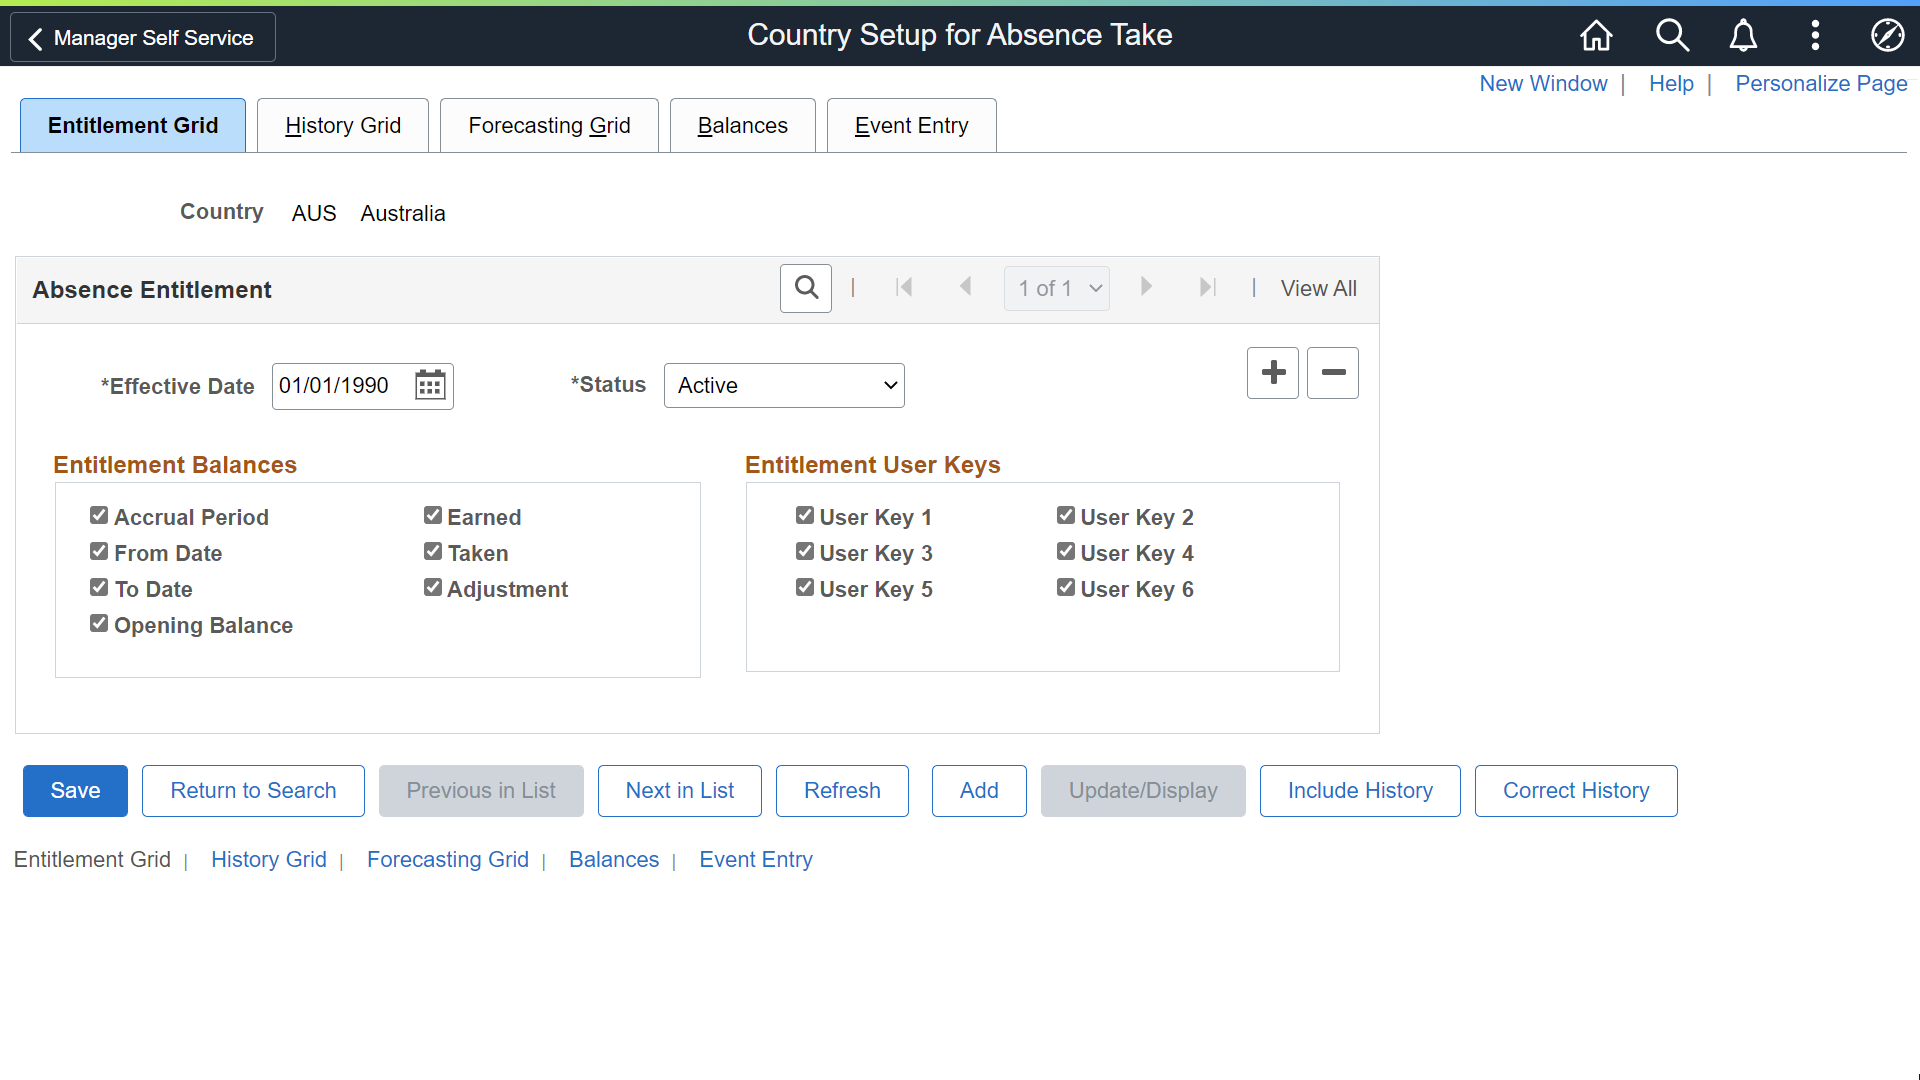
The fields on this page control what appears on the View Absence Balances page.
Field or Control |
Description |
|---|---|
Accrual Period |
Select to have the system display the accumulator period for each entitlement balance, for example, year-to-date or month-to-date. (Define the period for an entitlement accumulator on the Accumulator Periods for Element <element name> page. Select the entitlement accumulators on the Balances page. ) |
From Date and To Date |
Select to display the begin and end dates of the accrual period. |
|
Opening Balance |
Select to display the balance details such as opening, accrued, taken, adjustment and closing balances. |
|
Earned |
|
|
Taken |
|
|
Adjustment |
|
User Key 1...6 |
Select to display the values of up to six user keys that are associated with the entitlement accumulator. (Define user key values on an entitlement element's Auto Generated Accumulators page.) |
Use the History Grid page (GP_ABS_SS_CNTRY2) to select the history fields that appear on the View Absence Requests page.
Navigation:
This example illustrates the fields and controls on the History Grid page.
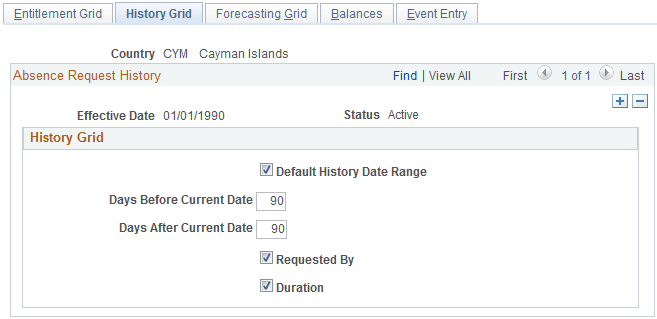
The fields on this page control what appears on the View Absence Requests page.
Field or Control |
Description |
|---|---|
Default History Date Range |
Select to define the default date range for displaying historical absence events. When you select this check box, the system displays 90 days before the current date and 90 days after the current date. Note: Users can select dates outside of this date range by editing the From and Through fields on the View Absence Requests page. |
Days Before Current Date and Days After Current Date |
Use these fields to modify the default date range for displaying historical absence events. |
Requested By |
Select to display a column that identifies who (which role) submitted each request: the employer, administrator, or manager. Names are not displayed. This field is selected by default. |
Duration |
Select to display the duration of the absence event. This field is selected by default. |
Use the Forecasting Grid page (GP_ABS_SS_CNTRY3) to select forecasting options and fields to display on the View Forecasting Details page.
Navigation:
This example illustrates the fields and controls on the Forecasting Grid page.
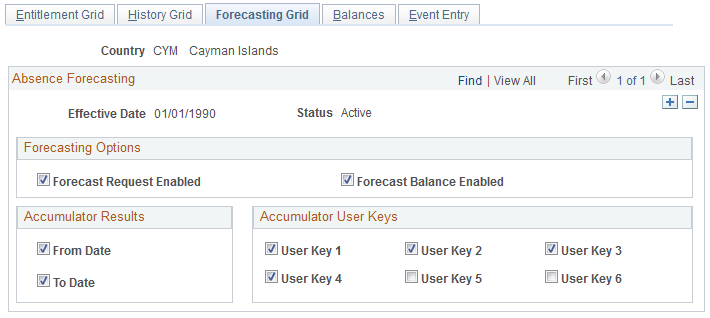
All check boxes on this page are selected by default.
Field or Control |
Description |
|---|---|
Forecast Request Enabled |
Select to enable self service users to run the online Absence Forecasting process. This causes a Forecast Balance button to appear on the Employee - Request Absence page and Manager - Request Absence page. For self service users to run the forecasting process for a given absence take element, the country take rule for that take element must also allow forecasting. (The Allow Forecasting check box must be selected on the take element's Forecasting Messages page.) |
Field or Control |
Description |
|---|---|
Forecast Balance Enabled |
Select to enable self service users to run the online Balance Inquiry process. This causes a View Forecast Balances link to appear on the Request Absence pages and the View Absence Balances pages. |
From Date and To Date |
Select to have the forecasting results display the From Date and the To Date for the forecasted period. |
User Key 1...6 |
Select to display the values of the user keys that are defined for the forecasted entitlement element's accumulator. |
Use the Balances page (GP_BAL_ELIG_SS) to enter balance elements and select display options on the View Absence Entitlement Balance page.
Navigation:
This example illustrates the fields and controls on the Balances page.
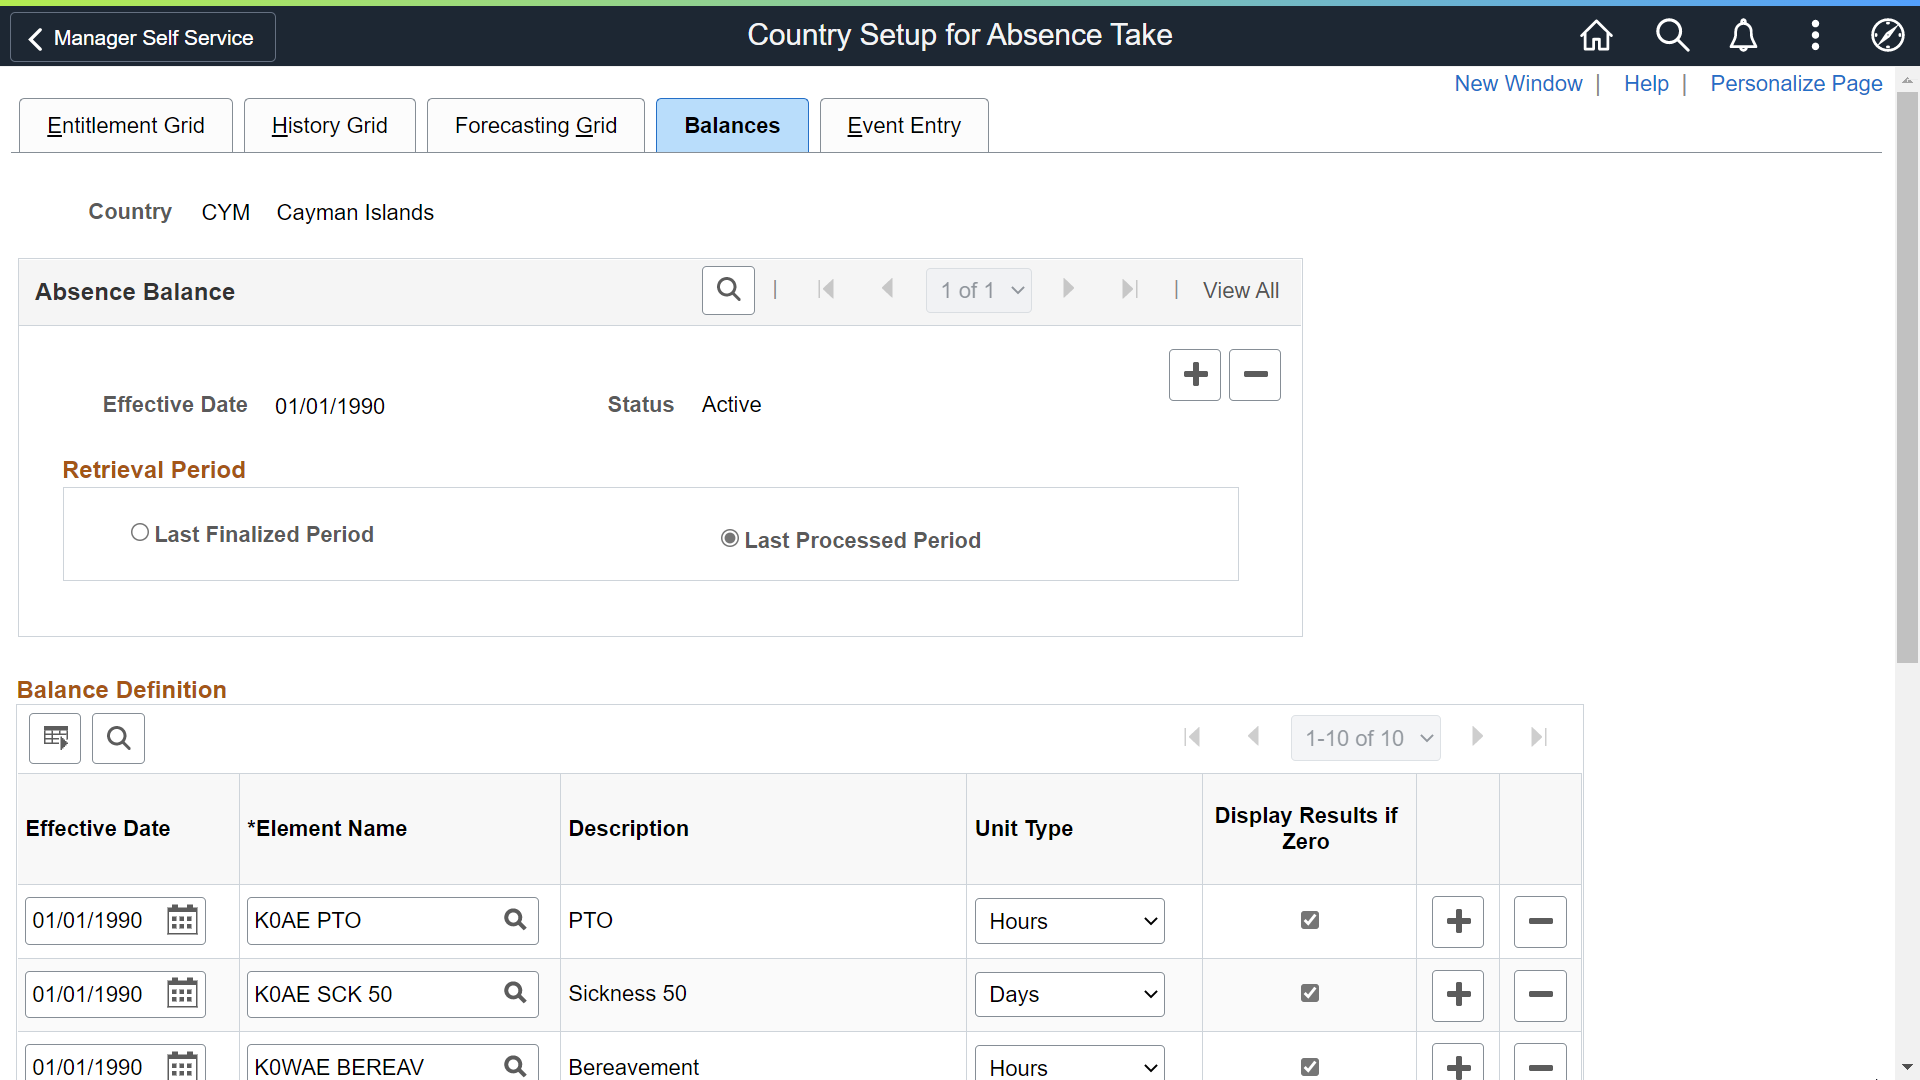
The fields on this page control what appears on the View Absence Entitlement Balances page in the Self Service component.
Field or Control |
Description |
|---|---|
|
Last Finalized Period |
Select this field to show the balances as of your last finalized calendar. |
|
Last Processed Period |
Select this field to show the balances as of your last processed or calculated calendar. |
Effective Date |
The date that the balance accumulator will appear on the View Absence Entitlement Balances page. |
|
Element Name |
Select the accumulator element for the entitlement balance you want to display. |
|
Unit Type |
Select Days or Hours as the units to display on the self service pages. These are units that users see when viewing absence entitlement balances. Note: The selected unit type should match the unit type defined for the take element. |
|
Display Results if Zero |
Select to display the element on the View Absence Entitlement Balances page when there is no balance for that accumulator. The system displays the balances as of the most recent run of the Entitlement process for the employee. |
Use the Event Entry page (GP_ABS_EVT_ENTRY) to select deletion options to allow absent entries to be deleted on the Absence Event Entry page.
Navigation:
This example illustrates the fields and controls on the Event Entry page.

The fields on this page control real time balance calculation, deletion, cancellation, and Fluid options for absence requests.
Field or Control |
Description |
|---|---|
Delete Option |
Select a value to determine which absence events can be deleted on the Absence Event Entry page. Valid values are All Events, All Events Except Finalized, and All Events Except Processed. The delete button is disabled on the Absence Event Entry page for all rows that do not meet the criteria indicated by the Delete Option. |
Balance Information
|
Field or Control |
Description |
|---|---|
|
Real Time Forecasting |
Select this option to enable real time calculation of balances as of today. When you request a leave of absence, the system calculates your current balance as of today and recalculates it based on the number of hours or days you are requesting. |
Cancelation Rules
Field or Control |
Description |
|---|---|
Limit By Months - Backward and Limit By Months - Forward |
Define the range of months before and after the current date in which submitted absence requests must fall to be eligible for cancellation. For example, let us say that the Limit By Months - Backward is set to 2 and the Limit by Months - Forward is set to 3. In this case, on March 18 users would be able to cancel absence requests submitted for January 1 through June 30. |
Fluid Options
Field or Control |
Description |
|---|---|
Show Absence Type |
Select to display the type of absence for absence requests submitted using the PeopleSoft Fluid user interface. |
Save for Later Option |
Select to provide a Save for Later button for users submitting absence requests using the PeopleSoft Fluid user interface. |
|
Show Process Details |
Select to allow the employees to view the absence process details in the View Request Page from Self Service. Note: By default, this option is not enabled. |
Event Handler
While approving or cancelling absences, you can define an app package and class and execute any country specific logic using these options. The context of the absence event is set by absence code while calling the country extension event handler.
Field or Control |
Description |
|---|---|
Root Package ID |
Search and select root package ID, for approving or canceling absence. |
Application Class Path |
Search and select the application class path. |
Note: The Country Specific app class needs to extend the core app class HGA_COUNTRY_SPECIFIC:CountrySpecific and implement the method ExecuteCECode() in their app class.
The record object for GP_ABS_SS_DAT and Action are passed as context and will be available for the country extension event handler app class.
This helps country extension code to identify the absence event and execute any country specific logic.