Entering Positive Input
|
Page Name |
Definition Name |
Usage |
|---|---|---|
|
GP_PI_MNL_ERNDED |
Enter positive input for one payee. (You select the employee ID, pay group, and calendar to access this page.) |
|
|
GP_PI_GRP_ERNDED |
Enter, edit, or view positive input for payees in the same pay group and calendar. |
|
|
GP_PI_MNL_SEC |
Enter a rate code or a numeric value for a percent, base, rate, unit, or amount component; change the currency; add a description; and enter begin and end dates. You can also override system and variable elements associated with positive input, such as department, job code, or rate as of date. |
Before you can enter positive input, you must set up the calendar with which the positive input is associated. Create the calendar with a run type of payroll. After creating the calendar, you can begin.
Global Payroll provides several options for manual entry of positive input. You can:
Enter positive input for a single payee associated with the pay group and calendar that you select.
Enter positive input for multiple payees associated with the same pay group and calendar.
Use a template to create your own data entry page for payees in the same pay group.
This topic provides tips for entering positive input.
Positive Input for a Payee with Different Payment Keys
Positive input is applied to the payment key of the period for which the positive input is processed. For example, if a change in a contract ID causes segmentation, the positive input is applied to the contact ID that's in effect for that segment. You can direct the positive input to a specific contract by entering the applicable begin and end dates for the instance. If positive input applies to a prior period contract, enter it in the applicable calendar. Retroactive processing occurs, if appropriate.
Positive Input for a Payee Who's Compensated at Different Rates for Different Types of Work
You can:
Enter the applicable numeric rate or select the rate code that the system uses to retrieve the rate.
Override the job code system element, if the earning element is defined with a non base-pay rate code.
The system retrieves the rate that's applicable to the job code that you select.
Positive input that's entered for finalized or approved payees is processed only during a retroactive pay run for the same calendar. If the pay group and calendar for which you are entering positive input has been finalized, or if there are payees associated with the calendar who have already been approved for banking, the following message appears on the data entry page:
"Pay Calendar has been finalized/approved. Any changes will be considered during retro processing."
Use the One Time (Positive Input) page (GP_PI_MNL_ERNDED) to enter positive input for one payee.
(You select the employee ID, pay group, and calendar to access this page.)
Navigation:
This example illustrates the fields and controls on the One Time (Positive Input) page.
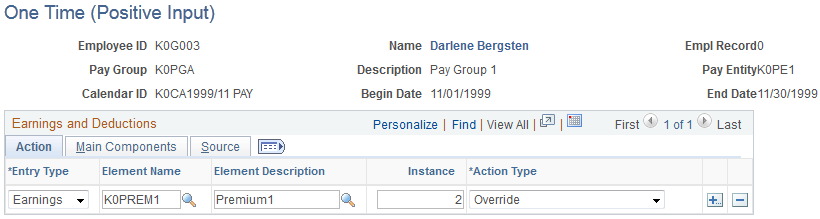
To enter positive input for a payee:
On the Action tab, select the earning or deduction element for which to enter positive input, assign it an instance number, and specify the action to take during processing.
On the Main Components tab, enter numeric values for the components of the element's calculation rule, if applicable.
To enter a numeric value for percent or base or to select a rate code element for any components of the element's calculation rule, click the Details link on the Main Components tab.
You can also override the value of a system or variable element, if applicable.
Action
Select the Action tab.
Enter each instance of positive input that applies to this payee.
Field or Control |
Description |
|---|---|
Entry Type |
Select Earnings or Deduction to indicate the type of element for which you're entering positive input. |
Element Name and Element Description |
Select the element for which you want to enter positive input by either name or description. You can select from those elements that meet all these conditions:
|
Instance |
Enter a number from 1 to 999 to identify the instance of positive input that you're entering for the element. The default entry for the first row is 1, but if a payee has more than one row of positive input for the same element, the system assigns an instance number incrementally from the highest instance number assigned to existing rows. Instance numbers provide the system with a way to prioritize multiple rows of positive input for the same element. The lower the instance number, the higher the priority. |
Action Type |
Select the type of action to perform when processing this instance of positive input. Values are Override, Add, Do Not Process, and Resolve to Zero. When you select Resolve to Zero, you cannot enter information on the Positive Input – Details page. |
Main Components
Select the Main Components tab.
The fields that you can complete depend on the value that you select in the Action Type field and the calculation rule used by the earning or deduction element.
Field or Control |
Description |
|---|---|
Unit |
If unit is a component of the element's calculation rule, you can enter a positive or negative number of units in this field. To select a rate code element to retrieve the unit's value from HR, click the Details link to access the Positive Input – Details page. If you don't enter a value and the units are defined on the element's Calculation page, the system checks the element's as of date to determine the appropriate value. |
Rate |
Similar to the Unit field. |
Amount |
Enter a positive or negative amount to override the element's calculation rule. The system uses this amount to resolve the element, regardless of its calculation rule. If you enter an amount, you can still enter a numeric value in the Unit or Rate field—if these are components of the element's calculation rule. Although the values that you enter aren't used for calculations, the system moves them to the earnings and deductions results table, making the information available for payslips. For example, if you have an earning element defined as rate × units and enter an amount and a rate, the system uses the amount that you enter to resolve the element and passes the amount and rate to the results table. |
Currency Code |
When you select a rate or amount, the code for the processing currency appears (as defined by the element definition or the pay entity). To use another currency, select it here. |
Details |
Click the Details button to access the Positive Input – Details page, where you can select a rate code or enter a numeric value for any component of the element's calculation rule (percent, base, rate, amount, or unit). You can also override a variable or system element that is associated with this instance of positive input, such as the business unit, department, or job, and enter other instructions. A check mark appears in the Details check box if instructions have been entered on the Positive Input – Details page. |
Source
Select the Source tab.
Field or Control |
Description |
|---|---|
Updated By User and Last Update Date/Time |
These fields display the ID of the user who last updated the positive input information along with the date and time of the update. |
Batch Code |
Enter a unique batch code to assist in further identifying the positive input entry with which a payee record is associated. |
Use the Positive Input By Calendar page (GP_PI_GRP_ERNDED) to enter, edit, or view positive input for payees in the same pay group and calendar.
Navigation:
This example illustrates the fields and controls on the Positive Input By Calendar page.
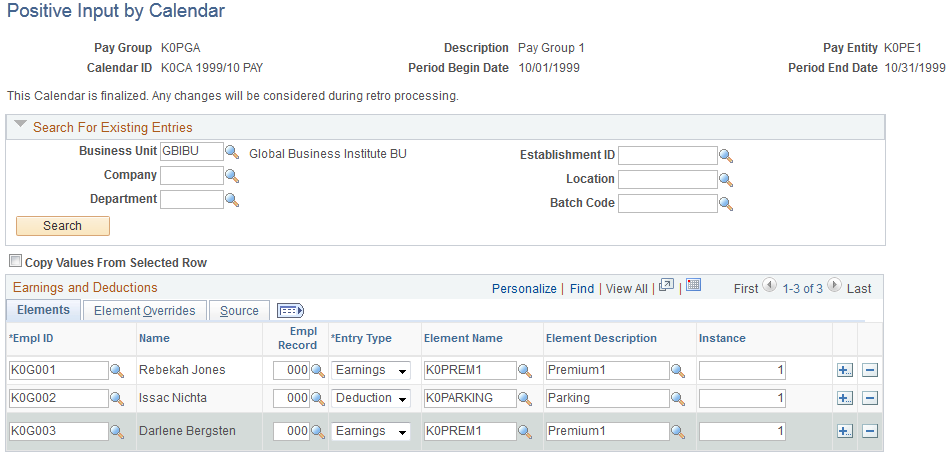
You can use this page to add, change, or view positive input for multiple payees associated with the same pay group and calendar. You cannot delete positive input from this page.
Search For Existing Entries
Use this group box to specify which positive input records to display or edit. The system retrieves the entries that meet all your selection criteria.
To display positive input entries for payees or edit unprocessed entries:
Enter the search criteria for the positive input entries to review.
To search by department or location, you must first select the business unit.
To search by batch code, there must be at least one payee who matches your search criteria and has an assigned batch code. This is because the Batch Code field in the Search for Existing Entries group box prompts against a derived table of all batch codes assigned to payees that match your search criteria.
Click the Search button.
Review or edit the entries on both tabs in the Earnings and Deductions group box.
Earnings and Deductions
Fields in this group box are similar to those on the One Time (Positive Input) page that you use to enter positive input for a single payee.
To enter positive input entries for payees:
(Optional) On the Source tab, enter a unique batch code for each payee row to assist in further identifying the positive input entry with which a payee record is associated.
Complete the remaining required and optional data entry fields on this tab.
(Optional) Click the Details button to access the Positive Input - Details page, where you can enter rate codes, begin and end dates, and other instructions for each payee.
You can also override system and variable elements associated with the positive input.
Add rows of data entry fields, as needed.
To add rows of data entry fields:
Select the Copy Values From Selected Row check box to copy the values that you entered in a given row into the new rows.
Deselect this check box to add blank rows.
Click the Add New Rows (+) button on the row that you are copying and enter the number of rows to add in the user prompt field that appears.
The system does not copy the EmplID or the Empl Record field value.
Enter an ID and other values for all new rows on both the Elements and Element Overrides tabs.
Use the Positive Input - Details page (GP_PI_MNL_SEC) to enter a rate code or a numeric value for a percent, base, rate, unit, or amount component; change the currency; add a description; and enter begin and end dates.
You can also override system and variable elements associated with positive input, such as department, job code, or rate as of date.
Navigation:
Click Details on the Main Components tab of the One Time (Positive Input) page or the Element Overrides tab of the Positive Input By Calendar page.
This example illustrates the fields and controls on the Positive Input - Details page.

The title that appears at the top of the page depends on whether you access this page from the One Time (Positive Input) page or the Positive Input By Calendar page.
Specify Values OR Elements
The fields for units, rate, base, and percent are enabled only when they are components of the calculation rule for the selected earning or deduction element. Any numeric values that you entered on the One Time (Positive Input) page appear here.
You can enter a positive or negative numeric value or select a rate code element that retrieves the unit value from HR. If you don't enter a value for the component and the component's value is defined on the element's Calculation page, the system uses the element's as of date to determine the value.
Field or Control |
Description |
|---|---|
Begin Date and End Date |
Enter the start date for the instance of positive input. If you enter a begin date, you must also enter an end date, and vice versa. The system doesn't use the begin date for processing. Enter the end date if it differs from the calendar end date. If the calendar period is segmented, the end date that you enter determines the segment or slice to which the instance of positive input is assigned. The end date must be on or before the calendar end date. |
Currency Code |
When you enter a value in the Rate Value, Base Value, or Amount Value field, the code for the processing currency (as defined by the element definition or the pay entity) appears in this field. To use another currency, select it from the list. |
Absence Dates
Complete the following fields if you're entering positive input for an earning or deduction element associated with an absence take.
Field or Control |
Description |
|---|---|
Absence Begin Date and Absence End Date |
Enter the dates of the absence event. |
Period Begin Date |
Enter the later of the begin date of the absence event or of the calendar period. |
Period End Date |
Enter the earlier of the end date of the absence event or of the calendar period. |
Other Data
Field or Control |
Description |
|---|---|
Batch Code |
The system populates this field by default with the batch code on the Element Overrides tab, if any. Batch codes are optional, and assist in further identifying the positive input entry with which a payee record is associated. You can use this identifier as a search value on the Positive Input By Calendar page. Note: For each payee, the system synchronizes the batch code that you enter on the Positive Input By Calendar page with the batch code on the Element Overrides tab, and vice versa. |
Description of PI (description of positive input) |
Enter a description to be stored in the GP_RSLT_PI_DATA record. You might use this feature to print a description besides the element description defined on the Element Name page (GP_PIN) when printing payslips or reports. |
Supporting Element Overrides
You can override system or variable elements associated with an instance of positive input. For example, you can override the department, job code, or location associated with an instance. When you override the job code for a non base-pay earning element, the system uses the compensation rate that's applicable to the job that you specify.
Assume that a payee does two types of work for your organization, with two pay rates. During the pay period, the payee works 32 hours at Job A—the regular job—and eight hours at Job B. You enter the 32 hour instance of positive input for Job A. Because the entry applies to the payee's regular job, you need do nothing more with this instance. You enter the eight-hour instance for Job B and override the standard job code for the eight-hour instance in the Supporting Element Overrides group box.
An override applies to one instance of positive input only. After the instance is resolved, the supporting element reverts to its previous value. The fields that you can complete depend on the element's format: numeric, character, or date. You cannot enter monetary values.
Note: The Supporting Element Overrides group box may appear different from the exhibit shown in this documentation. Using the configurable element overrides feature, you can modify the labels, fields, and prompt displays for each element, thereby enhancing the ease and accuracy of data entry for supporting element overrides.
See Understanding Element Override Configurations.
Field or Control |
Description |
|---|---|
Business Unit |
To select a business unit other than the one to which the payee is assigned (through the Job Data component in HR), select from the prompt table. The system loads the prompt tables, so that they are available when completing the Supporting Element Overrides group box. |
Field or Control |
Description |
|---|---|
Element Entry Type |
Select the type of element to override. Values are SystemElem and Variable. |
Element Name |
Enter the name of the element to override, from elements that meet all the following conditions:
|
Character Value |
If the supporting element that you selected uses character values, you can enter up to 25 characters in this field. The field is unavailable when you select the system element of department, job code, or location unless you previously selected a business unit. When you've selected a business unit and department, job code, or location, the system displays a prompt table that lists the values applicable to the business unit that you selected. You can select the override value from the prompt table. For example, if you select 123 as the business unit and Job Code as the element name, the prompt table lists all job codes associated with business unit 123. |
Numeric Value |
Enter the number for system use if the supporting element uses numeric values. |
Date Value |
Enter the date for system use if the supporting element uses date values. |