Setting Up Generic Reports
To set up generic reports, use the Generic Report Break Levels (GP_GENRPT_BRK_LVLS) and Generic Reports (GP_GENRPT) components.
|
Page Name |
Definition Name |
Usage |
|---|---|---|
|
GP_GENRPT_BRK_LVLS |
Define break levels. |
|
|
GP_GENRPT_SETUP |
Define the report ID and parameters. |
|
|
GP_GENRPT_ROW |
Define rows or columns and the elements that are to be reported. |
Use the Generic Report Break Levels page (GP_GENRPT_BRK_LVLS) to define break levels.
Navigation:
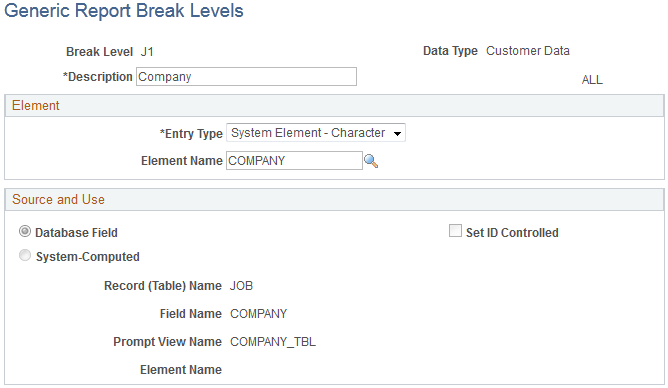
This example illustrates the fields and controls on the Generic Report Break Levels page.
Note: If you sort by Department break level, we recommend that you sort by Business Unit first and then by Department.
Field or Control |
Description |
|---|---|
Break Level |
A number and/or code that identifies the break level. |
Data Type |
Values are: System Data: For a PeopleSoft-delivered break level. Customer Data: For all other break levels. |
Description |
A meaningful description for the break level. This is the heading for the break data that will appear on your report. |
Element
Field or Control |
Description |
|---|---|
Entry Type |
Select the entry type of the element that you're associating with the break level. Values are System Element - Character and Variable - Character. |
Element Name |
Select the system element or variable that you're associating with the break level. For example, if you define pay group as the break level, select the GP PAYGROUP element. Note: Any element selected must be resolved and stored. |
Record (Table) Name |
If you select Variable - Character as the Entry Type, enter the name of the record from which the variable was originally populated. |
Field Name |
If you select Variable - Character as the Entry Type, in addition to entering the name of the record from which the variable was originally populated, you must also specify the field on the record. |
Source and Use
If you select a system element, information contained on the Source and Use page of GP_PIN appears in this group box.
Use the Generic Reports - Definition page (GP_GENRPT_SETUP) to define the report ID and parameters.
Navigation:
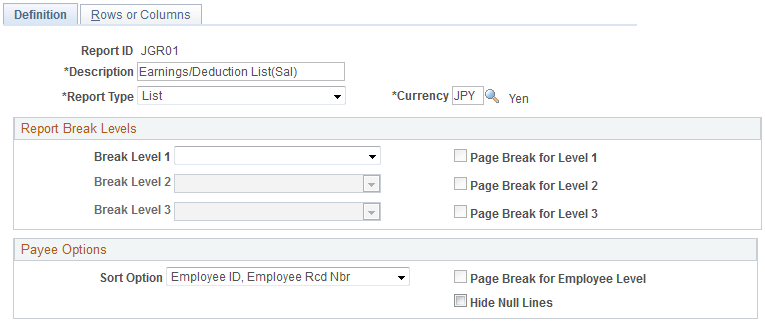
This example illustrates the fields and controls on the Generic Reports - Definition page.
Field or Control |
Description |
|---|---|
Report Type |
Values are Summary, List (element list), and Accumulators. |
Currency |
Define the default currency for the report. Amounts are converted to this currency before processing. You can change the currency on the Create Generic Reports run control page. Generic reports provide a maximum of 14 print positions for currency amounts. The system changes the number of decimal places, depending on the currency code. Amounts are truncated to 1, 2, or 3 decimal places, depending on the currency. If the currency does not use decimal places, all 14 print positions are available to display amounts. |
Report Break Levels
Field or Control |
Description |
|---|---|
Break Level 1, Break Level 2, and Break Level 3 |
You can use up to three break levels. If you use multiple break levels, the system sorts first by break level 1, then by break level 2, and last by break level 3. Select from the break levels that you set up on the Generic Report Break Levels page. |
Page Break for Level 1, Page Break for Level 2, and Page Break for Level 3 |
Select to have a page break at the selected break level on the printed report. |
Payee Options
Field or Control |
Description |
|---|---|
Sort Option |
Select a default method for sorting by employee. You can sort by the employee ID and employee record number or by the name and employee record number. When you run the report, you can change the sort option on the run control page. |
Page Break for Employee Level |
(Summary type only) Select to print a separate page for each employee. |
Hide Null Lines |
(List and Summary type only). Select to prevent the printing of lines that have a value of 0. |
Use the Rows or Columns page (GP_GENRPT_ROW) to define rows or columns and the elements that are to be reported.
Navigation:
This example illustrates the fields and controls on the Rows or Columns page.
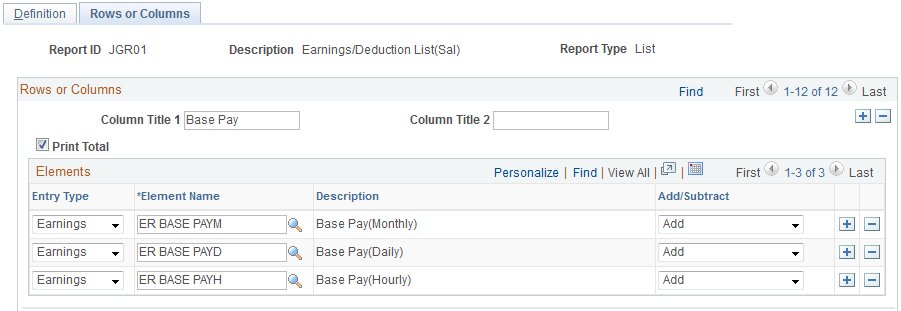
Different fields appear on this page depending on the report type that you selected on the Generic Reports - Definition page. For all report types, the Column Title, Print Total, Element Name, and Description fields appear.
The following additional fields appear for the specified report type:
|
List and Summary |
Accumulators |
|---|---|
|
Entry Type |
User Key |
|
Add/Subtract |
Print Field Label |
|
Do not print row if no results |
|
|
Print Calendar ID |
Rows or Columns
The following table summarizes the type of data in the rows and columns for each report type.
|
Report Type |
Columns |
Rows |
|---|---|---|
|
List |
Element or group of elements |
Payees |
|
Summary |
Date ranges |
Element or elements |
|
Accumulator |
Accumulators |
Payees |
Field or Control |
Description |
|---|---|
Column Title |
Define the title for each column. Each title can be two lines with up to 30 characters in each line. |
User Key |
(Accumulator type only) Select a user key for the accumulator. A column is either a user key or an element. |
Print Total |
Select to print totals before a page break. |
Print Field Label |
This check box appears only for Accumulator report types and only for columns that are not user keys. Select to print a label instead of the values for an element in the column. The system prints the text from the Label field. |
Do not print row if results equal zero |
This check box appears only for Accumulator report types and for columns that are not user keys. Select the check box to suppress rows where an accumulator does not have an end date and therefore forwards zero results into each new calendar. Selecting this check box will prevent unwanted and meaningless rows from displaying on the report. |
Print Calendar ID |
This check box appears only for Accumulator report types and only for columns that are not user keys. Select this check box to print the calendar ID of the result row, thereby increasing the readability of the report for calendar groups in which retroactive processing has occurred. |
Elements
Select the elements that are to be reported in each row or column.
Field or Control |
Description |
|---|---|
Entry Type |
Select the entry type of the element. Values are Auto Assgn (auto assigned), Bracket, Deduction, Earnings, Formula, SystemElem (system element), and Variable. |
Element Name |
Select the element name. |
Label |
Replaces the Description field only for the accumulator report type when you select the Label Column check box for a column that is not a user key or calendar ID. Enter the label that is to be printed in the column when the associated element is other than 0. |
Add/Subtract |
Select whether the element should be added to or subtracted from the total for the column or row. |
Note: For Accumulator report types, some precision may be needed. The system obtains all the user keys from the accumulator result table for all the accumulators that are defined in the setup. It then prints the user keys and selects the accumulator results starting from those keys.
In addition, there are cases where accumulators continue to carry forward after an event has completed (a loan repayment, for example) because the accumulators have not been defined with an end date. In such cases, it may be necessary to identify an accumulator where the results always carry forward as zero (monthly deduction, for example), and use the Do not print row if results equal zero check box. The above also applies in cases where accumulators have been defined with a storage option of "All Calculations" and the calendar run has encountered retroactive processing. If your calendar group has both payroll and absence calendars, the accumulators will appear in all calendars (both payroll and absence) from the retroactive period through to the current period. If you can identify a column in which these additional accumulators will also have a zero result, then use the Do not print row if results equal zero check box to suppress the extra unwanted rows.