Configuring Direct Reports Functionality
To configure direct reports functionality, use the Direct Reports Interface (HR_DR_UI_CFG), Direct Reports Tables Build (RUNCTL_HR_DR), Test Direct Reports Results (HR_DRPT_API), and Invoke Direct Reports UI API (HR_DRPT_API_UITEST) components.
These topics provide an overview of direct reports, direct reports performance tables, and discuss how to configure and view direct reports functionality.
To configure and view searches that extend beyond direct report searches, see the Configuring Person Search documentation.
|
Page Name |
Definition Name |
Usage |
|---|---|---|
|
HR_DR_UI_CFG_1 |
Configure the components and transactions that include the direct reports data functionality. |
|
|
HR_DR_UI_CFG_2 |
Select the actions and fields that appear on the direct reports UI for a transaction. |
|
|
RUNCTL_HR_DR |
Run the Build Direct Reports Tables process to update the direct reports for managers with current information. |
|
|
HR_DRPT_API_EXEC |
Test the direct reports API. |
|
|
HR_DRPT_API_RSLTS |
View the exceptions and data returned by a method. |
|
|
HR_DRPT_API_TRACE |
View the trace log of a method execution. |
|
|
HR_DRPT_API_UITEST |
Test the direct reports user interface using the classic direct reports page. |
|
|
HR_DR_DIRECTREPORT |
View a list of direct reports and select employees to add to the API Results list on the Invoke Direct Reports UI API page. |
|
|
(Classic) <Transaction Name> - Employee Selection Criteria Page |
HR_DR_DIRECTREPORT |
View a list of your direct reports and select from these employees to perform transactions using the classic pages. |
|
HR_PSEL_FLU |
View a list of your direct reports and select from these team members to perform a transaction using the fluid pages. |
Direct reports information is used throughout HCM applications, especially in the manager self-service applications. Typically, direct reports information is used in a way that involves navigating an organizational hierarchy. For example, a manager uses Direct Reports to promote or give a raise to an employee. You may use direct report information in:
Drill-down mode, enabling managers to select workers for processing in a self-service application.
Chain of command mode, which determines workflow for approvals and notifications.
There are two major components for implementing direct reports functionality:
Data service.
The data service navigates an organization structure and returns a list of workers that report to a particular manager or a management hierarchy for a particular worker. The data service is completely unaware of its context, which enables to service both online and batch requests.
User Interface.
This is a common, configurable user interface (UI) that is de-coupled from data service. It receives information from the data service and presents it in a streamlined, consistent, reusable UI that enables users to visually navigate an organizational structure and select one or more workers for processing.
Direct Reports for Self Service Applications
There are two methods of setting up direct reports functionality. If you are setting up direct reports for the following applications or functionality, use the Direct Reports Setup (SS_LINK_TBL) component:
PeopleSoft eDevelopment – Administer Training-related components
HCM Portal Pack
Manager Dashboard
PeopleSoft ePay
Note: Otherwise, use the Direct Reports Interface component described in this topic.
The direct reports tables are designed to improve the performance of all direct reports processes. Although loading the direct reports tables is not required to use most manager self service pages, running this process to build the table improves the performance of the pages. However, you must run this process in order to use the Organizational Chart Viewer and Profile Management Search.
The direct reports tables store the current reporting structure for those access types that are resolved with complex processing of job data. Access types (also known as the access or navigation methods) are:
2 - Supervisor Id
3 - Department Manager ID
4 - Full Position Management
5 - Partial Position Management with Supervisor ID
6 - Partial Position Management with Department Manager ID
Note: When you run the process for partial position methods (Partial Position Management with Supervisor ID or Partial Position Management with Department Manager ID), the process will build the subordinate method’s tables as the same time. That is, the process for Partial Position Management with Supervisor ID will build the Full Position Management table and the Supervisor ID table before building the Position/Supervisor ID table.
There is a separate reporting structure table for each of the access methods. The tables contain a row for each supervisor and his or her direct and indirect reports. You must build the tables for each access method you use. You can run the build process for one access method at a time or for all of them at once.
For example, the following hierarchical list represents a reporting structure with Betty Locherty (KU0007) at the top of the reporting structure. This reflects how the process displays the hierarchy in a table or list form for easy query. The list indents each different level of the reporting structure. The collapse (-) and expand (+) icons appear next to other workers that are managers.
This example illustrates a hierarchical list for the manager Betty Locherty and her direct reports.
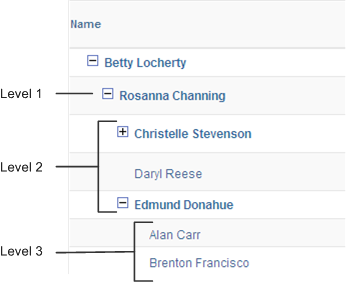
The resulting direct reports table entries would reflect a row for Betty Locherty and each worker that reports up to her: The level from Betty is defined as well as whether this person is a manager or supervisor. Then, additional rows are added for all the other managers that report to Betty and their reports. This table illustrates this scenario:
Note: This example is simplified with no employee record number or job information. It is used only to illustrate the concept of how the hierarchy is transformed to a table.
|
SUPERVISOR_ID |
EMPLID |
HR_DR_LEVEL |
SUPERVISOR_FLAG |
|---|---|---|---|
|
KU0007 (Betty Locherty) |
KU0046 (Rosanna Channing) |
1 |
Yes |
|
KU0007 |
KU0020 (Christelle Stevenson) |
2 |
Yes |
|
KU0007 |
KU0044 (Daryl Reese) |
2 |
No |
|
KU0007 |
KU0102 (Edmund Donahue) |
2 |
Yes |
|
KU0007 |
KU0150 (Alan Carr) |
3 |
No |
|
KU0007 |
KU0048 (Brenton Francisco) |
3 |
No |
|
KU0046 (Rosanna Channing) |
KU0020 (Christelle Stevenson) |
1 |
Yes |
|
KU0046 |
KU0044 (Daryl Reese) |
1 |
No |
|
KU0046 |
KU0102 (Edmund Donahue) |
1 |
Yes |
|
KU0046 |
KU0150 (Alan Carr) |
2 |
No |
|
KU0046 |
KU0048 (Brenton Francisco) |
2 |
No |
|
KU0102 (Edmund Donahue) |
KU0150 (Alan Carr) |
1 |
No |
|
KU0102 |
KU0048 (Brenton Francisco) |
1 |
No |
Note: You must schedule a nightly job to update the tables with any future dated information that becomes current. You can also capture Event Manager events as information is changed in the transactional pages that impact the reporting structure. Scheduling the processes will pick up these changes and apply them to the tables.
Use the Direct Reports Configuration page (HR_DR_UI_CFG_1) to configure the components and transactions that include the direct reports data functionality.
Navigation:
This example illustrates the fields and controls on the Direct Reports Configuration page. You can find definitions for the fields and controls later on this page.
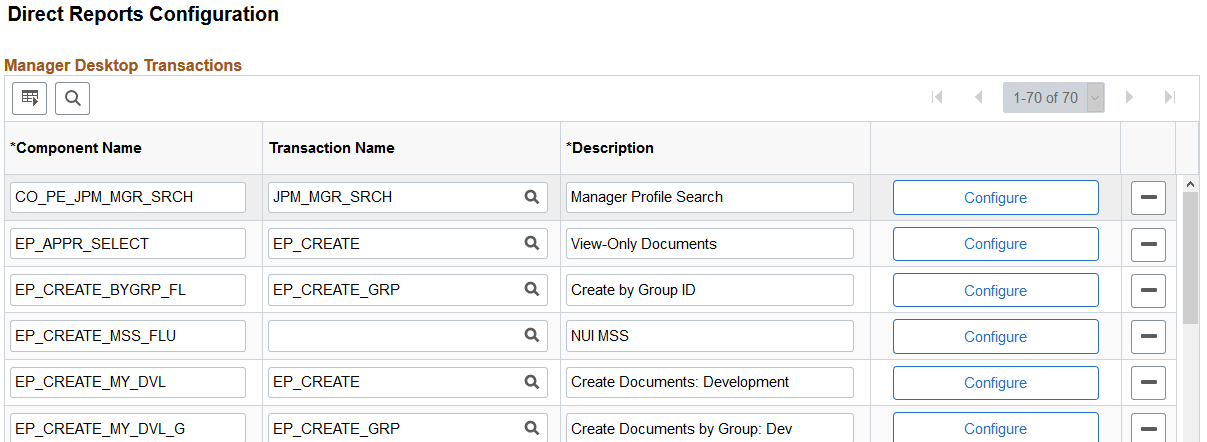
Displays a list of components and transactions for which direct reports functionality is enabled. You can add a new component and transaction or click the Configure button to specify how the direct reports API and UI function within the context of the component and transaction.
Use the Direct Reports Transaction Configuration page (HR_DR_UI_CFG_2) to select the actions and fields that appear on the direct reports UI for a transaction.
Navigation:
Click the Configure button for an application on the Direct Reports Configuration page.
This example illustrates the fields and controls on the Direct Reports Transaction Configuration page. You can find definitions for the fields and controls later on this page.
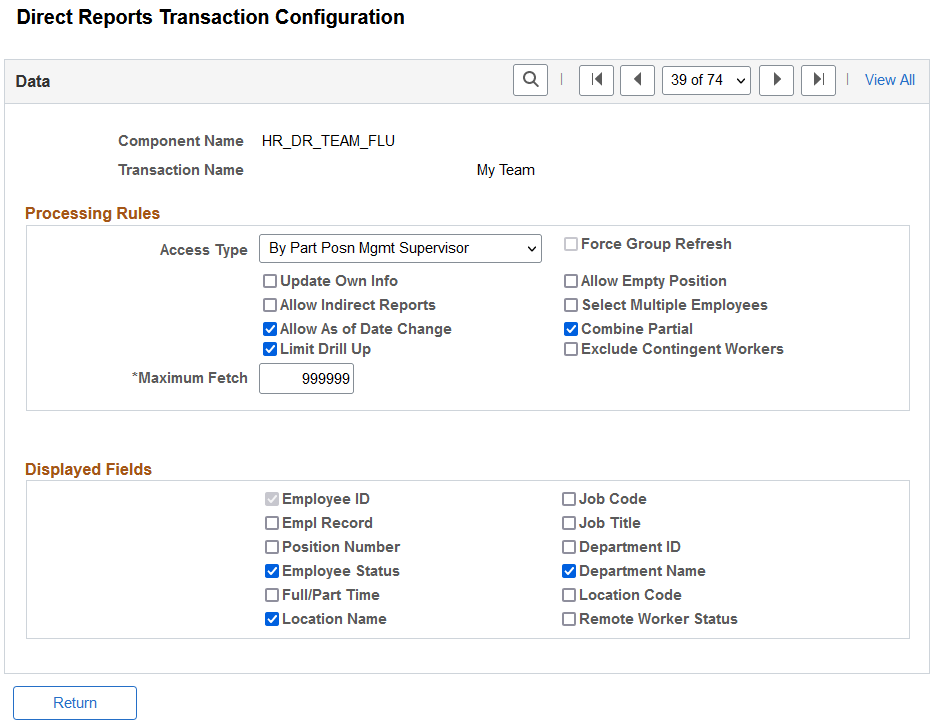
Processing Rules
Field or Control |
Description |
|---|---|
Access Type |
Select the reporting relationship to use for determining who reports to whom. This field defines the reporting relationship used by the Select Employee page for this transaction component and determines which method is used to identify who approves the transaction. Available options are:
|
Update Own Info |
Select to indicate that the user can update their own records. When you select this check box, the manager's information is returned in the direct reports results list along with their direct reports or management hierarchy. |
Allow Indirect Reports |
Select to return indirect reports of the user. This navigates down the organizational hierarchy and returns direct reports of direct reports and so forth until the lowest reporting level is reached. |
Allow As of Date Change |
Select to enable the ability to change the as of date. |
Limit Drill Up |
Select to limit the drill up. |
Maximum Fetch |
Enter the maximum amount of rows the system should retrieve. |
Force Group Refresh |
Select to run the Group Build process (GBP002) to refresh the group membership prior to displaying direct reports. If you do not select this check box, the group members as of the last scheduled run of the process appear on the page. The system only makes this check box available if you select the access type By Group ID. |
Allow Empty Position |
Select to return unfilled position reports. This check box is available when you select one of the position-related options as an access type. |
Select Multiple Employees |
Select to enable the user to select more than one worker from the search results. If this field is selected, a check box appears next to the names in the results list, otherwise a Select button appears. Note: You should not modify this value on delivered transactions, as they are built for selection of single or multiple values and if you change the setting, the transaction as delivered might not work. |
Combine Partial |
Select to indicate, when using one of the partial position management navigation methods, that the secondary method be applied even if the primary method returns valid data. |
Exclude Contingent Workers |
Select to not include contingent workers in the direct line reporting hierarchy. |
Displayed Fields
Select one or more fields to appear within the direct reports list when rendered by the application.
Note: Options may vary based on the component.
Use the Direct Reports Tables Build page (RUNCTL_HR_DR) to run the Build Direct Reports Tables process to update the direct reports for managers with current information.
This process also supports pivot grids throughout the system by populating direct report flat tables corresponding to each access type. The pivot chart selects data from flat tables through PSQuery.
Navigation:
This example illustrates the fields and controls on the Direct Reports Tables Build page. You can find definitions for the fields and controls later on this page.
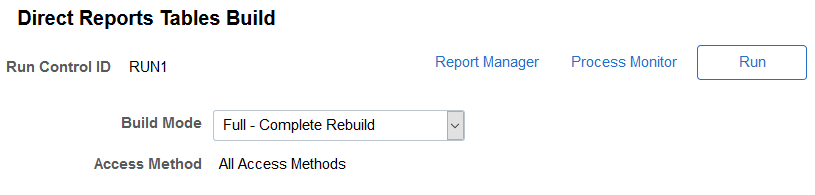
This process maintains the direct reports tables. When run in Full-Complete Rebuild mode, it truncates the tables and builds them based on the current structure defined in the JOB, POSITION_DATA, and DEPT_TBL tables. When run in Incremental-Current Date Upd mode, it detects changes made to the three tables since the last run date and updates the tables accordingly.
Note: Set up this process to run in Incremental-Current Date Upd mode every night shortly after midnight using a recurring schedule to capture the formerly future-dated rows that are now current and effective.
Field or Control |
Description |
|---|---|
Build Mode |
Identify the mode in which to build the tables.
|
Access Method |
Select which direct access method tables to process. If you use more than one access method but not all of the access methods, you should build the tables for those you use. You can run the process for one access method at a time or for all at once. Method options are:
|
Note: If you run the process for the partial position methods (5 - Position / Supervisor ID or 6 - Position / Dept Manager), the process will build the subordinate method’s tables at the same time. That is, the process for 5 - Position / Supervisor ID will build the 4 - Reports To Position table and the 2 - Supervisor Id tables before building 5 - Position / Supervisor ID.
Updating Direct Reports Tables
You can update the direct reports tables two ways:
The Direct Reports Table Build process
Schedule to run this process nightly (after midnight) using a recurring schedule for each access method for which you have run for the initial build. This job should run using the build method Incremental-Current Date Upd. This process will update the tables with information that has become current since the process was last run and any changes made since the last process run. This is required to keep the table up to date with any changes to reporting data.
The Event Manager direct reports events
This process will maintain the current data as the data is updated online.
These events are not required, as the nightly process will pick up any changes made during the day. They are provided to get real time updates to current data. They do not detect future dated rows that have become current so they do not replace the nightly process. The events provided are:
AssignmentAdded – New Empl Rcd created
AssignmentTerminated – Assignment (Job) terminated
DRDepartmentManagerUpdated – Department manager changed
DRDepartmentUpdated – Department ID changed
DRPositionDataUpdated – Position data reporting changed
DRPositionReportingUpdated – Position or Reports To updated
DRSupervisorUpdated – Supervisor changed
DRStatusUpdated – Effdt and Status updated
Note: The Direct Reports events use the EOEN_MSG_CHNL queue and the EOEN_MSG service operation. If these are not configured, the Direct Reports table will not be updated.
For information on Event Manager set up and activation, see Events and Notifications Framework.
Use the Test Direct Reports Results - Set / Execute page (HR_DRPT_API_EXEC) to test the direct reports API.
Navigation:
This example illustrates the fields and controls on the Test Direct Reports Results - Set / Execute page. You can find definitions for the fields and controls later on this page.

Field or Control |
Description |
|---|---|
Class Method |
Select a method from the available options:
|
Execute Method |
Click to execute the method using the class properties you set. |
Class Properties
The properties and their default values, if any, of the selected class appear in this page region. You can change any of these before executing the method.
Field or Control |
Description |
|---|---|
Navigation Method |
Select the method to use when determining reporting relationships. The options are: 1 - Department Security Tree, 2 - Supervisor ID, 3 - Department Manager ID, 4 - Reports To Position, 5 - Position / Supervisor ID, 6 - Position / Dept Manager, and 7 - Group ID. |
Target Employee ID |
Enter the employee ID of the target employee. |
Target Empl Record |
Enter the employee record number of the target employee. |
Position |
Enter the position of the target employee. |
As Of |
Enter the as of date to use when determining reporting relationships. |
Group ID |
Enter a group ID when Navigation Method is Group ID. |
Show Name |
Indicate if the system should include employee names in the Direct Reports Rowset grid. The default value is True. |
Show Empty Positions |
Identify whether unfilled positions should be returned in the Direct Reports Rowset grid when the navigation method is position-based. The default value is False. |
Show Indirect Indicator |
Identify whether the Direct Reports Rowset grid should indicate whether an employee has direct reports. The default value is False. Note: Not applicable when Navigation Method = Department Security or Group ID. |
Include Target Employee |
Should the target employee be filtered out of the returned Direct Reports Rowset and Supervisor Rowsets grids. When True, the target employee is not filtered out. When False (which is the default), circular reporting relationships are not shown. |
Maximum Fetch |
Enter the maximum number of rows to return. |
Use Flattened Tables |
Select True or False. For better performance, the PeopleSoft application provides the framework for creating flattened views of reporting structures so that they can be accessed easily. |
LimitDrillUp |
Indicate if the user be allowed to DrillUp to a level higher than the target employee/job that was first specified. For example, when used in a manager self-service transaction, should I be able to drill down 2 levels, and then up 3 levels to expose and select my peers? On the other hand, when used in a notification process, drilling up beyond the initial target employee/job is essential. When True (which is the default), DrillUp is limited. |
Combine Partials |
Indicate, when using one of the partial position management navigation methods, whether the secondary method be applied even if the primary method returns valid data. The default value is True. |
Rebuild Group |
Specify, when the Navigation Method is Group ID, if the system should force the group to be rebuilt, even if group results for this effective date already exist. |
Buffer |
Indicate if the service should buffer the next level up and down to increase performance. The default value is False. |
Trace |
Indicate if the service should generate a trace of processing when executing class method. The default value is False. |
Debug Mode |
Specify, when Debug Mode = True, if any exceptions encountered during execution should be displayed prior to the results set being displayed. |
Use the Test Direct Reports Results - Execution Results page (HR_DRPT_API_RSLTS) to view the exceptions and data returned by a method.
Navigation:
This example illustrates the fields and controls on the Test Direct Reports Results - Execution Results page. You can find definitions for the fields and controls later on this page.
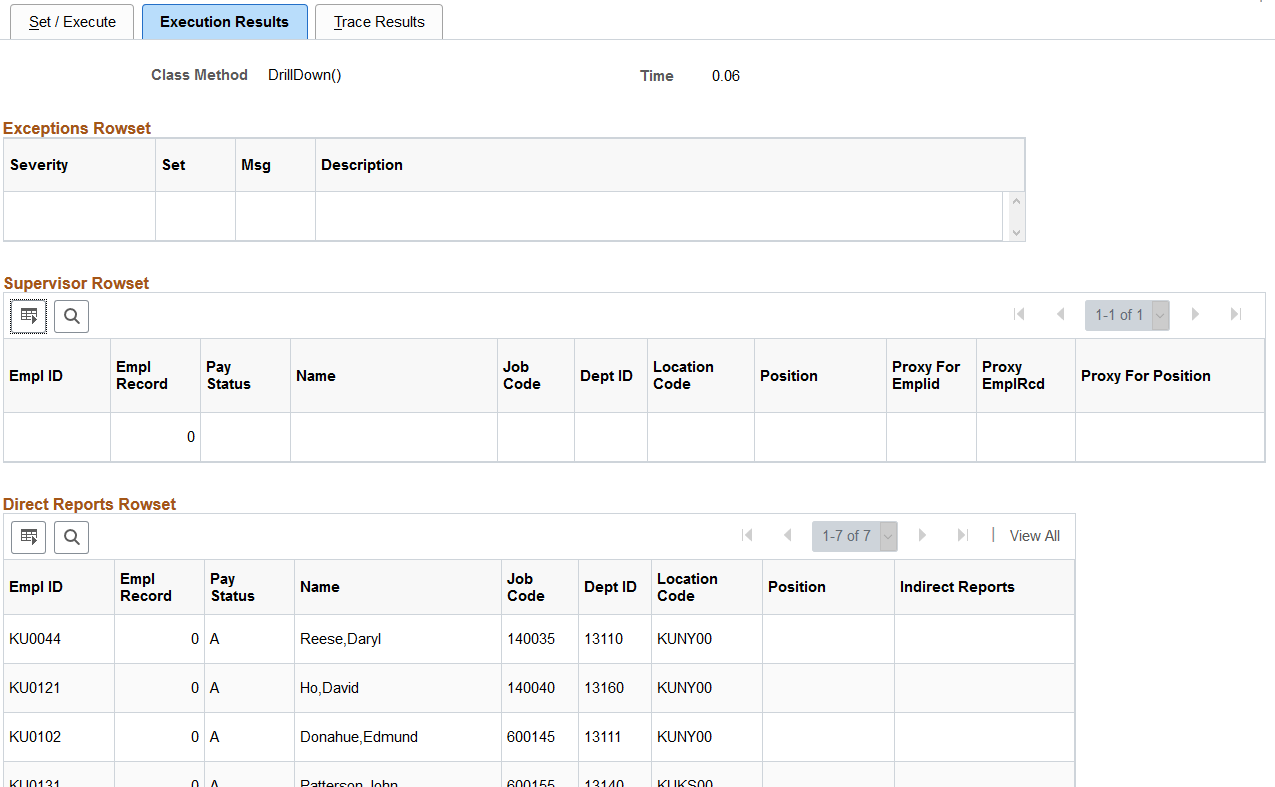
This page enables you to view results of the method execution.
Use the Test Direct Reports Results - Trace Results page (HR_DRPT_API_TRACE) to view the trace log of a method execution.
Navigation:
This example illustrates the fields and controls on the Test Direct Reports Results - Trace Results page. You can find definitions for the fields and controls later on this page.
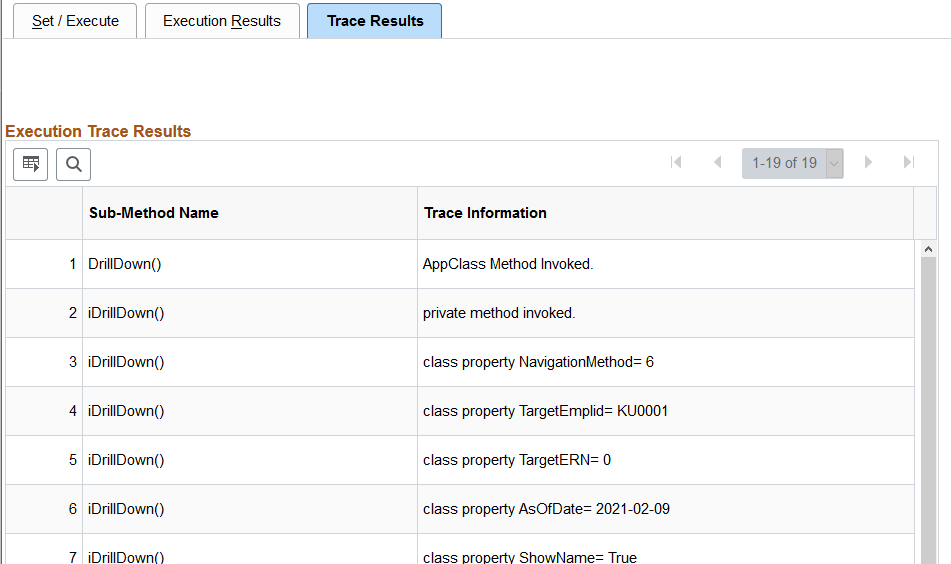
Data appears on this page only if you select True for the Trace class property.
Use the Invoke Direct Reports UI API page (HR_DRPT_API_UITEST) to test the direct reports user interface using the classic direct reports page.
Navigation:
This example illustrates the fields and controls on the Invoke Direct Reports UI API page. You can find definitions for the fields and controls later on this page.
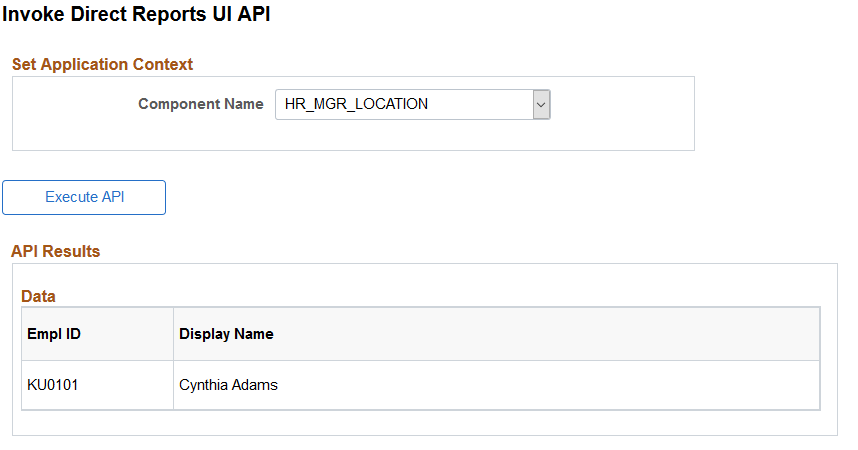
The testing of this API shows the results set that the you will see based on the current configuration. To populate the API Results grid, select a component name and click Execute API. The system will present the <Transaction Name> - Employee Selection Criteria page where you will enter an as of date and select employees as of that date.
The example here shows the API Results values that were made by selecting Cynthia Adams from within the application context Location Change component pages.
Use the DirectReports User Interface page (HR_DR_DIRECTREPORT) to view a list of direct reports and select employees to add to the API Results list on the Invoke Direct Reports UI API page.
Navigation:
Select a value from the Component Name field and click Execute API button on the Invoke Direct Reports UI API page.
This example illustrates the fields and controls on the DirectReports User Interface: <Transaction Name> - Employee Selection Criteria page via the DirectReports User Interface page access.
Note: Where <Transaction Name> represents the name of the application page and transaction you are accessing.
This example also displays Select as a check box option, where you can select multiple team members for this transaction.

Note: This page displays the classic interface for any component defined with a Direct Reports Configuration. Although you can select fluid components from the Invoke Direct Reports UI API Page, you can only view it using the classic user interface from this page.
When you select the direct reports, the direct reports plug-in executes within the context of the component and returns the results to the API Results grid on the Invoke Direct Reports UI API page.
Note: Managers will access the (Classic) <Transaction Name> - Employee Selection Criteria Page to select direct reports when using the classic pages. See this page for field definitions.
Use the <Transaction Name> - Employee Selection Criteria page (HR_DR_DIRECTREPORT) as a manager to view a list of your direct reports and select from these employees to perform transactions using the classic pages.
The page displays team members based on the direct reports configuration for the classic Transaction Name.
Note: Where <Transaction Name> represents the name of the application page and transaction the manager is accessing.
Navigation:
As a manager, access an application transaction component where you need to select one of your employees.
This example illustrates the <Transaction Name> - Employee Selection Criteria page when a manager accesses a system transactional page that requires him or her to select one of their team members using the classic pages.
This example also displays Select as a button, where you can only select one employee for this transaction.
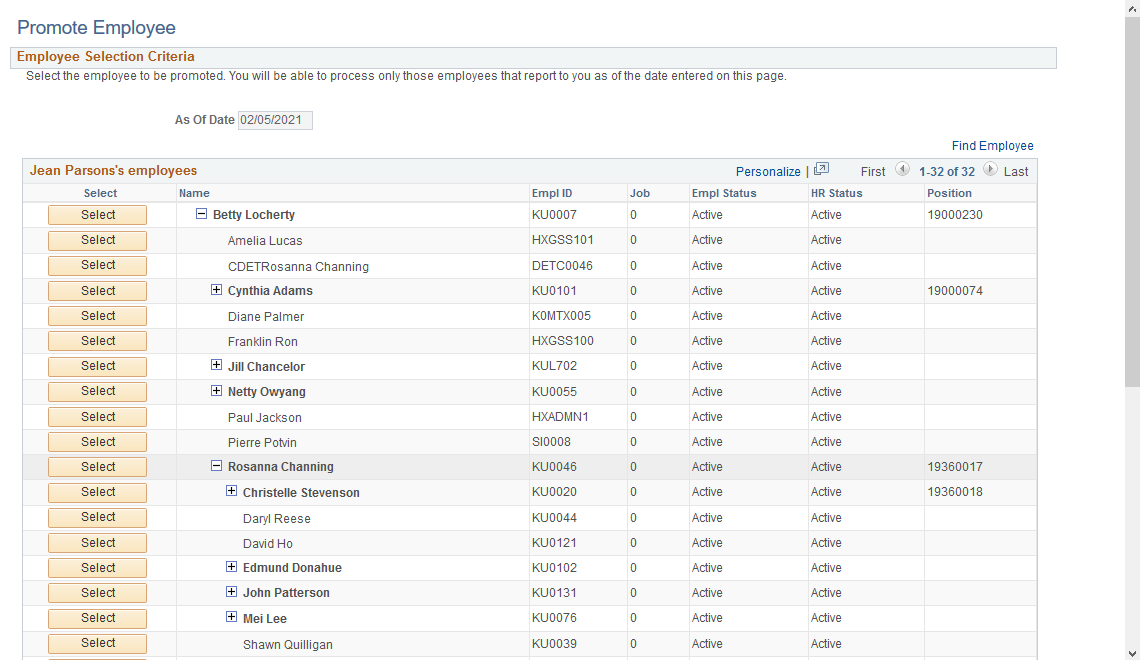
Use this page to select the direct reports. Click the + (expand) button next to an employee’s name to drill down and view their reports. Click the - (collapse) to hide the direct reports of a person.
Employee Selection Criteria
Field descriptions for the example, and for any <Transaction Name> – Employee Selection Criteria page (HR_DR_DIRECTREPORT), are as follows.
Field or Control |
Description |
|---|---|
Find Employee link |
This link appears on the right, above the grid header. To search within your direct reports organization, click the Find Employee link, which enables you to select from the same list of direct and indirect reports as if you expanded all nodes. Note: The Direct Reports UI setup determines which employees are available for selection and which fields appear on the <Transaction Name> - Employee Selection Criteria page. When you select this link, the system displays the Find Employee page (HRDR_SRCH_EMPS_SEC), where you can enter search criteria. You can select an employee from this page to open in the transaction. Note: The Find Employee page allows you to select only one employee from the search results. It does not allow you to select groups of individuals. |
Select button |
The Select button appears when the transaction applies to one individual. Managers click this button to be taken to the transaction page for this person. |
Select check box, and Continue button |
The Select check box appears for transactions where you can select groups of individuals for whom you will perform the transaction. After selecting employees, the manager clicks the Continue button to perform the transaction for all the selected employees. For example, a manager can transfer multiple employees to a new location at the same time. |
HR Status |
The HR Status field appears on the Employee Selection Criteria page only if the Allow Indirect Reports check box is selected on the Direct Report Transaction Configuration page Inactive employees can have active employees reporting to them directly or indirectly. |
Use the <Transaction Name> - Find Team Member page (HR_PSEL_FLU) as a manager to view a list of your direct reports and select from these team members to perform a transaction using the fluid pages.
The page displays team members based on the direct reports configuration for the fluid Transaction Name.
Note: Where <Transaction Name> represents the name of the application page and transaction the manager is accessing.
Navigation:
As a manager, select a transaction component that requires you to select from a list of your team members.
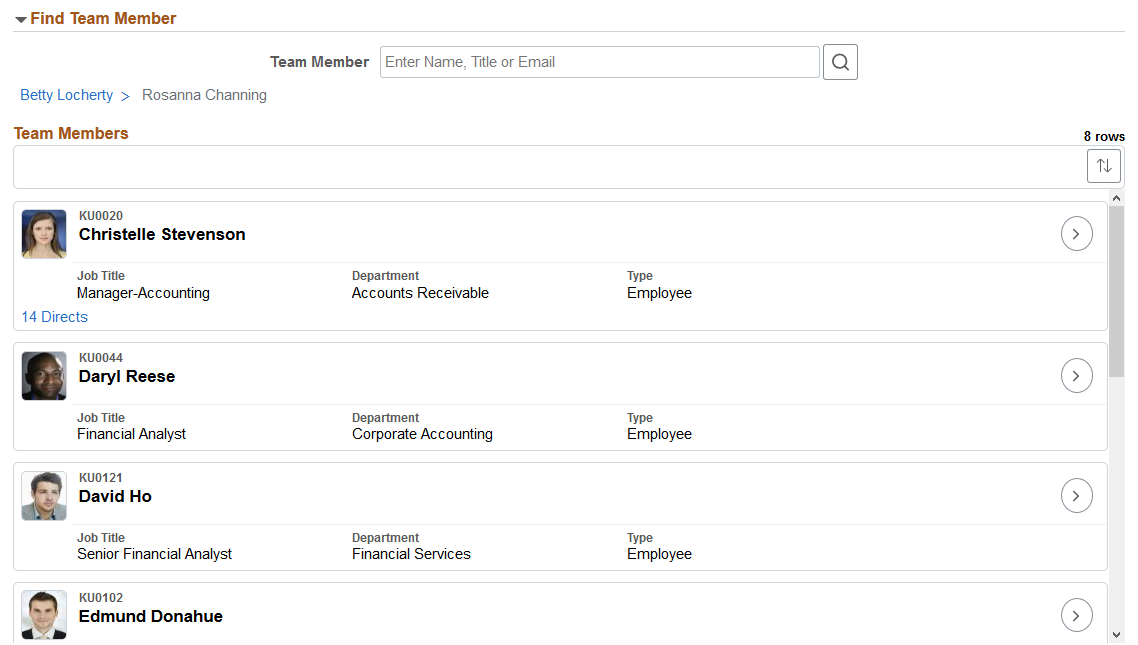
This example illustrates the <Transaction Name> - Find Team Member page when using fluid.
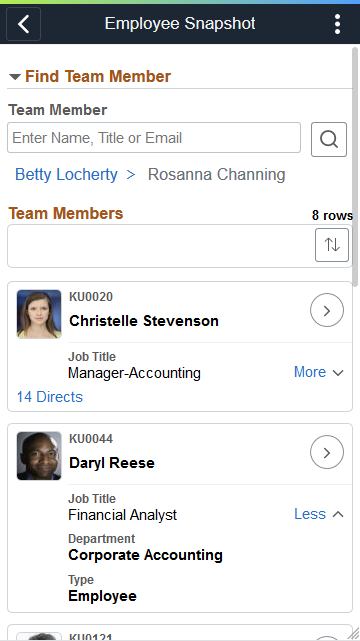
This example illustrates the <Transaction Name> - Find Team Member page using a small form factor device like a smartphone.
In some transaction components, the Find Team Member page is displayed as a secondary modal. The name in the banner may vary and is based on the configuration.
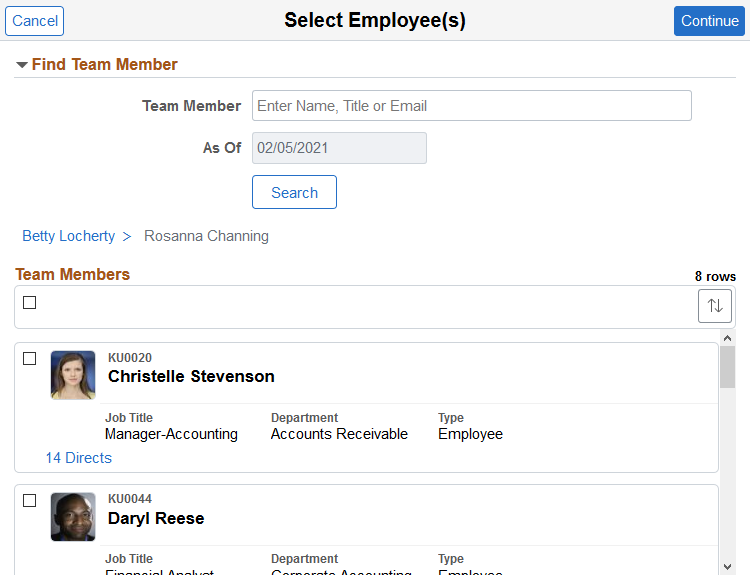
This example illustrates the Select Employee(s) – Find Team Member secondary modal page of a transaction when using fluid.
This example also displays Select as a check box option, where you can select multiple team members for this transaction.
This page displays all direct, and indirect reports in some cases, of the logged-in manager based on the manager’s job. Depending on the transaction page, managers can either select one or multiple employees to view or perform a transaction.
Use this page to search for and select an employee for whom you want to manage a transaction.
Find Team Member
Expand this section to use search criteria to narrow your search for team members.
Field or Control |
Description |
|---|---|
Team Member |
Enter a partial or full name, title, or email description to filter and narrow your search on team members. To search within your direct reports organization, click the Find Employee link. Enter criteria on the Find Employee page (HRDR_SRCH_EMPS_SEC), and then click Search. Select an employee to open in the transaction. |
As Of |
This field is not available for all transactions and is based on the configuration of the transaction. Note: When configuring the As Of field, the transaction that is using direct reports should also be designed to change the date. Enter a date to specify the period in time you want to view your direct reports’ information. |
Search button |
Click this button to have the system display a list of direct (and indirect reports, if applicable) that meet the search criteria you entered in the Team Member field. |
Team Members
Use this grid to view and select persons from a list of team members.
Field or Control |
Description |
|---|---|
|
Click to sort the employees by column headings. A colored sort icon button indicates that you have specified one of these grid sorts. |
|
(For selecting multiple employees) The Select check box appears for transactions where you can select groups of individuals for whom you will perform the transaction. Select the check box in the header to select all team member rows. To select a specific set of team members, select the check box for each team member row to include the employee in the transaction. Selecting an employee does not select that employee’s direct reports. Important! If you change the team member list, either by navigating to a different level of the reporting hierarchy or by performing a search, any previous selection is cleared. This behavior keeps you from losing track of who has been selected—the only selected employees are those who are selected in the currently shown list. After selecting employees, the manager clicks the Continue button to access the transaction for all the selected employees. For example, a manager can transfer multiple employees to a new location at the same time. |
Employee Photo |
Displays the photo for the employee when the Display on Self Service option is enabled on the Installation Table – HCM Options Page. |
<Number> Directs link |
When a person has direct reports, the number of this person’s direct reports appear as a link at the bottom left of the person’s row. Click the link to drill down and have the page display a list of this person’s direct reports. When managers drill down into the reporting hierarchy, breadcrumbs appear above the Team Members grid to show the management hierarchy from the user to the currently displayed group of employees. Select a person’s name in the breadcrumbs to navigate back to that person’s list of direct reports. When managers view their own direct reports, no breadcrumbs appear. Note: Indirect report information appears if the Allow Indirect Reports option is enabled on the Direct Reports Transaction Configuration Page for the PeopleSoft Fluid User Interface - Manager Self-Service transaction. |
More and Less link |
(Smartphone) Click the More link to view additional job information about the employee. Click the Less link to hide the additional job information about the person. |
HR Status |
The HR Status field appears on the Employee Selection Criteria page only if the Allow Indirect Reports check box is selected on the Direct Report Transaction Configuration page Inactive employees can have active employees reporting to them directly or indirectly. |
|
(For selecting an individual employee) Click this button to access the transaction page for this person. |
 (Sort or Sort Team Members) button
 (Select All) or (Select this row) check box, and
  (Select) button