Updating Personal Data
Use the Modify a Person component in classic and Modify Person tile in fluid to update a person's name, address, phone numbers, marital status, education, and other personal information.
These topics provide an overview of types of personal data, using workflow to update person addresses, and discuss how to update personal data.
These contain the same pages that you use to add personal data records with the exception of the Organizational Relationship page in classic.
Note: The Classic Person Data and Job Data components have been replaced by functionality in Fluid. For more information, see (Fluid) Updating Job Data and (Fluid) Pages Used to Update Personal Data.
|
Page Name |
Definition Name |
Usage |
|---|---|---|
|
PERSONAL_DATA1 |
Update a person's personal information. |
|
|
PERSONAL_DATA2 |
Update a person's name, address, phone, and email information. |
|
|
PERSONAL_DATA3 |
Maintain regionally-required information about a person. |
|
|
HR_VETERAN_STATUS |
Employees use this self-service page to enter and update self-identification veteran information. When the employee submits the Veteran Status page, the system displays the veteran self-identify data in the Veteran group box on the Regional page in the Personal Information – Add a Person or Modify a Person component. Administrators can update the selection on the Regional page. |
|
|
EMERGENCY_CONTACT |
Enter names, addresses, and primary phone information for people to contact in the event of a worker emergency. |
Use the Modify Person Tile in fluid to make updates to personal data for a person in the system. The Person Data page appears within the context of an Activity Guide Composer process and uses sections to manage certain types of information.
These contain the same pages that you use to add personal data records.
The following videos provide an overview and demonstration of how to use the fluid Person Data modification feature:
Video: Image Highlights, PeopleSoft HCM Update Image 47: Person Data Modernization
Video: Person Data Modernization
|
Page and Section Name |
Definition Name |
Usage |
|---|---|---|
|
HC_HR_PERS_MODIFY_FL_GBL (this is the cref for the tile) |
Update an existing Person Data record in fluid. |
|
|
PERSONAL_DATA_FL |
Update personal details, contact information, and regional information about a person in fluid. |
|
|
N/A (See the Person Data page) |
Update a person's personal information. |
|
|
N/A (See the Person Data page) |
Update a person's name, address, phone, and email information. |
|
|
N/A (See the Person Data page) |
Maintain regionally-required information about a person. |
|
|
N/A (See the Person Data page) |
Update information for custom steps that use drop zones embedded in your activity guide process. |
|
|
N/A (See the Person Data page) |
View error and warning messages related to the Person Data validation process, if any. |
|
|
Modify Person - Summary Page |
PERSONAL_DATA4_FL |
View the proposed information you are updating for a person record. |
|
PERSON_DATA_SUB_FL |
Confirm that a person record was successfully updated. You can also initiate the process to add or modify person data, creating or view organizational relationships, or view or modify job data for an existing person. |
Administrators use the Modify Person tile to update a Person Data record.
Note: The following must be in place to see and access this tile and pages:
--The Fluid Person and Manage Relationship check box must be enabled on the Person and Job Installation - Person and Organization Page.
--You must be assigned the HR Admin Modify Person role.
Navigation:
The Modify Person tile is delivered as part of the fluid Manage Human Resources Dashboard.
This example illustrates the Add Person tile
Select this tile to begin the process to modify an existing Person record only using fluid.
Modify Person Flow in Fluid
Use the following steps to perform the fluid-based approach to quickly update a Person record:
This diagram shows the high-level functional pages and steps to modify a person using the fluid pages.
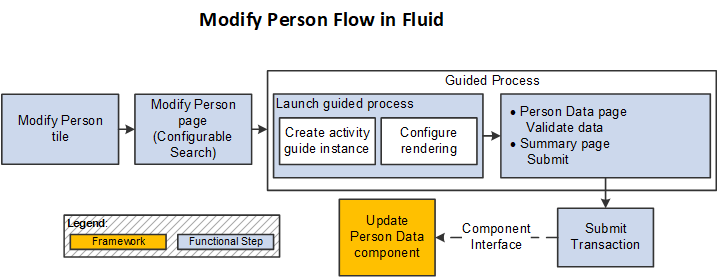
Select the Modify Person Tile to begin the process ().
Note: Users can also access the Add Person and Create <Organizational Relationship> search/match pages and select the Edit button for an existing person in the Potential duplicates grid to directly access the Modify Person pages.
Use the configurable search page to find a person record (see Setting Up Search Configuration).
Select a person to continue to the Modify Person activity guide process.
There are two steps in this activity guide:
The Person Data Page to update person details.
The Modify Person - Summary page (see Add Person - Summary Page) to review the data.
Note: The Modify Person activity guide uses the same pages as the ones for the Add Person activity guide, with the exception of the CheckList section. For page and field definitions, see the (Fluid) Adding a Person documentation.
Submit the information to update the Person Data record.
Note: The Modify Person process does not use Approvals.
See also Fluid Add or Modify Persons, Create Organizational Relationships, and Manage Job Data Architectures.
The Personal Data pages include two different types of personal data:
Effective-dated data.
Name, address, biographical (such as education, marital status, and language), checklist, and some regional fields are effective-dated. Enter current, historical, or future information in these fields. When new information takes effect, the system stores the old data so that you can track the changes that occur over time.
Effective-dated biographical data is stored in the Personal Data History record (PERS_DATA_EFFDT). Name information is stored in the NAMES record with its own effective date. Address information is stored in the ADDRESSES record with its own effective date.
Noneffective-dated data.
Some personal data fields aren't linked to an effective date. In these fields, new entries overwrite and delete the previous entries. This situation means that you can store only current information. The system stores noneffective-dated data in the Personal Data record (PERSON).
Note: PeopleSoft Human Resources also includes a workflow process for updating employee addresses.
Keeping a person's personal information current can be time-consuming. With workflow, users who do not ordinarily have access to the PeopleSoft Human Resources system can update their address data by using an email program to send the information to your PeopleSoft Human Resources system.
To update effective-dated information on the Personal Data pages:
Insert a new data row in the effective-dated locations (for example, for name, biographical information, or addresses).
Each of these group boxes or sections can use different effective dates. They are not related.
Enter the date when the new personal data that you're entering will take effect.
This date can be current or in the future.
Enter the new information.
Save the pages.
The system updates a worker's emergency contact information automatically if you specify that the contact information is the same as the worker's contact information. When the emergency contact information is different from the worker's contact information, you must maintain the emergency contact information manually.
To activate the automatic emergency contact address update:
Access the address and phone pages:
(Classic) Administrators use the Contact Address/Phone page to update emergency contact information.
(Fluid) Employees use the Emergency Contact (Detail) Page to update emergency contact information.
Select the following options before you update the worker's address:
(Classic) The administrator selects the Same Address as Employee and Same Phone as Employee check boxes on the Contact Address/Phone page.
(Fluid) The employee selects the Same as Mine and Same Phone as Mine check boxes on the Emergency Contact - Address Pageand Emergency Contact - Phone Page respectively.
Select the type of address and type of phone number that is the same as the emergency contact.
When you update the address, the system automatically updates the emergency contact address. It also updates the Update Dependent/Beneficiary pages in the Benefits menu and the Payroll Options pages in the Payroll menus.
If the emergency contact address changes and is no longer the same as the worker's, deselect the check boxes mentioned in the previous step. The system makes the address fields on the address and phone pages available, and you can enter a different address. After you deselect the check box, the system no longer updates the emergency contact address automatically.
Even if the emergency contact address is the same as the worker's, you can enter a different phone number.
Record additional emergency contact phone numbers for the emergency contact.
(Classic) Use the Other Phone Numbers page.
(Fluid) Use the Emergency Contact - Phone Page and insert additional rows.
To enter a new address for a worker:
Access the Contact Information page of section:
(Classic)
(Fluid) and access the Person Data Page - Contact Information Section.
Add a new address row.
(Classic) Enter an address type, select the Add Address Details link, enter a new effective date for the address, select the Add Address link, and enter the worker's new address information.
(Fluid) Enter the address type, new effective date, and details on the Add Another Address page.
Updating Emergency Contact Address Information
The system also updates the Dependent/Beneficiary pages in the Benefits menu and the Payroll Data pages in the Maintain Payroll Data (USF) menu when the (Classic) Same Address as Employee and Same Phone as Employee check boxes or (Fluid) Same as Mine and Same Phone as Mine check boxes are selected.