Building and Viewing Time Period Calendars
To set up time and view period calendars, use the Build Time Period Calendar (TL_RCTRL_CAL_PG) and the View Time Period Calendar (TL_CALND_VW_PNLGRP) components.
This section discusses how to build and view time period calendars.
|
Page Name |
Definition Name |
Usage |
|---|---|---|
|
TL_RCTRL_CAL_PNL |
Create instances of a time and labor calendar that will include each of your period start and end dates. |
|
|
TL_CALENDAR_VW_PNL |
View the time period instances for each calendar. |
This section contains important information on how to build calendars to insure that:
The system defines the correct period of interest for rules processing.
The data in Payable Time is what you expect it to be.
Important! To understand the information in this section, you must be familiar with the material in Understanding Batch Processing in Time Administration and Creating Rules in Time Administration.
Building Calendars
Build calendars for the following time periods:
The entire period for which you intend to report time.
The entire span of time on which rules may be run.
In the Time Administration process, if gaps exist in time reporting periods or the calendar connected with a rule, the system may select a much greater period of interest than necessary, and the schedule resolve process may end up resolving a larger range of dates than necessary. This can significantly reduce performance time.
The Time Administration process determines the period of interest by looking at both the time reporting period—identified by the time period ID for the workgroup−and the time period ID associated with each rule. The time reporting period establishes the initial period of interest, while the rule period helps to determine how far into the past (or into the future) the Time Administration process may need to go to capture the data needed for rules processing.
Example: Building Calendars
Assume that there is a rule program containing a weekly rule and a biweekly rule with the following priority ranking:
|
Rules |
Rule Priority |
Periods |
|---|---|---|
|
Rule 1 |
Priority 1 |
Weekly |
|
Rule 2 |
Priority 2 |
Biweekly |
Assume that you have calendars for the following periods:
|
Calendar Builds for the Weekly Period |
Calendar Builds for the Biweekly Period |
|---|---|
|
2000 |
2000 |
|
2005 |
No Calendar Build for 2005 |
|
2006 |
2006 |
In this example, if you process rules for a period that ends on January 7, 2006 but starts December 15, 2005, you will extend the period of interest back to 2000, since no calendar exists for the biweekly rule in 2005, and both the weekly and biweekly rules must be run. Assuming that you are processing a group of exception reporters, the schedule resolve process would resolve time back to 2005 (time for exception reporters is based on time schedules unless there is an exception to the schedule).
If you have not built calendars for the periods used to determine the period of interest (the period ID connected with the workgroup and the rule), you may receive the following message when running the Time Administration process:
This example illustrates the message displayed when running the Time Administration process if you have not built calendars for the period ID connected with the workgroup and the rule.
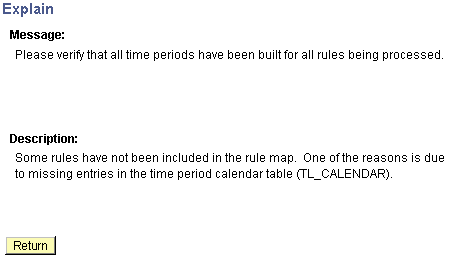
In most cases when this message is reported, a period calendar has either not been built for a period ID or the calendar has not been built far enough into the past or future for all period IDs associated with the time reporters being processed through the Time Administration process.
Building a Complete Calendar
To avoid the problems described in this example, do the following:
Determine all of the period ID's associated with the time reporters to process through the Time Administration process. Period ID's are associated with:
Workgroups
Rules
Determine the maximum and minimum dates among the following:
The Process Date on the Process Time Admin Page.
The DUR (date under report) in TL_RPTD_ELPTIME.
The PUNCH_DTTM in TL_RPTD_PCHTIME.
Determine where the minimum date found in step two intersects the time reporting period for the workgroup to process.
Build the calendar at least as far into the past as the start of this period. And if this minimum date intersects a rule period belonging to a rule in the workgroup's rule program, and the rule requires time data from before the workgroup period, build the calendar as far into the past as the final period of interest start date.
Determine where the maximum date found in step two intersects the time reporting period for the workgroup to process.
Build the calendar at least as far forward into the future as the end of this period. And if this maximum date intersects a rule period belonging to a rule in the workgroup's rule program, and the rule requires time data from days following the workgroup period, build the calendar as far into the future as the end of the rule period.
Override Indicator Set to OFF
If you rebuild your calendar with the override indicator set to OFF, and period instances already exist within the start and end dates of the calendar, the system will not alter the existing period instances within these dates. If you create new time periods, the system adds them to the existing ones.
Note: To change the definition of an existing period, you must set the override indicator to ON and rebuild the entire calendar using the new period definition.
To preserve your current period definitions, but change the start and end dates of the calendar, set the override indicator to OFF, change the begin and end dates, and rerun the Calendar Build process. The following criteria apply:
If the new start and end dates fall within or are equal to the old dates, the system builds new period instances.
If the new start date is less than the first calendar's start date, and the end date is the same as or less than the first calendar's start date, new period instances are built backwards in time, beginning with the old start date.
Example 1: Override Indicator Set to OFF
Term |
Definition |
|---|---|
Original Calendar Dates: |
January 1, 2000 − December 31, 2000 |
New Calendar Dates: |
December 15, 1999 − December 31, 2000 |
The end dates are identical; however, the start dates are different. The new start date is December 15, 1999; the old start date is January 1, 2000. The system will create new period instances from December 31, 1999 to December 15, 1999. If the new end date is later than the old end date, and the new start date is the same as or greater than the old start date, the system builds new period instances going forward from the last end date.
Example 2: Override Indicator Set to OFF
Term |
Definition |
|---|---|
Original Calendar Dates: |
January 1, 2000 − December 31, 2000 |
New Calendar Dates: |
January 1, 2000 − February 15, 2001 |
The start dates are identical; however, the end dates are different. The new end date is February 15, 2001; the old end date is December 31, 2000. The system builds new period instances going forward from the old end date. If both the new start and end dates are outside the range of the old start and end dates, the system builds new period instances. It will move backwards from the old start date until it reaches the new start date, and forward from the old end date until it reaches the new end date.
Example 3: Override Indicator Set to OFF
Term |
Definition |
|---|---|
Original Calendar Dates: |
January 1, 2000 − December 31, 2000 |
New Calendar Dates: |
December 15, 1999 − February 15, 2001 |
The new calendar expands the date range of the old calendar in two directions. The system builds new periods backwards from December 31, 1999 to December 15, 1999, and forwards from January 1, 2001 to February 15, 2001.
Note: For daily, weekly and monthly period types, if the override indicator is set to OFF, the system does not alter existing records. But for repeating periods, records are always deleted, irrespective of the value of the override indicator.
Note: Because complex periods are not created through the standard calendar build process—they are created when you define the period on the Complex Time Period page—they must be extended or shortened to change the start and end dates of these periods.
Override Indicator Set to ON
If you rebuild a calendar with the override indicator set to ON, the system deletes all records from the new start date onwards and rebuilds the calendar as if no period instances existed for the new calendar period. No period instance for dates prior to the new start date are altered.
Note: For daily, weekly, and monthly period types, if the override indicator is set to ON, the system deletes all records from the new start date onwards. But for repeating periods, records are always deleted, irrespective of the value of the override indicator.
Note: Because complex periods are not created through the standard calendar build process—they are created manually when you define the period on the Complex Time Period page—they must be manually readjusted rather than "rebuilt" to change the start and end dates of these periods.
Creating Payable Time
Important! If you are unfamiliar with the concept of payable time, review the section on Understanding Batch Processing in Time Administration before reading the following section.
Payable time is created through the interaction between the schedule calendar, time reporting periods, and rule periods. Compare the work schedule calendar to the workgroup and rule periods to ensure that the start and end dates of these periods are correctly aligned. If the periods are incorrect, you could end up creating Payable Time on different days than you expected. This is illustrated in the example below:
Example: Creating Payable Time
Assume the following:
You are processing a workgroup containing exception reporters.
The workgroup period should specify a begin date of Monday, June 5 and an end date of Sunday, June 11. By mistake, you defined a period ID for the workgroup that specifies a begin date of Tuesday, June 6 and end date of Monday, June 12.
There are two rules defined for the workgroup—a daily rule and a weekly rule. The period ID for the weekly rule specifies that the rule period begins on Monday, June 5 and ends Sunday, June 11. The rule period is consequently out of sync with the period ID on the workgroup.
The earliest change date is Tuesday, June 6.
This example illustrates the interaction of time reporting periods, rule periods and calendar.
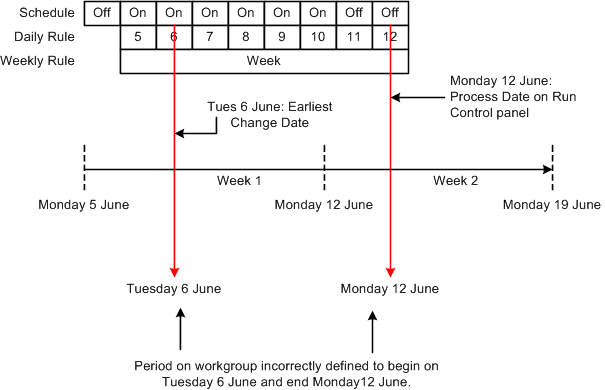
In this example the Time Administration process passes all the dates from June 6 to 12—the current workgroup period—to Payable Time. Assuming that the weekly rule in our example generates new time data for June 5—a date just outside the current workgroup period—we end up with a Payable Time date range of June 5 to 12. By contrast, the correct period ID for the workgroup would have produced a Payable Time date range of Monday June 5 to Sunday June 11. Note that the calendar schedule for these date ranges results in different data being sent to Payable Time. Using the incorrect time reporting period, the schedule indicates two days off. Using the correct time reporting period, the schedule indicates only one day off. As you can see, it is important to understand the relation between time reporting periods, rule periods, and the schedule calendar, because they all work together to create Payable Time.
See the product documentation for PeopleTools PeopleSoft Process Scheduler
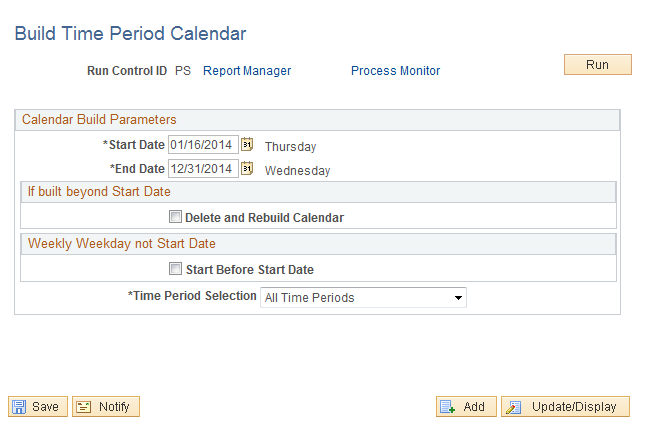
Use the Build Time Period Calendar page (TL_RCTRL_CAL_PNL) to create instances of a time and labor calendar that will include each of your period start and end dates.
Navigation:
This example illustrates the fields and controls on the Build Time Period Calendar page. You can find definitions for the fields and controls later on this page.
Field or Control |
Description |
|---|---|
Delete and Rebuild Calendar |
Select to enable the system to override any existing calendar with a new one containing different or redefined periods. If this field is deselected, the system leaves any existing period instances built in place and allows you to insert new ones by modifying the calendar build scope. This enables you to update the calendar created by the system during the build process without recreating the entire calendar from scratch. Note: If you change the definition of an existing period--for example, you change the start date of a weekly period from Sunday to Monday--select the Delete and Rebuild Calendar check box and build a new calendar. Be aware that redefining a period used in rules processing will trigger Referential Integrity and cause payable time to be reevaluated. Therefore, if the time period you rebuild alters the period instances in a rule, any reported or payable time affected by the change is recalculated in Time Administration. If Payable Time that has been frozen is affected, the Time Administration process creates offsets for the changes. |
Start Before Start Date |
This applies only to weekly time periods and allows resetting the calendar start date when the start date bisects a period instance. For example, assume the calendar start date is January 1, 2000. You've defined a weekly period that begins on Monday. January 1 falls on a Saturday, which means that the week overlaps the start date. This is illustrated below: |
This example illustrates a weekly period that begins prior to the calendar start date.
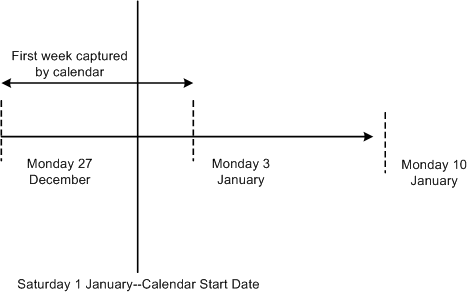
In the diagram above, the first weekly period captured by the calendar begins Monday December 27 —4 days before the calendar start date. In this situation, specify whether the calendar should begin on the Monday before the specified calendar start date, or on the first Monday that falls within the calendar period. If you select Use Prior Week Start Day, the calendar begins before the initially specified start date (on December 27 in this example). If the Use Prior Week Start Day check box is cleared, then the calendar begins on the following Monday (January 3 in this example).
Note: You do not have to build the time period calendar at this time. Set up the rest of your time and labor system (workgroups and taskgroups), then build the time period calendar. The time period calendar must be built prior to reporting time, running the Time Administration process, or tracking attendance.
Field or Control |
Description |
|---|---|
Time Period Selection |
Select a time period. The scope enables you to include or exclude specific periods or period types from the calendar build process. Valid values are: All Time Periods. Select to choose all time period types. The system uses all time periods entered. The time Period Type and Time Period ID are not available or displayed. Listed Period Definitions. Select to indicate which periods to use on an ad hoc basis. When this is selected, the Time Period ID becomes available. Add more periods by inserting additional rows in the Time Period ID region. Listed Period Types. When this field is selected, the Period Type field becomes available in the Time Periods region. You can choose from daily, weekly, monthly, or repeating period types. Note: Complex period types are never included in the Time Period Selection field because the calendar build process does not generate complex period instances. They are created when you define a complex period on the Complex Time Period Page. |
Use the View Time Period Calendar page (TL_CALENDAR_VW_PNL) to view the time period instances for each calendar.
Navigation:
This example illustrates the fields and controls on the View Time Period Calendar page. You can find definitions for the fields and controls later on this page.
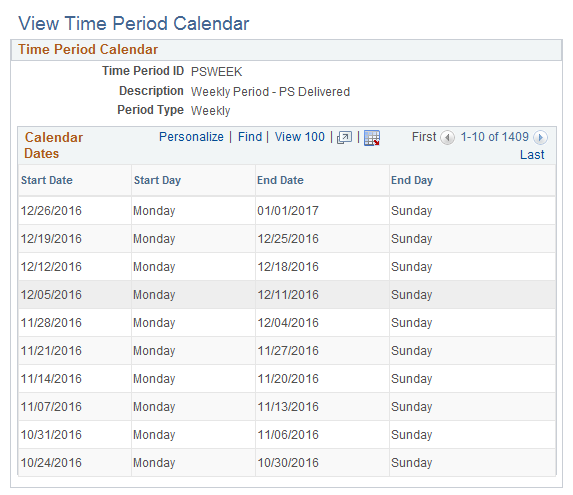
Use the scroll arrows to move up and down the list of the start and end dates on the Time and Labor View Page.