- DSR Software Upgrade Guide
- IDIH Upgrade at a Site
- Upgrade the Mediation and Application Guests
- VEDSR Mediation and Application Guest Upgrade
A.5.2.2 VEDSR Mediation and Application Guest Upgrade
This procedure updates the Mediation and Application guests in a VEDSR
system. To upgrade the guests, the installation
fdconfig file is copied and modified before the
fdconfig utility is run to recreate the guests.
- To establish SSH session and login, use an SSH client to
connect to the TVOE host:
ssh <TVOE host IP address> login as: admusr password: <enter password> - To note the CPU pinning allocations, run the following commands
to allocate CPU sets for EACH (including the PMAC(s)) VM
configured:
$ cd /var/TKLC/upgrade- Print the current CPU pinning
allocations:
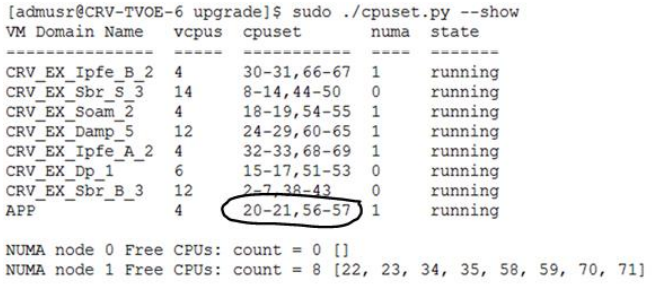
$ sudo ./cpuset.py –showNote the mapping of cpuset values to Mediation and Application VMs.
For example:
Figure -1 CPU Pinning Allocation

- Print the current CPU pinning
allocations:
- Log in to PMAC using a web browser and navigate to:
<pmac ip address>.- Log in as guiadmin user.
- To remove existing Application server, navigate to
Main Menu and then
VM Management.
- Select the Application guest.
- Click Delete.
- To remove existing Mediation server, navigate to
Main Menu and then
VM Management.
- Select the Mediation guest.
- Click Delete.
- To establish SSH session and login, use an SSH client to
connect to the PMAC:
ssh <PMAC IP address> login as: admusr password: <enter password> - To create upgrade fdconfig file from a template, copying the
installation config file, and modifying the copy to support
upgrade.
- Navigate to
/var/TKLC/smac/guest-dropin$ cd /var/TKLC/smac/guest-dropin - Copy the vedsr upgrade template from the
mediation directory using the below
command:
sudo cp /usr/TKLC/smac/html/TPD/mediation- x.x.x.0.0_x.x.x-x86_64/vedsr_idih_upgrade.xml.template - Remove the .template extension and update the software versions, hostnames, bond interfaces, network addresses, and network VLAN information for the TVOE host and IDIH guests to be upgraded. Refer to Appendix P for a breakdown of the config file
- Navigate to
- To reset the guest creation timeout, enter the following
command:
$ sudo sqlite3 /usr/TKLC/plat/etc/TKLCfd-config/db/fdcRepo.fdcdb 'update params set value=3000 where name="DEFAULT_CREATE_GUEST_TIMEOUT"'; - To modify the upgrade config file, peform the following
steps:
- Edit the upgrade config file and locate the
Oracle guest stanza. The sections to be removed
are highlighted in the config file excerpt
shown:
<!--REMOVE_FOR_DR_START (DO NOT remove this line! )--> <!--Oracle Guest Configuration--> <tvoeguest id="ORA"> <infrastructure>PMAC</infrastructure> <tvoehost>mgmtsrvrtvoe</tvoehost> <!--Oracle Guest Profile: Update if hardware is Gen6 default is Gen8--> <!--profile>ORA_GEN6</profile--> <profile>ORA_GEN8</profile> <postdeploy> <scriptfile id="oraHealthcheck"> <filename>/usr/bin/sudo</filename> <arguments>/usr/TKLC/xIH/plat/bin/ana... </scriptfile> </postdeploy> </scripts> </tvoeguest> <!--REMOVE_FOR_DR_END (DO NOT remove this line! )--> - In the <infrastructures> section of the
upgrade config file, update the tpd, ora, med, and
app release numbers to reflect the target
release.
Config file excerpt. Update the highlighted values.
<image id="tvoe">
<name>TVOE-3.6.2.0.0_88.58.0-x86_64.iso</name>
</image>
Note:
The Oracle guest stanza must be removed from the newly created upgrade config file. Failure to do so causes the Oracle guest server to be re-installed. - Edit the upgrade config file and locate the
Oracle guest stanza. The sections to be removed
are highlighted in the config file excerpt
shown:
- To reinstall the Mediation and Application servers, execute the
following command using the upgrade file:
sudo fdconfig config --file=hostname-upgrade_xx-xxxx.xmlNote:
The upgrade config file must be used in the above command, or the database is destroyed, and all database data is lost. - To monitor installation, from the PMAC GUI, monitor the IDIH installation on the Task Monitoring page until the installation is complete.
- To execute the CPU Pinning script, establish an SSH session to
the TVOE Host by logging in as
admusr.Print the current CPU pinning allocations:
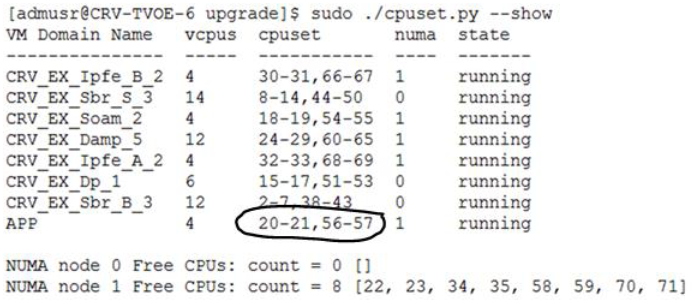
For example:$ cd /var/TKLC/upgrade $ sudo ./cpuset.py --show
If we do not see None for either cpuset or numa (or both), we first clear the pinning for those VMs using following command:
Have the mapping of the VMs to cpuset ready which was determined from step 2.[admusr@CRV-TVOE-6 upgrade ~]$ sudo ./cpuset.py --clear=APP Successful. Domain APP must be restarted for changes to take affectExecute the following to allocate CPU pinning on EACH VM according to the mapping:$ sudo ./cpuset.py --set=<VM Name> --cpuset=<cpuset>For example:[admusr@CRV-TVOE-6 upgrade ~]$ sudo ./cpuset.py --set=APP –cpuset=20-21,56-57 Successful. Domain APP must be restarted for changes to take affectNote:
Execute the CPU pinning script for both the application and mediation server VMs. - To restart the VMs for which the pinning has been assigned or
modified, use following command:
Alternately, we can restart the entire TVOE sever using below command:[admusr@CRV-TVOE-6 ~]$ sudo virsh shutdown <VM Name> [admusr@CRV-TVOE-6 ~]$ sudo virsh start <VM Name>$ sudo init 6Note:
Once the TVOE host is restarted, establish an SSH session to the TVOE Host by logging in as admusr. - To verify the CPU pinning is allocated as set in step 12, run
the following commands:
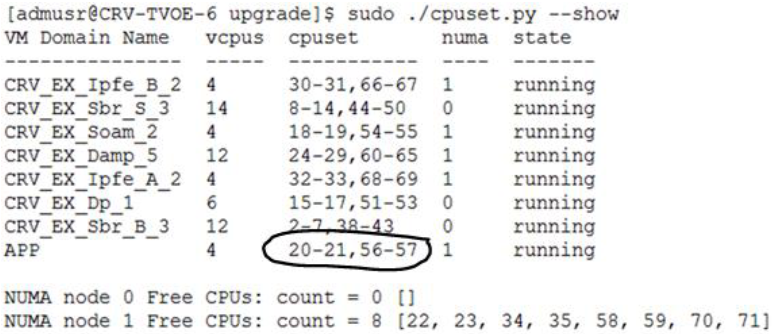
Print the newly allocated CPU pinning allocations and cross check with the mapping.$ cd /var/TKLC/upgradeFor example:

Note:
Repeat this procedure for each TVOE host. - To reset SOAP password, in case upgrading to release IDIH 8.2.1, reset the SOAP password to allow self-authentication of DSR with IDIH to send traces. For more information, see Reset the SOAP Password.