Adding Formulas to Fields
Using uDesigner, you can create formulas for fields that, in Unifier, will calculate the value of the field and display it. Calculated fields usually will be read-only fields. You can also build composite fields that combine string text data elements into one field.
Notes:
- As a best practice, any field used in a formula should be marked "required"; otherwise, the calculation cannot be performed.
- User-defined formulas are prioritized over system-defined formulas. If you create a user-defined formula that references a system-defined formula, it may not always be honored and can lead to miscalculations or failure. Therefore it is recommended that you avoid creating user-defined formulas that rely on or reference system-defined formulas. A warning message is displayed when you error check a form or change the form status to Complete or Deploy.
- You cannot designate a multi-select field as a formula field; however, you can use a multi-select field as an element in a string formula.
- Linked and Summary Elements are not allowed in defining the formula.
Creating Formulas using String (Text) Data
In uDesigner, you can create a composite field that combines multiple data elements. String building involves combining values from text box data elements and specifying a string-type pull-down. For example, you can create a field called "Project Identifier" using a formula that includes Project, Record No., and location.
You can define a string formula only for text box and multi-line text field data elements. This feature is typically for building fund code segments, but you can also use it to build an address code field to Including a Map.
String formulas can be up to 250 characters long, including the delimiters (such as dashes or underscores).
To create a string formula:
- Open the form containing the field for which you want to build a formula. The Form Designer window opens.
- From the toolbar, click Properties. The Elements Properties window opens.
- Select the field and click the Formula button. The Formula Creation window opens.
- Select the delimiter.
The delimiter separates the elements. For example if you select a dash (-) between elements for Project Identifier, it would appear as Project-Record-Location.
You must select the delimiter before adding the element to the right pane.
- Select an element from the left pane and click Add Parameter. The element moves to the right pane.
If you want to change your selection, click Undo or Clear All. After you add an element, the element list is disabled and the delimiter icon is activated.
- Click the delimiter icon to add it into the formula creation field.
- Continue adding other elements following the same procedure.
- Click OK to save the formula and close the window.
Creating Numeric Formulas
You can use any integer, currency, or decimal amount data element to create a formula. The field that holds the calculated value must be numeric with decimals, and there must be other numeric data elements on the form. The formula is based on calculations that you assign to the field by selecting from a list of the numeric data elements on the form. A numeric formula can include a logarithmic function.
Besides integer, decimal or currency amounts, you can also use the values in pull-down menus, radio buttons, and check boxes for numeric formulas. For pull-down menus in calculations, the value of the chosen data set will be used. For radio buttons, the value of the button will be used (1 or 2 are the default values, but the formula will use whatever values are specified when the business process is set up). For check boxes, 1 or 0 will be used in the formula. If the check box is checked, the value will be 1; if it is not checked, the value will be 0.
Numeric formulas can be up to 250 characters long, including the delimiters (such as dashes or underscores).
To create a numeric formula:
- Open the form that contains the field for which you want to create a formula. The Form Designer window opens.
- In the Form Designer window, select the field for which you want to create the formula.
When the calculation is performed, this field will appear as read-only on the form and is automatically updated whenever the fields that make up the formula change.
- Click the Formula button. A Formula Creation window opens.
- In the Formula Type field, choose Formula from the list.
- Click the Create button. Another Formula Creation window opens.
- In the Element pane, select the data element and click Add Parameter to add it to the Formula pane.
Only those fields that can be used in a formula will appear in this list.
- Use the numeric keypad to enter the calculating operators to create a formula, or to enter numeric values to use on the element.
Each time you enter an operator, the elements become available again to add to the formula.
- Continue Steps 6 and 7 until you have completed the formula.
- Click OK to save your changes and close the window.
To create a numeric formula with a logarithmic function:
The log function supports fields on business process forms only, not attribute forms, attribute/detail forms for managers, or manager sheets. Also note: uDesigner calculates base 10 logarithms, so the base is assumed.
- Follow steps 1 through 5 explained in the previous procedure.
You can start the formula using the log function, or start it using an element or numbers and operators, followed by the log function. For example:
log(SQ Footage) * Unit Cost
or
100*Quantity/log(Cost) + 75
- However you start the formula, you must click the log button to enter the logarithm. When you do so, uDesigner enters log( ( into the formula box.
- To continue the log formula, you can use an element from the Element list, or enter numbers and operators using the number pad.
- At the end of the log function, click the end-parenthesis ( ) ) button on the numeric pad.
- To complete the formula, add other operators and numbers to the formula, if necessary.
- Click OK.
Creating formulas that use dates
You can create two types of date formulas:
- A date plus/minus formula will produce a date from a date element, plus or minus a specific number of days, or plus/minus the value in another date or numeric element on the form.
- A date-difference formula will produce the number of days between two date fields. This numeric operation is useful for calculating payment due dates.
Formulas Using Date Fields
uDesigner provides two data definitions upon which date pickers can be built: Date Picker, which includes the date and time, and Date Only, which does not include the time. For example, to create a date-add formula for a date-and-time type of field, you can add an integer only to another date-and-time element; you cannot use a date-only type of element in the equation.
Note: Data elements built on these definitions cannot be mixed in a formula. Combining Date Picker and Date Only Picker in a formula will lead to unexpected results. For example, if the source is Date Picker, set the destination data element to Date Picker. If the source is Date Only Picker, make sure the destination Date DE is also the Date Only Picker data definition.
To create a date plus/minus formula:
- Open the form that contains the date field for which you want to create a formula. The Form Designer window opens.
- In the Form Designer window, select the date field for which you want to create the formula.
When the calculation is performed, this field will appear as read-only on the form and will be automatically updated whenever the fields that make up the formula change.
- Click the Formula button. A Date Formula window opens.
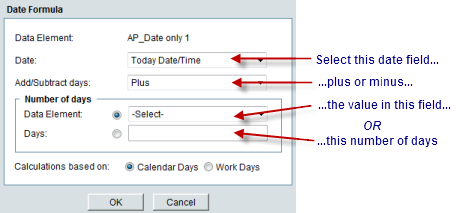
- For Calculations based on, choose:
- Calendar Days to calculate the formula based on calendar days. This option does not take company non-working days into account.
- Work Days to calculate the formula based on the company calendar working and non-working days.
Example:
When: Date 2 = Date 1 + 1 working day
- If Date 1 is a working day, the system calculates from the selected date and adds the number of working days. So, if Date 1 = 01/23/2023 (working day), then Date 2 = 01/24/2023.
- If Date 1 is a non- working day, the system calculates from the next working day and adds the number of working days. So, if Date 1 = 01/21/2023 (non-working day), then Date 2 = 01/24/2023 because the system calculates from 01/23/2023 at 12.00 AM
To create a date-difference formula:
- Open the form that contains the field for which you want to create a formula. The Form Designer window opens.
- In the Form Designer window, select the date field for which you want to create the formula.
When the calculation is performed, this field will appear as read-only on the form and will be automatically updated whenever the fields that make up the formula change.
- Click the Formula button. A Formula Creation window opens.
- In the Formula Type field, choose Date Difference from the list.
The window expands to show additional fields, as shown in the table below.
- Click OK to save your changes and close the window.
In this field: | Do this: |
|---|---|
Latest Date | Click the down arrow. uDesigner displays a list of all the numeric fields on the form. From this list, choose the field that contains the later of the two dates that will be used in the calculation. |
Earliest Date | Click the down arrow. From this list, choose the field that contains the earlier of the two dates that will be used in the calculation. |
Calculations based on | Choose Calendar Days to include all the days of the week in the calculation. Choose Work Days to use only the work days of the week in the calculation. |
Linking Data Pickers Using a Formula
Data pickers can be linked to corresponding pickers to make available to the user the functionality of the data picker and also of the linked picker.
- Shell data pickers can be linked to shell pickers to facilitate shell auto-creation
- Configurable manager data pickers can be linked to configurable manager pickers to enable quantity and cost rollups to configurable manager sheets
- User Pickers can be linked to user data pickers to offer the functionality of both types of picker on a business process form. To do this, place the user data picker on the business process upper or detail form and place the linked User Picker in a hidden block on the form; then link the two types of pickers as described in the following steps.
To link a data picker:
- Open the form on which you want to link the pickers.
- In the Form Design window, click the Properties button. The Elements Properties window opens.
- On the Elements Properties window, select the shell picker, the code picker of a configurable manager, or the user picker you want to connect to a data picker.
- Click the Formula button. The Formula Definition window opens.
- In the Data Picker Element field, select the data picker element on the form that you want to link to the picker or shell you selected.
- For rollups to a configurable manager sheet: The configurable manager data picker will populate the code picker for the manager with the value and the data will roll up to the code on the sheet. The field becomes read-only. Anytime the data picker value changes, it will be automatically reflected on the code picker.
- For BP auto-creation across shells: The shell will use the shell data picker to tell it where to create the business process.
- For business processes, a Configurable Manager, and shells: The user data picker, when linked to the User Picker, will provide the functionality of both the User Picker and the User Data Picker. Refer to the Unifier Data Reference Guide for descriptions of the picker data elements.
Using a Formula in a Required Field
You can define a formula for a required field in your form.
If you create a BP record or line item by way of CSV/Excel or RESTful web services, if the required elements are set as formulas, and the required elements are not included in the Integration tab (company or shell), the system will not complete the BP record or line item creation.
Note: In the Bidder detail form, the short description (short_desc) DE is a required field. You cannot add the (short_desc) DE in a hidden block.
Last Published Saturday, June 6, 2026