Adding an Item Log to a Detail Form
You can add an item log to the form for line item, document, and cost type business processes.
Item logs appear in the lower section of the form. When the user adds line items to a record, they appear in this log. In addition, to organize the details of your business process, you can create multiple tabs, up to eight, to collect and organize items into categories.
When a user opens a new cost or line-item business process, Unifier automatically opens a "standard" item log using the naming convention "Standard - Line Item List." (This name can be changed if you want.) In addition, some features of the line item list are added by default. For cost BPs, these include the number of items, pagination, number of lines to be displayed per page, transaction currency, and total amount.
When a user opens a document business process, Unifier also opens a line item list; however, the list behaves differently, depending on whether the user activates the detail form. If the detail form is not activated, the Line Item list serves as a document attachment area, where users can attach documents or folders. If the detail form is activated, the user can add documents as line items.
Designing the line item list consists of specifying the data elements you want to display for each line item that a user adds. Columns correspond to the data elements you placed on the detail form.
Designing the List
To design the item log:
- Open the business process form for which you want to add an item log and click Item Logs in the navigator. The Item Logs log opens.
Note: You can sort Item Logs using the Name, Last Saved, or Type column. You cannot sort the log using the Tab Name, Tab Order, or System Defined column.
- Select a tab from the log and click Open.
- Complete the tabs as described in the following sections.
Specifying the Layout
Use the Layout tab to designate what data from the line item list should appear on the log. The data will appear in columns on the log.
Note: For Cost-Type, multiple-tab Forms, If you include an "amount" field on the log for a line item list for a tab, a total of the line item amounts will appear at the bottom of each numeric column on the form.
- In the Tab Name field, enter the name you want to appear for the tab on the form.
- To add a column to the list log, click the Add button. The Layout Header Properties window opens.
- Use the table below to complete the fields in this window.
- Click Apply.
uDesigner displays the columns on the Layout window.
- (Optional) To change the order of the columns on the list, use the Move Up and Move Down buttons. These buttons move the columns left or right, respectively, on the line item list.
- To add another column to the layout, repeat steps 2 through 4.
- Click Apply.
Note: One additional column may appear on the log. When you started the upper form, you filled in an Options tab. On this tab, under Line Items, if you selected the Add summary line item amounts check box, a summary of line item amounts will become an automatic column on the log, titled Sm.
In this field: | Do this: |
|---|---|
Data Element Label | Select a Data Element Label from the list of available data elements. This is the name that will appear as the field name on the form. The list is generated from the detail form. If you do not see the data element you want, go to the detail form and add it. The Data Element Name field shows the database name of the data element you chose. |
Column Heading | Enter the column heading you want to appear on the line item form. The field is pre-populated with the data element label, but you can edit it. |
Width | Enter the width (in pixels) of the column. The default is 150 pixels. |
Alignment | Choose the positioning of the data (and column heading) within the column: Left, Center, or Right aligned. |
Sorting the List by Column Order
You can determine which column to use as the default sort order for the line item list log. This allows you to choose a column to sort by initially. Classic payment line items sort order always follows the order of PSOV Sheet line items. However, the sort order defined in Payment BP Item Log is ignored.
- Click the Sort Order tab.
- In the Initial Sort Column field, choose the field by which you want to sort the list.
- In the Sort Order field, choose whether the sort order should be ascending (A-Z) or descending (Z-A).
- Click Apply.
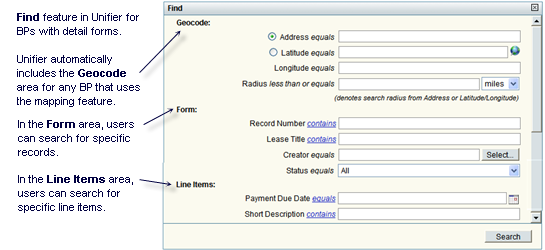
Specifying Search Criteria for the Find Feature
Users will sometimes need to locate particular line items in a business process, often for the purpose of task management or milestone tracking. To make it easier for users to locate a line item, use the Find tab to specify field names on the form that they can use in their search. The user can also narrow a search by using operators on the fields, such as "contains" or "equals."
To specify search criteria:
- Click the Find tab, and then click Add. The Find Properties window opens.
- In the Data Element Label field, select a field (data element) users can use to find a line item.
When you select a data element label, uDesigner automatically displays the database label of the element in the Find Label field. This field is editable.
- If you want to change the name of the element to something more meaningful to the user, enter the name in the Find Label field.
- Click Apply.
- To add another element for searching, repeat steps 2 through 4. Then click OK.
- On the Line Items window, click OK.
Organizing Items Under Tabs
If your business process generates many line items, you can create tabs along the bottom of the form for organizing data into categories for quick retrieval. You can create up to eight tabs for a form. In uDesigner, a tab is composed of a detail form and a line item list. When you create the tabs with the detail forms, uDesigner automatically creates a blank line item list for each detail form.
Specifying the Tab Order
After you have designed the line item lists for each tab, you can specify the order in which you want the tabs to appear across the bottom of the form.
To specify the tab order:
- Open the business process form and click Item Log in the Navigator.
- From the toolbar, click Tab Order. The Tab Display Order window opens.
- Select the tab name and click the Move Up (Left) or Move Down (Right) button to move the tabs into the order you want them to appear on the form.
- Click OK.
Last Published Saturday, June 6, 2026