Adding Steps to the Workflow
To add steps to a workflow:
- Click the S Step button.
- To add a workflow step, click anywhere in the canvas area of the window.
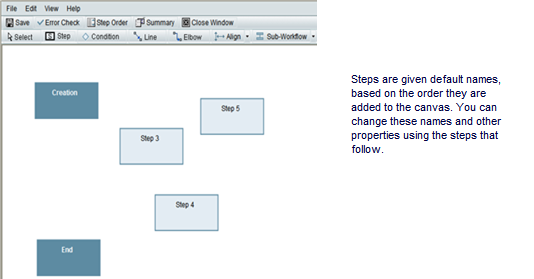
- Continue to add as many steps as necessary by clicking the canvas again.
- When you have added all the steps, click the S Step button again.
- Adjust the layout of the workflow as follows:
- Click the Select tool.
- Click a step and, while holding down the mouse button, drag the step to its new position.
- Continue to move the steps into place until you are satisfied with the layout.
Note: You may need to return to this step during the workflow design process.
Specifying the Steps' Properties
Specifying a step's properties is where you will give the step a name and designate the forms attached to this step. Be sure you have created all necessary action and view versions of these forms before you start these procedures.
To specify a step's properties:
- On the Workflow Designer window, click the Select tool.
- Double-click a step.
The Step Properties window opens.
- Use the information in the table below to complete the step properties.
- Click OK.
In this field: | Do this: |
|---|---|
Step Name | Enter a name for the step. Use a noun, such as "Customer Approval" or "Finance Review." To help you determine a name, fill in the end of this sentence: "Sent for ____" You can enter up to 50 alphanumeric characters for the name. Note: You can give a creation step a name, but you cannot rename the End step. |
Description | Enter a description of what the step entails. |
View Form | Select which read-only forms should be available to the recipient at this step. (View forms are not available for the creation step because the only purpose of the creation step is to begin an action.) Note: For business processes with multiple workflows, use the same form for the end step of each workflow. This ensures that the same final form will be generated each time a BP record is complete, regardless of which workflow is used. |
Edit Form | Select the name of any action-item forms the recipient should respond to at this step. Note: For business processes with multiple workflows, use the same form for the end step of each workflow. This ensures that the same final form will be generated each time a BP record is complete, regardless of which workflow is used. |
Sub-Workflow Name | If this step is part of a sub-workflow, enter the name of the sub-workflow to which it belongs. |
Trigger Element | Optional) Click the Add button and select the field (data element) that will serve as the trigger for a conditional step that must be resolved before the workflow can continue. The value of the data element at runtime will dictate whether the conditional step must be resolved. You can specify multiple data elements. If you do so, the values of all the data elements must be met to trigger the conditional step. Note: You cannot use a multi-select data element as a trigger element because the trigger element feature does not recognize the commas that separate the values in these elements. |
Add additional task assignees from the following data elements | To add additional task assignees when the BP record reaches this step, select this check box. To access list of all User Data Picker and User Picker entries for all action forms included in the workflow, click Select next to Upper Form, select the applicable pickers, and click OK. To access list of all User Data Picker and User Picker entries for the Detail Form of the Line Item tab included in the workflow, click Select next to the applicable tab name, select the applicable pickers, and click OK. Note: This feature is not available for Creation and End steps. |
Add additional Cc users from the following data elements | To copy additional users when the BP record reaches this step, select this check box. To access list of all User Data Picker and User Picker entries for all action forms included in the workflow, click Select next to Upper Form, select the applicable pickers, and click OK. To access list of all User Data Picker and User Picker entries for the Detail Form of the Line Item tab included in the workflow, click Select next to the applicable tab name, select the applicable pickers, and click OK. Note: This feature is not available for the Creation step. |
Last Published Saturday, June 6, 2026