To create and export a package:
- From the Primavera Portfolio Management Console Packages tab, click Export (refer to Working with Packages in Administration).
Or
From the Windows Start menu, choose Programs > Primavera Portfolio Management > Export PPM Package. The Login dialog box appears.
Note: No other users should be logged on while the Export PPM Package application is running.
- Enter your login name and password and click OK. The General tab of the Export Package wizard appears.
- In the Name field, enter the name for the XML file which will contain the exported package you create.
Note: This name can be changed at the end of the procedure. Refer to the last step in this procedure.
- (Optional) In the Description field, enter a description of the package.
- Click the Define Package as "Solution Module" checkbox if you want the package to be a solution module. The client information fields are displayed.
- In the Creator field, enter the name of the creator (optional).
- In the Organization field, enter the name of the organization (optional).
- The ID field contains an 8-digit license number (This number should be changed to better control package versioning by making each solution module have a unique key (refer to Replacement Options).
- In the Knowledge URL field, enter the URL for the creator (optional).
- Click Next. The Content tab of the Export Package wizard appears.
- In this step, select the objects to include in the export package:
- Click Select All to include all PPM objects in the exported package. A checkmark appears next to each of the displayed hierarchies.
- Click Unselect All to remove all checkmarks next to the displayed hierarchies.
- Check the checkbox next to the hierarchies you want to include in the export package.
- To manually select or unselect objects in a hierarchy, select the hierarchy (not the checkbox), and click Edit.
OR
Double-click the hierarchy. The Select Objects dialog box appears. All the objects in the hierarchy appear. Manually check or uncheck the objects as required.
Notes:
- The Edit button is disabled for non-hierarchical entries such as Function INCLUDE File or Indicators.
- Check the Check to export parent objects only checkbox if you want to export only parent objects, excluding the items and candidates. When you mark this checkbox, the selected portfolio and all its child portfolios will be selected for export, but the items and candidates will not be selected. If you clear this checkbox you can manually select the items to be included in the export package.
- If you select a folder (or a Portfolio), you select all of its contents. To unselect part of a folder, you must first unselect the parent node.
- When you select a Query Based Portfolio, only the Query that determines which Items belong to the Portfolio appears (the items or portfolios it contains are not imported).
- In the Select Objects dialog box, you cannot select the root container.
Click the Search tab to locate specific objects.
- Click Close to return to the Content step of the Export Package wizard. If you select only some of the objects in a hierarchy, the checkbox next to the hierarchy is checked and grayed.
- Check the Security Policy checkbox to export the security defined for the system security policy and for all the root folders. This option will replace the security defined in the destination with the security included in the package. Since hierarchies support the process of applying and managing system security, the security policy will propagate to all objects and modules in the hierarchy.
- Check the Security properties of exported objects to export specific security properties defined on objects. The security properties consist of the inheriting status plus the security rows defined on the objects.
- Check User permissions of exported objects and users as derived entities to export the user defined rows of security (permission defined for a user rather than a group or role), the owners of the objects, and User Group members. If you do not select this option, the importing user will become the object's owner (refer to Supporting Security and Security Policies.
- Click Next. The Options step of the Export Package wizard appears.
- Select an option for storing new objects that do not already have a home folder:
- Select Root Folder to import new objects directly into the root folder.
- Select Create a new folder named: to import new objects into a new import folder you specify under the appropriate hierarchy. When you import, a folder with this name is created in each hierarchy to which new objects are added. All new objects are placed in these folders if you select the option to import all new selected objects into an import folder.
- If you selected Indicators on the Content step, they will be exported as is, and will override any indicators used in the target system when imported. Skip this step. However, if you do not export them, click the Indicator Mapping button to open the Indicator Mapping dialog box and determine how the current package's indicators should be mapped to the slots available in the target system, if known. The mapping can also be done later, when importing a package.
- Select one of the following rules for replacing existing selected objects in the import process:
- Show conflicts for all potential replacements. When you import the package, all existing objects are not replaced and they appear in the conflict report where you can manually select the objects that you wish to import.
- Do not show conflicts for objects with creator ID. Objects belonging to the creator specified here are replaced without appearing in the conflict report. These are objects that were previously imported from a package that was set to be a solution module with its unique ID being the creator ID displayed here. Other objects appear in the conflict report.
- Do not show conflicts for objects modified prior to. Objects older than the specified date are replaced without appearing in the conflict report. Other objects are not replaced and they appear in the conflict report. The date arrow opens a calendar from which you can select the date.
- Replace ALL without showing conflicts. All objects are replaced without appearing in conflict report.
Note: Value lists are always overwritten and therefore never appear in the conflict report.
- Configure how portfolios and folders should be replaced as follows:
- Replace - replaces the container and its contents with no regard for what was previously in the container. All deleted items of the replaced container are placed in the "removed" import folder.
- Append - replaces objects in the container and appends any objects that were in the target container but are not in the import package.
- For example, if the package contains:
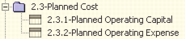
- And the target database contains:
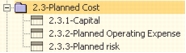
- After using the Replace option, the result will be:

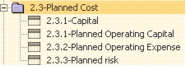
- After using the Append option, the result will be:
- Check Package defines storage if package storage should override existing storage for objects that are replaced by the package.
- Check Package defines category names if you wish to maintain the package names of categories that exist in both the package and the target database.
When unchecked (default), the names of categories in the package do not override the names in the target database. - Click Next. The Export progress window is displayed. The Export PPM Package application searches for derived objects to include in the exported package. When the search completes, the Derived Objects step of the Export Package wizard is displayed.
This step contains a summary of the contents of the export package. It includes:
- Objects explicitly selected in `Content'. The number of hierarchies explicitly selected.
- Objects implicitly selected in `Content' step. The number of objects indirectly selected in the selected hierarchies.
- Total derived objects (added by packager). The number of derived objects added by the packager.
- New derived objects; Store derived objects in. All new derived objects, as selected in the Options step, are imported to the Import Folder name here.
Note: Derived value lists are always transferred to the target database. If they were not, it would create a problem with query based portfolios or functions which rely on new values in value lists.
- EXISTING objects (derived) should be replaced following these rules. The rules for importing existing derived objects. Refer to the next to the last step in this procedure for information about the rules.
- To view the list of derived objects in the package, click Details. The Derived Objects dialog box is displayed.
Note: The Derived Objects dialog box is read-only.
- Click Close to return to the Derived Objects step of the Export Package wizard.
- To change the rules for importing existing derived objects, select one of the following:
- Do NOT replace anything. Do not show conflicts. The derived objects do not replace existing objects without appearing in the conflict report.
- Same policy as the selected objects. Follows the policy defined for selected objects.
- Click Finish. The Create Package dialog box appears. Select a new name and location for the export package, if necessary.