Importing Source Data
This topic discusses source data import process, and viewing and correcting errors.
Note: This activity can be performed by a partner if the partner has privileges assigned.
|
Page Name |
Definition Name |
Usage |
|---|---|---|
|
EOCM_IMPORT_PAGE |
Choose to import either catalog sources or a master catalog source. |
|
|
EOCM_DS_LOAD_1 |
Import partner offering data from a partner source file. |
|
|
Import Master Catalog Sources page |
EOCM_DS_LOAD_M |
Import partner-offering data using a shared catalog source definition. |
|
Import Status Details page |
EOCM_DS_STATUS_SEC |
View detail import process information for a particular file. |
|
EOCM_DS_ERR_SEC |
View details of errors that occurred during the import process. |
|
|
EOCM_CATWRKBCH_CMP |
View details of errors occurred and a list of methods to correct them. |
When a partner changes a source file, such as adding new offerings, deleting offerings, or updating prices, the catalog management business process flow cycle begins. It starts with the process of importing the updated source file into a temporary table in Catalog Management. Once imported, the data is available to be transformed and loaded into the enterprise catalog.
Managing Errors
The system allows the import process to run to completion even if errors are encountered. The system captures the error information and presents the user with the following set of options:
Delete the error rows for a specified file.
Delete all the imported data for a specific file.
Export error rows to an external .txt file, correct the errors in this file, and then re-import the file by appending it to the previously imported data.
Use the Import Catalog Sources page (EOCM_IMPORT_PAGE) to choose to import either all catalog sources or a master catalog source.
Navigation:
This example illustrates the fields and controls on the Import Catalog Sources page. You can find definitions for the fields and controls later on this page.

This page shows the import history for the selected partner ID and catalog source. From this page you can view or delete previously imported data files, or add a new file to be imported.
Field or Control |
Description |
|---|---|
Partner ID and Catalog Source |
Values are based on the source layout you selected on the Import Catalog Sources Search page. |
Append |
Select to append additional files to the associated file. Note: The check box will be disabled for files that are imported successfully. |
Status |
Click the link to go to the Import Status Details page and view more detailed information about the status of the import process. |
Upload |
Click to upload the source file. Use the browse button to locate and select the desired file. Once selected, the path to the file is displayed. Click the Upload button to upload the file and return to the Import Catalog Sources page. The name of the selected file appears in the Attached File field, and the status of the file is Uploaded. Note: The View File and Import buttons are now active. |
View File |
Click to review the contents of the source file. |
Import |
Click to import the offering data into Catalog Management. A process request is submitted. Click the Process Monitor link to monitor the status of the request. The status of the file changes to Imported when the file has been successfully imported. Click the Refresh button to update the status. Note: This button becomes inactive once the file is imported. |
View Errors |
If an error occurs, the status is updated to Error once you click the Refresh button. Click to view and correct import errors. |
Rows Imported, Success Rows and Error Rows |
Displays the total number of rows imported, the number of rows imported successfully, and the number of rows that caused errors. |
Add File |
Click to add a new row. The next sequence number appears in the SeqNum field. |
Note: The import process leverages PeopleTools file attachments, which can be configured to use either the FTP or HTTP transfer protocol. File attachments are supported by using PeopleCode built-ins that implement the transfer of a file to or from a browser using the application server.
Import Status Details
Use the Import Status Details page (EOCM_DS_STATUS_SEC) to view detail import process information for a particular file.
Navigation:
Click the Status link located on the Import Catalog Sources page.
This example illustrates the fields and controls on the Import Status Details page.

Use the Import Status Details page to view more detailed import process information for the selected file.
See the product documentation for PeopleTools: Process Scheduler
The process of a master catalog source definition is similar to the process users use for importing partner-offering data using a catalog source definition for a single partner. The only difference is when a user selects the catalog source to import. In the master catalog source situation, the same catalog source may be listed multiple times in the search results.
To select a master catalog source to import:
Access the Import Catalog Sources page.
Click the Import Master Catalog Source link.
The Import Master Catalog Source search page appears.
Select the desired master catalog source file by SetID, partner ID, and catalog source.
If multiple partners have been identified to share a specific master catalog source, that source file will be listed multiple times in the search results.
Use the Data Source Import Error Detail page (EOCM_DS_ERR_SEC) to view details of errors that occurred during the import process.
Navigation:
Click the View Errors button.
Field or Control |
Description |
|---|---|
Partner ID, Catalog Source and Sequence Number |
Values are based on the information from the Import Catalog Sources page. |
Line Number |
Displays the row in the source file where the error occurred. |
Field Name |
Displays the name of the field that caused the error. |
Text |
Describes the error. |
Delete Errors |
Select to delete error rows from a specific imported file. |
Remove Imported Data |
Select to remove all the imported data from a specific file. |
Export Error Data |
Select to export the error rows to a flat file. Note: Once exported, you can make corrections, and then re-import the data using the Append Data feature. The corrected data will be appended to the rows that were imported successfully. |
See the product documentation for PeopleTools: PeopleCode Language Reference and PeopleTools: PeopleCode Developer's Guide
This section provides an overview of how to manage errors, and the methods of correcting them when Quick Item Load process is used.
Errors are managed using the Manage Errors page, based on the process and whether it for Administrator or Partner. The Manage Errors page looks different for the import process and the load map process.
Error Handling in the Quick Item Load Process
The Quick Item Load Process centralizes all of the steps and processes needed to load items through Catalog Management into eProcurement. All processing is done through the Manage Catalogs Workbench. This provides a centralized location from which all error handling is achieved. All methods of error correction are accessible through the Manage Catalogs Workbench.
When an error is received, the Load Stage status shows as Error in the Catalog Workbench. The Error Details page is accessed by clicking on the Error link from the Catalog Workbench or the Review Load Errors icon in the timeline.
Clicking on the link opens a modal page called Manage Errors page. The details of errors can be obtained on this modal page, which include the type of error that occurred, the number of error lines, the field where the error occurred, and any additional error text when available.
The Manage Errors page is generated separately for the Load Map Process and the Import Process, depending on permissions for the Partner or the Administrator. A drop-down menu helps to select various methods of correcting an error depending on the type of error received.
Use the Manage Errors page (EOCM_CATWRKBCH_CMP) to view details of errors occurred and a list of methods to correct them.
Navigation:
This example illustrates the fields and controls on the Manage Errors page . You can find definitions for the fields and controls later on this page.

Field or Control |
Description |
|---|---|
Lines with Error |
Click on a value to display a modal page with more information on the specific lines that are in error, with error details. |
Error Correction method |
Select from the options to decide a method to correct the error:
|
View Source Definition |
Click to open the Master Data Source Definition page. Partners can view the definition in display only mode. A message appears that for making changes to the source definition, the partner may have to contact the administrator. Note: Only Administrators can make changes to the source definition. |
View Catalog Map |
Click to open the Catalog Mgmt Map Defn modal page. Partners can view the map in display only mode. A message appears that for making changes to the catalog map, the partner may have to contact the administrator. Note: Only Administrators can to make changes to the catalog map. |
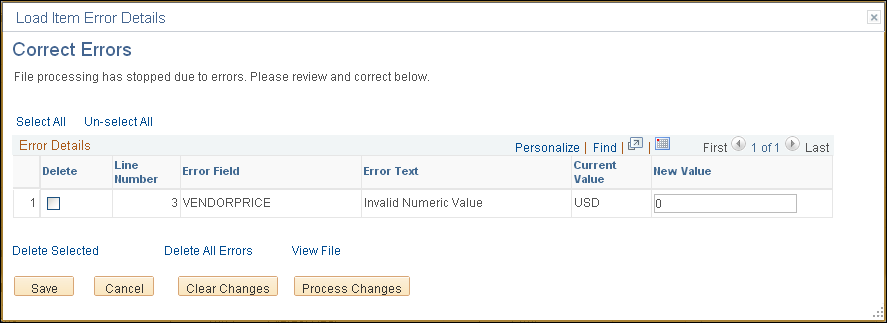
Correct Errors Online
Use the Correct Errors Online page (EOCM_ERR_CORR_SEC) to correct errors online, after selecting the method from the Manage Errors page.
Navigation:
On the Manage Errors page, select the method and click Go.
This example illustrates the fields and controls on the Correct Errors Online page.
This section discusses how to import catalog sources and the ways to use correction options.
Error Handling For Abends
There may be certain cases where the system is unable to manage errors and a process abends. When there is an abend the status goes to Error. When a user clicks on the link, a modal window appears with a link to the process monitor. A text message displays that the processing encountered an error and may be resolved after checking the error details in the process monitor.
Errors of type Unit of Measure (UOM) and Currency
To allow for validation of currency and unit of measure in the item file, users should select the Correct data error & reprocess option on the Map Information page. Data Transformation is to be set up for Currency and UOM fields on the Map Field Detail tab. This setup is to avoid the possibility of invalid currency and/or UOM values loading into the production tables, which could generate validation errors during the subsequent eProcurement CUP load processing. CUP validation errors must be corrected either on Validate and Process Imported Items page in eProcurement, or on Item Load Errors page in Inventory.
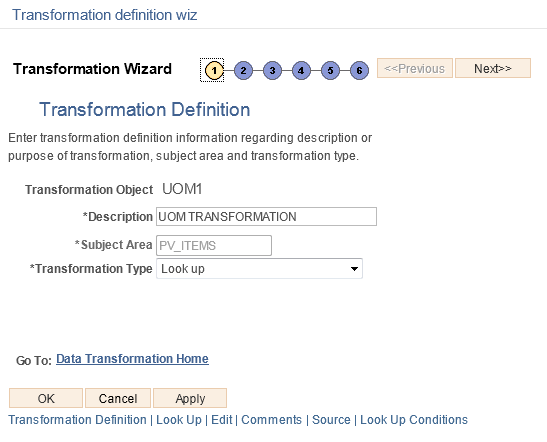
Setting Up UOM and Currency Transformations
Setting Up UOM and Currency Transformations is a process in six steps each for UOM and Currency Transformations. For the first three steps, user must enter the desired description and select relevant values from the fields as per the examples given. The rest of the steps can be followed with default data populated on the screens.
Use the Transformation Definition Wizard page to setup UOM and Currency Transformations.
This example illustrates the fields and controls on the Transformation Definition Wizard (1 of 3).
This example illustrates the fields and controls on the Transformation Definition Wizard (2 of 3).

This example illustrates the fields and controls on the Transformation Definition Wizard (3 of 3).

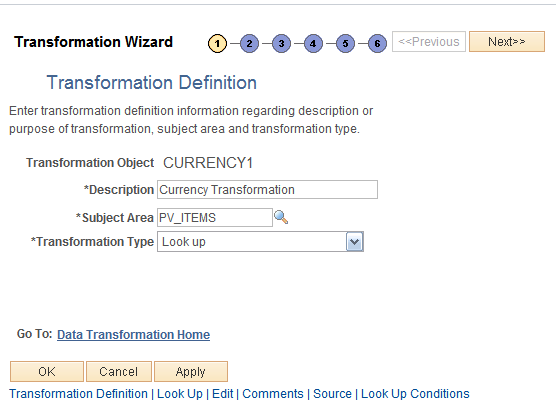
Currency Transformation
This example illustrates the fields and controls on the Currency Transformation Wizard (1 of 3).
This example illustrates the fields and controls on the Currency Transformation Wizard (2 of 3).

This example illustrates the fields and controls on the Currency Transformation Wizard (3 of 3).
