Entering and Importing Spreadsheet Vouchers
This section discusses how to enter and import spreadsheet vouchers
Access the Spreadsheet Voucher - Data Sheet worksheet by clicking the ExcelUploadforVoucher.xls file delivered with your PeopleSoft products. You use the Data Sheet worksheet to create and import voucher data.
This example illustrates the fields and controls on the Spreadsheet Voucher - Data Sheet worksheet. You can find definitions for the fields and controls later on this page.
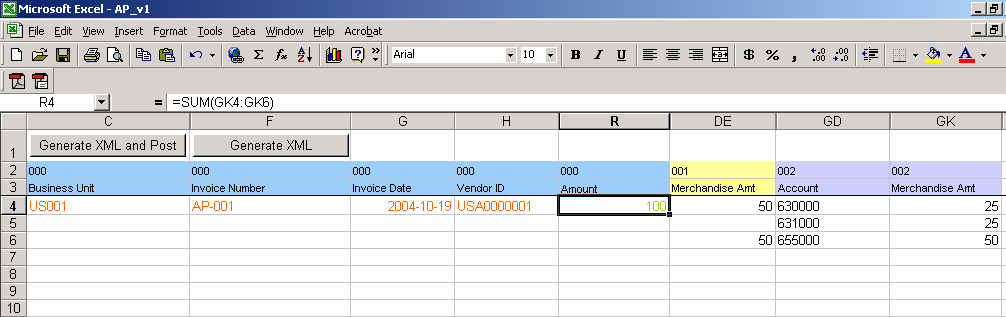
Enter voucher data and import the voucher data into PeopleSoft Payables using the Data Sheet worksheet. The Data Sheet worksheet is designed to display only the fields selected in the Template worksheet. You can use Microsoft Excel functionality to populate data in the Data Sheet worksheet. For example, you can enter a formula in the gross amount field in the voucher header that sums up the amount fields on the voucher distribution line.
Note: You are required to enter data in at least one row in the voucher header and the voucher distribution line. If no data is entered in the voucher line, VB macros create data from the fields entered in the voucher header. You should not enter the same voucher header data for multiple voucher lines. Also, you should not enter the same voucher line data for multiple distribution lines.
Field or Control |
Description |
|---|---|
Record Type (line 2) |
Displays the record type associated with the field:
|
Description (line 3) |
Displays the description of the field. |
Generate XML and Post |
Click to create an XML file and instantly post the file to the URL defined in the Template worksheet. The Microsoft Excel Save As window appears when you click the Generate XML and Post button. Save the XML file with the default file name to the same folder where the actual spreadsheet resides to instantly post the XML file to the URL. Note: For the VB macro to post your file to the URL available to the Integration Broker, you must use the default file name and save the file in the same directory and folder that contains the source Microsoft Excel file (for example, the ExcelUploadforVoucher.xls file). Note: The URL string must be valid to post the XML data. The VOUCHER_BUILD message retrieves the XML data from the URL site once it is posted. |
Generate XML |
Click to create an XML file. The Microsoft Excel Save As window appears when you click the Generate XML button. Indicate the file name and where you want to save it. As an example, you can write the data to an FTP site and create another process to post the XML file to the URL separately. When the Integration Broker is active, the VOUCHER_BUILD message picks up the XML data. Note: You can save the file using a different file name and folder than the default file name and folder if you are using another process to post your file to the URL available to the Integration Broker. |