Entering Express Deposits
|
Page Name |
Definition Name |
Usage |
|---|---|---|
|
PAYMENT_EXPRESS1 |
Enter information and control totals for a new deposit. |
|
|
PAYMENT_EXPRESS2 |
Enter and apply payments with item IDs in a deposit after you enter the deposit control totals. |
|
|
PAYMENT_EXPRESS3 |
Post a deposit (provided that you entered and saved payments on the Express Deposit - Payments page), review accounting entries, create worksheets for incompletely applied payments, clear worksheets, or permanently delete the entire deposit so that you can start over. |
|
|
Express Deposit - Accounting Entries |
GROUP_ENTRY3 |
Review and modify accounting entries for payments in an express deposit. See the Express Deposit - Action Page. |
If you have an item ID, use express deposit so that you can enter deposits and apply payments at the same time. You do not need customer information to use an express deposit.
If you do not have an item ID but have a customer ID, a reference number, an amount, or only a business unit, you must use a payment worksheet to apply the payment.
You can use express deposits to enter deposits, apply payments, and set payments to post as long as these conditions are met:
The item currency and the base currency of the payment must be the same.
You do not need to journal payments directly.
You need only limited handling of discounts.
You will post the deposit in a standard run of the Receivables Update process.
This documentation discusses how to:
Enter express deposit totals.
Enter and apply payments with express deposit.
Select an express deposit action.
Correct express deposit balancing errors.
Use the Express Deposit - Totals page (PAYMENT_EXPRESS1) to enter information and control totals for a new deposit.
Navigation:
This page is identical to the Regular Deposit - Totals page.
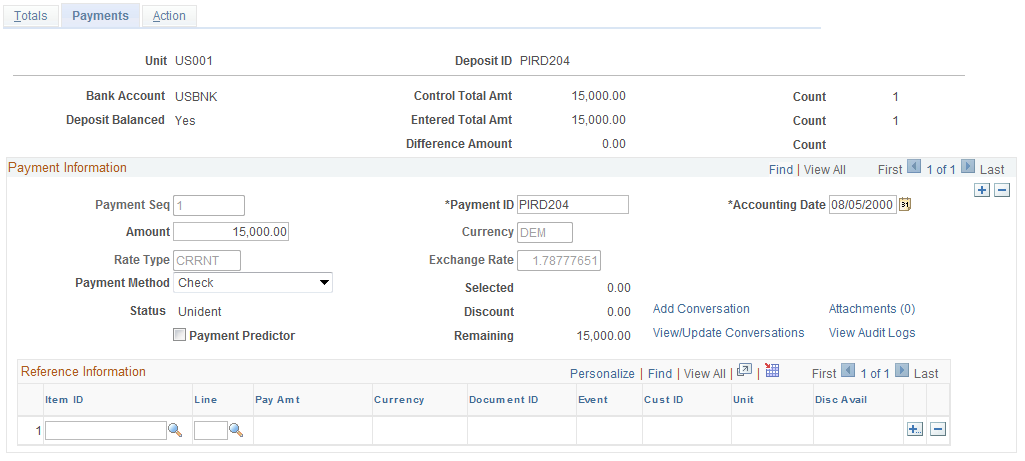
Use the Express Deposit - Payments page (PAYMENT_EXPRESS2) to enter and apply payments with item IDs in a deposit after you enter the deposit control totals.
Navigation:
This example illustrates the fields and controls on the Express Deposit - Payments page. You can find definitions for the fields and controls later on this page.
Field or Control |
Description |
|---|---|
Deposit Balance |
Displays the deposit status. When the amount total and number of entered payments equals the control amount and count from the Express Deposit - Totals page, the status changes from No to Yes. |
Control Total Amt (control total amount) |
Displays the control totals entered on the Express Deposit - Totals page. |
Entered Total Amt (entered total amount) and Difference Amount |
Displays the amount of the payments that you have entered and the difference between the payments entered and the control totals. If the control and entered totals are not the same, you cannot apply any of the payments. Balancing these control totals is a necessary first step in payment application. |
Payment Information
You can only update payment information for deposits that have not been reconciled with a bank statement.
Field or Control |
Description |
|---|---|
Payment Sequence |
When you enter a payment ID, the system assigns the next number to the payment so that you can track the order in which they were entered. |
Payment ID |
Enter the check number or other identifying number. |
Accounting Date |
Displays the payment date using the accounting date on the Totals page as the default. The system validates the payment date to make sure it falls within the open period for the business unit and transaction type as defined on the Open Periods page for the business unit. The payment date may be different from the deposit date if you use the postmark date from checks. The payment date affects earned discounts, so it must be accurate. |
Payment Predictor |
Select to use the Payment Predictor process to process a payment. This setting may override a default setting at the customer level. If a worksheet already exists for this payment, the check box is clear, and you cannot select it. Note: If you receive payments for vendor rebate claims or claimback items from PeopleSoft Purchasing or PeopleSoft Order Management, do not select this option. You must manually apply the payments on the payment worksheet to indicate the base and VAT amounts for each item. |
Amount |
Enter the amount for the individual payment. |
Payment Method |
Select Check or Electronic Funds Transfer. The system uses the default payment method from the deposit type or business unit on the Receivables Options page. You can override the default payment method only for individual payments. If the Payment Method field is left blank, the payment method is assigned like this:
If the payment method is Cash, the deposit was entered as a cash drawer receipt for a counter sale. In this case, all payments in the deposit are cash payments, and you cannot change the payment method. Also, you cannot add any payments to the deposit. The only information that you can change for cash payments is the reference information. Note: If you enter deposits online, the cash payment method is not available. |
Selected |
Displays the total amount of payments applied to items. |
Discount Taken |
Displays the total amount of discount taken on the items. |
Remaining |
Displays the total amount of the payment remaining after you apply items to the payment. This amount reflects discounts taken. |
Add Conversation and View/Update Conversations |
Click the Add Conversation link to access the Conversations page and add a new conversation concerning a customer's express deposit. Click the View/Update Conversations link to review or update an existing conversation with or about the customer associated with this express deposit. |
Reference Information
Field or Control |
Description |
|---|---|
Item ID |
Enter the ID of the item that you want to pay. When you provide an item ID, the system displays the item's payment amount. You can override this amount to create a partial payment or overpayment. The system displays a value in the Cust (customer) field or the Unit field unless an item ID references more than one item. If the system finds more than one item for the item and item line that you entered, it supplies only the item ID. |
Discount |
Select for an earned discount. The check box is selected by default if the discount is earned. The check box is deselected if the discount is unearned. If you want to take an unearned discount, you must create a payment worksheet. |
Disc Avail (discount available) |
Displays the amount available for an earned discount. |
If you cannot completely apply a payment on this page, use a payment worksheet to apply prepayments, deductions, adjustments, on-account payments, and write-offs as needed.
Use the Express Deposit - Action page (PAYMENT_EXPRESS3) to post a deposit (provided that you entered and saved payments on the Express Deposit - Payments page), review accounting entries, create worksheets for incompletely applied payments, clear worksheets, or permanently delete the entire deposit so that you can start over.
Navigation:
Field or Control |
Description |
|---|---|
Delete Express Deposit |
Click to delete the entire deposit. If you entered and saved payments on the Express Deposit - Payments page, use this option only if you want to permanently delete the entire deposit. |
Deposit Balance |
Displays the status for the deposit. It must be Balanced before you can set the deposit to post. |
Go To Worksheet |
Click to open the Payment Worksheet Application page, where you can manually apply payments to items and make partial payments. This link is only displayed after a worksheet is built. |
Status |
Displays the posting action for the deposit. Values are No Action (deposit not ready to post) or Standard (deposit has been set to post). |
Posting Actions
Select a posting action for the payments.
Field or Control |
Description |
|---|---|
Do Not Post |
The system disables this button by default. You can click this button only if you previously selected Batch Standard for payments. This option will reverse the posting status from Standard to No Action for payments that are either not journaled or not posted. |
Batch Standard |
. Click to set payments to Batch Standard posting status. The next time that a standard scheduled Receivable Update batch job runs, this payment will be processed. Be aware that this run may occur only once each day depending on how often your organization schedules standard jobs. Selecting this button:
|
Note: Express deposits are posted as individual payments rather than in a payment group. However, a payment group consisting of only one payment is used for a cash application.
Worksheet Actions
Field or Control |
Description |
|---|---|
Build |
Click to create one worksheet for every payment in the deposit. The system indicates the number of worksheets created. Note: Instead of using the Build button, you can use the worksheet menu options to create one worksheet at a time. Important! The system does not build payments without any identifying information into a worksheet. Carefully review these unidentified payments. |
Delete |
Click to delete the payment group that was created without deleting the entire deposit. If you accidentally select the wrong action, select Delete Worksheet on the Worksheet Action page to delete the worksheets, but retain the express deposit information that you entered. |
Accounting Entry Actions
Field or Control |
Description |
|---|---|
Create Entries |
Click to create accounting entries online for all applied payments in the deposit, as long as the deposit is in balance. The system accesses the Accounting Entries page (GROUP_ENTRY3) where you can review and modify accounting entries. The payment status is set to Worksheet. You must return to the Action page to set the group to post. Typically, you let the Receivables Update process create accounting entries. You need to create accounting entries online only when you must review them immediately. |
A deposit is out of balance when either the number of entered payments does not match the control number or the total amount of entered payments does not equal the deposit control amount. You may recognize an out-of-balance deposit either by the Not Balanced message on the express deposit entry pages or because the Worksheet Selection page is not available when you try to build a worksheet for one of the payments in a deposit.
To correct errors on express deposits:
Adjust express deposit totals.
Adjust payment information.
Delete the deposit as needed.
The pages that you use to correct express deposit balancing errors are identical to the pages that you use to enter express deposits. However, you use a different navigation path to access the pages for balancing errors. You use the Express Deposit Balancing component (EXP_BALANCE).
The pages work the same as when you enter deposits and payments, but only out-of-balance deposits are available for you to select. When you use pages for balancing errors, you can change any of the information associated with a deposit or payment.