Receiving and Editing Spreadsheet Payments
|
Page Name |
Definition Name |
Usage |
|---|---|---|
|
EXCEL_EDIT_REQUEST |
Use to retrieve and validate payment data that is created from an uploaded XML file. |
|
|
Payment Interface Page |
PAYLOAD_REQUEST |
Run the Payment Loader process for spreadsheet payments. See Running the Payment Loader Process. See the Payment Interface Page for more information. |
|
EXCEL_ERROR_LIST |
Select deposit records created from the Excel Payment Upload process. |
|
|
EXCEL_ERR_CORR |
Edit payments created from the Excel Payment Upload process that have been marked as containing errors |
|
|
EXCEL_ERR_CORR2 |
Edit the reference information for a payment received from the Excel Payment Upload process. |
|
|
EXCEL_ERROR_DJ_SEC |
Correct Direct Journal accounting line errors. |
Before you can enter and import spreadsheet payments, you must:
Copy either the ExcelUploadforDeposits.xls or ExcelUploadforDeposits_2007.xlsm file to a folder on your workstation.
The files are located in the core\build\excel folder of the shipped PeopleSoft software.
Install MicroSoft-delivered XML library file MSXML.DLL on your workstation.
Set up your Microsoft Excel to accept macros.
Important! The Security is set to Medium in the delivered Excel files. When the security is set to Medium, you can choose whether or not to run potentially unsafe macros. Always choose to enable macros! If you disable the macros, the functionality of the upload will not run.
Configure Integration Broker for the Receivables EIP (enterprise integration point).
The web server and the application server should be configured for setting up the Integration Gateway. Also, the application server should be configured to have the Pub/Sub servers established before bringing up the application server.
Determine your default local node for the Integration Broker to receive the data and run the application message. Oracle defines the default local node as PSFT_EP, but you can change it to your default local node.
Configure your browser to automatically detect LAN settings. From your browser, navigate to Select the Connections tab and click the LAN Settings button. Select Automatically detect settings in the Automatic configuration group box.
See the product documentation for PeopleTools: Integration Broker Administration.
Create an Excel Payment Upload process run control.
Access the Spreadsheet Payment - Template worksheet by clicking either the ExcelUploadforDeposits.xls or ExcelUploadforDeposits_2007.xlsm file delivered with your PeopleSoft products. You set the defaults and set up your payment spreadsheets for importing into PeopleSoft Receivables on the Template worksheet.
This example illustrates the fields and controls on the Spreadsheet Payment -Template worksheet.
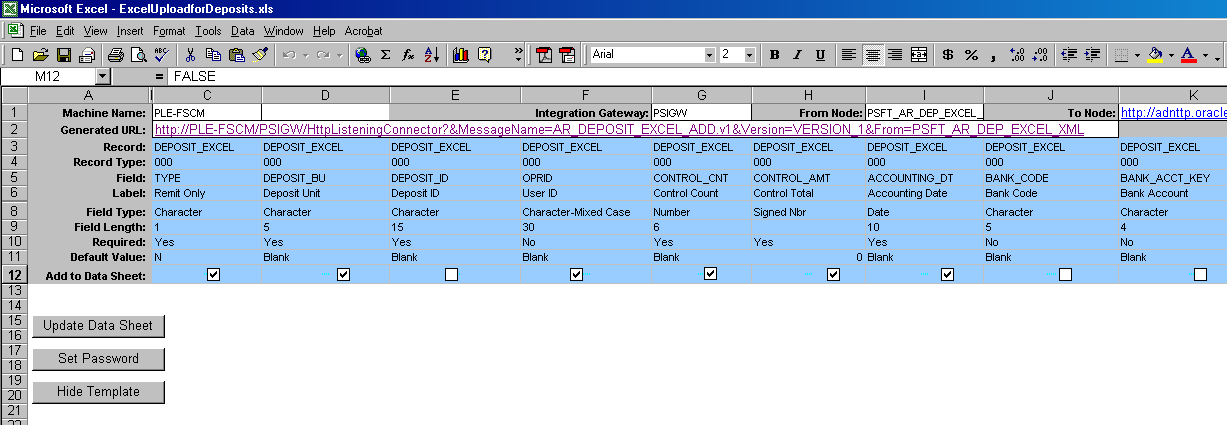
The Template worksheet in the Spreadsheet Payment workbook contains all of the available fields that you can use on the Data Sheet worksheet to enter payment data.
Field or Control |
Description |
|---|---|
Machine Name, Integration Gateway, From Node, and To Node |
Displays the machine name, integration gateway, from node, and to node. The data displayed in these fields creates a URL string. The values for these fields are determined by login options. For information about the Login window, see Entering Spreadsheet Payments. |
Generated URL |
Displays the URL generated from the machine name, integration gateway, and node fields. |
Record |
Displays the Excel Payment Upload table name associated with the field. |
Record Type |
Displays the record type associated with the field. Values are:
The deposit, payment, customer remit, summary, and detail reference remit information fields are color-coded to differentiate the various sets of data. |
Field |
Displays the name of the field. |
Label |
Displays the label of the field. |
Field Type |
Displays the type of the field. Types include Character, Date, and Number. |
Field Length |
Displays the length of the field. |
Required |
Displays a value of Yes or No depending on whether the field is required during data entry. |
Default Value |
Enter the default value for the field. The Default value entered on the Template worksheet will be the value used in the XML file. You can override the default value on the Data Sheet worksheet. Note: You can enter default values for fields not included in the Data Sheet worksheet. The default values will become part of the transaction data, but will not be visible on the Data Sheet worksheet. |
Add to Data Sheet |
Select to include the field on the Data page. |
Update Data Sheet |
Click to update the Data Sheet worksheet with the selected fields. |
Set Password |
Click to enter or change a password associated with this spreadsheet file. |
Hide Template |
Click to hide the Template worksheet for this spreadsheet file. You will be prompted to enter a password if one has not been defined. You can navigate back to the Template worksheet by selecting from your Excel Tools menu, Macro, Macros. A window pops up listing all the macros. Select the ShowAdminSheet macro and click Run. The system prompts you for a password before displaying the Template worksheet. |
Access the Spreadsheet Payment - Data Sheet worksheet by clicking either the ExcelUploadforDeposits.xls or ExcelUploadforDeposits_2007.xlsm file delivered with your PeopleSoft products. You use the Data Sheet worksheet to create and import payment data.
This example illustrates the fields and controls on the Spreadsheet - Data Sheet worksheet.
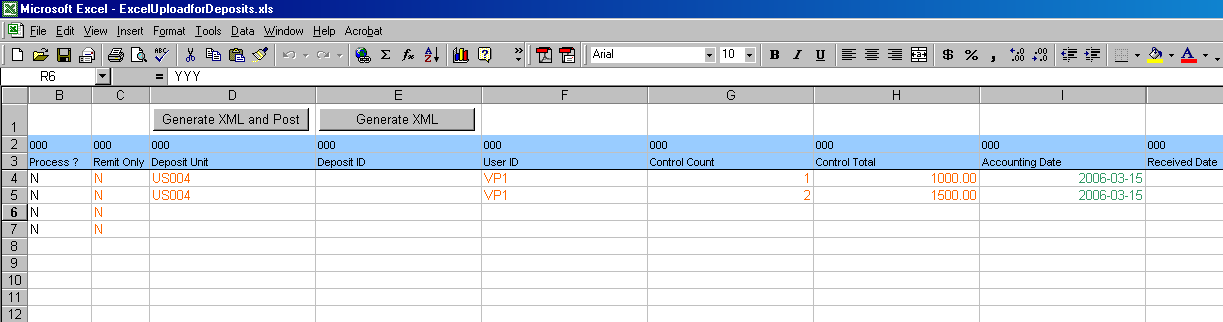
Enter payment data and import the payment data into PeopleSoft Receivables using the Data Sheet worksheet. The Data Sheet worksheet is designed to display only the fields selected in the Template worksheet.
Note: You must enter data in record type 000, the Deposit Information fields in the first row of the Data Sheet worksheet. The VB macro skips all rows until the macro locates data in the Deposit Unit field in record type 000. You are not required to enter the deposit information for multiple payments if they are part of a single deposit. Also, you are not required to enter the same payment information for multiple lines of customer and item remit information.
Field or Control |
Description |
|---|---|
Record Type (Line 2) |
Displays the record type associated with the field. Values are:
|
Description (Line 3) |
Displays the description of the field. |
Generating the XML and Posting
To create and post the file, select one of the following buttons:
Field or Control |
Description |
|---|---|
Generate XML and Post |
Click to create an XML file and post the file to the URL entered onto the Address field of the login page. The Excel Save As window appears when you click the Generate XML and Post button. Indicate the filename and where you want to save it. |
Generate XML |
Click to create an XML file. The Excel Save As window appears when you click the Generate XML button. Indicate the file name and where you want to save it. For example, you can write the data to an FTP site and create another process to post the XML file to the URL. When Integration Broker is active, it posts the XML data to the system making the data available for processing by the online and batch Receivables Excel Payment Upload process. |
Upon clicking the Generate XML and Post button, the user is required to enter a user ID, password, and URL that are valid to upload deposit information into the PeopleSoft database.
This example illustrates the fields and controls on the login window for the AR Excel Deposit Upload spreadsheet. You can find definitions for the fields and controls later on this page.

Field or Control |
Description |
|---|---|
User ID and Password |
(Required) Enter a valid user ID and password. |
Address |
(Required) Enter the machine address. |
Generate log file |
Select this option to create a log file that shows the results of the upload process. |
Dedicated Integration Broker Gateway and Local Note |
Select this check box if using a Dedicated database configuration for the Integration Broker Gateway. In this case, leave the Local Node clear. You must enter a value for the Local Node if not using a dedicated database configuration for the Integration Broker Gateway. See the product documentation for PeopleTools: Integration Broker. |
Use the Excel Payment Upload Process page (EXCEL_EDIT_REQUEST) to retrieve and validate payment data that is created from an uploaded XML file.
Navigation:
Field or Control |
Description |
|---|---|
Deposit Unit |
Enter the business unit for the Excel deposits that you want to edit. Leave this field blank to accept deposits from any business unit. |
Deposit ID |
Enter the deposit ID for the Excel deposits that you want to edit. Leave this field blank to accept all deposits. |
User ID |
Enter the user ID for the Excel deposits that you want to edit. Leave this field blank to accept all user IDs. |
Use the Payment Interface page (PAYLOAD_REQUEST) to run the Payment Loader process for spreadsheet payments.
Navigation:
Select the Upload from Excel check box.
Note: You can use the Excel Payment Upload process to enter remit-only information.
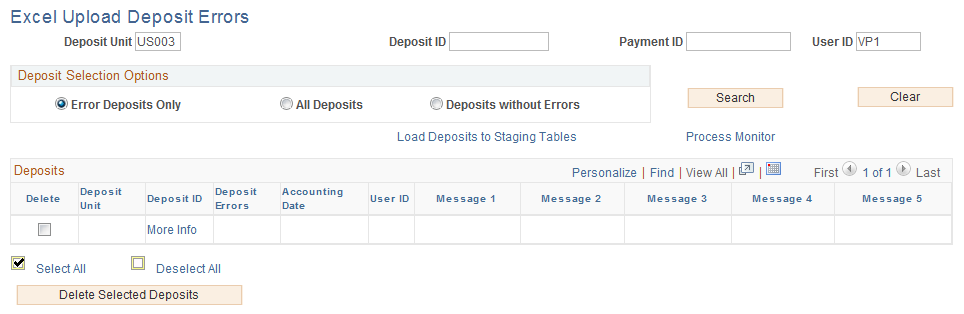
Use the Excel Upload Deposit Errors page (EXCEL_ERROR_LIST) to select deposit records created from the Excel Payment Upload process.
Navigation:
Use this page to review and select deposit records created by the Excel Payment Upload process. You can narrow the selection criteria by specifying a deposit business unit, deposit ID, payment ID, or user ID. You can review all of the Excel deposit records by leaving all four of these fields blank.
This example illustrates the fields and controls on the Excel Upload Deposit Errors page. You can find definitions for the fields and controls later on this page.
Field or Control |
Description |
|---|---|
Error Deposits Only |
Select to display only spreadsheet deposits that contain errors. |
All Deposits |
Select to display all spreadsheet deposits with or without errors. |
Deposits without Errors |
Select to display only deposits that do not contain errors. |
Search |
Click this button after you determine the search criteria to display the relevant deposits in the Deposits region. The page displays the deposit data and up to five error messages for each deposit. |
Clear |
Click to clear the search criteria. |
Load Deposits to Staging Tables |
Click to run the Excel Payment Upload process. The process uses the values in the Deposit Unit, Deposit ID, and User ID fields for the run control criteria. You can view the deposits that the system will edit and load to the staging tables by selecting the Deposits Without Errors check box and then clicking the Search button. |
Process Monitor |
Click to access the Process List page and view the process that you initiated by clicking the Load to Staging Tables link. A link on the Process List page enables you to return to the Excel Upload Deposit Errors page. |
Delete |
Select to mark the deposit for deletion. |
Deposit ID |
Displays the identifier for a payment within a deposit. Click the link for the payment to open the Excel Upload Error Correction page, where you can edit payments created from the Excel Payment Upload process that have been marked as containing errors. |
Deposit Errors |
Indicates whether the deposit has errors. Valid values are Y, to indicate errors in a deposit, and N, to indicate that no errors are in a deposit. |
Message 1, Message 2, Message 3, Message 4, and Message 5 |
Displays up to five error messages associated with each deposit. |
Delete Selected Deposits |
Click to delete any deposits on this page that have the Delete check box selected. |
Use the Excel Upload Error Correction page (EXCEL_ERR_CORR) to display the deposit data for deposits with errors.
Navigation:
Click the link for the deposit ID on the Excel Upload Deposit Errors page.
This page also displays up to five error messages for a deposit. You can change the deposit information or information for individual payments on this page to correct the errors. The system enables you to add or delete payments for the current deposit. If you add or delete payments, you must also change the values in the Control Total Amount and Control Count fields until the values in the Difference Amount and Difference Count fields equal zero.
After completing the changes, click the Apply button to save your changes, or click the OK button to save the changes and return to the Excel Upload Error Correction page. Click the Cancel button to remove any changes you have made since clicking the Apply button or the OK button.
Note: Clicking the Cancel button after accessing the References page can also remove some changed data if you do not first click the Apply button or the OK button.
Field or Control |
Description |
|---|---|
Message 1, Message 2, Message 3, Message 4, Message 5 |
The system displays up to five error messages associated with the deposit. The Payments region displays all error messages associated with the payments in the deposit. |
Get Payments with Errors |
Click to populate the Payments region with information about any payments in this deposit that contain errors. |
Get All Payments |
Click to populate the Payments region with information about any payments in this deposit. |
Error Correction Complete |
Displays a check box that indicates that the error correction for this deposit is complete. |
References |
Click to access the References page. You can modify values and add or delete reference records on this page. |
|
Direct Journal Acctg Entries |
Click to access the Excel Direct Journal Error page. You can correct Direct Journal accounting line errors on this page. |
Use the References page (EXCEL_ERR_CORR2) to edit the reference information for a payment received from the Excel Payment Upload process.
Navigation:
Click the References link on the Excel Upload Error Correction page.
Use this page to add, delete, or modify any customer, summary, and detail references associated with a payment.
Click the Apply button to save your changes or click the OK button to save your changes and return to the Excel Upload Error Correction page. Clicking the Cancel button cancels any changes you have made.
Use the Excel Direct Journal Error page (EXCEL_ERROR_DJ_SEC) to correct Direct Journal accounting line errors.
Navigation:
Click the Direct Journal Acctg Entries link on the Excel Upload Error Correction page.
Use this page to edit the direct journal accounting entry values.