Setting Up FACTS I Trees
To set up FACTS I trees, use the following components:
Tree Manager (PSTREEMGR)
FACTS Tree Group (FACTS_TREE_GRP)
TableSet Control (SET_CNTRL_TABLE1)
This section discusses:
|
Page Name |
Definition Name |
Usage |
|---|---|---|
|
Tree Definition and Properties Page |
PSTREEDEFN |
Create a new tree, beginning with the tree definition to identify the tree name, related structure ID, SetID, and any other rules or characteristics of the tree. Upon clicking OK, you are directed to the Enter Root Node for Tree page where you define levels and root node. Once done, the OK button directs you to the Tree Manager page to build your tree. |
|
Tree Manager Page |
PSTREEMGR |
Access an existing tree with options that enable you to access and modify the tree definition and properties, print, and configure tree display options. |
|
FACTS_TREE_GRP |
Contains all of the FACTS I trees and the rollup level. This page is identified on the run control page for FACTS I reporting and processing. |
|
|
SET_CNTRL_TABLE1 |
Defines all the record groups based on a specific Set Control Value and their associated SetIDs. Also identifies the default SetID of the PeopleSoft General Ledger business unit. |
|
|
TableSet Control - Tree Page |
SET_CNTRL_TABLE2 |
Set up tree values on this table if your SetID for your business units do not match your default SetID. |
Use the Tree Definition and Properties page (PSTREEDEFN) to create a new tree, beginning with the tree definition to identify the tree name, related structure ID, SetID, and any other rules or characteristics of the tree.
Upon clicking OK, you are directed to the Enter Root Node for Tree page where you define levels and root node. Once done, the OK button directs you to the Tree Manager page to build your tree.
Navigation:
Enter a tree name and click the Add button.
Use the Tree Manager page (PSTREEMGR) to access an existing tree with options that enable you to access and modify the tree definition and properties, print, and configure tree display options.
Navigation:
Create the Transfer Agency tree using PeopleSoft Tree Manager based on the following example.
This tree contains nodes for each of the transfer agencies and is used by both FACTS I and FACTS II. If you have decided to use the same ChartField for both Transfer Agency and Transfer Account, then the values in your ledger for that ChartField will represent both Transfer Agency and Transfer Account at the same time. The tree will allow the program to translate the combination Transfer Agency/Account value of the ledger to the Transfer Agency value that is required by U.S. Treasury.
This example illustrates the fields and controls on the FACTS Transfer Agency tree - Tree Manager page. You can find definitions for the fields and controls later on this page.

Using PeopleSoft Tree Manager, set up a FACTS I Bureau tree similar to this example for your organization.
This example illustrates the fields and controls on the FACTS I Bureau Tree Manager page. You can find definitions for the fields and controls later on this page.

The node values at one level of the tree represent the values that the U.S. Treasury is expecting in the FACTS I flat file. You select this level on the FACTS Tree Group page.
See also PeopleTools documentation: PeopleSoft Tree Manager, "Introduction to PeopleSoft Tree Manager"
Using PeopleSoft Tree Manager, set up a Fund Group tree similar to this example for your organization.
This example illustrates the fields and controls on the Tree Manager page - FACTS I Fund Group tree. You can find definitions for the fields and controls later on this page.

Using PeopleSoft Tree Manager, set up a Department tree similar to this example for your organization.
This example illustrates the fields and controls on the FACTS I Department Tree page. You can find definitions for the fields and controls later on this page.

This tree consists of a hierarchy of department levels with the ledger values that roll up into them. The level that appears for this tree on the FACTS Tree Group page indicates the level that will be used for reporting.
Using PeopleSoft Tree Manager, set up an Account tree similar to this example for your organization.
This example illustrates the fields and controls on the Tree Manager page - FACTS I Account tree. You can find definitions for the fields and controls later on this page.

For FACTS I reporting, the Account value is four characters; the node value is 1000 at the ACCDT_TYPE level in the FACTS_ACCOUNT tree.
Note: To display tree levels on the tree, click the Display Options link and select the Display Levels check box. Click the Update button.
Using PeopleSoft Tree Manager, set up an Exchange/Account tree similar to this example.
Note: The FACTS I Exchange / Acct tree requires three nodes: T, X, and X OR T. The node names must be named exactly as specified.
This example illustrates the fields and controls on the Tree Manager page - FACTS I Exchange Account tree. You can find definitions for the fields and controls later on this page.

Using PeopleSoft Tree Manager, set up a Custodial/Acct tree similar to this example.
Note: The FACTS I Custodial / Acct tree requires three nodes: S, A, and S OR A. The node names must be named exactly as specified.
This example illustrates the fields and controls on the Tree Manager page - FACTS I Custodial/Acct tree. You can find definitions for the fields and controls later on this page.

Using PeopleSoft Tree Manager, set up a Budget Subfunction tree similar to this example.
Note: The FACTS I Budget Sunfunction / Acct tree requires no specific node name. This tree has to list only those accounts that require this attribute to be reported.
This example illustrates the fields and controls on the Tree Manager page - FACTS I Budget Subfunction / Account tree. You can find definitions for the fields and controls later on this page.

Using PeopleSoft Tree Manager, set up a FACTS I Tran Partner tree similar to this example.
This example illustrates the fields and controls on the FACTS I/II Transaction Partner Tree Manager page. You can find definitions for the fields and controls later on this page.

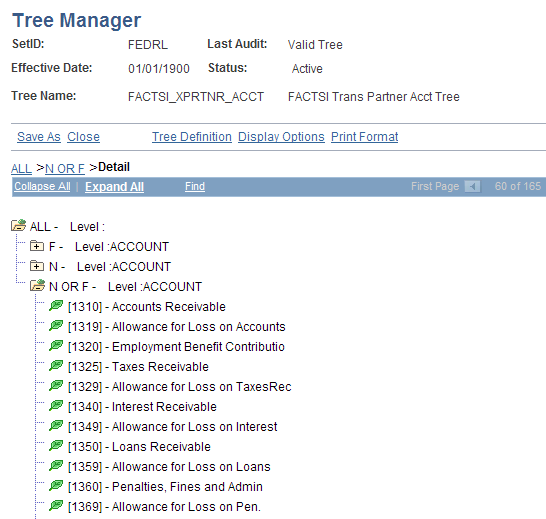
Using PeopleSoft Tree Manager, set up a Transaction Partner / Acct. tree similar to this example.
Note: The FACTS I Transaction Partner / Acct tree requires three nodes: N, F, and N OR F. The node names must be named exactly as specified.
This example illustrates the fields and controls on the FACTS I Transaction Partner/Acct Tree Manager page. You can find definitions for the fields and controls later on this page.
Using PeopleSoft Tree Manager, set up a FACTS I Accounts Req Attributes tree similar to this example.
This example illustrates the fields and controls on the Tree Manager page - FACTS I Accounts Req Attributes (accounts requiring attributes) . You can find definitions for the fields and controls later on this page.

Note: The FACTS I Account Req Attributes tree differs from the FACTS II tree of the same name in that it requires only three nodes: TRADING_ PARTNER, FED_NONFED, and BUDGET_SUBFUNC. The node names must be named exactly as specified.
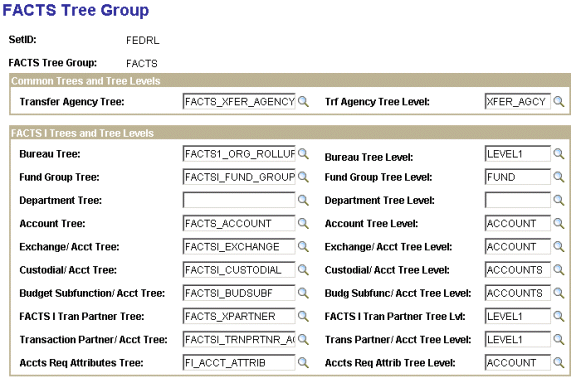
Use the FACTS Tree Group page (FACTS_TREE_GRP) to associate all of the FACTS I trees and the rollup levels for processing.
This page is identified on the run control page for FACTS I reporting and processing.
Navigation:
This example illustrates the fields and controls on the FACTS Tree Group page (1 of 2). You can find definitions for the fields and controls later on this page.
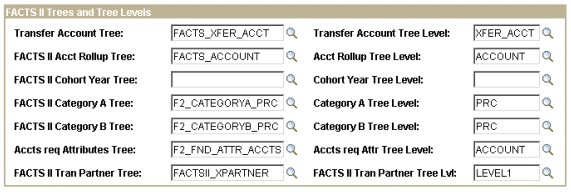
This example illustrates the fields and controls on the FACTS Tree Group page (2 of 2). You can find definitions for the fields and controls later on this page.
Field or Control |
Description |
|---|---|
Common Trees and Tree Levels |
Select the Transfer Agency Tree name and the Tree Level that you created for your organization. This tree is used by both FACTS I and FACTS II. |
FACTS I Trees and Tree Levels |
Associate the appropriate tree names and the tree levels that you created for your organization with each of the PeopleSoft tree names. These are FACTS I trees only. |
FACTS II Trees and Tree Levels |
Associate the appropriate tree names and the tree levels that you created for your organization with each of the PeopleSoft tree names. These are FACTS II trees only. |
Carefully choose the SetIDs to be used for the FACTS Tree Group and the FACTS I Trees and configure the TableSet Control SetIDs accordingly. Incorrect configuration could result in the unavailability of tree group names or tree names in prompt lists on pages, or in the inability of the FACTS I process to retrieve data.
If your organization has only one business unit and you use only one SetID to set up your ChartFields, trees, and tree groups, then your TablesSet Control SetIDs should all be the same and do not need changing. Also, if you use more than one business unit that uses the same default SetID, then the Control Tables should not need to be modified. However, check the TableSet Control pages for each business unit and SetID, using their values as the Set Control Values, to ensure that all tables and trees are using the same SetID. Note that the Tree Group table is in the GL_15 Federal Reports Record Group in the TableSet Control Record Group page.
If you use more than one SetID in your organization for setting up your ChartFields, trees, and tree groups, then you must make sure that each SetID that you use is set up correctly in TableSet Controls. The SetIDs used in the following steps are only examples:
Set up your FACTS I ChartFields, trees, and tree group using the FEDRL SetID.
Identify the general ledger business unit (for example, FED01) that you want to use for FACTS I processing.
Access the SetControl Value (FED01) in TableSet Control - Record Group page. The Default SetID designated at the top of this page is the default SetID that you set up for the general ledger business unit.
Find the GL_15 Federal Reports Record Group and select the SetID (FEDRL) for GL_15 to match the SetID (FEDRL) that you used to create your tree group.
The FACTS Tree Group table is a part of the GL_15 Record Group and must have the same SetID. This selection enables the Tree Group list box to appear on the Accumulate FACTS I Data page so that you can select a FACTS Tree Group to process.
Verify whether the Default SetID (SHARE) on the TableSet Control Record Group page is the same (YES) or not the same (NO) as the SetID that you used to set up your trees.
The FACTS I processes normally refer to the Default SetID in the TableSet Control Record Group page and uses the default SetIDs to retrieve the FACTS I tree.
If YES, save and exit TableSet Control.
If NO, you must enter each tree on the TableSet Control - Tree page that has a SetID that is different from the Default SetID on the TableSet Control - Record Group page.
If you run FACTS I processing on multiple business units, repeat these steps.
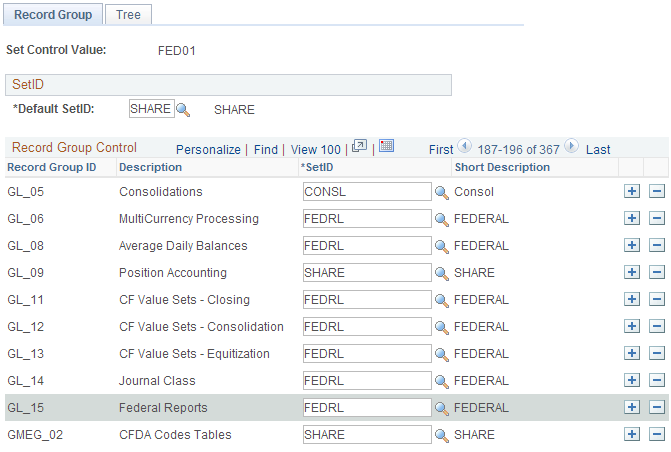
Use the TableSet Control - Record Group page (SET_CNTRL_TABLE1) to defines all the record groups based on a specific Set Control Value and their associated SetIDs.
Also identifies the default SetID of the PeopleSoft General Ledger business unit.
Navigation:
This example illustrates the fields and controls on the TableSet Control - Record Group page. You can find definitions for the fields and controls later on this page.
Field or Control |
Description |
|---|---|
Set Control Value |
To run the FACTS I Accumulation and Validation processes, you must enter a business unit. The business unit that you use is the set control value that you select to ensure that the FACTS I tree group and trees are accessible during FACTS I processing. |
Default SetID |
This is the default SetID for the general ledger business unit that you intend to use for processing FACTS I. |
Record Group ID and Description |
Find the GL_15 Federal Reports record group ID. This record group contains the FACTS Tree Group table. |
SetID |
Select a SetID for this record group that matches the SetID that you used to set up the FACTS Tree Group to use in the Accumulate FACTS I Data process. The selected SetID enables you to display a list of FACTS Tree Groups and to select the Tree Group name on the Accumulate FACTS Data page that you want the FACTS I process to access. Note: You do not need to change anything on either of the TableSet Control pages if you use only one SetID as the default for the business unit that you intend to use for FACTS I processing and for setting up your FACTS I ChartFields, trees, and tree group. |
Use the TableSet Control - Tree page (SET_CNTRL_TABLE2) to set up tree values on this table if your SetID for your business units do not match your default SetID.
Navigation:
This example illustrates the fields and controls on the TableSet Control - Tree page. You can find definitions for the fields and controls later on this page.

Note: PeopleSoft General Ledger uses the Default SetID on the TableSet Controls page to determine which trees a business unit can access. If a business unit's Default SetID is different from the SetID under which a tree is built, you must list each of those trees separately on this page so that they are accessible by the business unit for processing and reporting.