Setting Up CRM Integration Broker for Asset Integration
|
Page Name |
Definition Name |
Usage |
|---|---|---|
|
IB_NODE |
Create a remote node for the Financials database (for example, E920P41) in your CRM database (if it does not yet exist). Set up default local CRM node (for example, C920P20). |
|
|
Connectors page |
IB_NODECONN |
Enter the default Gateway ID and the Connector ID. Ping remote node. |
|
Node Definitions page (FSCM) page |
SINGLE_SIGNON |
Add the FSCM remote node (E920P41, for example) to the Single Signon setup. |
|
Gateways page |
IB_GATEWAY |
Select the Local Gateway for the Financials database. |
|
Gateway Properties page |
IBGWSIGNON |
Access the IntegrationGateway.properties file. |
|
Activating and Configuring the Service Operations for Asset Integration in CRM |
IB_SERVICE |
Activate the service operations. |
|
Service Operations - Handlers page |
IB_SERVICEHDLR |
Activate the handlers for the service operations. Activating and Configuring the Service Operations for Asset Integration in CRM |
|
Service Operations - Routings page |
IB_SERVICERTNGS |
Add and configure the routings needed for the service operations. Activating and Configuring the Service Operations for Asset Integration in CRM |
|
Queue Status page |
IB_MONITOR_QUEUES |
Confirm that the queues that are used in the Asset Integration are running. Activating and Configuring the Service Operations for Asset Integration in CRM |
Follow the steps below for setting up CRM Integration Broker
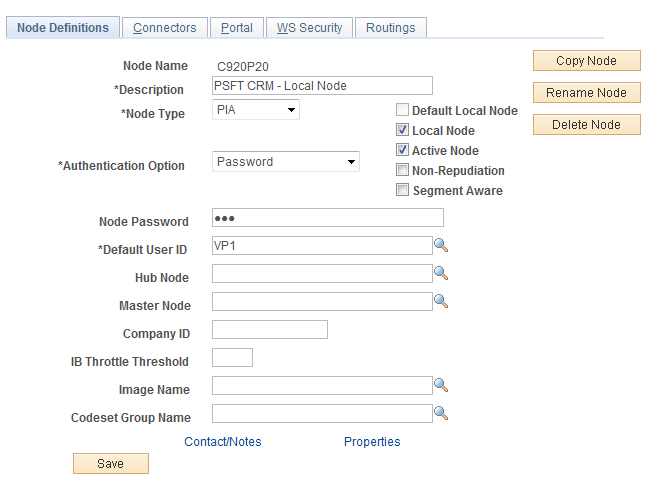
1. Sign on to the CRM database and access the Node Definitions page (IB_NODE)
Create the CRM Default Local Node if not already defined (C920P20, for example): (Navigation: PeopleTools, Integration Broker, Integration Setup, Nodes, Node Definitions.
This example illustrates the fields and controls on the Node Definitions page.
Create a Node for the Financials database as pictured (for example, E920P41):
This example illustrates the fields and controls on the Node Definitions page (FSCM).
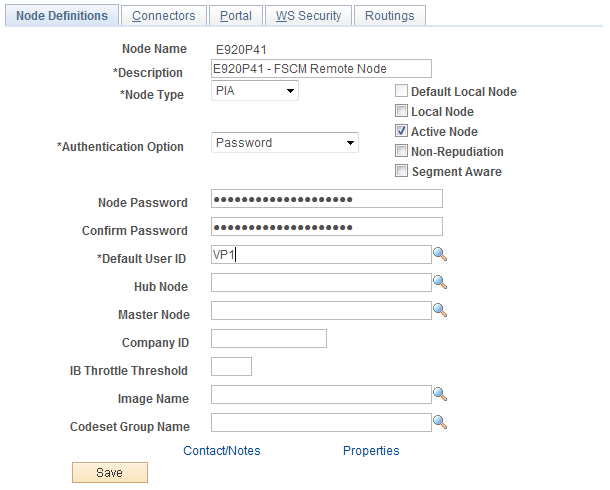
Default User ID should be the same as the User ID used by the Default Local Node.
The User ID is also the same as the one used in the setup of the Gateway Properties for this Node (VP1).
2. Use the Connectors page (IB_NODECONN) to enter the default Gateway ID and the Connector ID
Ping remote node.
Navigation:
This example illustrates the fields and controls on the Connectors Page.

Select the following:
Gateway ID = the local default Gateway (for example, LOCAL)
Connector ID = PSFTTARGET
3. Use the Gateways page (IB_GATEWAY) to select the Local Gateway for the Financials database.
Navigation:
This example illustrates the fields and controls on the Gateways Page.

Press CTRL + J and confirm the AppServer URL value. Then click the continue link.
4. Once you are returned to the Gateways page, click the Gateway Setup Properties link:
This example illustrates the fields and controls on the Gateway Setup Properties.
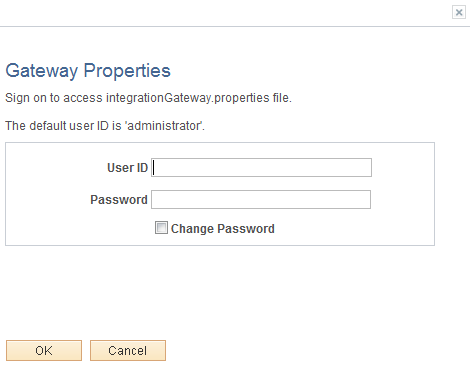
Gateway Properties page
Log in with UserID and Password.
Once you click OK, you are directed to the PeopleSoft Node Configuration page.
Find the Node Names for the Default Local Node (C920P20, for example) and the Financials database node (E920P41, for example). Confirm the App Server URL values. Click the Ping Node button to confirm each node. (If you receive No Success, log in to the Financials database (E920P41, in our example) and press CTRL+J to confirm the Application Server URL).
Add the FSCM remote node (E920P41, for example) to the Single Signon setup. Access the Single Signon page (PeopleTools, Security, Security Objects, Single Signon).
Activate and configure the following service operations:
COPY_AM_SUBTYPE
MANUFACTURER_FULLSYNC
COPY_IT_ASSET
INSTALLED_PRODUCT_FULLSYNC
INSTALLED_PRODUCT_SYNC
SYNC_IT_ASSET
Access the Domain Status page and confirm that your Domain is Active (PeopleTools, Integration Broker, Service Operations Monitor, Administration, Domain Status).
Activate the COPY_AM_SUBTYPE service operation. In the CRM database, access the Service Operations - General page (PeopleTools, Integration Broker, Integration Setup, Service Operations. Find the COPY_AM_SUBTYPE service operation):
This example illustrates the fields and controls on the Service Operations — General Page (COPY_AM_SUBTYPE).
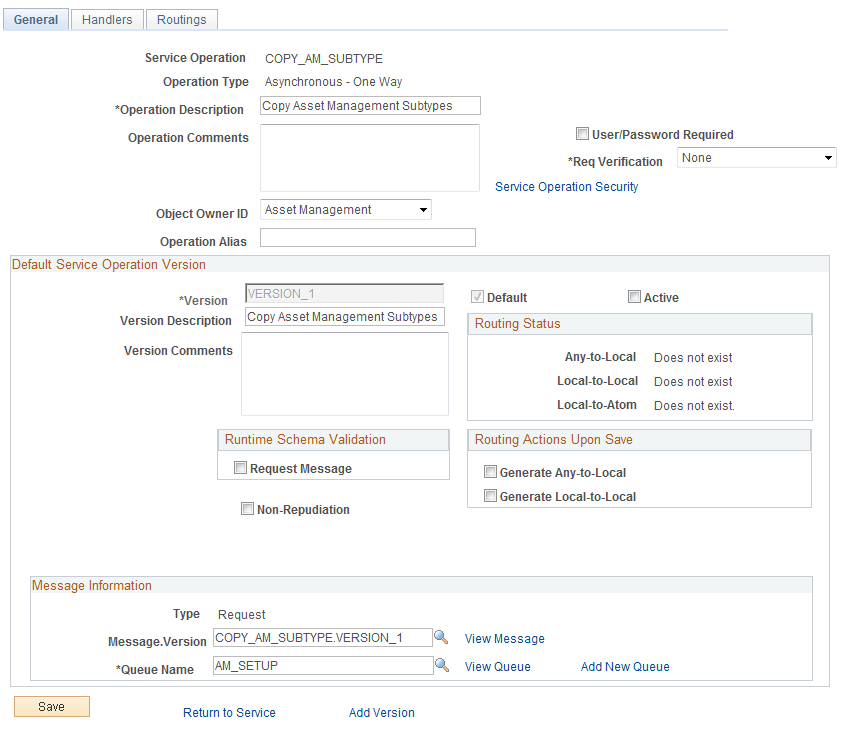
Select the Active check box to activate the service operation. Access the Handlers page and make sure that the Status is Active. Access the Routings page and add a new routing that reflects the integration:
This example illustrates the fields and controls on the Activate a Service Operation.
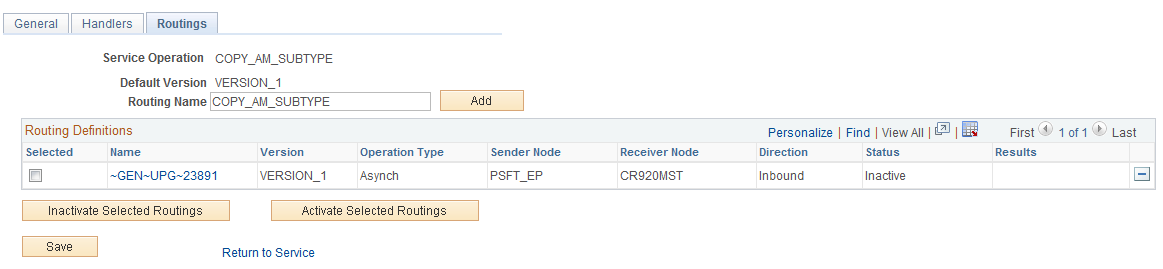
Supply the new Routing Name and click the Add button.
You will be directed to the Routing Definitions page for the routing name that you just added:
This example illustrates the fields and controls on the Routing Definitions Page (COPY_AM_SUBTYPE).

Make sure the Active check box is selected, supply a description and make sure the Sender Node is the defined FSCM remote node and the Receiver Node is the default local node.
Activate the MANUFACTURER_FULLSYNC service operation. In the CRM database, access the Service Operations – General page (PeopleTools, Integration Broker, Integration Setup, Service Operations. Find the MANUFACTURER_FULLSYNC service operation):
This example illustrates the fields and controls on the Service Operations — General Page (Activate MANUFACTURER_FULLSYNC).
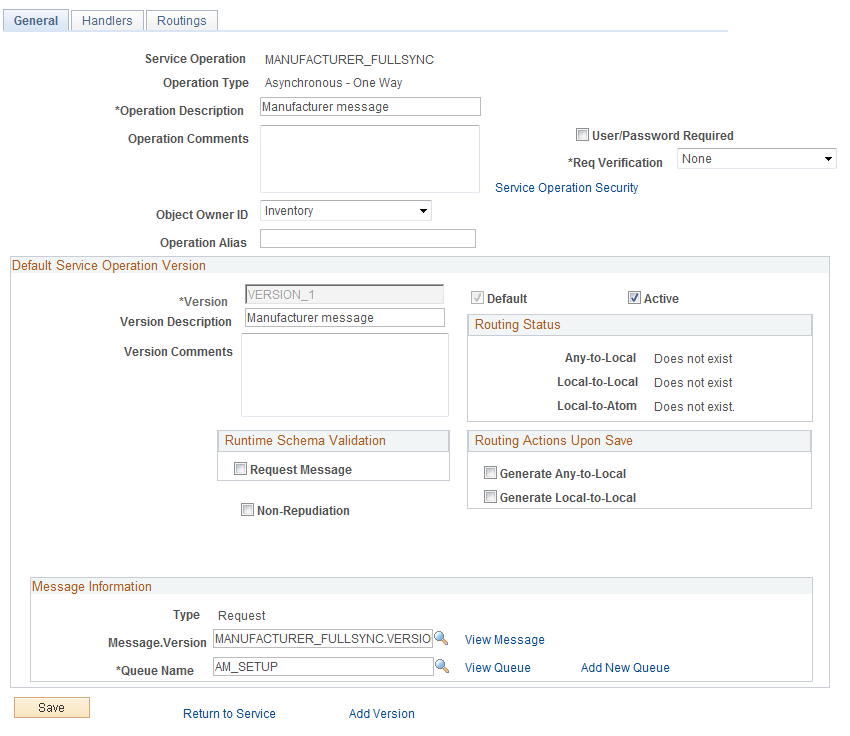
Select the Active check box. Access the Handlers page and activate the delivered handlers.
Access the Routings page and add a new routing that reflects the integration:
This example illustrates the fields and controls on the Routings Page (MANUFACTURER_FULLSYNC).

Supply the new Routing Name and click the Add button. You will be directed to the Routing Definitions page for the routing name that you just added:
This example illustrates the fields and controls on the Add Routing Name (MANUFACTURER_FULLSYNC).
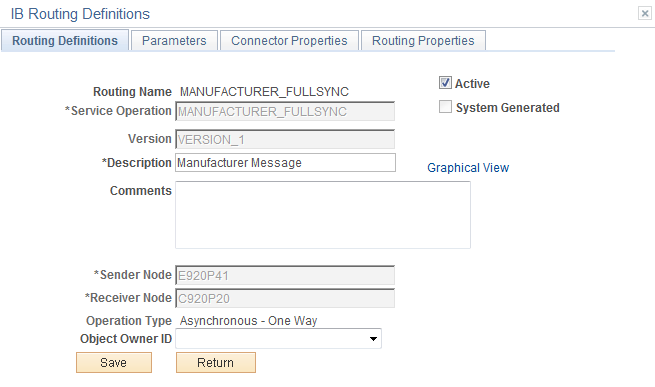
Make sure the Active check box is selected, supply a description and make sure the Sender Node is the defined FSCM remote node and the Receiver Node is the default local node.
Activate the COPY_IT_ASSET service operation. In the CRM database, access the Service Operations – General page (PeopleTools, Integration Broker, Integration Setup, Service Operations):
This example illustrates the fields and controls on the Service Operations — General Page (COPY_IT_ASSET).

Select the Active check box. No need to activate handlers or routings for this service operation. Once the COPY_IT_ASSET message is subscribed, it is transformed to INSTALLED_PRODUCT_FULLSYNC.
Activate the INSTALLED_PRODUCT_FULLSYNC service operation. Access the Service Operations – General page (PeopleTools, Integration Broker, Integration Setup, Service Operations):
This example illustrates the fields and controls on the Service Operations — General Page (Activate INSTALLED_PRODUCT_SYNC).

Select the Active check box. Access the Handlers page and activate its handler. Access the Routings page and add a new routing that reflects the integration:.
This example illustrates the fields and controls on the Routings page.

Supply the new Routing Name and click the Add button. You are directed to the Routing Definitions:
This example illustrates the fields and controls on the Add Routing Name (INSTALLED_PRODUCT_FULLSYNC).

Make sure the Sender Node is the FSCM remote node and the Receiver Node is the CRM default local node.
Access the Parameters page and complete the Parameters as follows:
This example illustrates the fields and controls on the Parameters page.

Make sure that the External Alias, messages and transform program read as they are pictured here (the Message.Ver out of Transforms is "INSTALLED_PRODUCT_FULLSYNC.VERSION_1)
Activate the INSTALLED_PRODUCT_SYNC service operation. Use the Service Operations - General page (IB_SERVICE) to activate service operations. (Navigation: PeopleTools, Integration Broker, Integration Setup, Service Operations)
This example illustrates the fields and controls on the Service Operations - General Page (Activate INSTALLED_ PRODUCT_SYNC).
Select the Active check box. On the Handlers page, activate the handler. On the Routings page, add a new routing as in previous steps (call it INSTALLED_PRODUCT_SYNC, for example). Click the Add button:
You will be directed to the Routing Definitions page:
This example illustrates the fields and controls on the Routing Definitions page.
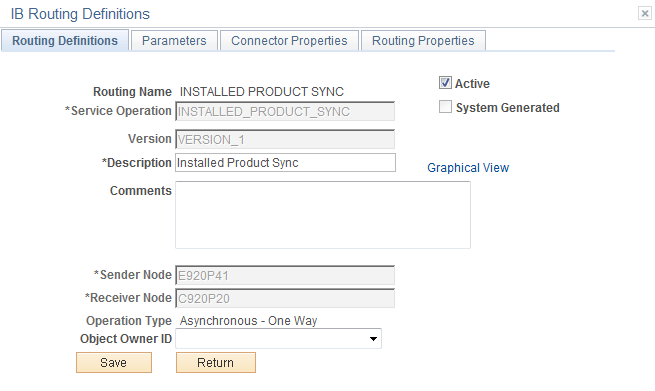
Make sure the Active check box is selected. The Sender Node should be the FSMC remote node and the Receiver Node should be the CRM default local node.
Navigate to the Parameters page and complete the Parameters section as follows
This example illustrates the fields and controls on the Parameters page.

Activate the SYNC_IT_ASSET service operation. In the CRM database, access the Service Operations – General page (PeopleTools, Integration Broker, Integration Setup, Service Operations):
This example illustrates the fields and controls on the Service Operations - General page (CRM database).

You should not have to activate the handler. Navigate to the Routings page, supply a new Routing Name, INSTALLED_PRODUCT_SYNC_CRM and click the Add button.
You will be directed to the Routing Definitions page:
This example illustrates the fields and controls on the Routing Definitions page.

As pictured, click the Active button. The Sender Node should be the CRM default local node and the Receiver Node should be the FSCM remote node.
Navigate to the Parameters page and supply the parameters as pictured:
This example illustrates the fields and controls on the Parameters page.

Use the Queue Status page (IB_MONITOR_QUEUES) to confirm that the queues that are used in the Asset Integration are running. (Navigation: PeopleTools, Integration Broker, Service Operations Monitor, Administration, Queue Status)
This example illustrates the fields and controls on the Queue Status page.
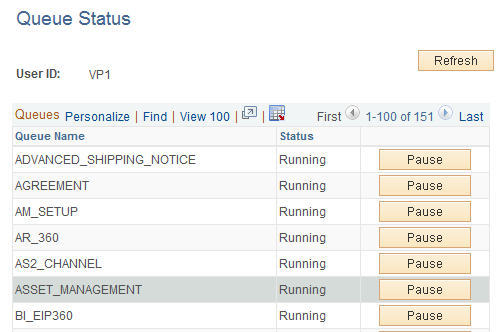
If the status is Paused (as is the AM_SETUP as pictured), click the Run button.