Using the Projects Update Wizard
Project administrators can use the Projects Update Wizard to update project information across the organization. As the project progresses and changes occur, you can use the Projects Update Wizard to update project and activity user fields, status, end dates, type, manager, team members and location.
The Projects Update Wizard provides users a four-step process to update project information which includes the following:
Select Update Type
Enter New Values
Select Projects & Activities
Review and Submit
Note: If configured, the Projects Update Wizard complies with the PeopleTools Security and retrieves only the projects that satisfy the security setup.
Navigation
The Projects Update Wizard can be accessed as a link from within the Project WorkCenter or added as a separate tile to a homepage.
This example illustrates the fields and controls on the Projects Update Wizard tile.
This example illustrates the fields and controls on the Projects Update Wizard link.
|
Page Name |
Definition Name |
Usage |
|---|---|---|
|
PC_WC_UPDWIZ1_FL |
Identify and select an update type from the available options. |
|
|
PC_WC_UPDWIZ2_FL |
Enter the new values to be used on the update. |
|
|
PC_WC_SELPA_WIZ_FL |
Select projects and activities to be updated. |
|
|
PC_REVIEW_WIZ_FL |
Review your changes to the selected projects and activities, and submit the updates. |
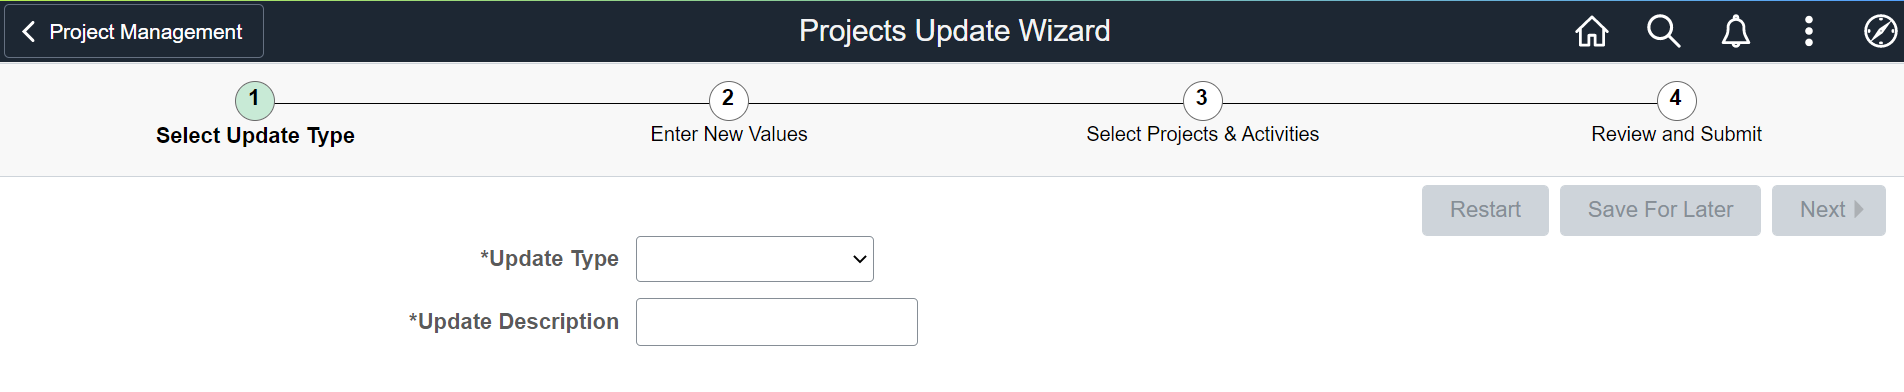
Use the Select Update Type page (PC_WC_UPDWIZ1_FL) to identify and select an update type from the available options.
Navigation
This example illustrates the fields and controls on the Select Update Type page.
You can find definitions for the fields and controls later on this page.

|
Field or Control |
Description |
|---|---|
|
Update Type |
Select the information to be updated. The available options are listed in alphabetical order. Options include:
|
|
Update Description |
Describe the update to be processed. |
|
Restart, Save For Later, and Next |
These buttons are enabled after you enter the update type.
|
Use the Enter New Values page (PC_WC_UPDWIZ2_FL) to enter the new values to be used on the update. The information is displayed on the basis of the update type selected in the above step.
Navigation
After entering the update type, click the Next button.
This example illustrates the fields and controls on the Enter New Values page.
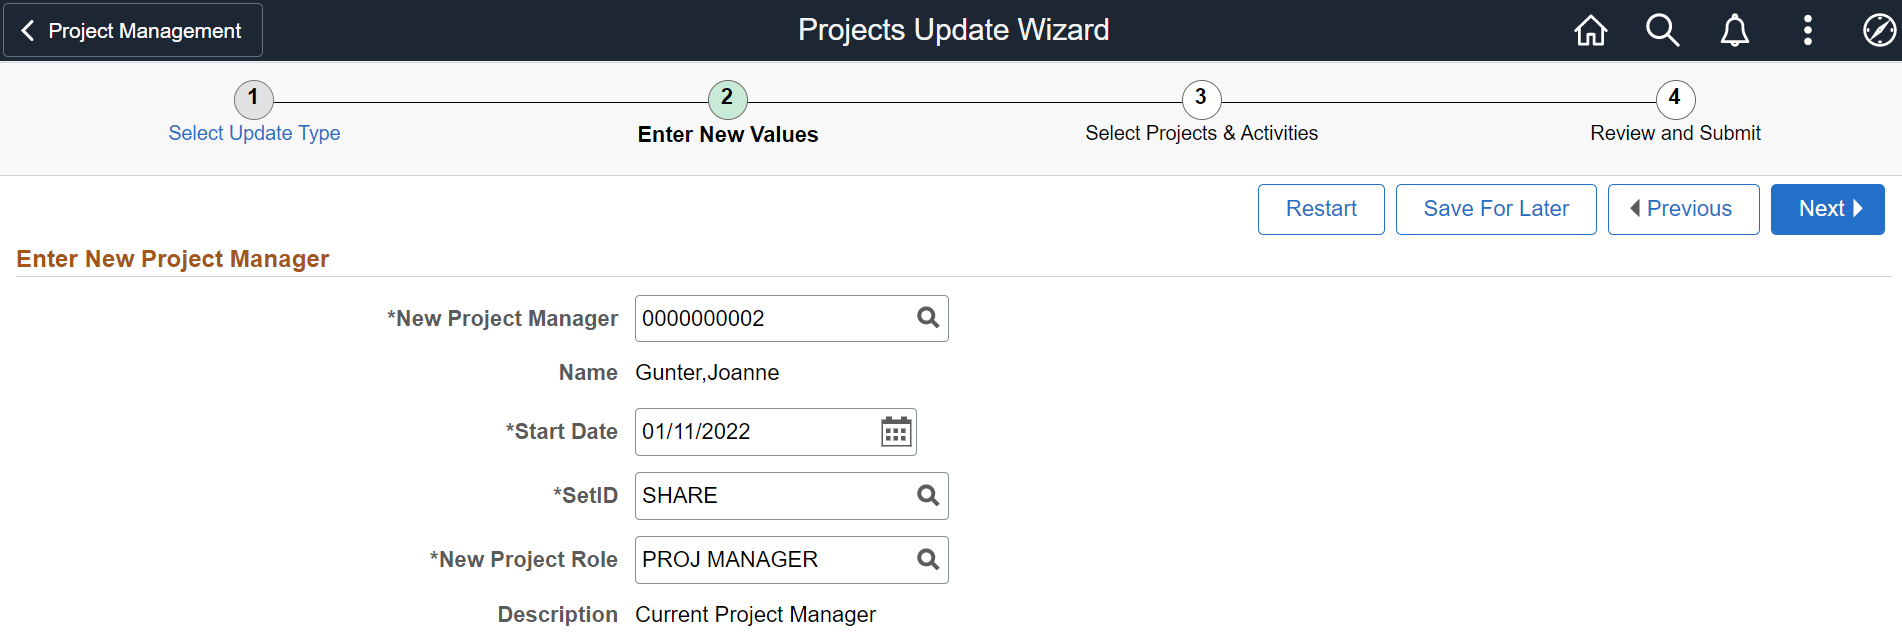
The information displayed on this page depends on the Update Type selected in the previous step. In this example, new project manager information is entered.
Note: For certain updates, such as the Project and Activity User Fields, you can clear an existing value, and set it to blank. When you proceed with a blank value, the system displays a message indicating that existing fields will be cleared and set to blank.You can either proceed or cancel the update.
After entering the new values, click the Next button to proceed to the Select Projects & Activities step.
Select the Select Projects & Activities page (PC_WC_SELPA_WIZ_FL ) to select projects and activities to be updated. The information displayed on this page is dependent on the update type selected in the first step. For example, if you are updating both projects and activities, you might see separate search criteria allowing you to locate specific values for the update process.
Navigation
After entering the new values in step 2, click the Next button.
This example illustrates the fields and controls on the Select Projects & Activities page.
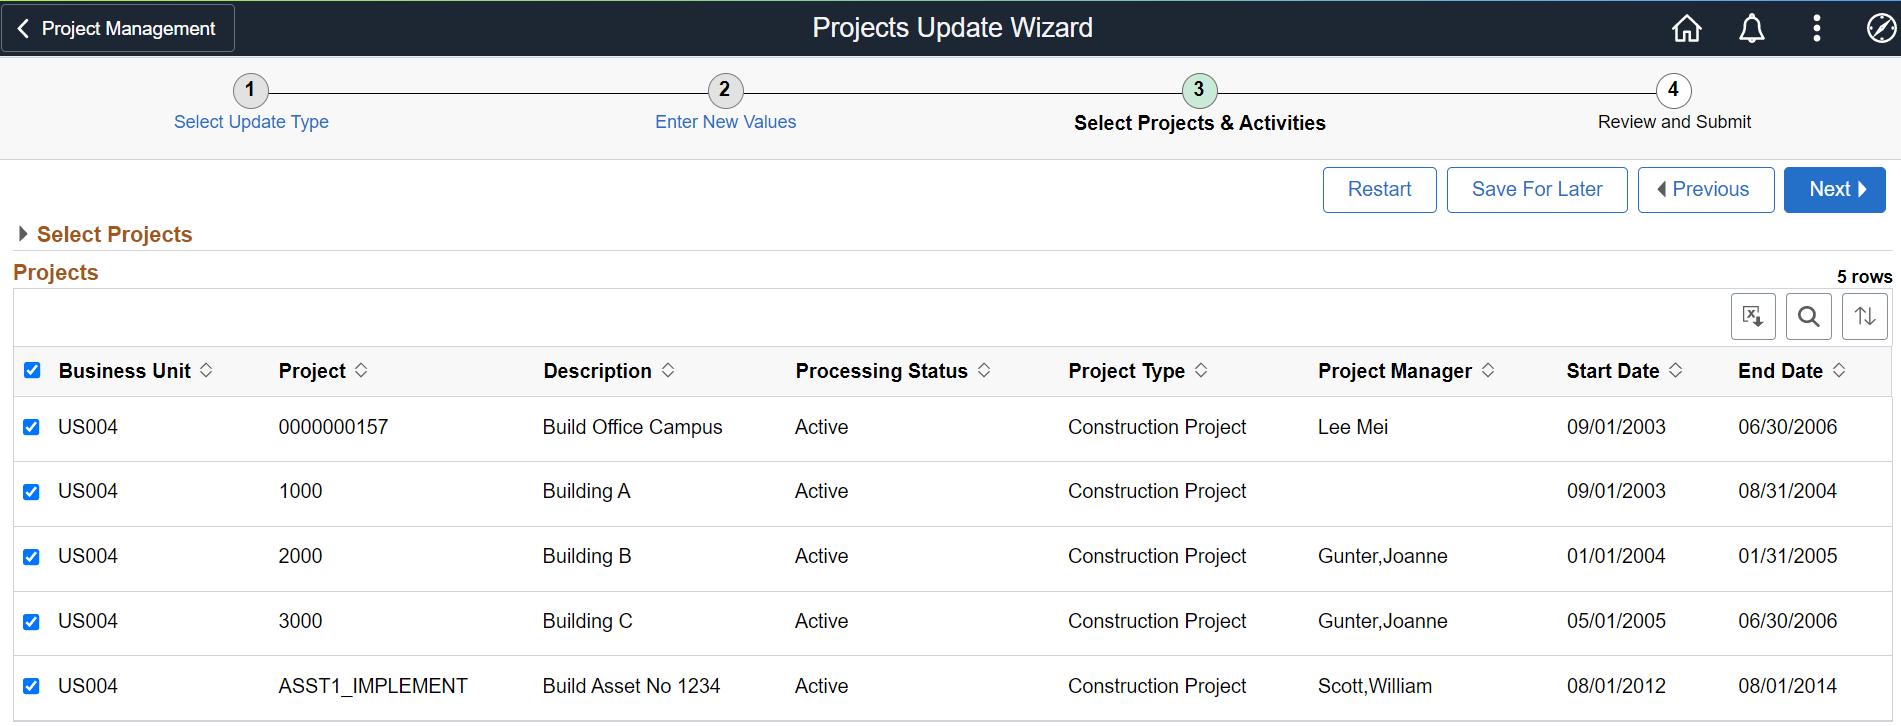
You can search for projects by entering various search criteria. In the Projects grid, select the check boxes of the projects to be updated, and click Next to proceed to the Review and Submit step.
Select the Review and Submit page (PC_REVIEW_WIZ_FL) to review your changes to the selected projects and activities, and submit the update. The information displayed on this page is dependent on the information being updated. It displays all the fields that are being updated along with other key information.
Navigation
After selecting the required projects and activities in the Select Projects & Activities step, click the Next button.
This example illustrates the fields and controls on the Review and Submit page.
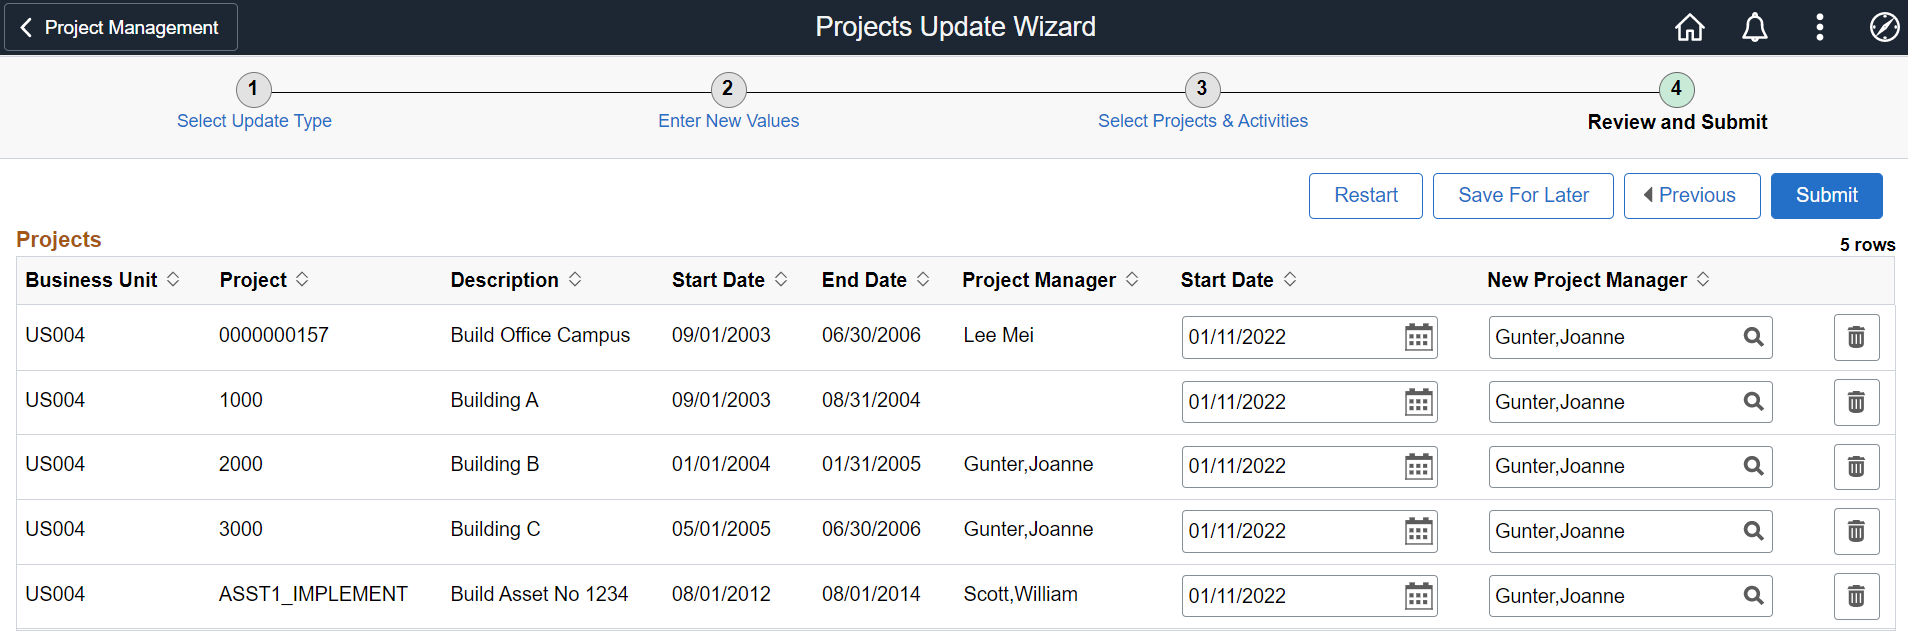
Select the Delete icon to remove a row from the update wizard.
The page displays both the current and new field values.You can further modify the new fields before you submit the changes. Then, click the Submit button.
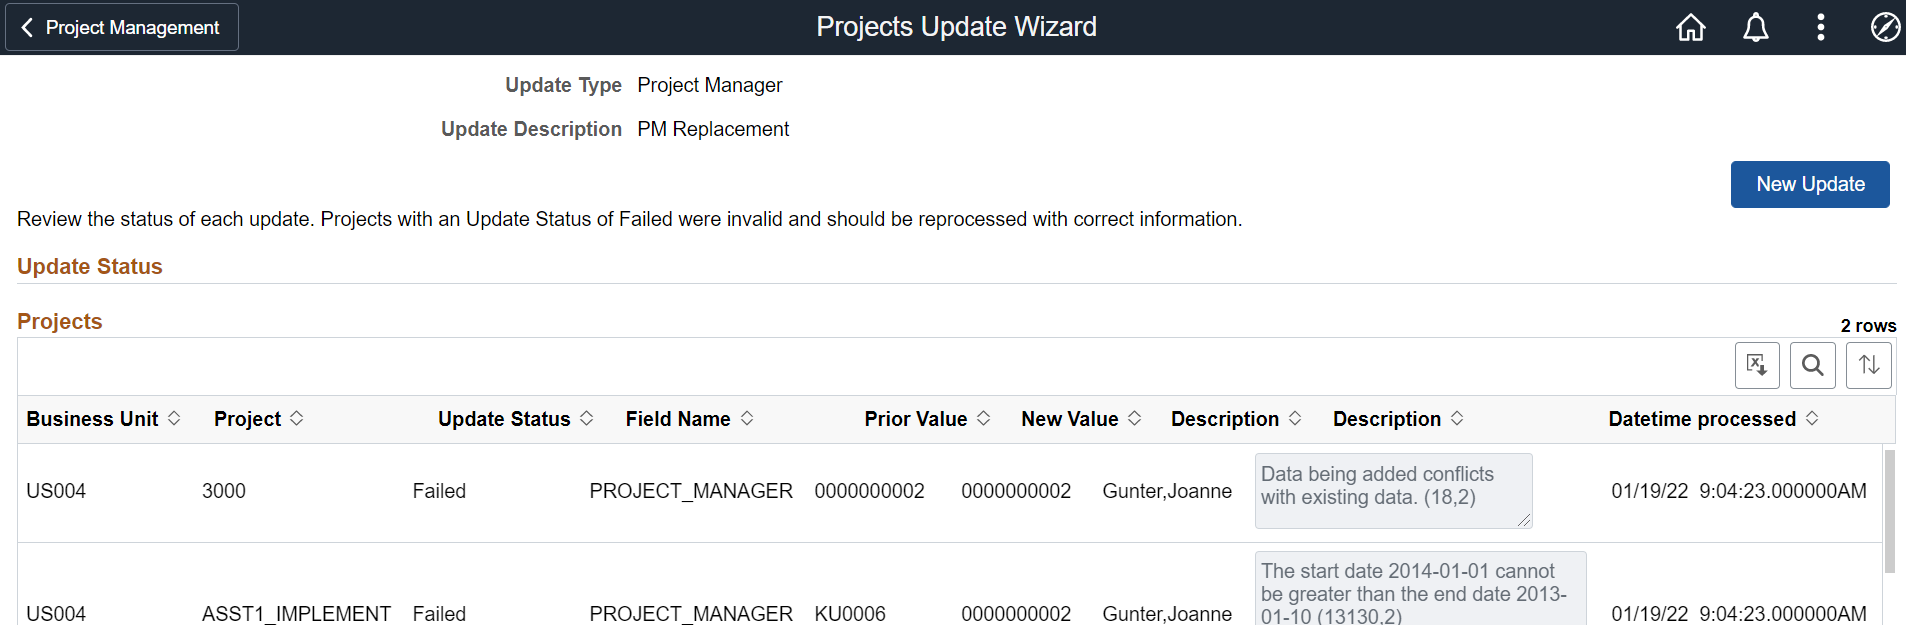
A confirmation page displays the projects and activities updated through the process.
This example illustrates the fields and controls on the Save Confirmation page.
|
Field or Control |
Description |
|---|---|
|
Update Status |
Displays the status of each field updated- Success or Failed. If the update fails, you can find information on why the update failed. You should reprocess the update with the correct information. |
|
New Update |
Click this button to return to the Select Update Type step in the Project Update Wizard, and begin a new update. |
You can follow the same steps to update the other project fields.
With Projects Update Wizard, you can update the end dates of projects, activities, and project teams.
Perform the following steps to update project end dates:
Step 1: Select Update Type
Select the update type as End Date, enter a description, and go to the next step.
Step 2: Enter New Values
Select to update the end dates for a project, activity, or project team.
Note: If you have installed both Program Management and Resource Management products, the Project Team End Dates field does not display.
Step 3: Select Projects & Activities
In this step, you can search for projects, project activities, and project team to update the end dates. In most cases, the end dates of these three items will be updated in the same action, whereas in other cases,only a subset of dates will be updated.
For added flexibility, the search fields in the Search Project, Search Project Activities, and Search Project Team tabs are independent. In many cases, the user will search for project information on the Search Project tab first.
Note: To ensure that the project search fields are consistent across all the tabs, the projects fields should be entered first on the Search Projects tab. These fields will default to the Search Project Activities and Search Project Team tabs as long as those tabs do not already have search criteria. If the Search Project Activities and Search Project Team tabs have search criteria, use the Clear button to remove them before updating the Search Project tab. Changes to any of the search fields in the Search Project Activities and Search Project Teams tabs will not be copied to the other tabs.
Step 4: Review and Submit
Review the projects, activities, project team details, and the new end date that you have selected.
Note: You cannot select a project end date earlier than the project activity end date. Similarly, you cannot select an activity end date later than the project end date.
With Projects Update Wizard, you can update project locations.
Perform the following steps to update project locations:
Step 1: Select Update Type
Select the update type as Project Location, enter a description, and go to the next step.
Step 2: Enter New Values
Select a set ID, effective date, and the new project location. The location prompt displays values based on the set ID.
Step 3: Select Projects & Activities
Search for projects, select the required ones, and proceed to the next step.
Step 4: Review and Submit
Review the project location changes. The effective date must be a date within the project start date and end date. If not, the system displays an error message. Correct the error and proceed with submission.
With Projects Update Wizard, you can update the project manager on a project.This update is not available if both the Program Management and Resource Management products are installed.
Perform the following steps to update project managers:
Step 1: Select Update Type
Select the update type as Project Manager, enter a description, and go to the next step.
Step 2: Enter New Values
Select the project manager, enter the start date, set ID, and project role details. Proceed to the next step.
Step 3: Select Projects & Activities
Search for projects, select projects, and proceed to the next step. The BU prompt displays values based on the set ID selected in step 2.
Step 4: Review and Submit
Review your changes. Ensure that the start date of the manager is within the start and end dates of the project. Click the Submit button to complete the update process.
With Projects Update Wizard, you can update project template status en masse.
Perform the following steps to update project template status:
Step 1: Select Update Type
Select the update type as Project Template Status, enter a description, and go to the next step.
Step 2: Enter New Values
Select the New Template Status option. You can set the status as Active or Inactive.
Go to the next step.
Step 3: Select Projects & Activities
A set of project level search criteria is available to identify one or multiple projects. Only project templates are displayed.
Select the projects and proceed.
Step 4: Review and Submit
The status entered in Step 2 defaults to the page, but can be changed to another status. This provides the user the option to update some templates to a different status using the New Template Status option and leave some in the current status.
Review the field changes and submit them.
With Projects Update Wizard, you can update project user fields.
Perform the following steps to update project user fields:
Step 1: Select Update Type
Select the update type as Project User Fields, enter a description, and go to the next step.
Step 2: Enter New Values
The page displays a list of fields available for update. You can also remove an existing value and leave the field blank.
Go to the next step.
Step 3: Select Projects & Activities
Select the projects and proceed.
Step 4: Review and Submit
Review the field changes and submit them.
With Projects Update Wizard, you can update project status.
Perform the following steps to update project status:
Step 1: Select Update Type
Select the update type as Status, enter a description, and go to the next step.
Step 2: Enter New Values
Select the Update Project Status or Update Activity Status option, or both. Enter set ID, effective date, and new statuses in the respective fields.
After entering all the details, proceed to the next step.
Step 3: Select Projects & Activities
In this step, you can search for the projects and the activities to be updated. The BU prompt displays values based on the set ID selected in the Enter New Values step. If the Update Project Status control is in use, the project and activities will be displayed for selection on the basis of the new project status selected in step 2. The same condition applies if the activity status control is in use.
Step 4: Review and Submit
Submit the changes after making the status updates.
Note: Project Templates are not available for the status update.
With Projects Update Wizard, you can update project and activity types.
Perform the following steps to update project and activity types:
Step 1: Select Update Type
Select the update type as Type, enter a description, and proceed to the next step.
Step 2: Enter New Values
You can update project and activity types. You can also remove an existing value and leave the field blank.
Step 3: Select Projects & Activities
Search for projects and activities to be updated.
Step 4: Review and Submit
Review the modifications and submit them.
With Projects Update Wizard, you can update project teams by adding one or more team members. The Project Team update type should not be used to add Project Managers. Project Managers have their own update type.
Perform the following steps to update project teams:
Step 1: Select Update Type
Select the update type as Project Team, enter a description, and proceed to the next step.
Step 2: Enter New Values
You can update project teams. You can add one or more team members to the project.
Step 3: Select Projects & Activities
Search for projects to be added.
Step 4: Review and Submit
Review the modifications and submit them. The Schedule Start Date and End Date default to the Project Start Date and End Date. You can change the Schedule Start Date and End Date but ensure the new dates are between the Project Start Date and End Date.
Note: If there are multiple schedules for the project resource, the resource is always added to the latest schedule.