Generating Site Acquisition Requests
This topic discusses how to generate site acquisition requests.
|
Page Name |
Definition Name |
Usage |
|---|---|---|
|
RE_SAR |
Enter SAR detail information |
|
|
RE_SAR_METRICS |
View the comparison matrix. |
|
|
RE_SAR_OPTIONS |
Enter options and critical dates. |
|
|
RE_SAR_CRDT_DTL |
Enter schedule details and recipient information for critical date notifications. |
|
|
SAR Notes |
RE_SAR_NOTES |
Add notes to the SAR. |
|
RE_SAR_ANALYTIC |
View the SAR analytic graphic. |
|
|
SAR Contact |
RE_SAR_CONTACT |
Add contacts to the request. |
|
Search For Contacts |
RE_CNCT_SRCH |
Search for contacts to add to the request. |
Use the SAR Details page (RE_SAR) to enter SAR detail information.
Navigation:
This example illustrates the fields and controls on the SAR Details page. You can find definitions for the fields and controls later on this page.

Field or Control |
Description |
|---|---|
Action |
After completing the SAR, select the appropriate action:
|
Status |
Displays the current status of the SAR. Values are:
|
Site Acquisition Request Name |
Enter a unique name for this request. |
Commencement |
Enter the commencement date of the site acquisition process. This field is required. |
Estimated Completion |
Enter the date you anticipate this request will be complete. This date must be later than the commencement date. |
Real Estate Specialist |
Select the real estate specialist assigned to this request. |
Portfolio Manager |
Select the portfolio manager assigned to this request. |
Add Site |
Click this button to insert a new row and add more sites to the Sites Under Consideration grid. You can add up to 50 sites to each request. Users can select any sites from the Site Repository that are not in a New or Operating status. At least one site must be attached to the SAR to activate it. |
Site Name |
Select the sites you want to consider for this request. |
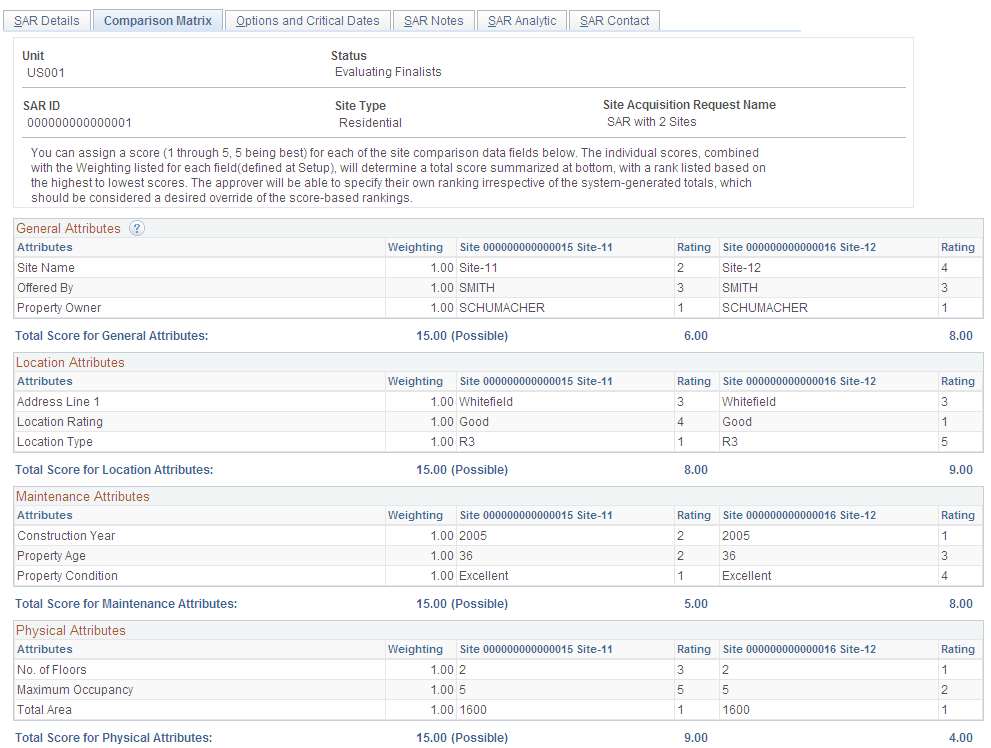
Use the Comparison Matrix page (RE_SAR_METRICS) to view the comparison matrix.
Navigation:
This example illustrates the fields and controls on the Comparison Matrix page (1 of 2). You can find definitions for the fields and controls later on this page.
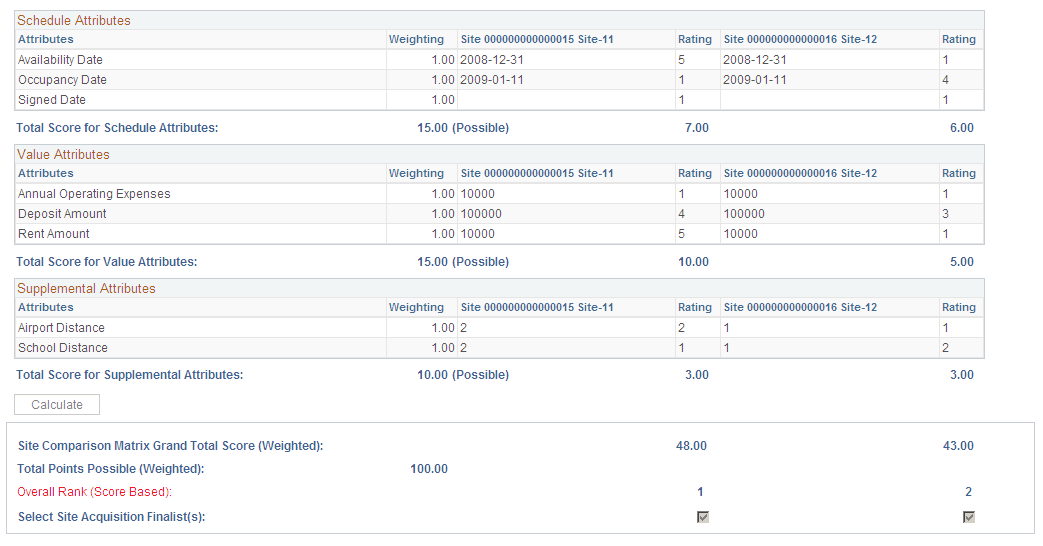
This example illustrates the fields and controls on the Comparison Matrix page (2 of 2). You can find definitions for the fields and controls later on this page.
The Comparison Matrix grid displays all of the generic and supplemental fields defined for a site. The attributes appear in individual grids categorized based on functionality, as they were defined in the site repository. The categories and individual grids are:
Location Details
Physical Attributes
Site Value
Operation/Maintenance
Schedule
Supplemental Data
The site comparison matrix displays all the sites and the attributes for the given SAR in the form of multiple grids, categorized according to the Site Repository component. Any fields that are defined in Supplemental Data will appear in the Comparison Matrix, regardless of site type.
You can assign a score (1 through 5, 5 being the best) for each of the site comparison data fields. The individual scores, combined with the weighting listed for each field (defined at setup), determine a total score summarized at the bottom, with a rank listed based on the highest to lowest scores. The approver can specify their own rankings, which override system-generated, score-based rankings.
Although you are required to set up the weightings and field selection by site type page, the use of the weightings to generate the scores is optional. If you do not assign weightings, then the default weighting value for all fields is 1.0, which essentially means no additional weight.
The Calculate button sums all of the weighted ratings and alters the Overall Rank field based on the score attained by each site. The site with the maximum rating usually is the site best suited for acquisition. However, the Adjusted Rank field is open to the approver or PM for override of the order with which the sites should be pursued, despite the scoring that generated the system rank.
Comments can be entered against each row, as well as in a large comments box at the bottom of the page.
Field or Control |
Description |
|---|---|
Weighting |
Displays the weighting assigned when setting up the site attributes. |
Rating |
Select a rating for each attribute. |
Calculate |
Click this button to recalculate the scores based on the rankings entered in the Rating fields. |
Activate Site Acquisition Request |
When the SAR is in a Pending state, all of the data fields are open and this button is available. This button duplicates the Activate functionality in the Action drop-down list box on the SAR Details page. |
Overall Rank (Score Based) |
Displays the ranking of each site based on this system calculation: the weighting × the rating + the value for each attribute |
Select Site Acquisition Finalists |
Select the check box under the appropriate sites to select these sites as finalists for review. While in a Pending status, you cannot update which sites should be finalists. |
Use the Options and Critical Dates page (RE_SAR_OPTIONS) to enter options and critical dates.
Navigation:
This example illustrates the fields and controls on the Options and Critical Dates page. You can find definitions for the fields and controls later on this page.

Field or Control |
Description |
|---|---|
Add Option |
Click this button to insert a new row and add another option to this request. Note: You must complete the Option Date and Option Name fields before you can insert a new row. |
Apply Template |
Click this button to apply a predefined critical date template to the page. Option and critical date information within the template is copied into the SAR. |
Option Date |
Enter the date that this option occurs or expires. The date that you enter must occur on or after the current date and cannot occur before the commencement date. This field is required. |
Option Name |
Select the option for which you want to establish a critical date. |
Option Status |
Displays the status of the option. The values are:
|
Access the Critical Dates Details page (click the Critical Date icon on the Options and Critical dates page).
This example illustrates the fields and controls on the Critical Dates Details page. You can find definitions for the fields and controls later on this page.

Field or Control |
Description |
|---|---|
Option Name |
Select the option for which you want to establish for a critical date. This field is required. |
Option Date |
Enter the date that this option occurs or expires. The date that you enter must occur on or after the current date and cannot occur before the site commencement date. This field is required. |
Message Text |
Enter the text to insert into the email notification. |
Email Text |
Click to display a sample of the email content that is generated and sent to recipients. You cannot edit the email text from this view. The email text is specified when you define the option during setup. You may, however, tailor the Message Text field to customize the message for a specific request. |
Schedule Details
Field or Control |
Description |
|---|---|
Enable Notifications |
Select to enable email notifications. |
Send initial notification |
Select the option for sending initial notifications. Critical date notifications operate within a date range. The options in this group determine the timing of the start date. Options include: Prior to Option Date: Use this option to begin notifications on a specific number of days, months, or years before the option date. On the Lease Start Date: Use this option to begin sending notifications from the request Commencement Date field that is specified on the SAR Details page. On a Specific Date: Use this option to begin sending notifications on a specific date. The date that you select must precede the option date. |
Recurring - Send Recurring Notifications
Field or Control |
Description |
|---|---|
Never |
Use this option if the notification is not recurring. For example, only one notification is sent on the date that is specified by selecting Send Initial Notification. |
Daily |
Select this option to generate notifications daily. For example, setting the number value to 1 generates a notification every day from the initial notification until the option date occurs. |
Weekly |
Select this option to generate notifications weekly or at regular intervals on specific days of the week. For example, specify a value of 2 and select Mon and Wed for the system to generate notifications on Mondays and Wednesdays, every other week, between the start date and the option date. |
Monthly |
Select this option to generate notifications every month on a specific day of the month. For example, you can generate a notification every three months on the 31st day of the month between the start date and the option date. If you select the 29th, 30th, or 31st and the notification date occurs within a month that has fewer days, then the notification is sent on the last day of the month. |
Yearly |
Select this option to generate notifications annually on a specific day within a specific month. For example, you can generate notifications every two years on June 30. |
Recipients
This section enables you to specify the interested parties to whom critical date notifications are sent. The recipient list is role based. Notifications are sent only when a specific person is assigned to that role within the context of the site.
You use the Contacts section of the request to specify the roles and specific users who are assigned to those roles. You can select a role to which no one is currently assigned; however, no notification is actually sent. Conversely, if someone is assigned to that role and they are removed from the contact list, the system displays the role as the recipient; however, the person assigned to the role no longer exists and no notification is generated.
See Understanding Lease Administration Contacts.
Field or Control |
Description |
|---|---|
Role Name |
Select the role for whom you want to receive notifications. You can select from any of the predefined Lease Administration roles. If no one is assigned to this role, then the Name field is blank. |
Email Notify |
Indicates that email notifications are sent to the roles that are defined. Note: This field does not indicate whether the recipient's email address is configured correctly. The system assumes that all email recipients are able to receive mail. |
Use the SAR Analytic page (RE_SAR_ANALYTIC) to view the SAR analytic graphic.
Navigation:
This example illustrates the fields and controls on the SAR Analytic page. You can find definitions for the fields and controls later on this page.

This analytic is a graphical display of the sites and their respective total scores for each section of the Comparison Matrix.