Loading Resource Pool Information in Batch
This topic provides an overview of the Resource Pool Import utility.
|
Page Name |
Definition Name |
Usage |
|---|---|---|
|
RS_MASSPOOL_RUN |
View the status of submitted changes from the Microsoft Excel spreadsheet upload, submit a process to validate pool changes, and submit a process to purge the import table. |
Assigning pools and tracking pool information is critical to the success and effectiveness of capacity planning. You must be able to load large volumes of resource pool information quickly and efficiently. The Resource Import utility provides an easy way to accomplish this. These two scenarios are examples of when you would typically make batch changes to pool information:
During implementation to load the initial large volumes of resource information.
During reorganizations to quickly update pool assignments and rebuild the pool hierarchy in batch.
The system uses a Microsoft Excel file to import mass pool changes. The file is stored in the Excel directory on the drive where PeopleSoft PeopleTools are located. For example, if you store PeopleTools in c:\pt848, the Resource Pool Entry.xls spreadsheet is stored in c:\pt848\excel.
The delivered Resource Pool Entry.xls spreadsheet comprises four sheets:
Resource Pool Import Utility Home Page: Select the actions to perform for the spreadsheet.
Pool Modification: Add or modify resource pools.
Resource Pool Assignments: Add, modify, or delete named resource pool assignments.
Generic Resource Pool Assignments: Add, modify, or delete generic resource pool assignments.
Use the menu on the Mass Pool Changes page to manage the steps in the import process. To upload the Microsoft Excel file, use the Submit Pool Changes link on the Mass Pool Changes page.
To submit batch pool changes, the pool administrator completes these steps:
Load or update pool information to the Resource Pool Entry.xls spreadsheet.
Click the Import Pool Data button on the Resource Pool Import Utility Home Page sheet in the Excel file to initiate the import process.
Enter server address and access information to import the resource data and submit the process.
The data is moved to PeopleSoft staging tables.
Access the Mass Pool Changes page in PeopleSoft Resource Management and click the Submit Validation Process link for the system to validate the data.
If errors occur during processing, click the Fix Errors link and correct the errors.
Validate the data again by clicking the Submit Validation Process link.
If errors are still present, repeat Steps 4 and 5 until no errors occur.
When no errors occur, click the Submit Pool Changes link on the Mass Pool Changes page.
To use the Mass Pool Changes feature to load changes to resource pools into PeopleSoft Resource Management, users must have access to the WEBLIB_RS web library as part of their permission lists. To enable the Mass Pool Changes feature:
Select
Open the appropriate permission list that has access to the WEBLIB_RS web library.
Click the Edit link for the WEBLIB_RS web library name and select Full Access for the POOL_IMPORT.FieldFormula.IScript_Import_Pools function.
Access the Resource Pool Entry.xls spreadsheet on your local drive. Select the Resource Pool Import Utility Home Page sheet.
This example illustrates the fields and controls on the Resource Pool Entry.xls file: Resource Pool Import Utility Home Page sheet. You can find definitions for the fields and controls later on this page.

Field or Control |
Description |
|---|---|
Add/Modify Resource Pools |
Click to add or modify resource pools. |
Change Named Resource Pool Assignments |
Click to add, delete, or change named resource pool assignments. |
Change Generic Resource Pool Assignments |
Click to add, delete, or change generic resource pool assignments. |
Import Pool Data |
Click to enter the appropriate server access information to import the resource pool data and submit the data for import. |
Access the Pool Modification sheet (Resource Management, Manage Resource Pools, Mass Pool Changes).
This example illustrates the fields and controls on the Resource Pool Entry.xls file: Pool Modification sheet. You can find definitions for the fields and controls later on this page.

Field or Control |
Description |
|---|---|
Action |
Available options are: Add: Select to add a resource pool. You must supply the pool name, manager employee ID, and status. The pool ID is generated by the system. Change: Select to modify existing pool information. The only required fields are the Pool ID and any other fields that you want to modify. |
Pool ID |
Enter a value only when you are modifying pool information. |
Pool Name, Manager Employee ID, and Status |
Enter values when adding a pool. Status can either be Active or Inactive. |
Parent Pool ID and Parent Pool Name |
Enter values for the parent pool of the pool that you are adding or changing, if applicable. This is used to build the hierarchy of pools in the system. If you do not enter a value and the action is Add, the new resource pool is placed at the highest (most outdented) level of the pool hierarchy. |
Access the Resource Pool Assignments sheet.
This example illustrates the fields and controls on the Resource Pool Entry.xls file: Resource Pool Assignments sheet. You can find definitions for the fields and controls later on this page.

Field or Control |
Description |
|---|---|
Action |
Available options are: Add: Select to add a named resource to the pool. You must enter the employee ID, pool name or pool ID, start date, and capacity. Note: If the pool is newly added to the spreadsheet, you will not yet have a pool ID because the ID is system-generated. In this case, you must specify the pool name. When the process encounters a pool name without a pool ID in this spreadsheet, it assumes that you are referring to a newly created pool. If the pool name is not in the current Resource Pool Modification spreadsheet with an action of add, an error occurs, even if the pool name already exists in the system. If the pool that is being affected already exists in the system, you must enter a pool ID. Delete: Select to delete a named resource's pool assignment. You must enter the employee ID, start date, and pool ID. Change: Select to change an existing resource's assignment. You must enter the pool ID and employee ID. Enter additional data that you want to modify. Note: Delete and Change actions are valid only for existing pools, not for newly created pools that you are adding through the Pool Modification spreadsheet. |
Access the Generic Resource Pool Assignments sheet.
This example illustrates the fields and controls on the Resource Pool Entry.xls file: Generic Resource Pool Assignments sheet. You can find definitions for the fields and controls later on this page.

Field or Control |
Description |
|---|---|
Action |
Available options are: Add: Select to add a generic resource to the pool. You must enter the resource name, pool name or pool ID, start date, capacity, SetID, region, and personnel type. Delete: Select to delete a generic resource's pool assignment. You must enter the resource name, start date, and pool ID. Change: Select to change an existing generic resource's assignment. You must enter the pool ID and resource name. Enter additional data that you want to modify. Note: Delete and Change actions are valid only for existing pools, and not for newly created pools that you are adding through the Pool Modification spreadsheet. |
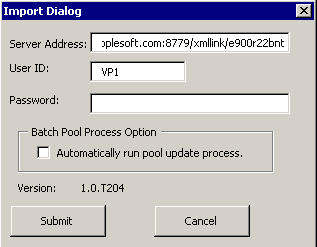
Access the Import Dialog box by clicking the Import Pool Data button on the Resource Pool Import Utility Home Page sheet.
This example illustrates the fields and controls on the Import Dialog box. You can find definitions for the fields and controls later on this page.
Field or Control |
Description |
|---|---|
Server Address |
Enter the location of the server on which to load the pool information. Example: http://rt-lnx01.peoplesoft.com:8779/xmllink/e900r22bnt |
User ID and Password |
Enter the ID and password with which to log into the PeopleSoft system. |
Automatically run pool update process |
Select to automatically load the pool information directly into the pool transaction tables. If you do not select this option, the data is left in the staging tables. This option gives you the ability to run multiple imports without affecting the pools transactional tables. At a later time, you can run the update process to move the information from the staging table and load it into the pool transaction tables. Note: Selecting this option for the import process does not guarantee that the pool information will be updated automatically in the system. Before the information is taken from the staging tables and loaded into the pool tables, the validation process is run on the data to ensure that it does not violate any business rules. If violations occur, the system will not load the data into the transactional tables. At that point, access the Mass Pool Changes page, fix the errors, and then import. |
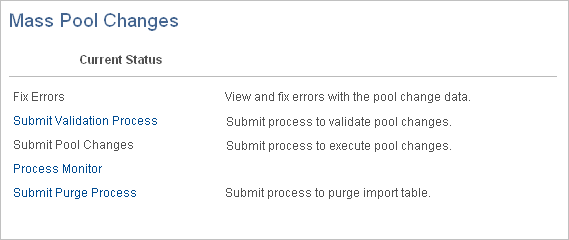
Use the Mass Pool Changes page (RS_MASSPOOL_RUN) to view the status of submitted changes from the Microsoft Excel spreadsheet upload, submit a process to validate pool changes, and submit a process to purge the import table.
Navigation:
This example illustrates the fields and controls on the Mass Pool Changes page. You can find definitions for the fields and controls later on this page.
Field or Control |
Description |
|---|---|
Current Status |
Displays the current status based on the action and the Application Engine process results. |
Fix Errors |
Click this link to access the Validation Errors page to view and fix pool change data errors. The link is active only if the imported data contains errors. Click OK to accept the changes. Note: You cannot submit the pool changes until you clear all validation errors. |
Submit Validation Process |
Click to trigger the Batch Process to Resource Pool Application Engine process (RS_MASSPOOL) to validate the imported data. Click the Process Monitor link to review the process status. When the validation process completes:
|
Submit Pool Changes |
Click to trigger the Batch Process to Resource Pool process to import the data into the system and update the transactional data with the changes. Click the Process Monitor link to review the process status. After submitting the pool changes, you can view the changes on the Manage Pool Resources page. |
Process Monitor |
Click to access the process monitor to view the status of the Batch Process to Resource Pool process for either pool validation or pool modifications. |
Submit Purge Process |
Click to trigger the Batch Process to Resource Pool process to purge the import tables in the system. You can not purge data after you submit the pool changes. Click this link when you can not fix the errors on the Validation Errors page and you want to import new data by using the Microsoft Excel file. |