Importing the SDN List
This topic provides an overview of the Specially Designated Nationals List (SDN List) import process and discusses how to import the financial sanction list, and build and rebuild the SDN List search indexes.
|
Page Name |
Definition Name |
Usage |
|---|---|---|
|
BSP_IMPORT |
Load the financial sanctions SDN List into the system. |
|
|
SIA_ADMINISTER |
Build the initial search indexes for the downloaded financial sanctions data. Also, use this page to rebuild the search indexes after downloading updated financial sanctions data. |
This diagram illustrates importing the Specially Designated Nationals (SDN) List from an XML data file using the File Import Process and populating the corresponding application tables with the SDN data
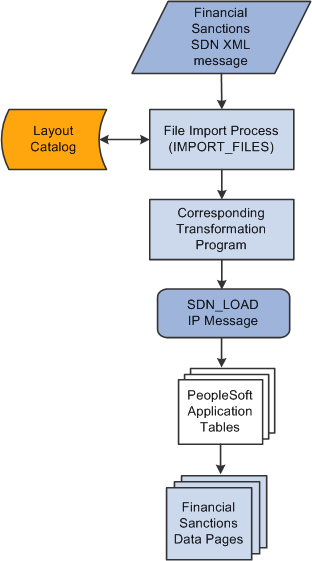
The SDN List Import process involves the following steps:
An administrator enters information pertaining to a financial sanctions, SDN data file in XML format.
This initiates the File Import Application Engine process (IMPORT_FILES), which functions as an interface or shell to define the necessary commands for the system to import the SDN data files.
The File Import Application Engine reads the layout definition data for the file (which is stored in the Layout Catalog) and calls the corresponding transformation process.
Using the SDN_LOAD IP message, the transformation Application Engine loads the data into the application tables.
Use the Import Financial Sanction List page (BSP_IMPORT) to load the financial sanctions SDN List into the system.
Navigation:
This example illustrates the fields and controls on the Import Financial Sanction List page. You can find definitions for the fields and controls later on this page.

Field or Control |
Description |
|---|---|
Import Type |
Select the method to import the sanction data. Options are:
|
File Location |
Appears when using the File import type only. Displays the file location entered on the configuration page by a bank integration administrator. Users have access only to the folders below the base path displayed in the File Location field. For more information, see Managing Import File Locations. |
Integration Node |
Enter the bank node that was used to transfer the data. This field appears only if FTP or HTTP is selected as the import type. |
View Integration Node Details |
Click to access the Node Details page and review property details of the selected node. This link is available only if FTP or HTTP is selected in the Import Type field. |
File Path |
Enter a file path according to the import type selected:
Note: Be sure that the application server and the Process Scheduler have access to the directory, FTP node, or HTTP node where the files are staged for import. |
File Selection Help |
Click to view help information about specifying file paths and file names. |
File Name |
Select the specific file to import. If you want to import multiple files based on extension for the FTP import type, leave this field blank. |
Layout |
Select the file layout of the SDN List file that is being imported. PeopleSoft provides the following layouts:
|
Advanced Options
Field or Control |
Description |
|---|---|
Encryption Profile |
Select an encryption profile to decrypt bank statements. Encryption profiles contain both encryption and decryption information. |
Use Integration Broker |
Select to lay out the files and publish the formatted document to PeopleSoft Integration Broker. Integration Broker then processes the formatted file accordingly. You select this option if you want to use the financial sanctions information as a trigger to Integration Broker to perform other processes, or to integrate with other systems. |
Post Process File Action |
Select what action, if any, to perform on the bank statement files after the data has been processed. The options are:
|
Post Process File Directory |
Enter a file path to the directory to which the file will be moved or copied if either option is selected as the post process file action. |
Layout Properties
Field or Control |
Description |
|---|---|
Value |
Property codes and values appear by default from values that are defined on the selected layout ID. If you configure unique code mappings for a layout (on the Code Mappings page), you need to modify the displayed CODE_MAP_GROUP value with the appropriate unique map value. See Code Mappings Page. |
The SDN search engine uses the Search Framework to perform a more thorough search of the SDN data than simply querying the database. It provides pattern-based matching as well as mapping of substitution data that can identify and find text such as abbreviations. For you to use the Search Framework search engine, the system must index the data that is being searched. Use this page to initially build and rebuild the delivered SDN_SEARCH_ADDR and SDN_SEARCH_NAME search indexes.
See the product documentation for PeopleTools: Search Technology and PeopleTools: System and Server Administration.
Use the Search Index Admin page (SIA_ADMINISTER) to build the initial search indexes for the downloaded financial sanctions data.
Also use this page to rebuild the search indexes after downloading updated financial sanctions data.
Navigation:
This example illustrates the fields and controls on the Search Index Admin page (1 of 2). You can find definitions for the fields and controls later on this page.
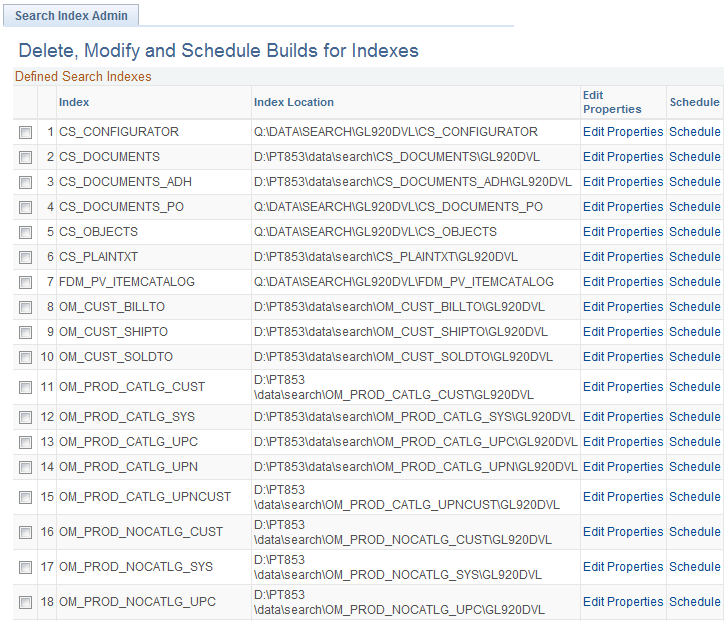
This example illustrates the fields and controls on the Search Index Admin page (2 of 2).

To initially build or rebuild an existing SDN search index:
Select SDN_SEARCH_ADDR and SDN_SEARCH_NAME.
You must initially build both the SDN_SEARCH_ADDR and the SDN_SEARCH_NAME indexes for the downloaded financial sanctions data.
You must rebuild both the SDN_SEARCH_ADDR and the SDN_SEARCH_NAME indexes after downloading updated financial sanctions data.
Click the Schedule link for both the SDN_SEARCH_ADDR and the SDN_SEARCH_NAME indexes.
The Search Index Admin secondary page appears.
In the Type of Build field, select Rebuild.
Note: Select Rebuild as the type of build for the initial build as well as for the rebuild.
Select the Run Recurrence Name and Server Name, and click OK.
This returns you to the Search Index Admin page.
Click Save.
This example illustrates the fields and controls on the secondary page to build or rebuild the SDN index.
