Defining Business Processes
Use the BPW_PROC_DEFN component to define the business processes in Business Process Weaver.
|
Page Name |
Definition Name |
Usage |
|---|---|---|
|
BPW_PROC_DEFN |
Define the business processes. This page is intended for power users and administrators who understand how tasks are linked and processed. |
|
|
BPW_PRI_STEPS_SEC |
Select the predecessors for each step, if applicable. Predecessors for the steps are used to define sequential execution. |
Use the Business Process Definition page (BPW_PROC_DEFN) to define the business processes. This page is intended for power users and administrators who understand how tasks are linked and processed.
Navigation:
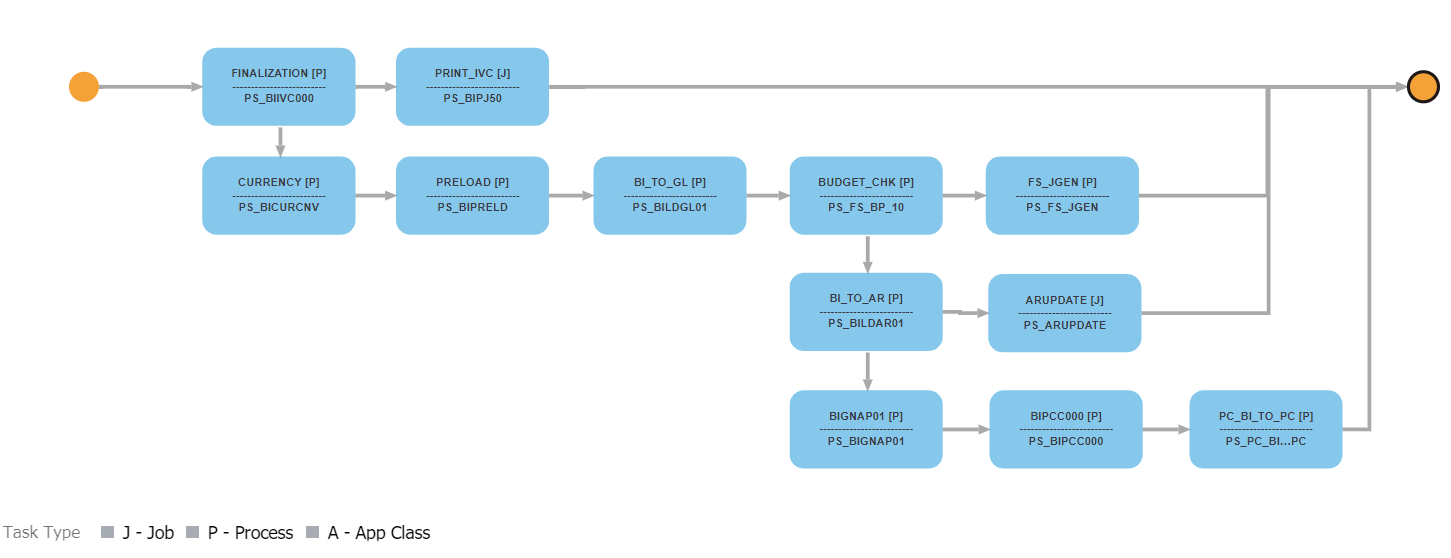
This example illustrates the fields and controls on the Business Process Definition page (1 of 2). You can find definitions for the fields and controls later on this page.

This example illustrates the fields and controls on the Business Process Definition page (2 of 2). You can find definitions for the fields and controls later on this page.
Field or Control |
Description |
|---|---|
Process Weaver ID |
Identifies a unique business process within the same Business Process Type. |
Business Process Type |
Select the type of the business process:
|
Description |
Provide a short description of the business process. |
Event Handler ID and Event Handler Parameter |
Select to attach an event handler and any parameter, at the process level, to the business process. |
Active |
Select to indicate whether the business definition is active. If not selected, you are unable to create run controls to run the business process. |
Public |
Select to allow all users to create a business process run control for this business process definition. When you select this option, the system disables the Security link. |
Security |
Click this link to identify users who are authorized to create a business process run control for the process definition. To enable this link, deselect the Public check box. |
Notifications |
Click this link to access the Business Process Definition Notifications page, where you can set up notification criteria and delivery channel, including worklist, email, and push to the PeopleSoft Fluid User Interface Home page. |
Copy from |
Click this button to copy steps from a different business process definition. |
Created Date/Time, By |
Identifies the time and the user who created this business process definition. |
Updated Date/Time, By |
Identifies the time and the user who last updated this business process definition. |
Process Steps
Use the Process Steps group box to define the steps in the business process.
Field or Control |
Description |
|---|---|
Step ID |
Identifies the process step. A unique ID, within the business process. |
Task ID |
Select the task to be executed in this step. The task must be set up in the Task Registry. |
Description |
Enter a short description of the step. If you do not enter a value, the field populates by default from the description of the task. |
Predecessors |
Displays the predecessor steps that must be executed before this step can be executed. To select the predecessors, click the Select Predecessors button, which launches the Select Step Predecessors page. |
Select Predecessors |
Select this button to launch the Select Step Predecessors page to select step predecessors. |
Pause Before |
Select to indicate that the process should pause before executing the step. |
Skip Step |
Select to indicate that the step should be skipped. Skip Step, Continue on Error and Pause After are mutually exclusive. If Skip Step is selected, then Continue on Error and Pause After are not available. If Continue on Error or Pause After is selected, then Skip Step is not available. |
Continue on Error |
Select this check box to indicate that the process should continue to the next steps even if an error occurred during the execution of this step. |
Pause After |
Select this check box to indicate that after this step completes, the process should not automatically continue to the next steps. Instead, the process should pause and wait for the user to resume the process. |
Event Handler ID, Event Handler Parameter |
Select to attach an event handler and any parameter to the step. If an event handler is associated with the task (set up in Task Registry), then it will be overridden. |
Graph
The Process graph shows the execution flow of the steps in the business process. Each node in the graph represents a step in the business process. The Step ID and Task ID are shown in the node. When you hover over the Step ID, the description of the step appears. If an icon is associated with the task, it appears in the top-left corner of the node.
The system automatically positions the nodes from left to right, top to bottom. However, with complex relationships between the steps, the layout may not be optimal. In this case, you can drag the nodes to rearrange them. The connection lines are automatically redrawn.
The width of the canvas that displays the graph is fixed. However, the height will automatically expand and shrink vertically (up to a certain height) as the user moves the node. The user can use the zoom buttons to zoom in or out.
These buttons enable users to manipulate the graph:
Field or Control |
Description |
|---|---|
|
Click the plus (zoom in) icon or the minus (zoom out) icon to adjust the size of the graph. These buttons are available for graphs that are larger than the viewing area. When you reach the minimum zoom rate (0.5), the zoom out icon is not available. Adversely, when you reach the maximum zoom rate (2), the zoom in icon is not available. |
Preview |
In most cases, when the data is updated in the Process Steps group box, the graph will be redrawn automatically to show the updates. However, in the event this does not happen automatically (for example, when deleting a step), you can click the Preview button to update the graph. |
Auto Layout |
After you have moved the nodes to rearrange them, click the Auto Layout button if you want to restore the layout to the system version. |
Revert to Saved |
If you have saved the previously changed node layout, this button will be available to restore to the saved layout after changes. |
 (Zoom In and Zoom Out)
Use the Select Step Predecessors page (BPW_PRI_STEPS_SEC) to select predecessors for each step, if applicable. Predecessors for the steps are used to define sequential execution.
Navigation:
Click the Select Predecessor icon.
This example illustrates the fields and controls on the Select Step Predecessors page . You can find definitions for the fields and controls later on this page.

Select the predecessors for each step:
Field or Control |
Description |
|---|---|
Select |
Select this check box to select the step as a predecessor. The check box is automatically selected if it was selected previously. |
OK |
Select to confirm the selection or selection changes. |
Cancel |
Select to cancel the selection changes. |