Maintaining Resources in PeopleSoft Maintenance Management
To set up resource groups, resource craft assignments, and resource eligibility status, use the:
Set Up Resource Group (RS_RESOURCE_GROUPS) component.
Assign Resources to Craft (RS_CFT_ASSGN) component.
Assign Resources to Shop (WM_SHOP_ASSIGNMENT) component
Maintain Resource Eligibility (RS_WRKR_MGMT) component.
This section provides an overview of resource maintenance and discusses how to set up resource groups, assign resources to crafts, assign resources to shops, maintain resource eligibility, add or change resources' eligibility, maintain resources' profile, maintain a resource's work experience, maintain resources' qualifications, maintain general information for resources, review resource profiles, maintain craft assignments for resources, maintain shop assignments for resources, manage a resource's monthly schedules, review a resource's daily schedules, and add or modify task details for resources.
|
Page Name |
Definition Name |
Usage |
|---|---|---|
|
Resource Group Definition - Resource Group |
RS_RESOURCE_GROUPS |
Add a new resource group or access an existing resource group. |
|
RS_RSRCGRP_ADD |
Define a group of tool or labor resources to use to narrow the search in the resource matching process. |
|
|
RS_CFTASSGN_PG |
Assigns resources to a craft based on a supervisor ID. |
|
|
WM_SHOPASGN |
Assigns resources to a shop based on a supervisor ID. This page is similar to Maintenance Management, Labor Administration, Assign Resources to Craft page. |
|
|
Maintain Eligibility - Resource Search |
RS_WRKR_MGMT_SRCH |
Search for an employee for whom you want to maintain eligibility. |
|
RS_WRKR_MGMT |
Indicate whether a resource is eligible or ineligible to be assigned to a shop, crew, or work order task. |
|
|
RS_WRKR_MGMT_FUT |
Add or change a resource's eligibility. |
|
|
RS_ERES_OVERVW |
Define additional employee information, an overview of the resource, and any of the resource's specialties. |
|
|
RS_ERES_WORK_HIST |
Add or modify a resource's work experience. |
|
|
Work Experience |
RS_WORK_HIST_EDIT |
Modify the work history of a selected resource. |
|
Delete Confirmation |
EO_DEL_CONFIRM |
Confirm the deletion of the work experience by selecting the Yes – Do Delete or select No – Do Not Delete. |
|
RS_ERES_COMP_ACOMP |
Add or modify a resource's qualifications. |
|
|
Competencies |
RS_CM_COMPTNCY |
Select additional competencies and interests that apply to a specific resource. |
|
Education |
RS_CM_EDU |
Add, modify, or delete degrees that apply to a specific resource. |
|
Licenses and Certificates |
RS_CM_LIC_CERT |
Add, modify, or delete any licenses and certificates that apply to a specific resource. |
|
Languages |
RS_CM_LANG |
Add, modify, or delete any languages that apply to a specific resource. |
|
Professional Memberships |
RS_CM_MEMBR |
Add, modify, or delete any memberships to professional organizations that apply to a specific resource. |
|
Honors and Awards |
RS_CM_HNR_AWRDS |
Add, modify, or delete any honors and awards that apply to a specific resource. |
|
Test Results |
RS_CM_TEST_RSLT |
Add, modify, or delete any tests that apply to a specific resource. |
|
Send Notification |
PT_WF_NOTIFY |
Send notification to interested parties about change in qualification. |
|
RS_ERES_GEN_INFO |
Add or modify a resource's information such as visa, work permit, passport, additional phones, and job information. |
|
|
RS_RES_PROF_RVW |
View basic resource information and add or modify contact information. |
|
|
RS_CFTPROF_PG |
Associate a resource with one or more crafts. |
|
|
RS_RES_SHOP_PROF |
Associate a resource with one or more shops. |
|
|
"Resource's" Name - Gina Angelini |
RS_RES_PROF_RVW |
Display a summary of a resource's profile information. You can click a link to access the Contact Information page and add contact information. |
|
Contact Information |
RS_RES_PROF_CONTCT |
Add contact information to an employee's profile. |
|
Monthly Schedule - Resource Search |
RS_SCHED_MONTHSRCH |
Search for a resource's monthly schedule. |
|
RS_SCHED_MONTH |
Review and modify assignments on a day per month basis. |
|
|
RS_SCHED_DAILY |
Review and modify appointments on an hour per day basis. |
|
|
RS_SCHED_APPT |
Add or modify an assignment for a specific day and time. |
|
|
Asset Monthly Schedule |
RS_ASSET_MONTH |
Review asset assignments on a day per month basis. |
|
Asset Daily Schedule |
RS_ASSET_DAILY |
Review and modify assignments on an hour per day basis. |
|
My Monthly Schedule |
RS_SCHED_MONTH |
Review resource's own monthly schedule. The Daily Schedule and Task Details pages are identical to the pages listed for the pages associated with the Monthly Schedule. |
This section discusses:
Resource groups.
Resource craft assignments.
Resource shop assignments
Resource eligibility status changes.
Resource profile maintenance.
Resource Groups
Resource groups are collections of resources defined by supervisor ID or shop ID in PeopleSoft Maintenance Management. You can select one or more supervisors or one or more shops to include in a resource group. The pool of resources reporting to any of a resource group's selected supervisors or assigned to any of the resource group's selected shops are included in the appropriate resource group. When you schedule a work order task, you can select one or more rows in the labor schedule, select a resource group, and then click the Recommend Labor button to run the Match Engine to recommend a list of resources in the resource group that match the work order task requirements. If you do not select a resource group to limit your search, the system searches through all of the resources set up in PeopleSoft Maintenance Management.
When you create a resource group based on one or more shops and select a Resource Group and the Recommend Tools button in the Tool Schedules grid for a work order task, the Match Engine considers only the tools assigned to the shop. If you do not select a resource group, the Match Engine searches through all of the assets identified as tools in the asset repository that fall under a specified asset classification.
Resource Craft Assignments
You can assign multiple resources to a craft. You can search for the resources that you want to assign to the craft by identifying one or more supervisors and searching for all resources associated with the selected supervisors. When you click the Click to populate resources button, the resources associated with the selected supervisors are listed. You can then delete the resources that you do not want to assign to the craft. Once you assign a resource to a craft, the craft is listed for the resource in the resource's profile (Manage Profiles). When you add a craft in the Craft page and save the page, you can indicate whether you want to copy accomplishments and competencies for this craft from the craft's qualification profile for non-HCM employees. Competencies and accomplishments are already added in PeopleSoft HCM for employees who are set up in the PeopleSoft HCM database.
Resource Shop Assignments
You can assign multiple resources to a shop. Using the Assign Resources to Shop (WM_SHOP_ASSIGNMENT) component, you can search for the resources that you want to assign to the shop by identifying one or more supervisors and searching for all resources associated with the selected supervisors. When you click the Populate Resources button, the resources associated with the selected supervisors are listed. You can then delete the resources that you do not want to assign to the shop. Once you assign a resource to a shop, the shop is listed for the resource in the resource's profile (Manage Profiles).
Resource Eligibility Status Changes
You can change the eligibility of a resource from active to inactive and vice versa. You can also add rows to indicate future eligibility effective dates for a resource. If you change a resource to ineligible at a future date, this does not prevent you from scheduling the resource before the effective date for an assignment that begins or continues after the effective date. However, you can no longer assign the resource on or after the date that the resource becomes ineligible and the resource is not included in Resource Matching. You can continue to access and update the ineligible resource's profile.
A user cannot change the status of a Maintenance Management resource to ineligible during a time period when work order assignments exist for the resource in Maintenance Management.
For example, resource A is assigned to a Maintenance Management work order task from July 1 to July 31. If a user accesses the Maintenance Management Maintain Resource Eligibility component and attempts to make the resource ineligible for assignment from July 10 to August 10. The system will prevent the user from changing the eligibility status of the resource and issues the following error message, "This resource cannot be made ineligible during this time frame. There are one or more active assignments scheduled during the dates specified for the resource's ineligibility period. Please edit these assignments before setting the resource to ineligible."
Important! The assignments for a resource, if you are using the PeopleSoft HRMS employee source database, are automatically canceled when an employee's status changes in PeopleSoft HRMS from active to any other status.
Resource Profile Maintenance
The resource profile is a dynamic record designed for periodic review and update by the resource and the resource's managers to reflect changes in the resources qualifications. You view or modify various parts of a resource's profile when you establish and maintain the resource.
You can add crafts to a resource's profile in the Manage Profile - Craft page. You add a craft to an employee, who is not set up in the PeopleSoft HCM database, you can copy the qualification profile associated with the craft to the non-HCM employee. PeopleSoft HCM employee qualifications are updated in the PeopleSoft HCM system.
When you assign a resource to more than one shop with overlapping shifts on the PeopleSoft Maintenance Management, Labor Administration, Manage Profiles page, you will receive the following message:
Warning — Business Unit US001, Shop ID SHOP A, Shift L1 overlaps with the previous shift (US001, SHOP B, L1) for 2006- 08 - 09
You are about to assign a resource to work on two different shifts that overlap one another.
Since this is a warning message, you can select OK and proceed with the assignment.
For example, a painter, Jerome Kern, is assigned to Business Unit US001 and Shop A. The painter's assigned shift is L1 (8 a.m. to 4 p.m) Monday to Friday. However, the organization needs Jerome Kern to perform work in any one of 5 Maintenance Shops (SHOP A, SHOP B, L-SHOP1, L-SHOP2, L-SHOP3) during the 8 a.m. – 4 p.m time period. To solve this problem, you can select the Labor Administration, Manage Profiles component, select Jerome Kern, and select the Shop tab and add the following rows:
|
Business Unit |
Shop |
Shift |
|---|---|---|
|
US001 |
SHOP A |
L1 |
|
US001 |
SHOP B |
L1 |
|
US001 |
SHOP-L1 |
L1 |
|
US001 |
SHOP-L2 |
L1 |
|
US001 |
SHOP-l-3 |
L1 |
When you click the Save button, the following message appears:
If you enter all the rows at once and Save the page, the system compares two rows at a time to each other. For example, SHOP A/L1 is compared to SHOP B/L1, then SHOP A/L1 is compared to SHOP-L1/L1, then SHOP A/L1 is compared to SHOP-L2/L1 and so on. You must click the OK button for each comparison before you can return to the menu. You may have to click the OK button several times if there are multiple shops. Manage: Profiles – Shop page
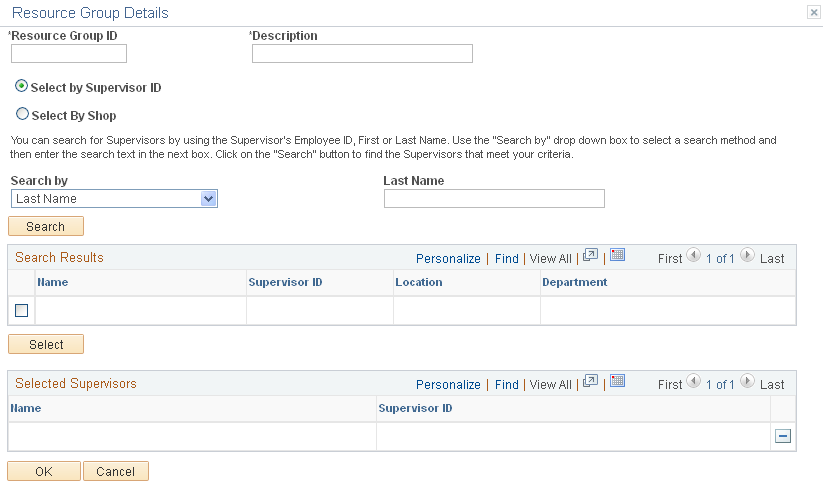
Use the Resource Group Definition - Resource Group Details page (RS_RSRCGRP_ADD) to define a group of tool or labor resources to use to narrow the search in the resource matching process.
Navigation:
Click the Edit button on the Resource Group Definition - Resource Groups page.
This example illustrates the fields and controls on the Resource Group Details page. You can find definitions for the fields and controls later on this page.
Field or Control |
Description |
|---|---|
Resource Group ID |
Enter a unique group identifier (15 characters). This is a required field. |
Select by Supervisor ID |
Select this option to indicate that you want to set up the resource group based on resources identified as working for the specified supervisor. Important! You must enter a supervisor on the Update Employee Data - Employee Job page for all resources before you can use resource groups that are based on a supervisor ID. |
Search By |
Search for supervisors by using the supervisor's employee ID, or first or last name. Use the Search By drop-down list box to select a search method and then enter the search text in the next box. Click the Search button to find the supervisors that meet your criteria. Select one of these values from the drop-down list box:
Note: To search using characters within an employee name or ID, enter a wildcard (%), then enter any contiguous characters, and then enter another wildcard (%). |
Select by Shop |
Search for a shop by using the shop ID, shop description, location, or work order business unit. Use the Search drop-down list box to select a search method and then enter the search text in the next box. Click the Search button to find the shops that meet your criteria. Select one of these values from the drop-down list box:
Click the Search button to display the specific shop or one or more shops based on your search criteria. Then select the check box next to the shop (or shops) that you want to include in the resource group. All of the resources and tools assigned to each shop are part of the resource group and are used by the matching engine to narrow your search for either labor resources or tools needed when you assign resources to a work order task in a work order. |
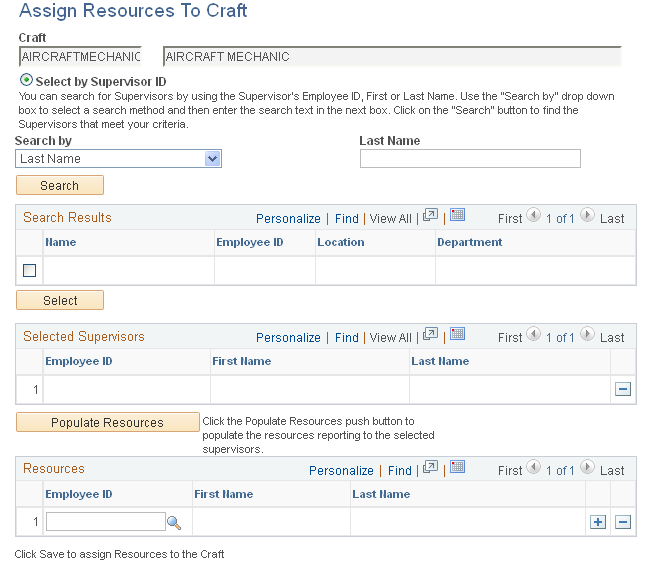
Use the Assign Craft page (RS_CFTASSGN_PG) to assigns resources to a craft based on a supervisor ID.
Navigation:
This example illustrates the fields and controls on the Assign Resources to Craft page. You can find definitions for the fields and controls later on this page.
Field or Control |
Description |
|---|---|
Search By |
Select either:
Note: If you leave these fields blank and click the Search button, a list of supervisor's names displays. |
Search |
Click this button to display the supervisor's name and ID. If you did not enter the name or identification of a supervisor, a list of supervisors displays in the Search Results group box. Select the check boxes next to the name or names of the supervisors who are in charge of resources you want to assign to this craft. |
Select |
Click this button to list the selected supervisors in the Selected Supervisors grid. |
Populate Resources |
Click this button to list the resources associated with the selected supervisors. The resources are listed by employee ID and a name in the Resources group box. You can delete resources that you do not want to assign to this craft. You can also add individual resources that you want to assign to this craft. |
Save |
Click this button to assign resources to the craft and update each resource's profile with this craft. |
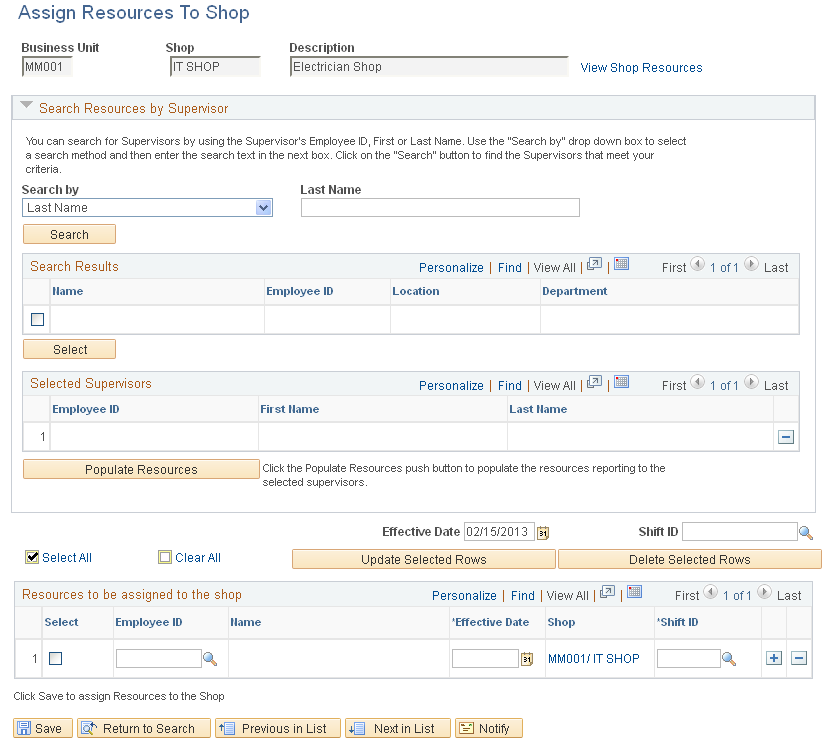
Use the Assign Resources to a Shop Page (WM_SHOPASGN) to assign resources to a shop based on a supervisor ID
Navigation:
This example illustrates the fields and controls on the Assign Resources to Shop page. You can find definitions for the fields and controls later on this page.
Field or Control |
Description |
|---|---|
Search By |
This Business Unit driven page Select either:
Note: If you leave these fields blank and click the Search button, a list of supervisor names displays. |
Search |
Click this button to display the supervisor's name and ID. If you do not enter the name or identification of a supervisor, a list of supervisors displays in the Search Results group box. Select the check boxes next to the name or names of the supervisors who are in charge of resources you want to assign to this shop. |
Select |
Click this button to list the selected supervisors in the Selected Supervisors grid. |
Populate Resources |
Click to populate “Resources to be assigned to the shop“grid with the resources reporting to the selected supervisor(s). All resources on the grid are added to the shop unless you delete any from the grid. |
Effective Date and Shift ID |
Specify the effective date and the working shift to determine when the resources become active in the shop. The effective date must be greater than or equal to today. |
Save |
Click this button to assign resources to the shop and update each resource's profile with this shop |
Use the Maintain Eligibility page (RS_WRKR_MGMT) to indicate whether a resource is eligible or ineligible to be assigned to a shop, crew, or work order task.
Navigation:
This example illustrates the fields and controls on the Maintain Eligibility page. You can find definitions for the fields and controls later on this page.
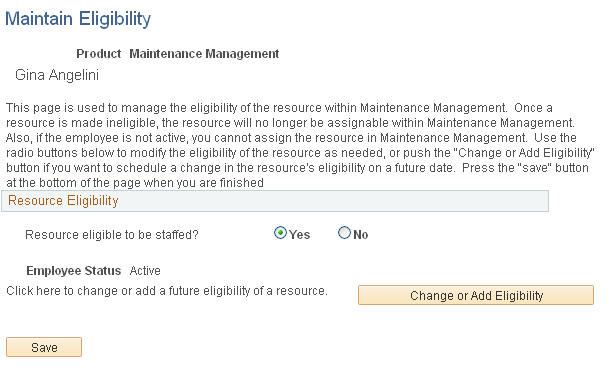
Prior to entering this page, you must search for and select an employee on the Maintain Eligibility - Resource Search page.
Field or Control |
Description |
|---|---|
Resource Eligible to be staffed? |
Select:
|
Change or Add Eligibility |
Click this button to access the Resource Eligibility Management page. |
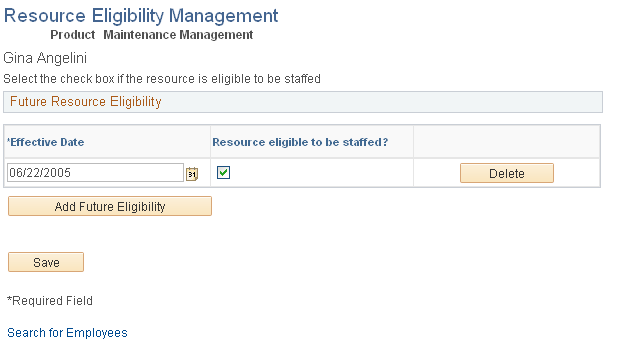
Use the Resource Eligibility Management page (RS_WRKR_MGMT_FUT) to add or change a resource's eligibility.
Navigation:
Click the Change or Add Eligibility button on the Maintain Eligibility page.
This example illustrates the fields and controls on the Resource Eligibility Management page. You can find definitions for the fields and controls later on this page.
Field or Control |
Description |
|---|---|
Effective Date |
Select the date in which you want this employee to become eligible. |
Resource eligible to be staffed? |
Select this check box if this resource is eligible to be assigned to a work order or work order task. |
Add Future Eligibility |
Click this button to add another row to the Future Resource Eligibility grid. You can add several rows with different dates to indicate when the resource will be eligible for assignment in the future. |
Use the Manage Profiles - Overview page (RS_ERES_OVERVW) to define additional employee information, an overview of the resource, and any of the resource's specialties.
Navigation:
Select the Overview tab.
This example illustrates the fields and controls on the Manage Profiles - Overview page. You can find definitions for the fields and controls later on this page.

Objective Overview
Enter or modify this resource's work objectives and background. You can reference skills, preferences, and strengths if you want. However, you can add or modify this information later in the profile.
Areas of Specialty
If you created a competency tree, it should appear in the Additional Resource Information group box. Click a competency in the competency tree and it adds it as a row in the Specialties group box.
Field or Control |
Description |
|---|---|
Type of Specialty |
You can select whether a specialty is a:
|
Worker Specialty |
Select the specialty from a list of competencies or categories, depending on the type of specialty that you selected. |
Add Specialty |
Click this button to add a blank row to the Specialties group box list. |
Note: Data that is captured in this page is for information only and is not used by the Resource Matching process.
Use the Work Experience page (RS_ERES_WORK_HIST) to add or modify a resource's work experience.
Navigation:
Select the Work Experience tab.
This example illustrates the fields and controls on the Work Experience page. You can find definitions for the fields and controls later on this page.
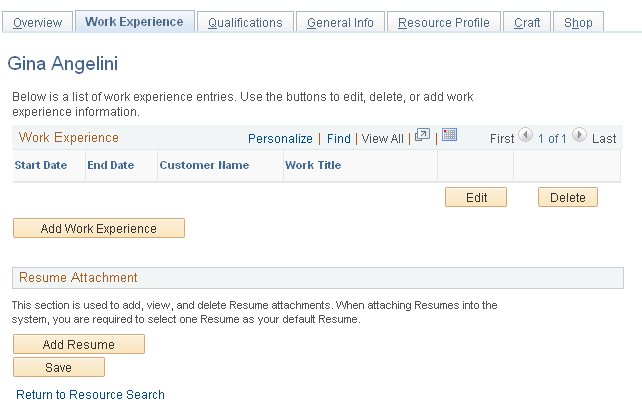
Work Experience
You can edit or delete a resource's work experience.
Field or Control |
Description |
|---|---|
Edit |
Click this button to access the Work Experience page for this resource, where you can modify the Start Date, End Date, Customer Name (name of company for which the employee worked or organization the technician supported), Work Title, and Work Description fields and click the Save button to save the changes. |
Delete |
Click this button to delete a row of work history for this resource. A Delete Confirmation page displays where you can select one of the following buttons:
|
Add Work Experience |
Click this button to access a blank Work Experience page for this resource where you can add the Start Date, End Date, Customer Name (name of company for which the employee worked or organization the technician supported), Work Title, and Work Description values and click the Save button to save the changes. Note: The work experience that you add here is used by the Resource Matching process and can be used by a user who evaluates candidates for an assignment. |
Resume Attachment
Add, view, and delete resumes in this group box. You must select one resume as the default resume for this resource.
Field or Control |
Description |
|---|---|
Add Resume |
Click this button to add a resume attachment. |
Browse |
Click this button to search for the resume for this resource and select the resume that you want to attach to this profile. |
Upload |
Click this button to upload the selected resume to this profile. |
Default |
Specify the resume, if there are more than one, to use as the default by the Resource Matching process. |
Delete |
Click this button to delete a resume from the Resume Attachment group box. |
Note: Be sure to save the page.
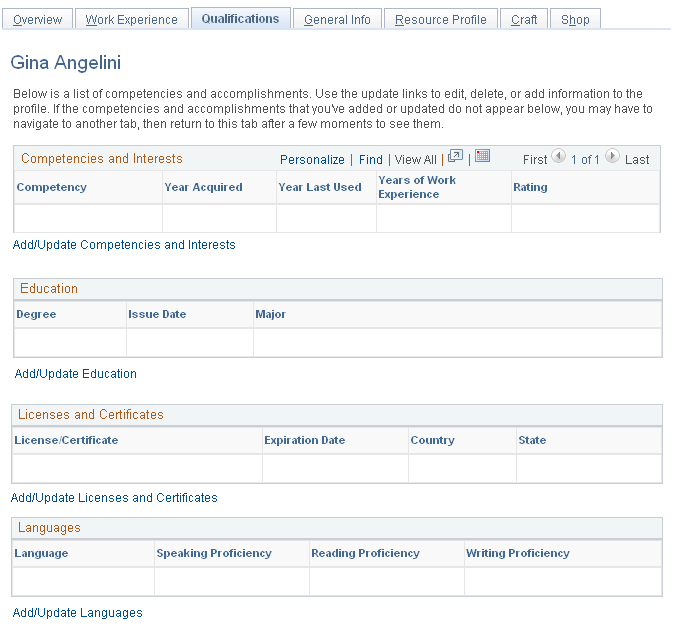
Use the Qualifications page (RS_ERES_COMP_ACOMP) to add or modify a resource's qualifications.
Navigation:
Select the Qualifications tab.
This example illustrates the fields and controls on the Qualifications (1 of 2) page. You can find definitions for the fields and controls later on this page.
This example illustrates the fields and controls on the Qualifications (2 of 2) page. You can find definitions for the fields and controls later on this page.

Competencies and Interests
Field or Control |
Description |
|---|---|
Add/Update Competencies and Interests |
Click this button to access the Competencies page to associate additional competencies with this resource. This page simulates the Competencies page in the Qualification Profile component, except you do not have access to the competency tree. See Competencies Page. |
Education
Field or Control |
Description |
|---|---|
Add/Update Education |
Click this link to add, modify, or delete degrees applicable to this resource. |
Licenses and Certificates
Field or Control |
Description |
|---|---|
Add/Update Licenses and Certificates |
Click this link to add, modify, or delete licenses and certificates that apply to this resource. |
Languages
Field or Control |
Description |
|---|---|
Add/Update Languages |
Click this link to add, modify, or delete languages and language proficiency that apply to this resource. |
Professional Memberships
Field or Control |
Description |
|---|---|
Add/Update Professional Memberships |
Click this link to add, modify, or delete memberships to professional organizations for this resource. |
Honors and Awards
Field or Control |
Description |
|---|---|
Add/Update Honors and Awards |
Click this link to add, modify, or delete honors and awards that apply to this resource. |
Test Results
Field or Control |
Description |
|---|---|
Add/Update Test Results |
Click this link to add, modify, or delete tests and their associated results that apply to this resource. |
Note: You can click the Notify button on each of the pages defined above to notify interested parties about this change if you select the Email Notification to Manager check box inpage.
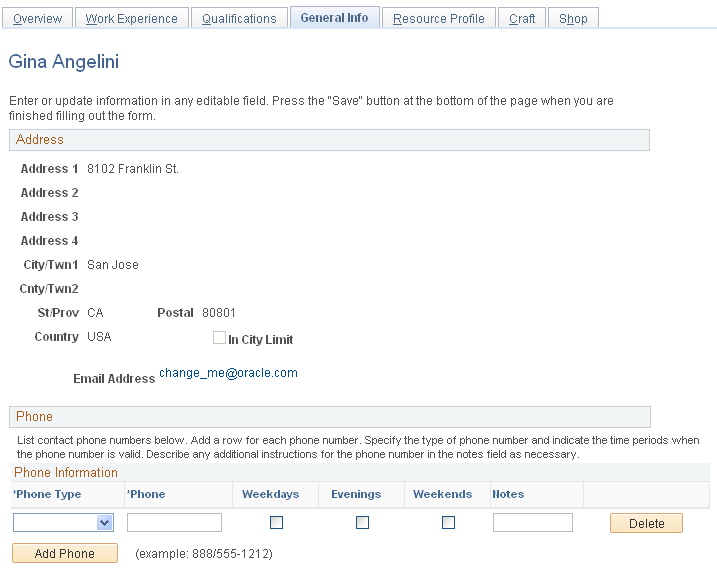
Use the General Info page (RS_ERES_GEN_INFO) to add or modify a resource's information such as visa, work permit, passport, additional phones, and job information.
Navigation:
Select the General Info tab.
This example illustrates the fields and controls on the General Info (1 of 2) page. You can find definitions for the fields and controls later on this page.
This example illustrates the fields and controls on the General Info (2 of 2) page. You can find definitions for the fields and controls later on this page.

You can update some fields in this page. However, to update most of the fields, you must access the employee source database, either HRMS or PeopleSoft Maintenance Management's Manage Employee Data, and make the changes.
Field or Control |
Description |
|---|---|
E-mail Address |
Click the resource's email address to create an email and send it to the resource. |
Phone
Field or Control |
Description |
|---|---|
Phone Type |
Select one for the following:
|
Phone |
Enter or modify the phone number. |
Weekdays, Evenings, and Weekends |
Select the check box that applies to when the resource is available at this phone number. |
Delete |
Click this button to delete a phone row. |
Add Phone |
Click this button to add another row and enter a selected phone type's information. |
Job Information
This information comes from the employee data.
Passports and Visas
This information comes from the employee data.
Weekly Work Days
Select the work days that apply to this resource. The values that you select here override Default Work Days values set up in the page.
Other
Field or Control |
Description |
|---|---|
Home Airport |
Enter or override an airport in this field. |
Assignment Restrictions |
Enter or modify any assignment restrictions for this resource. |
Use the Resource Profile page (RS_RES_PROF_RVW) to view basic resource information and add or modify contact information.
Navigation:
Select the Resource Profile tab.
This example illustrates the fields and controls on the Resource Profile page. You can find definitions for the fields and controls later on this page.
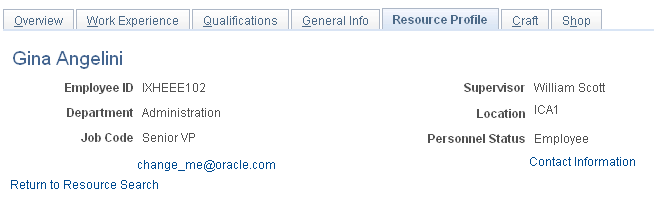
This page consolidates the resource profile sections into a single, display-only format. A region appears on this page if it contains data for the resource.
Field or Control |
Description |
|---|---|
Contact Information |
Click this link to access the (resource) Contact Information page to review phone information for this resource. |
View Detail |
Click this link to view a detail list of the competencies that apply to this resource. Click the View Summary link to return to the summary view of the Resource Profile page. |
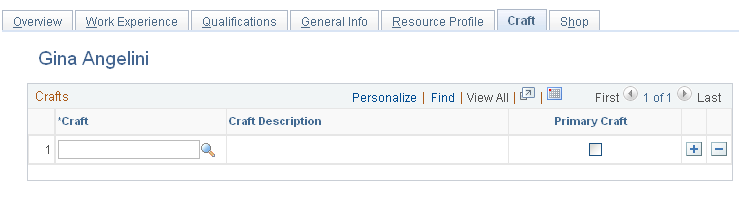
Use the Craft page (RS_CFTPROF_PG) to associate a resource with one or more crafts.
Navigation:
Select the Craft tab.
This example illustrates the fields and controls on the Craft page. You can find definitions for the fields and controls later on this page.
Field or Control |
Description |
|---|---|
Craft |
Select a craft to apply to this resource. When you add a craft for a non-HCM employee and select the Save button, a page displays where you can elect to copy all the competencies and accomplishments associated to the qualification profile of the craft to this resource's profile. Competencies and accomplishments for employees listed in the PeopleSoft HCM database are updated in PeopleSoft HCM. Note: Rows of crafts to which this resource is assigned are listed on this page. |
Primary Craft |
Select this check box if this is the primary craft for this resource. When you define a crew, and select this resource, this is the craft that is associated with the resource. Note: If you leave this check box blank, the system uses the first craft in the list as the resource's primary craft in the crew definition. |
Note: You can add multiple rows of crafts; however, select the Primary Craft check box for only one craft.
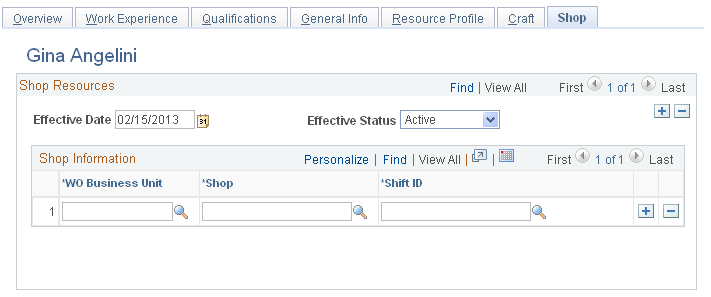
Use the Shop page (RS_RES_SHOP_PROF) to associate a resource with one or more shops.
Navigation:
Select the Shop tab.
This example illustrates the fields and controls on the Shop page. You can find definitions for the fields and controls later on this page.
Field or Control |
Description |
|---|---|
Effective Date |
Select the date from which the resources shop affiliation is either active or inactive. |
Status as of Effective Date |
Select if the resource's affiliation with this list of shops is Active or Inactive as of the selected effective date. |
WO Business Unit (work order business unit) |
Select the work order business unit associated with this shop. |
Shop |
Select a shop set up with the selected business unit. |
Shift ID |
Select a shift to apply to this resource when working from this shop. |
Note: You can add multiple rows of shops based on an effective date and status. You can also add multiple rows of effective dates and associated shops to track the shop history and to change the shops based on a different effective date.
Use the Monthly Schedule - Resource Search page (RS_SCHED_MONTHSRCH) to search for a resource's monthly schedule.
Navigation:
This example illustrates the fields and controls on the Monthly Schedule page. You can find definitions for the fields and controls later on this page.

Review the assignments and scheduled days off for this resource. If a resource is assigned to work order task assignment, a link with the description of WO ID/ WO Task ID/ Task Description appears. Click this link to access either the Technician Workbench or the Work Order Component depending on how you set up page. If you click a work order task link on this page, the Schedules page in the Work Order component displays for the specific task.
Field or Control |
Description |
|---|---|
This month |
Click this link to display the current system month if you the month displayed is different from the current month. The current month is the system default month. |
Update Employee's Holidays |
Click this button to initiate the Holiday Load process to refresh holidays on the resource schedule. All of the holidays that are associated with the holiday schedule are inserted into the resource schedule as tasks with the task category HOLIDAY. The refresh process occurs in the background in real time. A message indicates when the process is complete. |
Note: Click one of the date links in the month to access the Daily Schedule page.
Important! The Asset Monthly Schedule page works the same way as the Resource Monthly Schedule page. However, the Asset Monthly Schedule page does not have an Update Employee's Holidays button.
Use the Daily Schedule page (RS_SCHED_DAILY) to review and modify appointments on an hour per day basis.
Navigation:
Click a date that has assignments on a the Monthly Schedule page.
This example illustrates the fields and controls on the Daily Schedule page. You can find definitions for the fields and controls later on this page.
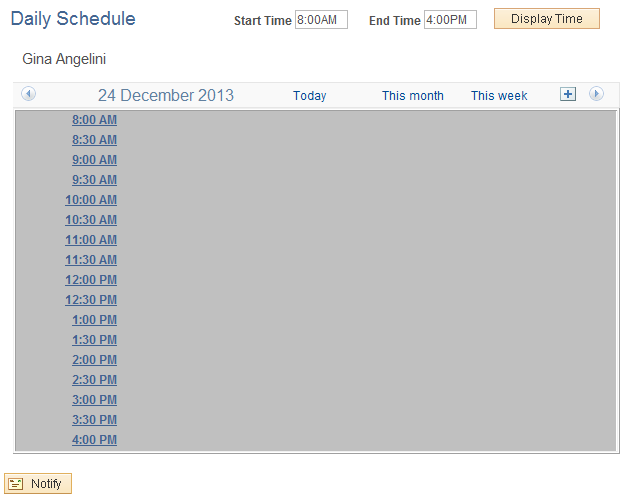
Review the selected daily schedule for this resource. Click an hour or click a task to add or modify task details. When a resource is assigned to a work order task, a hyperlink displays with the description, which includes the time range/work order business unit/ work order ID/ work order task ID/ task description. If you click this link either the Technician Workbench or the Work Order component displays depending your setup in page.
Important! You access the Daily Schedule page by clicking on a date that has assignments. If a schedule does not have assignments, when you click on the date, the Task Details page displays.
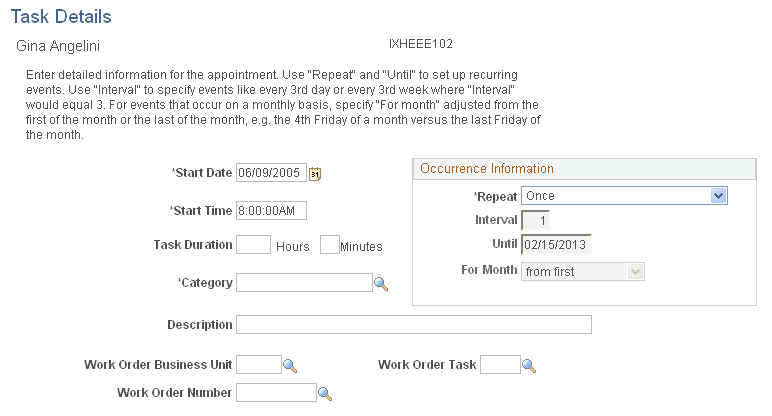
Use the Task Details page (RS_SCHED_APPT) to add or modify an assignment for a specific day and time.
Navigation:
Click an hour link on the Daily Schedule page.
Click an hour link on the Asset Daily Schedule page.
This example illustrates the fields and controls on the Task Details page. You can find definitions for the fields and controls later on this page.
Field or Control |
Description |
|---|---|
Start Date and Start Time |
Enter a different date and time, if desired. Note: The date and time are based on the date and time link that you clicked on the Daily Schedule page. |
Task Duration |
Enter the total time for this resource to perform this task. |
Category |
Select the task category that applies to this period of time. See Task Categories Page. |
Work Order Business Unit, Work Order Number, and Work Order Task |
Select these values to identify downtime on the calendar for the asset being repaired or maintained in a work order task. This is a manual process. |
Important! The Asset Task Details page contains the same fields as the Resource Daily Schedule page.
Occurrence Information
Field or Control |
Description |
|---|---|
Repeat |
Select a value that defines how often you want this task category repeated in the resource's schedule. The values are:
|
Interval |
Enter the number of intervals between occurrences of the event. |
Until |
Select the last date that the event should occur. |
For Month |
Select one of these values:
|