Scheduling Inventory Resources for a Work Order Task
This section describes how to assign and schedule inventory resources for work order tasks, set up a picking plan, copy items from the Equipment Parts List, add Inventory Items and Purchase/On-Hand Materials to the Equipment Parts List, define the Inventory Schedules Materials tab, define the Inventory Schedules Details tab, define the Inventory Schedules Reservation tab, define the Inventory Schedules Availability tab, define the Inventory Schedules Additional Information tab, define the Inventory Schedules Default Settings tab, define the Inventory Schedules Cost tab, define the Inventory Schedules Distributions tab, and perform Inventory batch reservations.
|
Page Name |
Definition Name |
Usage |
|---|---|---|
|
WM_WO_TASK_SCHED |
Enter resource schedules for work order tasks. |
|
|
WM_EPL_SELECT_SEC |
Select an inventory item associated with the selected asset for the task. |
|
|
WM_AM_EPL_UPDATE |
Add inventory items and purchase/on-hand items to existing EPL templates. |
|
|
IN_WO_RNCTL_OPT_SP |
Define the run parameters for the work order pick plan process. |
|
|
Item Search Criteria |
ITEM_SEARCH_SP |
Perform an expanded search for an inventory item. |
|
Pegging Workbench |
IN_PEG_DETAIL_SP |
Peg quantity for Inventory item in the work order task. |
|
Pegging Inquiry |
IN_PEG_DETAIL_SP |
Review the pegging status of an item. |
|
Item/Product Availability |
ATP_SUMMARY_INV |
Review the availability status of a selected item in the work order task line. |
|
Item Balance by Unit |
INV_BU_QTY_INQ |
Review remaining balance in Inventory of a selected inventory item in the work order task line. |
|
Delivery Instructions |
WM_WO_DELVSCHD_SEC |
Add instructions concerning how to deliver the inventory and purchase/on-hand materials. |
|
Reservation Errors |
WM_WO_RESERVE_SEC |
Review errors generated from Inventory when attempting to reserve an item. |
|
Shortage Workbench |
IN_SW_SELECTION |
Reserve and unreserve inventory items selected for work order tasks. |
|
Reserve Materials |
RUN_IN_FULFILL_RSV |
Perform batch reservation processing of inventory items selected for a work order task. |
|
Item Availability |
WM_WO_ITMAVAIL_SEC |
Review the reason why an item was identified as unavailable. |
|
Reservation Errors |
WM_WO_RESERVE_SEC |
Review reservation message errors. |
Select the Inventory Schedules tab on the Schedules page.
This example illustrates the fields and controls on the Schedules page - Inventory Schedules. You can find definitions for the fields and controls later on this page.

Field or Control |
Description |
|---|---|
Item Availability |
Click this button to determine the availability of a selected item as of the Schedule Needed Date. Selecting this button updates the Availability tab and indicates whether the quantity is available or not, the earliest available date, and the quantity available on the Schedule Needed Date. See Inventory Schedules - Availability tab — Schedules Page. |
Picking Plan |
Click this button to generate a picking plan for any of the listed items that have not already been selected for a picking plan. You do not have to select each row to generate a picking plan. A message displays indicating that you submitted a picking plan and provides the process instance and pick batch ID for tracking purposes. Note: If you indicated that items are committed based on the generation of a Picking Plan in the work order business unit's Integration page or the shop definition, then the Inventory Schedules - Details tab indicates that the items are committed. You must indicate in the User Preferences - Maintenance Management page that a user is authorized to run a picking plan. |
Picking Plan Setup |
Click this button to display the Process/Output Options page to define the allocations and run parameters for the work order picking plan report. |
Shortage Workbench |
Click this link to access the Inventory Shortage Workbench to reserve or unreserve the work order demand. Note: With proper authorization in PeopleSoft Inventory, you can access the Allocations Workbench from the Shortage Workbench. See Understanding Work Order Item Fulfillment from PeopleSoft Inventory. |
Copy from EPL (copy from equipment parts list) |
Click this button to access the Copy from Equipment Parts List page, where you can select among multiple EPL templates, if available, listed in descending order of applicability that match the target asset's classification criteria (asset type, subtype, manufacturer ID and model). The default template is listed at the top and is preselected. However, you can select a different template from which to copy the inventory parts. Selecting the template copies all of the inventory parts associated with the asset to the lower portion of the page. You then select the inventory parts that you want to copy to the work order task. |
Add to EPL (add to equipment parts list) |
Click this button to access the Add to Equipment Parts List page and add one or more selected inventory items to one or more EPL templates that appear on the page. You must select the items for each row on the Inventory Scheduling grid, enter a planned quantity, and select each item row to display the Add to Equipment Parts List page. |
Reserve |
Click this button to override the reservation rules hierarchy set up in the work order business unit and shop and immediately reserve the items for that task. The results of this selection displays information on the Inventory Schedules-Reservation tab. Note: This button only appears on the page if the user is authorized to perform this activity on the User Preferences-Maintenance Management page. Note: The user has the option to select (one or more) Inventory Schedule grid rows to be submitted for either the Picking Plan or Reserve options. If no rows are selected before clicking either the Picking Plan or Reserve button, then all the rows will be submitted for the requested function. |
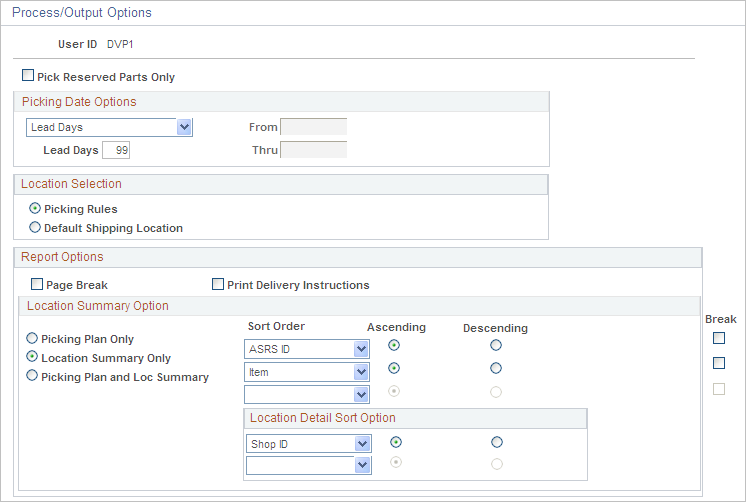
Use the Process/Output Options page (IN_WO_RNCTL_OPT_SP) to define the run parameters for the work order pick plan process.
Navigation:
Click the Picking Plan Setup button on the Inventory Schedules - Schedules page.
This example illustrates the fields and controls on the Pick Plan Setup - Process/Output Options page (1 of 2). You can find definitions for the fields and controls later on this page.
This example illustrates the fields and controls on the Pick Plan Setup - Process/Output Options page (2 of 2). You can find definitions for the fields and controls later on this page.
Field or Control |
Description |
|---|---|
Pick Reserved Parts Only |
Select this check box and run the Picking Plan to pick only the reserved inventory items (parts) associated with the work order task. Note: If the reserve rule is pick plan, all the parts for the task will be picked regardless if they have already been reserved and Pick Reserved Parts only is selected. |
Picking Plan Date Options |
Select one of these values to represent the number of days needed to reserve, pick, pack, and ship the majority of the items in the Inventory business unit. The requested quantities for soft-reserve items can be reserved when the scheduled shipment date falls within one of the following reservation lead days windows:
Note: If you do not select or enter one of the previous values, the system will use the lead days indicated for the Inventory business unit in Inventory, Fulfill Stock Orders, Fulfillment Rules, Setup Fulfillment, Setup Fulfillment or at the item level in Inventory, Fulfill Stock Orders, Setup Item Fulfillment. |
Picking Rules |
These rules are assigned at either the Inventory business unit level or at the item level and have these options:
|
Default Shipping Location |
These rules are assigned at either the business unit level or at the item level and have these options:
|
Page Break |
Select this check box to break the pages in the report for each work order. |
Print Delivery Instructions |
Select this check box to print the delivery instructions provided that you entered delivery instructions in the Inventory Schedules line. |
Location Summary Option
If you are using a push picking plan (the Action of Create Allocations on the Work Order Pick Plan page), you can print a Location Summary report either in addition to or instead of a full Picking Plan report. The Location Summary report sorts the demand lines according to where the items are physically stocked within the warehouse (Inventory business unit). The layout of the printed report reflects the actual positions of stock to be picked, enabling your personnel to fulfill all orders on the picking plan without revisiting locations.
Note: It is possible to complete all of the picking using only the Location Summary report; however, you can only view details such as picking errors or picking line and schedule orders and notes if you print out a full Picking Plan report.
Field or Control |
Description |
|---|---|
Picking Plan Only, Location Summary Only, and Picking Plan and Loc Summary (picking plan and location summary) |
Indicate which version of the picking plan you are printing. Location summary options are only available when you select Create Allocations in the Action field on the Work Order Pick Plan page. |
Sort Order |
Select up to three sorting levels to sort demand lines on the Picking Plan Location Summary report. These sort orders are based on the locations within the inventory business unit (physical location table). For each level, indicate whether the sort is in ascending or descending order and whether a page break should occur. Values for the highest-level Sort Order field are:
Once a value has been used at a higher-level sort order, the same value cannot be repeated in a lower-level sort. The values for the two lower-level Sort Order fields are:
|
Location Detail Sort Option |
Select up to two location detail sort options. The detail sort options are based on values located on the work order demand line, not the physical locations within the warehouse. For each level, indicate whether the sort is in ascending or descending order. Once a value has been used at the higher-level sort order, the same value cannot be repeated in the lower-level sort. Values for the location detail sort option fields are:
|
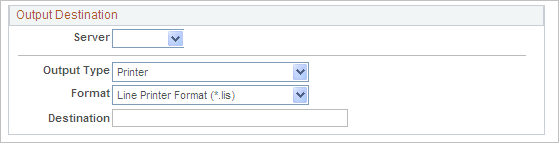
Output Destination
Select the Server, the Format of the output, and the Destination for the output, such as the name of an employee or a job location.
Field or Control |
Description |
|---|---|
Output Type |
Identify the type of output for your picking plan. Options are Email, File, Printer, Web, Default, Any, or Window. |
Format |
Identify the type of format for your picking plan. Options vary depending on the Output Type chosen. |
Destination |
Enter the directory into which you want to save the picking plan. |
Use the Copy from Equipment Parts List page (WM_EPL_SELECT_SEC) to select an inventory item associated with the selected asset for the task.
Navigation:
Maintenance Management, Work Order Management, Work Order, Schedules tab, click Inventory link, click the Copy from EPL button
This example illustrates the fields and controls on the Equipment Parts List Selection page. You can find definitions for the fields and controls later on this page.

This sample page displays for a target asset that has multiple EPL templates available. If only a single template is available, then that template displays as preselected in the top part of the page.
Field or Control |
Description |
|---|---|
EPL Template Selection(equipment parts list template selection) |
Displays one or multiple EPL templates. These templates are set up in PeopleSoft Asset Management. The preselected template is the default template for the selected asset, which is set up when you define the asset in PeopleSoft Asset Management. If the system lists multiple templates, select the template from which you want to copy items to the work order. The templates are listed in order of their applicability to the target asset specified on the work order task. The designated default template for the asset is always listed first and is preselected as the default. However, you can select the check box for any other template and the EPL Item Selection grid display will automatically refresh to display the Inventory items corresponding to the template that you selected. |
EPL Item Selection (equipment parts list item selection) |
Select the one or more of the items that you want to copy to the Inventory Schedules grid of the work order task to maintain or repair the selected asset. |
Copy Selected Items |
Click this button to copy the selected items to the Inventory Schedules grid. |
Use the Add to Equipment Parts List page (WM_AM_EPL_UPDATE) to add inventory items and purchase/on-hand items to existing EPL templates.
Navigation:
Click the Add to EPL button above the Inventory Schedules grid on the Schedules page.
Click the Add to EPL button above the Purchase/On-Hand Schedules grid on the Schedules page.
Field or Control |
Description |
|---|---|
Add to EPL (add to equipment parts list) |
Select the inventory item or items, enter the planned quantity, and select these rows on the Inventory Schedules grid that you want to add to an EPL template. On the Purchase/Hand Schedules grid, select or enter the materials, labor or tools items, enter the planned quantity, and select the rows that you want to add to the template. Click the Add to EPL button. Note: You must set up one or more asset-default or non-specific EPLs in PeopleSoft Asset Management, and select the one or both of the Allow Update Asset Default EPL and Allow Update Non-Specific EPLs options on the User Preferences, Maintenance Management page in order for the Add to EPL button to appear on the Schedules page of the work order. |
Adding to an Equipment Parts List
When you click the Add to EPL button, the Add to Equipment Parts List page displays a list of EPL templates that have been set up for the work order task asset or a non-specific category such as a location. If only one EPL template is available, this template is selected by default.
Field or Control |
Description |
|---|---|
EPL Template Selection (equipment parts list template selection) |
Select the EPL template rows that you want to update with the selected items or purchase/on-hand materials. |
EPL Items to Add |
Displays any items that you selected on the work order task grid to add to one or more selected EPL templates. |
Add to EPL (add to equipment parts list) |
After selecting one or more EPL templates, click this button to add the new inventory items or purchase/on-hand materials to the selected templates. A message displays indicating if the selected EPL templates were updated. |
Use the Inventory Schedules - Materials tab on the Schedules page to view details of the Inventory schedules.
This example illustrates the fields and controls on the Inventory Schedules Materials tab on Schedules page. You can find definitions for the fields and controls later on this page.

Field or Control |
Description |
|---|---|
Item ID |
Select an item ID from the Item ID Lookup page. Note: This field can also be populated by clicking the Copy from Requirements button or by selecting items from the EPL. |
|
Click this icon to access the Item Search Criteria page, where you can enter information to perform an expanded search for an item ID, select the item, and copy it to the line in the Inventory Schedules grid. |
Scheduled Quantity |
Enter the quantity of items that you need for this work order task. |
Schedule Needed Date |
Select the date that these inventory items are needed to perform the work. The default date is derived from the schedules start date for the work order task. |
UOM (unit of measure) |
Displays the default standard unit of measure for the item. There is a standard unit of measure and an ordering unit of measure associated with an item. All items are setup with a standard unit of measures such as EA (each). However, you can override the default standard UOM with an ordering UOM. For example, an item may be defined with a standard unit of measure of EA. You override this default value with the ordering UOM Boxsince a box may contain 4 EA. |
Planned Quantity |
Displays value copied from the work order task's requirements. If there are no requirements copied over, this field is not populated. Note: You must enter an amount in this field to add an inventory item to an EPL template when you click the Add to EPL button. |
Item Type |
Displays an Inventory item ID attribute value of either:
|

Navigation:
Click the Inventory Schedules - Details tab on the Schedules page
This example illustrates the fields and controls on the Inventory Schedules Details tab on Schedules page. You can find definitions for the fields and controls later on this page.

Field or Control |
Description |
|---|---|
Commit |
Displays whether the item has been committed in PeopleSoft Inventory. The status changes to committed depending on the commit rule that you selected on the work order business unit's Integration page or the shop definition. The commit rules include:
|
Pick Batch ID |
Displays the batch in which the pick plan was generated. |
Qty Issued (quantity issued) |
Displays after item is issued from PeopleSoft Inventory. |
Standard UOM (standard unit of measure) |
Add/Update a PO can also update the peg status to complete if the user reduces the PO quantity to be equal to the putaway quantity. This situation will occur if the user does a partial receipt and decides not to receive any more. |
Peg Status |
Displays the peg status of the selected inventory item: Note: The peg status that displays in this field only pertains to the purchase of Inventory items and is derived from the PeopleSoft Inventory system. You cannot purchase inventory items from PeopleSoft Maintenance Management.
|
Pegging Workbench |
Click the icon to access the Pegging Workbench in PeopleSoft Inventory, where you can add the quantity needed for the item to an incoming requisition or purchase order. This essentially reserves the specified quantity for the work order task against the incoming supply. When the material is received, a notification can be generated to notify WO personnel the material has arrived. Note: If you access the Pegging Workbench from the Inventory Schedules - Details tab, the system will autonumber the work order when it is saved (as long as it has not been previously saved). |
Pegging Inquiry |
Click this link to access the Inventory Pegging Inquiry and review the pegging details of an item. |
Select the Inventory Schedules - Reservation tab on the Schedules page.
This example illustrates the fields and controls on the Inventory Schedules Reservation tab on Schedules page. You can find definitions for the fields and controls later on this page.

Field or Control |
Description |
|---|---|
Qty Reserved (quantity reserved) |
Displays the actual quantity reserved in PeopleSoft Inventory. Work Order demand can be reserved in the following ways:
|
Reservation Status |
Displays the status of the selected item's reservation. Statuses that display include:
|
Reserve Messages |
Displays link to Reservation Messages page, which describes the reason(s) why an item could not be fully reserved. This link appears when you attempt to reserve materials for a work order task. |
Qty Pre Allocated (Quantity Pre Allocated) |
Displays the current quantity pre-allocated (if any) for the Scheduled Inventory item. The quantity pre-allocated is displayed as a hyperlink. Click the hyperlink to open the Inventory Allocation Workbench. The Allocation Workbench displayed by clicking the Qty Pre Allocated hyperlink will have only the Detail tab visible and the Allocation Type will be set to Pre-allocation. Note: The Qty Pre Allocated hyperlink will be enabled only if Inventory demand exists for the item. If the item has been picked or fulfilled, the quantity displayed will be zero and the corresponding link to the Allocation Workbench will be disabled. |
Priority |
Displays default value, which is derived from the setup of the reservation rules either at the work order business unit level, shop level, or work order type level, which is set up in the shop. PeopleSoft Inventory uses this number to sort demand and prioritize it accordingly, with 1 being the highest or most important priority and 999 being the lowest or least important priority. |
Reservation Errors
Use the Reservation Errors page (WM_WO_RESERVE_SEC) to review reservation message errors.
Navigation:
Click the Reserve Messages link on the Inventory Schedules - Reservation tab.
This example illustrates the fields and controls on the Reservation Errors page. You can find definitions for the fields and controls later on this page.

When you attempt to reserve an item on the Inventory Schedules grid and the system cannot reserve the item or can only partially reserve an item, you can click the Reserve Messages link to access the Reservation Errors page. This page describes reason that you could not reserve the item.
Select the Inventory Schedules - Availability tab on the Schedules page.
This example illustrates the fields and controls on the Inventory Schedules Availability tab on Schedules page. You can find definitions for the fields and controls later on this page.

Field or Control |
Description |
|---|---|
Current Qty Available (current quantity available) |
Displays the quantity available for the item in the Inventory business unit associated with the work order business unit. |
Availability Inquiry |
Click this button to access the Item/Product Availability page in PeopleSoft Inventory for the selected item based on a specific date. This page shows the cumulative ATP (Available to Promise) quantity, the available quantity, and the time phased supply and demand quantities for the item. |
Balance Inquiry |
Click this button to access the Item Balance by Unit page in PeopleSoft Inventory for the selected item. This page shows the quantity on hand, the quantity owned, the quantity available, and the quantity reserved for the item. It also shows the last adjustment, the last putaway date, the last order date and the last order. You can click links to access the Item Balance by All Units, the Item Balance by Location, and the Fulfillment Status components for the item. |
Schedule Needed Date |
Displays the default Schedule Date for the work order task. You can override this value and enter the date that the item is needed for the work order task. When you click the Item Availability button, the system updates the Need Date Qty Available field with the quantity available as of that date. |
Earliest Available |
Displays a date based on selecting one or more rows then clicking the Item Availability button on the Inventory Schedules page. This date determines, based on your scheduled quantity and schedule need date, when the selected Item is available. |
Item Availability |
Displays:
|
Need Date Qty Available (need date quantity available) |
Displays the quantity available on the date that you indicated you needed it for the work order task. This displays when you click the Item Availability button. |
Item Availability Page
Use the Item/Product Availability page (ATP_SUMMARY_INV) to review the availability status of a selected item in the work order task line.
Navigation:
Click the Availability link in the Inventory Schedules - Additional Information tab on the Schedules page.
This example illustrates the fields and controls on the Item Availability page. You can find definitions for the fields and controls later on this page.

When schedule an item that is unavailable and select the Item Availability button, it displays a No in the Item Availability field of an Inventory/Schedules row. When you click the No link, the Item Availability page appears with a message describing the error.
Select the Inventory Schedules - Additional Information tab on the Schedules page.
This example illustrates the fields and controls on the Inventory Schedules Additional Information tab on Schedules page. You can find definitions for the fields and controls later on this page.

Field or Control |
Description |
|---|---|
Delivery Flag |
Select this check box to enable you to add delivery instructions. |
Delivery Instructions |
Enter instructions describing how you want the selected inventory item delivered. |
Serial/Lot |
Displays a serial or lot numbers if the selected item is serial or lot controlled and quantities are issued to the inventory row. You can click a link to review the serial or lot numbers associated with the item. |
Select the Inventory Schedules - Default Settings tab on the Schedules page.
This example illustrates the fields and controls on the Inventory Schedules Default Settings tab on Schedules page. You can find definitions for the fields and controls later on this page.

Field or Control |
Description |
|---|---|
Transaction Source |
Displays the source of the transaction. These values determine whether the transaction costs are Scheduled or Actuals. There are two integration points that can insert a row into the Inventory Schedules grid of a work order: From the pegging workbench you can peg a purchase order containing an inventory item back to a work order, or you can enter a direct issue from PeopleSoft Inventory to the work order. If a transaction cost is:
Transaction Source values can be:
Note: For Inventory Schedules rows that are created by a direct issue from PeopleSoft Inventory, the Scheduled Quantity field will be 0 and the entire row will be disabled. The disabling of these rows prevents any changes and keeps the work order in sync with the feeder applications that created them. |
Select the Inventory Schedules - Cost tab on the Schedules page.
This example illustrates the fields and controls on the Inventory Schedules Cost tab on Schedules page. You can find definitions for the fields and controls later on this page.

Field or Control |
Description |
|---|---|
Estimated Unit Cost |
Displays the unit cost of the item. PeopleSoft Inventory determines the cost method of the item based on the primary book for the Inventory business unit and the cost profile of the business unit/item. For example, if the primary book for the Inventory business unit is FIN01 and the cost profile of the business unit/item is PERPAVG, the unit cost for the item will be the perpetual average cost for the item. |
Scheduled Material Costs |
Displays unit cost of each item scheduled, which is derived from PeopleSoft Inventory, multiplied by the scheduled quantity. |
Currency Code |
Converts Inventory currency to currency identified in the work order business unit. |
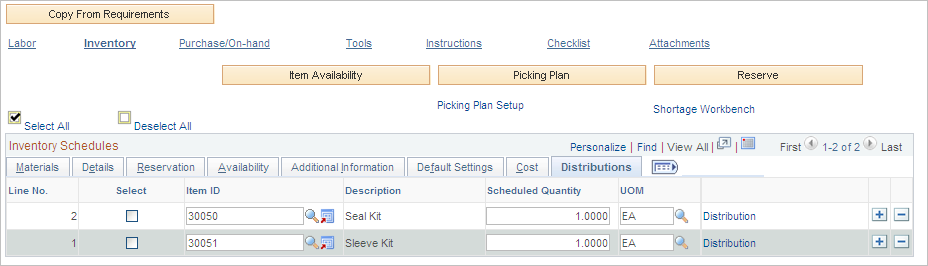
Select the Inventory Schedules - Distributions tab on the Schedules page.
This example illustrates the fields and controls on the Inventory Schedules Distributions tab on Schedules page. You can find definitions for the fields and controls later on this page.
Field or Control |
Description |
|---|---|
Distributions |
Click this link to access the distribution data specified for the row after an assignment has been made. You can override the values if necessary. Note: This link only displays if the View and Update Accounting check box on the User Preferences - Maintenance Management page is selected for this user. |
This example illustrates the fields and controls on the Reserve Materials page. You can find definitions for the fields and controls later on this page.

The handling of this page for work orders is described in the PeopleSoft Inventory documentation set of topics, Fulfilling Work Orders from PeopleSoft Maintenance Management.