Setting Up PeopleSoft Maintenance Management Asset Inspection Parameters
Use the following components to set up the Maintenance Management Asset Inspection parameters:
Measuring Instrument Type (WM_INSTRMT_TYPE) component.
Inspection Measurements (WM_INSP_MEASMT) component.
Inspection Observations (WM_INSP_OBSRVN) component.
Inspection Calculations (WM_INSP_CALCLT) component.
Inspection Alert Roles (WM_INSP_ALERT_ROLE) component.
Inspection Alert Messages (WM_INSP_ALERT_MSG) component.
Work Order Inspection Plans (WM_WO_INSP_PLAN) component.
This section provides an overview of asset inspection codes, inspection plans, and alert messages and discusses how to set up them to collect the information to evaluate the current condition and operability of assets.
|
Page Name |
Definition Name |
Usage |
|---|---|---|
|
WM_INSTRMT_TYPE |
Define measuring instruments used for asset inspections. |
|
|
WM_INSP_MEASMT |
Establish inspection measurements collected during asset inspections. |
|
|
WM_INSP_OBSRVN |
Establish observation codes collected during asset inspections. |
|
|
WM_INSP_CALCLT |
Establish formula-based calculations for asset inspection data. |
|
|
WM_INSP_ALERT_ROLE |
Define asset inspection alert roles. |
|
|
WM_INSP_ALERT_MSG) |
Define asset inspection alert messages. |
|
|
WM_WO_INSPL_MAIN |
Establish work order inspection plan templates. |
PeopleSoft Maintenance Management application allows maintenance technicians to conduct periodic asset inspections to gather both quantitative and qualitative information about the current condition of a particular asset, as well as to assess the asset’s overall operability. The results of a single inspection or combination of inspections can frequently lead to a maintenance event to prevent asset failure. Through the inspection, analysis, and reporting, maintenance technicians identify the issues with the assets and provide specific recommendations to prevent outages and failures. The results can also be used in trend analysis, regulatory reporting, and resource planning to reduce the likelihood of inducing the same defect in the future.
The asset inspection process consists of various systematic inspection implementation phases such as defining and organizing inspection content, creating inspection instances associated with work order tasks, collecting and evaluating inspection data, and taking appropriate maintenance actions. The inspection criteria will vary based on the parent task’s target asset. To effectively plan and conduct the inspections, maintenance technicians need suitable and reusable inspection plans, which define and sequentially organize the asset data to be collected for each inspection activity.
After defining inspection plans, you have two options to create asset inspections:
Initiate automatic generation of asset inspections as part of PM work order that is created for a particular PM Schedule.
Initiate asset inspections manually by associating it to a parent task using the Job/Task Template Copy functionality of an existing work order.
A newly created asset inspection instance has its own status lifecycle, but one that is subordinate to the lifecycle of its parent work order task. To complete asset inspections, the assigned labor resources need to perform inspection activities as specified in the inspection plan. On the basis of the data collected, a follow-on maintenance event, if required, can be scheduled to prevent asset failure.
You can define asset inspection contents based on the target asset characteristics and sequence them in reusable templates for effective asset inspection planning, execution, and tracking purposes. Asset inspection elements mainly include inspection codes, alert message definitions, and inspection plan templates.
Asset Inspection Codes
Inspection codes are used to record and track various diagnostic values while conducting asset inspection activities. Inspection codes are organized by SetID and made applicable to target assets according to default asset classification parameters.
The asset inspection codes include:
Inspection Measurements - Identifies the unit of measure, decimal precision, and tolerance range (if any) for numeric values captured by an Asset Meter or a separate measuring instrument.
Inspection Observations - Identifies the data type, capture or display criteria, and/or set of predefined code values to be used when recording subjective (non-numeric) data values for a particular target asset attribute.
Inspection Calculations - Identifies the meta-SQL formula text used to return a single numeric or logical (True/False) value to be used in different inspection calculation activities.
Asset Inspection Plans
An asset inspection plan is a template, which consists of one or more inspection activities, which in turn are composed of a series of steps using which inspection data is collected or evaluated. To conduct an asset inspection, maintenance technicians can leverage the inspection plan’s content and sequence to assess the target asset’s current condition and operability.
Asset Inspection Activities
An asset inspection instance includes certain activities to collect the target asset’s data for evaluating the asset’s health. The supported asset inspection activities include:
Data Collection - Supports the capture of one or more measurement, observation, and/or numeric type calculation code data points in a series of steps.
Trigger Evaluation - Supports the execution of one or more trigger type calculation code formulas (exception logic) in a series of steps for the activity.
Other Logistics - Refers to an activity without either Data Collection or Trigger Evaluation content. This activity consists solely of instructions, checklist, notes, and/or attachments data records.
Each activity involves collecting specific data using the asset inspection codes defined for it.
Use the Measuring Instrument Type page (WM_INSTRMT_TYPE) to define the types of measuring instruments and their attributes used during asset inspections. This is an alternative setup option, which can be used to support the capture of non-meter type measurement readings when:
The measuring device is transportable (not part of the asset) and can be used on different target assets.
Recording different measurements with more than a single UOM is possible.
Navigation:
This example illustrates the fields and controls on the Measuring Instrument Type page . You can find definitions for the fields and controls later on this page.

Field or Control |
Description |
|---|---|
Instrument Type |
Displays the type of measuring instrument. |
Show Where Used |
Click this link to view the existing measurement codes that use this instrument type. |
Comments |
Click this link to view or enter comments about the instrument type. A check mark indicates that the page contains comments. |
Effective Status |
Select the current status of the instrument type. Available options are Active and Inactive. |
Description and Short Description |
Enter long and short descriptions for the instrument type. |
Unit of Measure |
Enter at least one unit of measure that this instrument type supports. A single measuring instrument can sometimes utilize multiple measurement units, which may describe different attributes of the target asset. |
Lower Limit and Upper Limit |
Enter the lowest and highest measurement values that this instrument can measure for the unit of measure specified. |
Non-Asset and Asset |
Select the Asset option if measuring devices sharing this instrument type are defined as assets in the Asset Management system. Otherwise, select the Non-Asset option. If you select the Asset option, the Preferred Identifier field and the Asset Classification parameter fields become editable. |
Preferred Identifier |
Select the option typically used to identify the asset:
|
Asset Classification |
Select the required parameter values. For information, see Asset Classification Page. |
Use the Inspection Measurement page (WM_INSP_MEASMT) to define inspection measurement codes for physical properties such as temperature, pressure, and electrical charge during asset inspections. An appropriate unit of measure is used to describe the collected values. Measurement code definitions are organized by SetID and made applicable to target assets according to the default asset classification parameters that define how generically and specifically the code may be used.
When recording technical measurements, you must ensure the accuracy and basic validity of the numeric values. Different data for different asset attributes will be characterized by a wide range of magnitudes and decimal precision, often depending on the recording or display capabilities of the measuring devices used. The Inspection Measurement page allows to define reusable inspection measurement codes that identify the various measurements that can be collected during an Inspection, along with the parameters controlling how the data values they represent will be stored and displayed.
Navigation:
This example illustrates the fields and controls on the Inspection Measurement page. You can find definitions for the fields and controls later on this page.
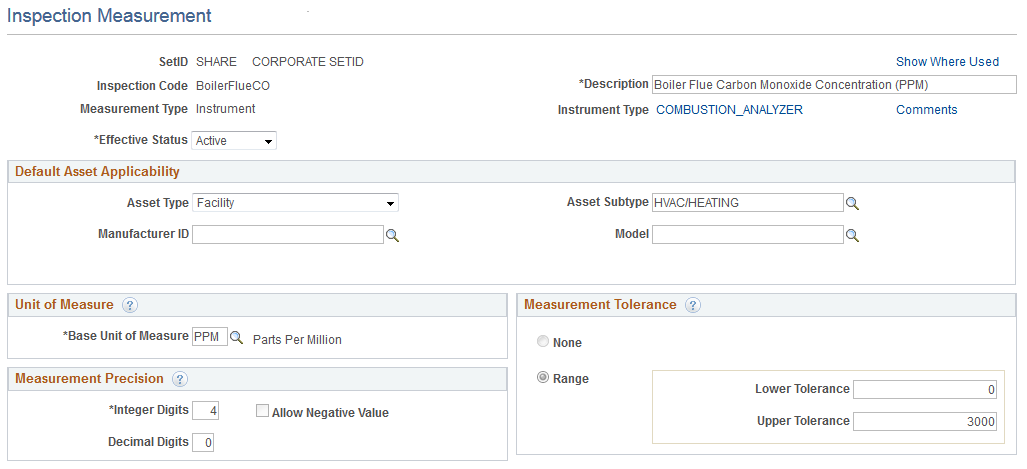
For a new inspection measurement, values for UOM, measurement precision, and measurement tolerance are defaulted from the parent device type’s definition and some of the default values are protected from further changes according to certain rules.
Field or Control |
Description |
|---|---|
Inspection Code |
Displays the unique measurement code. |
Measurement Type |
Displays the measurement type that the user selected. The measurement types include:
For Asset Meter and Instrument measurement types, click the link labeled with the name of the parent Meter/Instrument Type to review its definition. |
Show Where Used |
Click this link to view the existing inspection calculation codes and/or inspection plans that use this measurement code. See Inspection Calculation Page and Work Order Inspection Plan Page. |
Description |
Enter a description for the measurement code. |
Instrument Type or Meter Type |
Select this link to view the details of the parent device type. Note: Only Asset Meter and Instrument measurement types display this link. If you select the Asset Meter measurement type, then the label is Meter Type and if you select the Instrument measurement type, then the label is Instrument Type. |
Comments |
Click this link to view or enter comments about the measurement code. A check mark indicates that comments have been entered. |
Effective Status |
Select the status of the measurement code. Only active measurement codes can be used in an actual inspection. |
Default Asset Applicability group box |
Select the following values:
|
Base Unit of Measure |
Enter the unit of measure used to represent the value. Note: UOM is disabled and displays a default value if the parent Instrument Type definition contains either Asset Meter type or Instrument type, and only a single UOM. |
Measurement Precision
Field or Control |
Description |
|---|---|
Integer Digits |
Enter the maximum allowable number of numeric digits before the decimal point needed to capture and display measurement values. |
Decimal Digits |
Enter the number of numeric digits following the decimal point to capture and display measurement values. |
Allow Negative Value |
Select the check box when negative numeric values are allowed for this measurement. Note: This field is enabled or disabled based on any tolerance values specified. |
Measurement Tolerance
Field or Control |
Description |
|---|---|
None |
Select to indicate that tolerance limits are not applicable. |
Range |
Select the option to enter the permissible measurement limits. Note: Tolerance values, if defined, will be used in error or warning edits when measurement values are collected during an actual inspection.
|
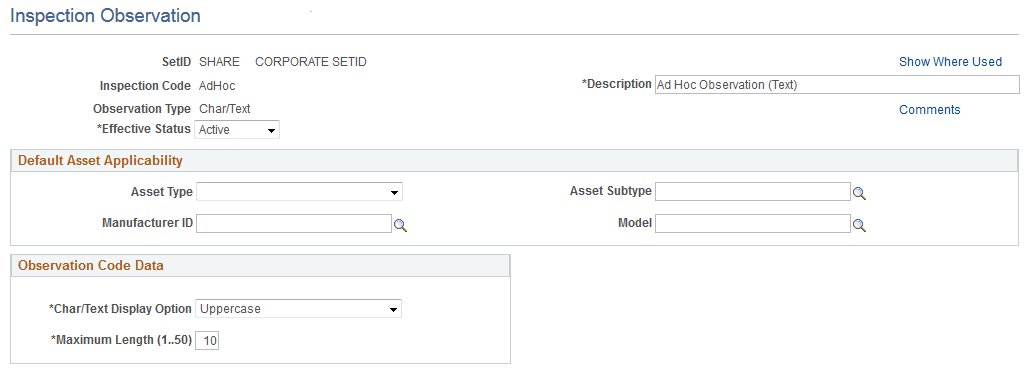
Use the Inspection Observation page (WM_INSP_OBSRVN) to establish subjective observation codes to be collected during asset inspections. For certain inspections, besides numeric measurements, it is often desirable to include qualitative data points in the form of subjective observations such as color, noise, and vibration. This descriptive, observational data are typically character or text-based. In some cases, limiting the set of possible responses to a small set of predefined values or codes can help streamline data entry and promote greater uniformity and trackability over time.
Navigation:
This example illustrates the fields and controls on the Inspection Observations page. You can find definitions for the fields and controls later on this page.
Field or Control |
Description |
|---|---|
Inspection Code |
Displays the unique observation code that defines a set of observation data to be captured for a target asset. |
Show Where Used |
Click this link to view the existing calculation codes and/or inspections plans that use this inspection observation code. See Inspection Calculation Page and Work Order Inspection Plan Page. |
Inspection Result Code |
Select the check box to use the list of code names to indicate the overall result of an inspection. Note: If this check box is selected, then this observation code will be made available in drop-down lists for Inspection Result codes on inspection plan templates. |
Description |
Enter a description for the observation code. |
Comments |
Click this link to view or enter comments about the observation code. A check mark indicates that comments have been entered. |
Observation Type |
Displays the selected observation type. The observation types include:
|
Effective Status |
Select the inspection observation code status. Only active observation codes can be used in an actual inspection. |
Observation Code Data group box |
If the observation type is Char/Text, the group box label is Observation Code Data.
|
CodeList Data
For Ranked CodeList, Toggle CodeList, and Unranked CodeList, enter the required values in the CodeList Data group box.
Field or Control |
Description |
|---|---|
Code Rank |
For Ranked CodeList type only, enter a unique numeric value (1-99) that signifies the relative rank, or sequence number of the indicated Code Name. Note: When entering data for this observation code in an actual inspection, the set of possible code name values will be listed in ranked order in a drop-down list box. |
Code Name |
Enter user-defined code names, which represent possible observation values for the inspection observation code. |
Toggle Value Type |
Prompts the user to enter either the Negative or Positive value in a pair of logically opposite code names. For example, On/Off and Pass/Fail. |
Use the Inspection Calculations page (WM_INSP_CALCLT) to establish user-defined calculations to create data points that can be used to describe and/or assess the condition of a target asset.
Inspection Calculation is the primary mechanism for customizing asset inspections functionality to your specific requirements. Calculations are of two types:
Numeric
Trigger
Numeric calculations are executed during an inspection’s data collection activity. That is after all necessary input values have been collected first. Clculations are constructed by entering one or more calculation detail lines. The resultant Calculation Text itself represents a meta-SQL sring providing all necessary information for subsequent (Inspection-time) execution by the customer installation’s SQL engine for their particular data base platform.
Trigger type calculations return a single logical (True/False) result. To ensure that user-defined calculation codes are properly constructed and can be executed successfully during actual Inspection events, validateand test execute them using the Validate button.
Navigation:
This example illustrates the fields and controls on the Inspection Calculations page- Numeric Calculation Type. You can find definitions for the fields and controls later on this page.
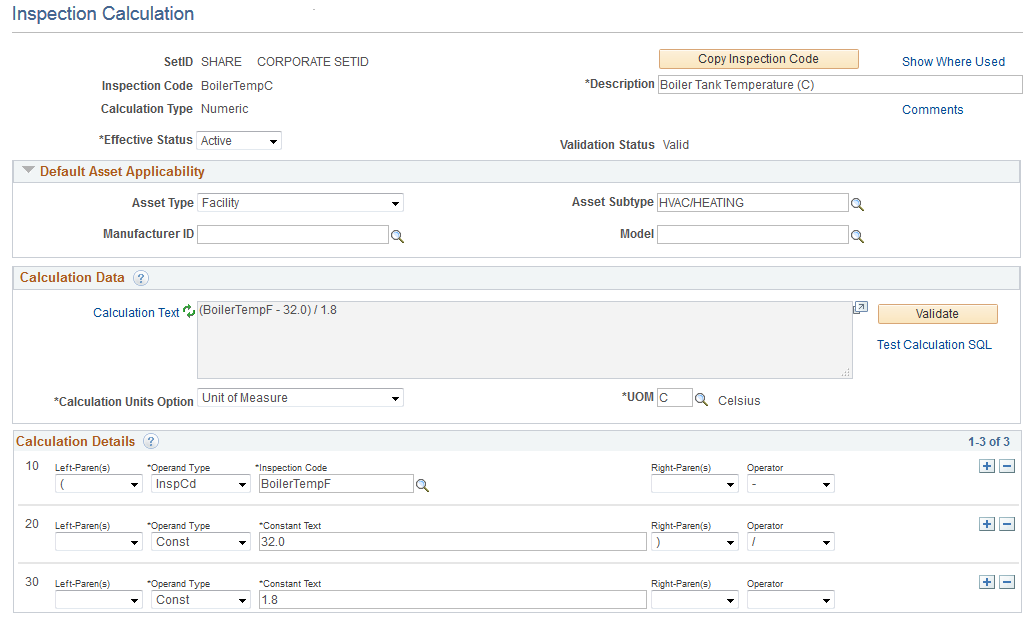
Numeric calculations use one or more input values from the measurement and observation data to calculate the result such as key ratios, formulas, and unit conversions. The result of numeric calculation type is single numeric values, whereas trigger calculation type returns logical results. Trigger calculation uses both quantitative and qualitative data while inspecting an asset.
Field or Control |
Description |
|---|---|
Inspection Code |
Displays the inspection calculation code. |
Copy Inspection Code |
Click this button to copy the current inspection code details to create a new inspection code definition. |
Show Where Used |
Click this link to view the existing inspection calculation codes and/or inspection plans that use this calculation inspection code. See Inspection Calculation Page and Work Order Inspection Plan Page. |
Description |
Enter a description for the calculation code. |
Comments |
Click this link to view or enter comments about the calculation code. A check mark indicates that comments have been entered. |
Effective Status |
Select the status of the calculation code. Only active calculation codes can be used in an actual inspection. |
Validation Status |
Displays Valid or Invalid status when the Validate button is clicked. The status is based on the correctness and completeness of the calculation details entered. |
Calculation Data
Field or Control |
Description |
|---|---|
Calculation Text |
Click the link or the icon to refresh the calculation string displayed in the text box. This is read-only field. Calculation text is built up from the calculation lines entered in the Calculation Details. |
Validate |
Click this button to validate the calculation details for completeness and correctness. If the calculation is incorrect, a message displays and the Validation Status field displays the Invalid status. Validation process performs a two-pass validation of the current calculation text string. Initially, each calculation detail line will be separately edited (with a limited number of edit conditions) for correct syntax. Then, if the first pass completes without exception, the meta-SQL will be test executed using dummy parameter values substituted for any inspection codes and/or other variable tokens. The Validation Status field displays validation result as Valid or Invalid along with an appropriate icon indicating success or failure. |
Test Calculation SQL |
Click this link to check the correct execution of the calculation string displayed in the text box. You can execute the calculation in a new window to verify the correct execution with different test values. For incorrect executions, an error message displays. |
Calculation Units Option |
Select (or accept default for) an option from the drop-down list to indicate an appropriate qualifier (if any) to be associated with the calculated numeric value. The available options include None, Percent, and Unit of Measure. Only Numeric calculation type displays this field. |
UOM |
Select a valid Unit of Measure from the prompt table list. Only Numeric calculation type displays this field. |
Calculation Details
To construct the SQL calculation, enter the calculation details in one or more calculation rows. Each calculation row represents an operand-operator pair with additional parameter fields. You can use nested parentheses to ensure the correct execution order and readability of the calculation strings. The details that you enter in the calculation rows are automatically inserted into the Test Calculation SQL text box.
Field or Control |
Description |
|---|---|
Logical Connector |
Select a value to connect two or more relational conditions. Note: This field is available only for Trigger type calculations. |
Left-Paren(s) |
Select the number of left parenthesis characters to insert into the calculation string. |
Operand Type |
Select the basic type of operand value to use in the calculation.
|
Right-Paren(s) |
Select the right parenthesis value. Note: Use of parentheses must be balanced. The total number of left parenthesis characters used must be the same as the total number of right parenthesis characters. |
Operator |
Select the value indicating the arithmetic operator to insert into the Calculation Text string. The available options are multiplication (*), addition (+), subtraction (-), and division (/). |
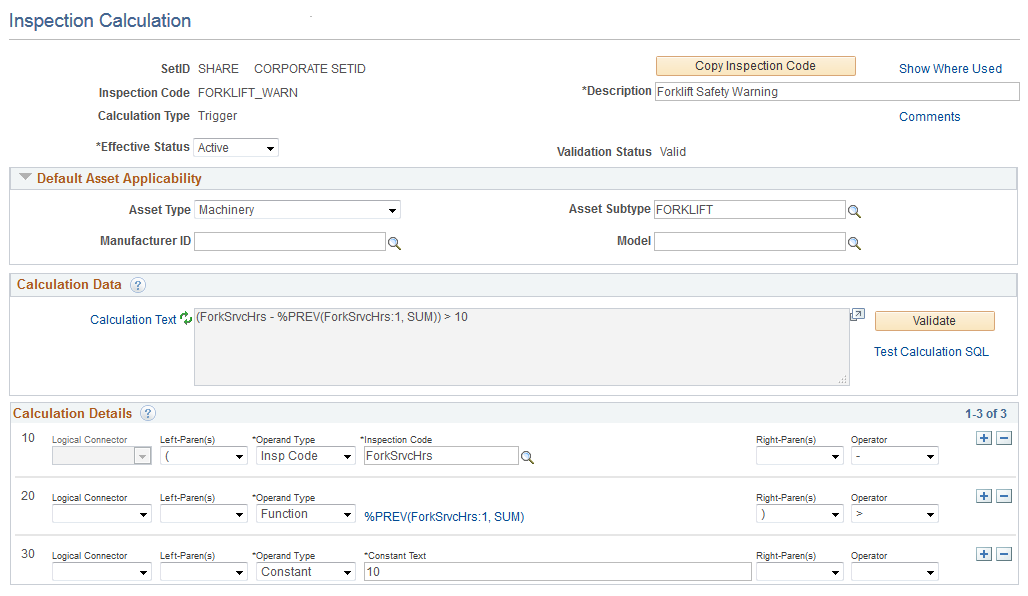
Inspection Calculations page- Trigger Calculation Type
The Trigger calculation type is more complex than the Numeric type. Its implementation includes two additional operand types CodeList and Function and likewise supports a robust set of relational operators in addition to the standard arithmetic operators.
This example illustrates the fields and controls on the Inspection Calculations page- Trigger Calculation Type. You can find definitions for the fields and controls later on this page.
Field or Control |
Description |
|---|---|
Operand Type |
Select a value from the drop-down list identifying the basic type of operand value to use in the calculation. The available options include CodeList, Constant, Function, and Inspection Code.
|
Operator |
Select a value from the drop-down list indicating the arithmetic or relational operator to insert into the calculation text string. The available options are multiplication (*), addition (+), subtraction (-),and division (/), less than (<), less than or equal to (<=), not equal to (<>), equal to(=), greater than (>), greater than or equal to (>=), in list (IN), and NOT IN. |
Use the Inspection Alert Role page (WM_INSP_ALERT_ROLE) to define asset inspection alert role definitions. This component provides the capability to define a variable role definition that, via the applicability rule parameters, can be used to resolve to the single appropriate employee’s email address when sending an alert message in an actual inspection instance.
The alert role definitions are organized by SetID and Role Name keys. The definitions will be effective dated to accommodate role assignment changes over time.
Navigation:
This example illustrates the fields and controls on the Inspection Alert Role page. You can find definitions for the fields and controls later on this page.

Field or Control |
Description |
|---|---|
Show Where Used |
Click this link to view the existing alert message definitions that use this alert role. |
Effective Date |
Enter the start date from when this alert role is effective. |
Effective Status |
Select the alert role definition status. Only alert roles with active status can be used in an actual inspection. |
Comments |
Click this link to view or enter the comments about the alert role. A check mark indicates that comments have been entered. |
User ID |
Select a user ID assigned to this role. |
Email ID |
Enter a valid Email address for the selected user. |
Inspection Alert Role – Applicability Rule Tab
Applicability Rule tab contains various parameters specifying under what matching Work Order Task field values this particular User will be the designated recipient.
This example illustrates the fields and controls on the Inspection Alert Role page - Applicability Rule tab. You can find definitions for the fields and controls later on this page.

Note: The symbol % is used as a wildcard character denoting that any or all values for the parameter field will be considered a match when the rule is applied during an actual messaging event.
Field or Control |
Description |
|---|---|
WO Business Unit |
Enter (or accept % wildcard default for) a matching WO BU value to be tested for when resolving the alert role definition in an actual message situation. |
Service Group |
Enter (or accept % wildcard default for) a matching service group value to be tested for. |
Maintenance Type |
Enter a matching maintenance type to test for or accept the default % wild card value. |
Shop |
Enter a matching shop to test for or accept the default % wild card value. |
Work Order type |
Enter a matching work order type to test for or accept the default % wild card value. |
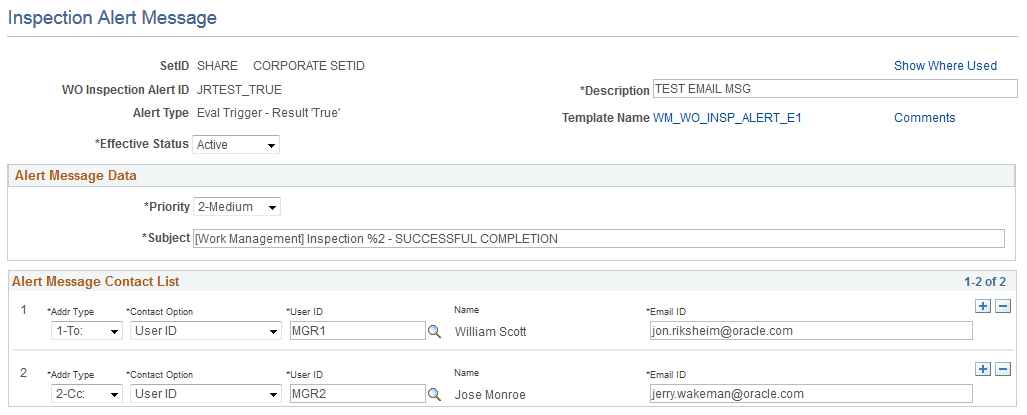
Use the Inspection Alert Message page (WM_INSP_ALERT_MSG) to predefine asset inspection alert messages to address both critical and common exception conditions of assets. Alert messages can be sent in response to exceptional conditions and events that may occur during the course of an inspection.
Sending alert messages in response to inspection events and exceptions are optional. You can associate the messages with the inspection instances by referencing a particular alert message definition on an inspection plan template using the Send Alert Message trigger option. The alert message template typically describes the nature of the problem encountered. It should include a pre-planned distribution list addressed to appropriate decision makers and/or others who can either take action or otherwise should be aware of the problem.
Navigation:
This example illustrates the fields and controls on the Inspection Alert Message page. You can find definitions for the fields and controls later on this page.
Field or Control |
Description |
|---|---|
Show Where Used |
Click this link to view the existing inspection plans that use this alert message definition. |
Alert Type |
Displays the alert message type that you selected. The alert types include:
Note: Typically, only a single alert message definition for each alert type need to be set up. However, as needed, system administrators can create several message variations for a particular alert type. That is, for different Inspection plans, alert messages with different priority values, subject lines, and contact list details can be set up. |
Description |
Enter a description for the alert message. |
Template Name |
Click the template name link to view or modify the generic email template definition mapped to this alert type. |
Comments |
Click this link to view or enter the comments about the alert message. A check mark indicates that comments have been entered. |
Effective Status |
Select a status for the alert message. Only active alert message definitions can be used in an actual inspection. |
Priority |
Select the message’s priority level. This value defaults from the generic template definition. You can modify the priority level appropriately. |
Subject |
Enter the subject line for the message. This value defaults from the generic template definition. you can modify the subject appropriately. |
Address Type |
Select a value from the drop-down list indicating whether the addressee is a primary (To) recipient, or else a copied (Cc) or blind-copied (Bcc) recipient. |
Contact option |
Select a value from the drop-down list indicating the type of variable/fixed addressee definition to use. Available options include:
|
Email ID |
Enter a valid email address for the recipient. |
Use the Work Order Inspection Plan page (WM_WO_INSPL_MAIN) to establish work order inspection plan templates to identify and define specific asset inspections.
Inspection plans, which is the main setup object for asset inspections utilize (in most cases optionally) all other inspection setup objects that are inspections codes, alert roles, and alert messages. It defines both the content and sequence of operations for the actual inspection instances that are generated from it. The key work subunits of inspection plans include inspection activities and inspection steps. The available inspection activities are Data Collection, Trigger Evaluation, and Other Logistics. An inspection plan must contain at least one activity regardless of the activity type.
Navigation:
This example illustrates the fields and controls on the Work Order Inspection Plans page. You can find definitions for the fields and controls later on this page.

Field or Control |
Description |
|---|---|
Template ID |
Displays the work order inspection plan template. |
Copy Inspection Plan |
Click this button to create a new inspection plan definition to which you can copy the selected details from the current inspection plan. |
Show Where Used |
Click this link to view the existing work order task templates that use this inspection plan. |
Description |
Enter a description for the inspection plan. |
Effective Date |
Enter the start date from when the inspection plan is effective. The default value is the current date. |
Effective Status |
Select the status of the inspection plan definition. Only active inspection plans can be used in an actual inspection. If the status is inactive, the Inspection Activities fields become read-only. |
Comments |
Click this link to view or enter any comments about the inspection plan. A check mark indicates that comments have been entered. |
Inspection Duration |
Enter the planned total hours required to complete all the inspection activities. Note: This value cannot be less than the Calculated Duration value. |
Calculated Duration |
Displays the total hours accumulated for all of the inspection activities. |
Description |
Enter a long description for this inspection plan. |
Inspection Result Code |
Select the appropriate observation code that indicates the possible results of inspections generated from this inspection plan. Click the inspection code link to view its details. |
Default Result Value |
Select the appropriate code name value that indicates the normal or expected result of the inspection activities created for this inspection plan. Note: If no other result values are set for this inspection instance by trigger evaluation activities, then this value is considered as the default value when the inspection is completed. |
Activity Sequence |
Enter a positive integer value that indicates the activity’s relative order of execution among all other activity detail lines. |
Activity Type |
Select the type of inspection activity to be performed. This can be Data Collection, Trigger Evaluation, or Other Logistics. |
Description |
Click the link to enter or view the details of the particular activity. |
Activity Duration |
Enter the planned total hours required to complete the activity. |
Default Craft |
Enter the default labor craft to assign a matching labor resource to this activity. |
Work Order Inspection Plans– Activity Detail Page
This example illustrates the fields and controls on the Work Order Inspection Plans– Activity Detail Page. You can find definitions for the fields and controls later on this page.

Field or Control |
Description |
|---|---|
Description |
Enter a description for the particular activity. |
Default Craft |
Enter the default labor craft used to assign the matching labor resource, who will perform this activity. |
Activity Duration |
Enter the planned total number of hours required to complete this activity. |
Data Collection Group
For the Data Collection activity type, the Data Points link displays the following fields in the Data Collection Groups grid:
Field or Control |
Description |
|---|---|
Step Sequence |
Enter a numeric value to indicate the relative execution order of the particular inspection step of the data collection activity. |
Collection Activity |
Select the basic type of inspection activity to be performed by this inspection step. This can be:
|
Inspection Code |
Enter a valid inspection code name representing the data value to be collected during the inspection. |
Description |
Click the link to view or modify the details of the inspection code. |
Required |
Select the check box to indicate that the user must collect the particular data value for the inspections generated from this inspection plan. This value is used as a parameter in subsequent numeric or trigger calculations. |
Show History |
Select the check box to allow the user to view a maximum of five data values previously collected for this inspection code while working on the inspection instance. |
Log Acceptance |
Select to indicate that the values entered for this inspection code during an actual inspection need to be explicitly accepted or rejected. You can use log acceptance:
|
Trigger Evaluation Activity
This example illustrates the fields and controls on the Work Order Inspection Plans– Trigger Evaluation Activity Detail Page. You can find definitions for the fields and controls later on this page.

For the Trigger Evaluation activity type, the Triggers link displays the following fields:
Field or Control |
Description |
|---|---|
Trigger Condition |
Enter the trigger type calculation code name. |
Description |
Click this link to view or modify the inspection calculation code details. |
Halt further Evaluation |
Select the check box to indicate that when the specified trigger condition returns a True value for an inspection step, then any subsequent trigger steps of the activity will be skipped. |
Set Inspection Result |
Select a value that indicates the overall inspection result when the specified trigger condition returns a True value. |
Initiate Work Response |
Select to choose the work response action when the trigger condition returns a True result for an inspection step. The available options are:
For information, see Initiating Work Response Actions. This option allows the particular roles to predetermine the type of work to be performed when any exception condition is triggered for an actual inspection. |
Send Alert Message |
Select to enter the alert message data indicating the precise nature of the problem detected and the planned work response, if any. |
Other Logistics Activity
For Other Logistics activity type, you can check the activity instructions, checklist items, notes, and attachments and perform the required activity steps.
This example illustrates the fields and controls on the Work Order Inspection Plans– Other Logistics Activity Detail Page. You can find definitions for the fields and controls later on this page.

Note: Checklist items are key to Other Logistics type, as data entry for them are used to signal when the activity begins and ends.
Instructions
The Instructions link is available for all the activity types.
Field or Control |
Description |
|---|---|
Step |
Enter the step sequence. |
Instruction |
Enter the activity instruction, if you have any instructions to be considered during the inspection. |
Checklist
The Checklist link is available for all the activity types.
Field or Control |
Description |
|---|---|
Checklist Type |
Select an option to indicate whether the particular checklist item needs to be performed before or after the activity. |
Required |
Select the check box to indicate that it is mandatory to perform the checklist item. |
Checklist Description |
Enter the description about the checklist item. |
Notes
The Notes link is available for all the activity types.
Field or Control |
Description |
|---|---|
Title |
Enter a title for the note pertaining to the activity. |
Note |
Enter any notes about the activity. |
Attachments
The Attachments link is available for all the activity types.
Field or Control |
Description |
|---|---|
Description |
Enter a brief description about the attachment. |
File Name |
Enter the attachment’s file name. |
Attach |
Select to upload the required file. |
See WO Inspection Page.