Setting Up Routes
To create route codes, use the Create Route Codes (ROUTE_INV) component. To create route groups, use the Create Route Groups (WAVE_INV) component.
Before you can use routes in fulfillment processing, you must define route options in several different areas of the system. To create route calendars, use the Maintain Route Calendar (ROUTE_CAL_INV) component. To assign transportation routes to a group, use the Assign Route Group (WAVE_ROUTE_INV) component. To assign customers or locations to a transportation stop, use the Assign Route Stop (ROUTE_STOP_INV) component.
To set up routes:
Enable route options for the business unit.
On the Inventory Definition - Business Unit Options: Shipping Options page, select the Use Routes option to indicate that the business unit uses transportation routes in its shipping operations. Route options for PeopleSoft Order Management and Inventory pages, processes, and reports are available only if you activate this flag. Conversely, if you inactivate the Use Routes flag, you delete all existing route data for the business unit.
Establish default route closing times and route stop increments.
On the Setup Fulfillment-Shipping page, define a route close time and a route stop increment. The route close time, which indicates what time each day routes should close, becomes the default closing time on the Maintain Route Calendar page. The route stop increment determines the intervals by which stop numbers increase when you add new stops to the route.
Establish route codes.
On the Create Route Codes page, define transportation routes and assign a carrier and a shipment method to each route.
Assign stops to routes.
On the Assign Route Stop page, assign ship to customers or locations to routes and define the stop sequence for each route.
Create route groups, if needed.
On the Create Route Groups page, define codes for route groups. On the Assign Route Group page, collect routes into route groups. You can assign a route to more than one group.
Create a route schedule.
On the Maintain Route Calendar page, specify which routes leave on which days of the year. Define a schedule for each route in the business unit.
|
Page Name |
Definition Name |
Usage |
|---|---|---|
|
ROUTE_INV |
Define transportation routes and associate each route with a carrier and a shipment method. |
|
|
WAVE_INV |
Define transportation route groups. |
|
|
ROUTE_STOP_INV |
Assign customers or locations to a route and to define the route's stop sequence. |
|
|
ROUTE_STOP_INV2 |
Copy a route stop definition from one route to another. |
|
|
WAVE_ROUTE_INV |
Gather routes into a group. |
|
|
WAVE_ROUTE_INV2 |
Copy the routes from one route group to another. |
To define route codes, use the Create Route Codes (ROUTE_INV) component.
Use the Create Route Codes page (ROUTE_INV) to define transportation routes and associate each route with a carrier and a shipment method.
Navigation:
This example illustrates the fields and controls on the Create Route Codes page. You can find definitions for the fields and controls later on this page.
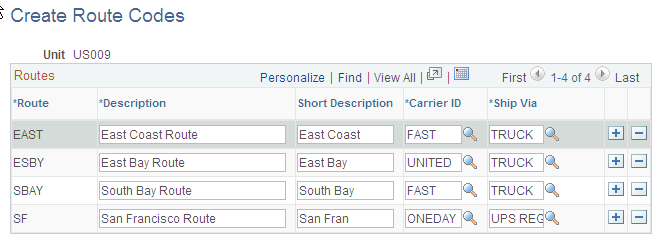
After you define a route, you cannot modify the route code. To change a code, delete it and insert a new one. You can change the descriptions, carriers, and ship via assignments based on the following scenarios:
You cannot delete a route with unshipped or uncanceled orders assigned to it.
If the route has a calendar schedule or stop with no assigned orders, the system displays a warning, but you can still delete the route.
Deleting the route automatically deletes the route's schedule and assigned stops.
When you change the carrier or shipment method, unshipped or uncanceled orders assigned to a route are not updated.
To define route groups, use the Create Route Groups (WAVE_INV) component.
Use the Create Route Groups page (WAVE_INV) to define transportation route groups.
Navigation:
This example illustrates the fields and controls on the Create Route Groups page. You can find definitions for the fields and controls later on this page.

After you define a route group, you cannot modify the group codes. If you want to change a code, you must delete it and insert a new one. You can modify the descriptions at any time.
Note: Deleting a route group automatically deletes any existing assignments for the group.
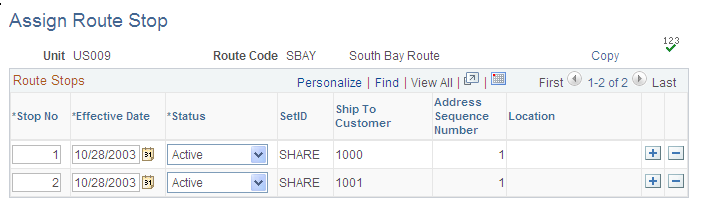
To create route stop assignments, use the Assign Route Stop (ROUTE_STOP_INV) component.
Use the Assign Route Stop page (ROUTE_STOP_INV) to assign customers or locations to a route and to define the route's stop sequence.
Navigation:
This example illustrates the fields and controls on the Assign Route Stop page. You can find definitions for the fields and controls later on this page.
Field or Control |
Description |
|---|---|
Stop No (stop number) |
Represents a delivery at a customer or location in a route. The interval by which the number increases when you add stops to the route is determined by the default route stop increment defined on the Setup Fulfillment-Shipping page. |
SetID |
To establish a route stop for an external customer, select the SetID to which the customer belongs, then select a ship to customer code and an address sequence number. |
Location |
Establish a route stop for an internal issue or interunit transfer. |
Validate Lines |
After you add or delete stops, click to update the route stop numbers according to the increment defined on the Setup Fulfillment-Shipping page. |
Note: Although you cannot change the SetID, ship to, and address combination or the location for existing route stops, you can update the stop number, effective date, and status at any time. If unshipped or uncanceled orders exist for the route, a warning appears when you delete the stop or change the status to Inactive.
Use the Copy Route page (ROUTE_STOP_INV2) to copy a route stop definition from one route to another.
Navigation:
Click the Copy link on the Assign Route Stop page.
This example illustrates the fields and controls on the Copy Route page. You can find definitions for the fields and controls later on this page.
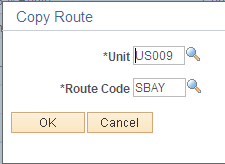
Select the business unit containing the route that you are copying, then indicate which route code you want to copy.
To assign customers to routes, use the Assign Route Group (WAVE_ROUTE_INV) component.
Use the Assign Route Group page (WAVE_ROUTE_INV) to gather routes into a group.
Navigation:
This example illustrates the fields and controls on the Assign Route Group page. You can find definitions for the fields and controls later on this page.
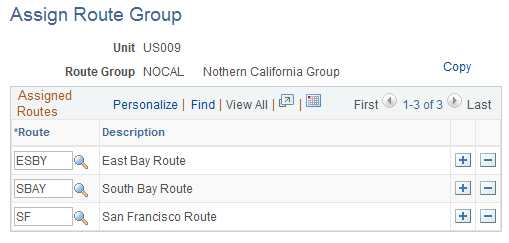
Select the route code for each route that you want to add to the group.
Use the Copy Route Group page (WAVE_ROUTE_INV2) to copy the routes from one route group to another.
Navigation:
Click the Copy link on the Assign Route Group page.
This example illustrates the fields and controls on the Copy Route Group page. You can find definitions for the fields and controls later on this page.

Select the business unit containing the group that you are copying, then indicate which route group you want to copy.